When you click on links to various merchants on this site and make a purchase, this can result in this site earning a commission. Affiliate programs and affiliations include, but are not limited to, the eBay Partner Network.
I love my GoPro and the flexibility of where it can be placed on the car, but the poor sound quality through the standard case was getting in the way of hearing the glorious GT4 exhaust note and your car gets more attention when there’s a GoPro stuck to it. This is a write up for my solution so far.
I added a video as an example of the camera angle and improved sound. Everything was taken at legal speeds (e.g. notice the short-shifting to 3rd joining the highway) but the sound makes it seem much more dramatic. Even the shot at the end with the tires losing contact was taken at pedal-bike speeds. Temps are dropping here and I was fighting for traction the whole time. I left out the more squirrely shots as it makes it look like I’m hooning around, which I wasn’t. Even between 45 and 50 degrees I would drive this car with a lot of restraint because the tires just can’t get heat:
The mount and Go-Pro case are now a permanent fixture on the bottom of my car and I just pop the camera in and thread the mic when I want to use them.
I tried to create a step-by-step below:
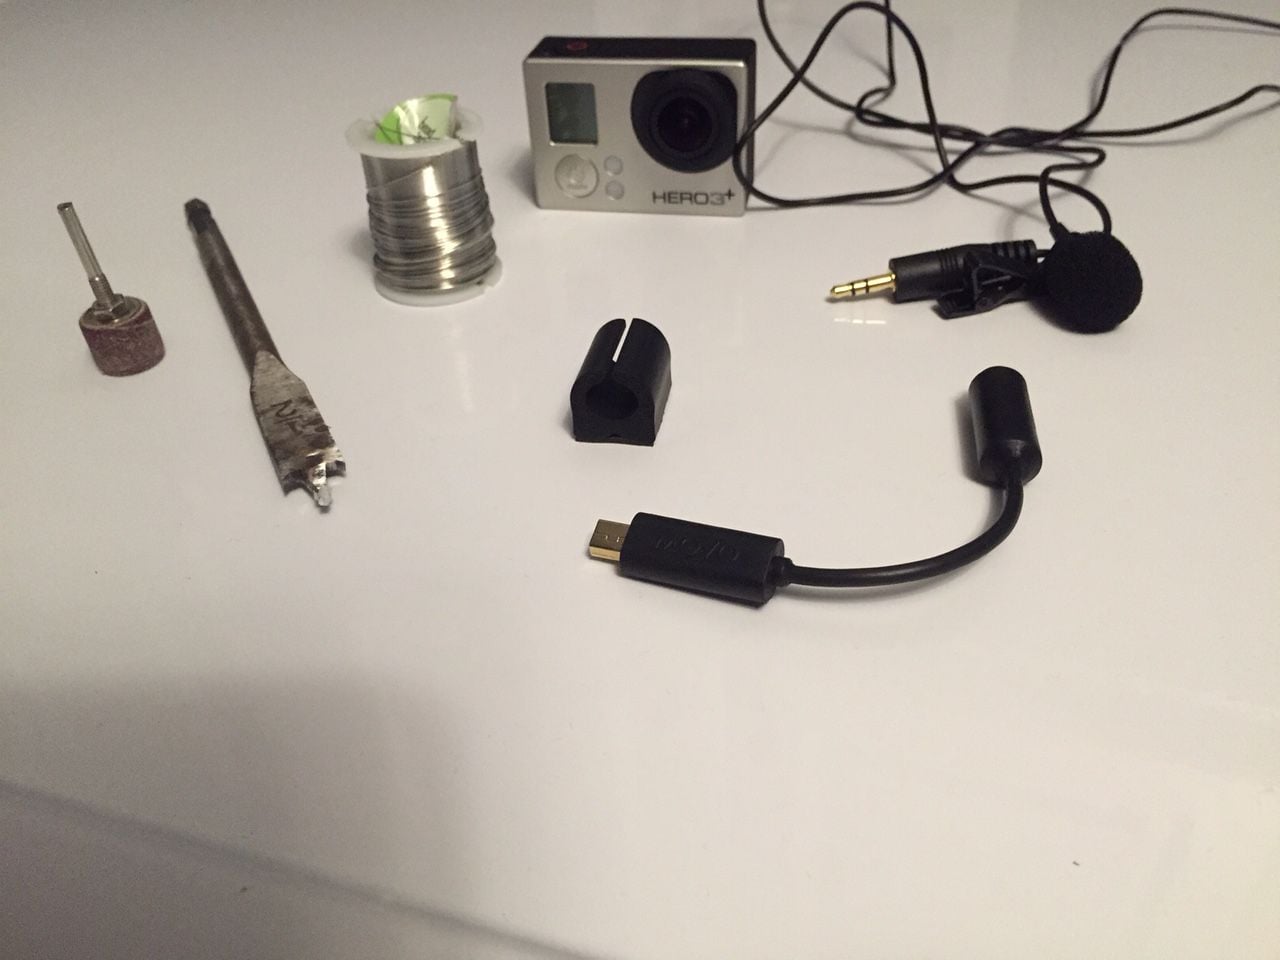
Product List
Movo GM100 Lavalier Lapel Clip-on Omnidirectional Condenser Microphone for GoPro HERO3, HERO3+ and HERO4 Black, White and Silver Editions (less than $20)
D-Wings adhesive cord organizers (less than $7 for a pack)
An existing GoPro waterproof case and adhesive mount
22 gauge wire from Michael’s craft store (in the aisle that has materials for making necklaces – not kidding)
An old ˝ inch spade bit
A mini sanding drum
Isopropyl alcohol
Case Alterations
Note: The reason for modifying a waterproof case vs. using a skeleton case was that I wanted as few holes in the case as possible so that it would still be at least splash proof. No doubt a rubber boot could be added to make it effectively waterproof.
To use an external mic with USB I had to get access to the USB port through the case by drilling a hole.
I took the port panel off of the GoPro and popped it in the case. I then drew a circle on the outside of the case with a sharpie to mark exactly where I needed the hole.
I then removed the GoPro and put the case in a vise to hold it while I made the hole with an old ˝ inch spade bit.
Finally I cleaned up the rough edges of the hole with a mini sanding wheel, but equally could have used the blade of a knife or a small file.
Case Mounting
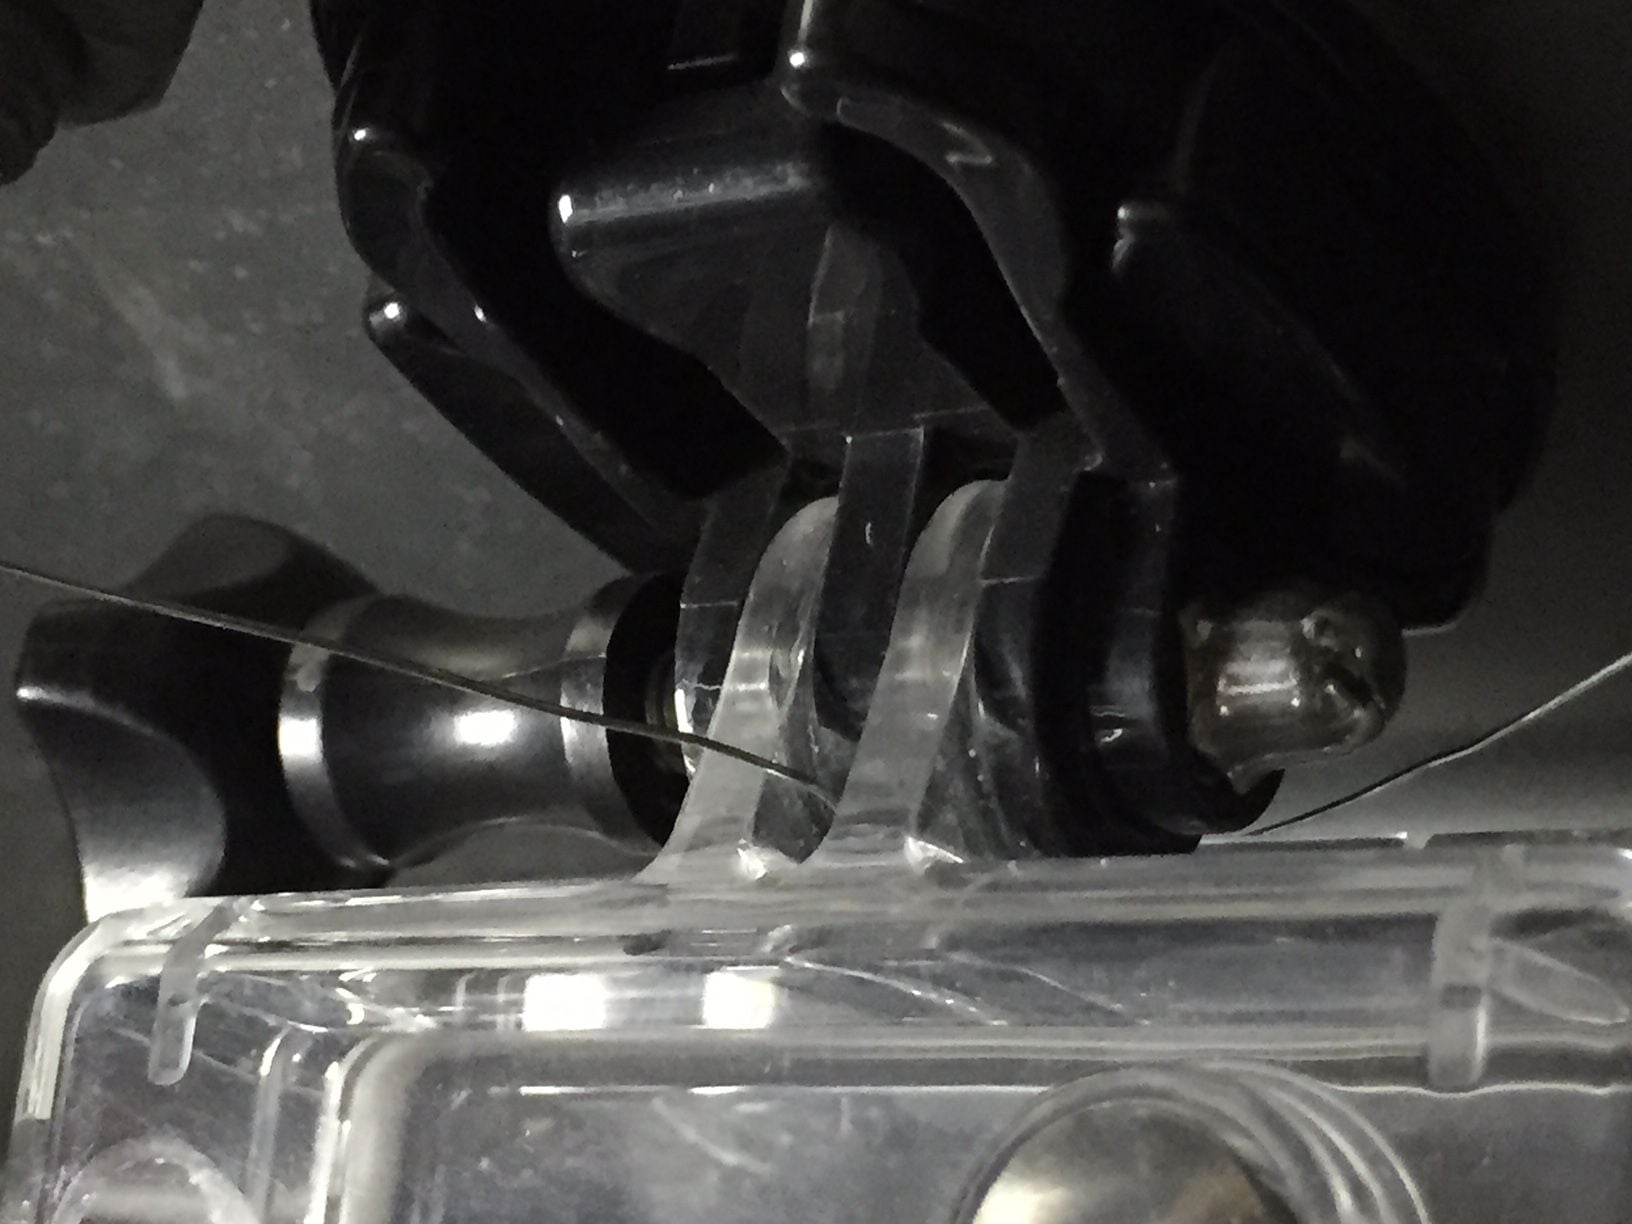
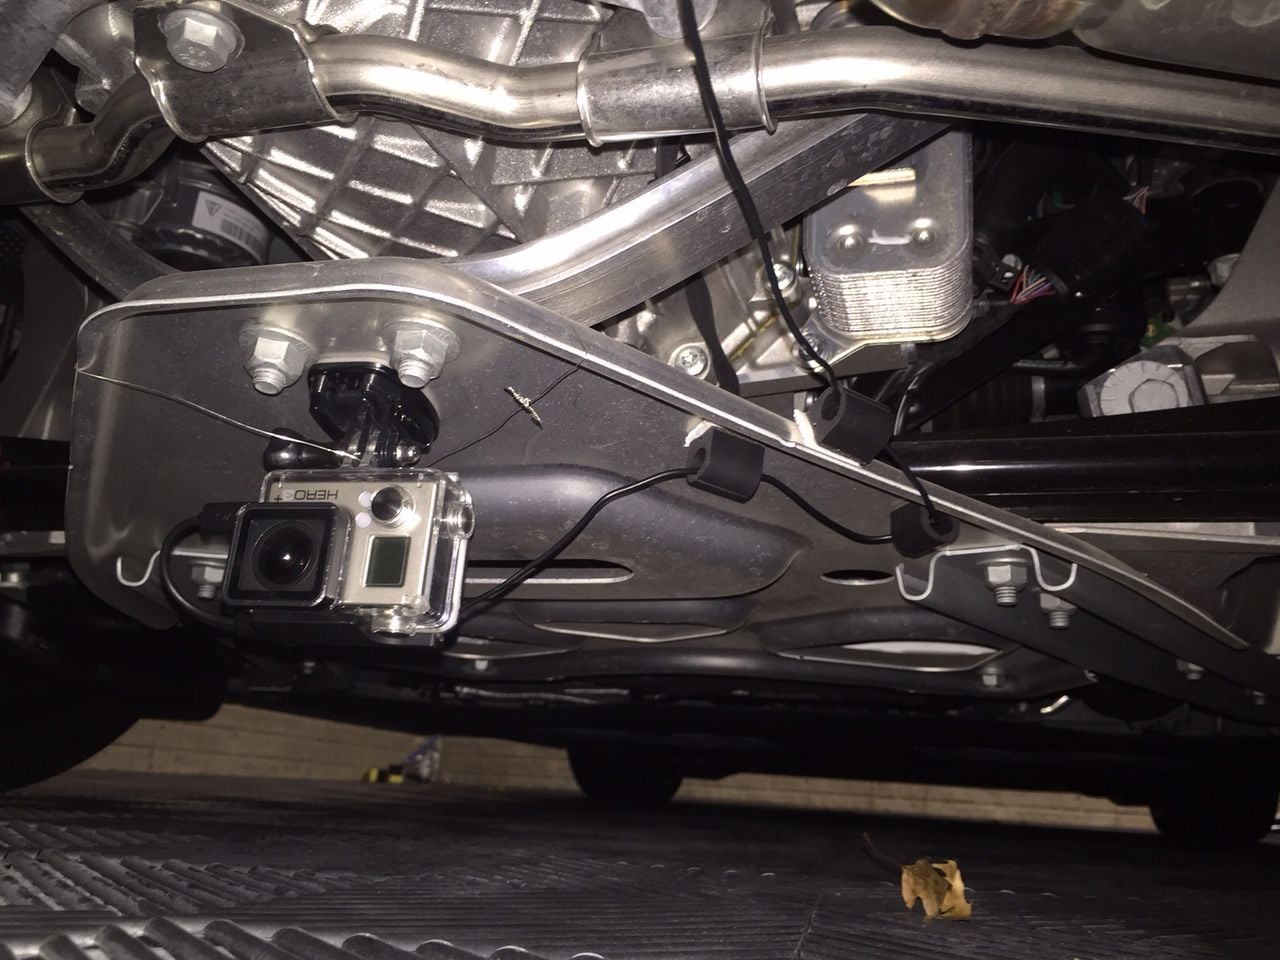
I mounted the GoPro adhesive mount to the bracing panel after cleaning the panel with isopropyl alcohol to remove grease and dirt. It is the perfect place - flat, smooth, multiple mounting options, and doesn't get too hot.
I then removed the case from the mount by removing the threaded screw after they were mounted underneath the car and looped 22 gauge wire around the bracing panel and tied it off to make a continuous loop.
I then pushed the wire between the attachment points of the mount and the case while pushing them back together.
Once the threaded mount screw was reinserted I then had a steel cable failsafe in cast the mount adhesive would somehow fail. I left very little extra slack in the wire loop because I didn’t want the camera dragging off of the ground should the mount adhesive actually fail.
Mic Routing
Note: There are a million products that could be used to hold the mic cable in place and route it. I used D-Wings clips because they’re just foam. If one ever fell off it wouldn’t harm my car or anyone else’s car.
I put the GoPro in the case under the car and attached the mic
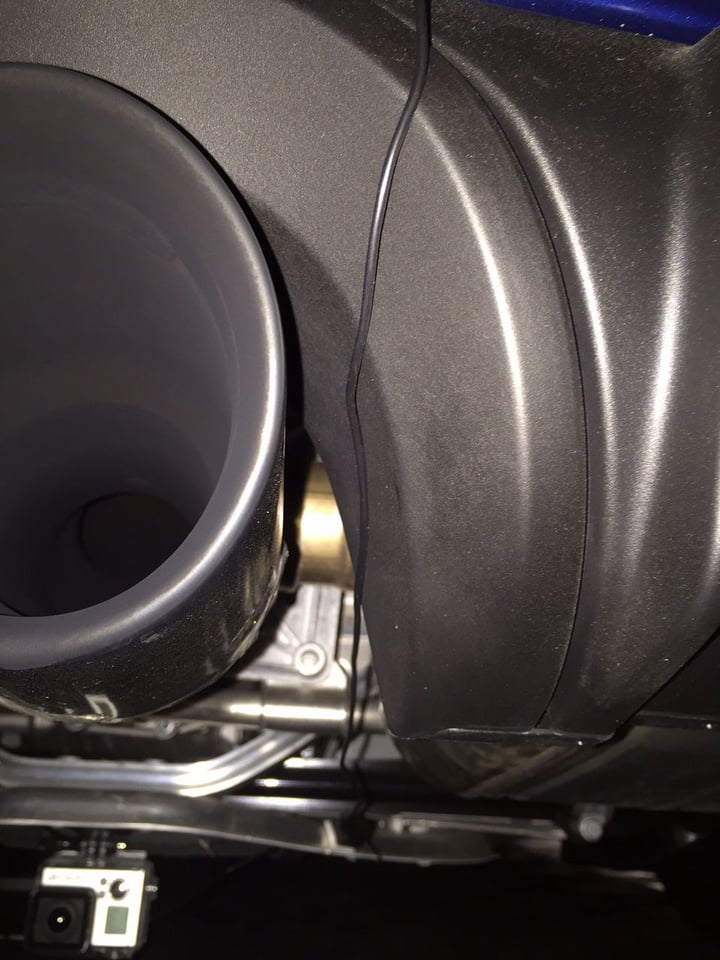
I then attached the lapel mic end to where I wanted it on the license plate holder. This let me know how much slack I had in the cable and allowed me to get about the job of routing the cable in such a way that it ‘threaded the needle’ between the side muffler and the edge of the exhaust tips without ever getting too close to either one. They would obviously melt the mic cable so this was the primary goal of routing the cable the way I did.
Once I found a good angle for the cable I adhered a D-Wings clip to the car at that point and clipped the cable inside.
I then kept going with the cable routing until I made it all the way back to the camera end. No more than 3 cable clips required, and then any remaining slack was handled on the mic end with the lapel clip.
Testing
On the first few trips I used the Go-Pro app on my phone to connect to the GoPro using Wi-Fi. This way I could always tell from the video stream that the camera was still attached and hadn’t somehow fallen off on the road despite my failsafe system. One I was confident with the setup I didn’t need to do that anymore.
I have always wanted to build a 911 Rally Car maybe you could help me.
Definitely. Hey, we've already confirmed that helper springs will do their job when the suspension's unloaded. Half of the R&D on a rally car is already complete
Did you feel it going airborne? Strange that would occur at low speeds. The road didn't seem *that* undulating.
Yep - you can certainly feel it. The camera does a bad job of capturing the severity of the gradient. It's actually a railroad crossing that's built up about 6 feet higher than the road on either side. If you know how steep it really is you slow down a lot, but I've seen people who weren't aware go completely 'Dukes of Hazard' over that crest.
I once went a little too fast in my SUV, only to hear golf clubs land back down in the trunk about a second after the car did.
The video does an excellent job of capturing the exhaust sound. Lovely.
Thanks! It's that sound that I really wanted to capture. It's such a great sound but it's muffled in many GT4 videos. The trick is routing the mic cable from the camera to the mic without the cable getting too close to the hotter components.
Great job
I have the earlier editon of the go pro so its a lot more involved adding an external mic but it can be done ( on youtube )
I still am amazed that Go Pro cant figure out a better mic setup
Very cool especially that last shot
regards
Ed
PS I would be shocked if that doesn't hit something eventually
It looks real low under there ?
Thanks, Ed!
It is low, but the chassis panels towards the back of the car are higher, so it has some room to work with. That's partly why the front-facing shots are so limited.
If I have a few more good days this season I'm going to try a much more aggressive mounting towards the front of the underside, which will be more risky. If it gets hit the case will hopefully swivel back on the mount, but it will be riskier... That's part of the fun though
Funny I looked at this thread when you posted - but could not get my computer to load the video. I just watched and in the end was like wow - a little air time - nice!!!
Sound great - nice job and presentation, thanks for posting - Gotta love the go pro - has changed how we get to see the world!
Funny I looked at this thread when you posted - but could not get my computer to load the video. I just watched and in the end was like wow - a little air time - nice!!!
Sound great - nice job and presentation, thanks for posting - Gotta love the go pro - has changed how we get to see the world!
Thanks, Supercup! Yeah, it's amazing what the GoPro lets us do. Can't wait to do some more experimenting.
Andy....I was wondering if you could have the GoPro record the exhaust valves. Some people swear they close some even with sports exhaust on. You could end the debate on the GT4 once and for all.
Andy....I was wondering if you could have the GoPro record the exhaust valves. Some people swear they close some even with sports exhaust on. You could end the debate on the GT4 once and for all.
That's a great point. Is the valve opening/closing process externally visible?
Andy....I was wondering if you could have the GoPro record the exhaust valves. Some people swear they close some even with sports exhaust on. You could end the debate on the GT4 once and for all.
They do close even with the sport exhaust mode on. At lower rpms, the valves always close to lower noise and stop drone. Also, the valves open no matter what at wot and high rpm even if the sport exhaust is off.
It is all controlled by an electric solenoid. 12V forces the valves closed. No current and they remain open. If you disconnect the solenoid, the the valves will therefore remain open no matter what. You'll notice that the car sounds much more aggressive than before at low rpm, but it will drone on the highway.
Doborder is running the same solenoid gps bypass switch that we use to pass sound at Laguna in his caymanGTS that I use on the gt3, so he can confirm that the solenoid works the same way.
 10-18-2015, 12:19 PM