When you click on links to various merchants on this site and make a purchase, this can result in this site earning a commission. Affiliate programs and affiliations include, but are not limited to, the eBay Partner Network.
So I am reading that Porsche used the same parts that failed to fix your problem - is that right? Doesn't that seem strange? Maybe there has to be a TSB or something like that issued for them to do anything different than an OEM repair.
Doesn't seem that strange to me. It's a low percentage failure that they have not developed a fix for, but they covered it on their dime. I did ask the dealer about putting in some steel bolts while they had everything apart, and they said Porsche would not approve to cover the repair if they did that.
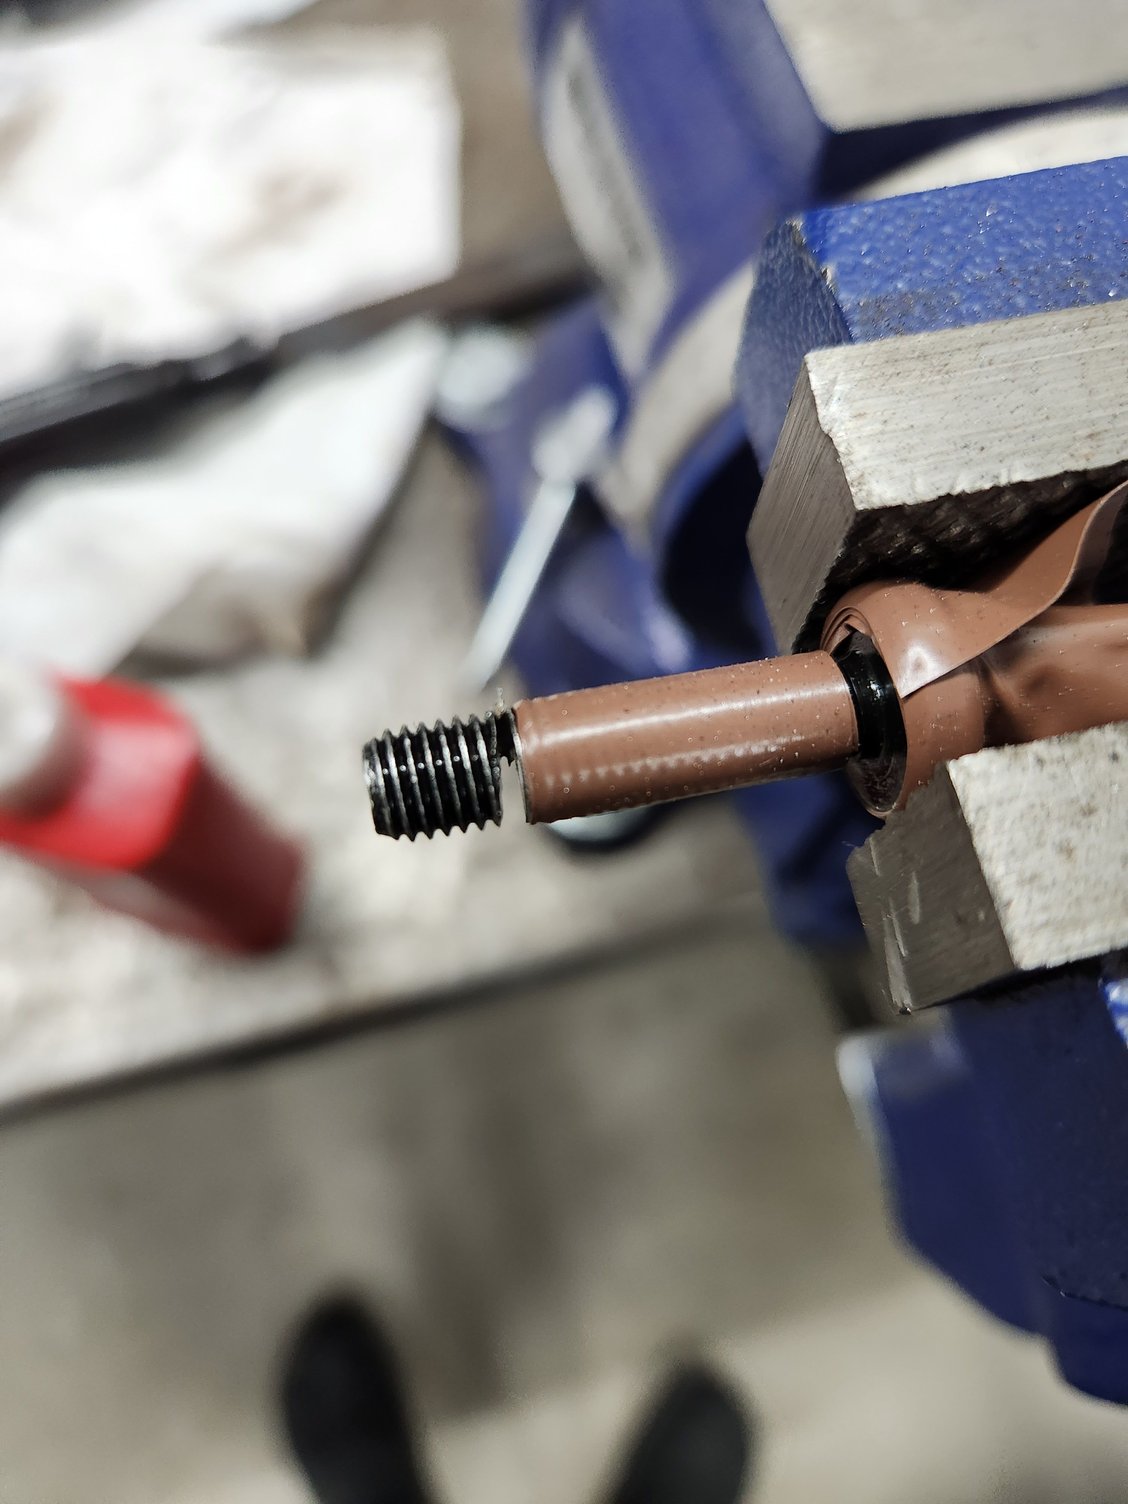
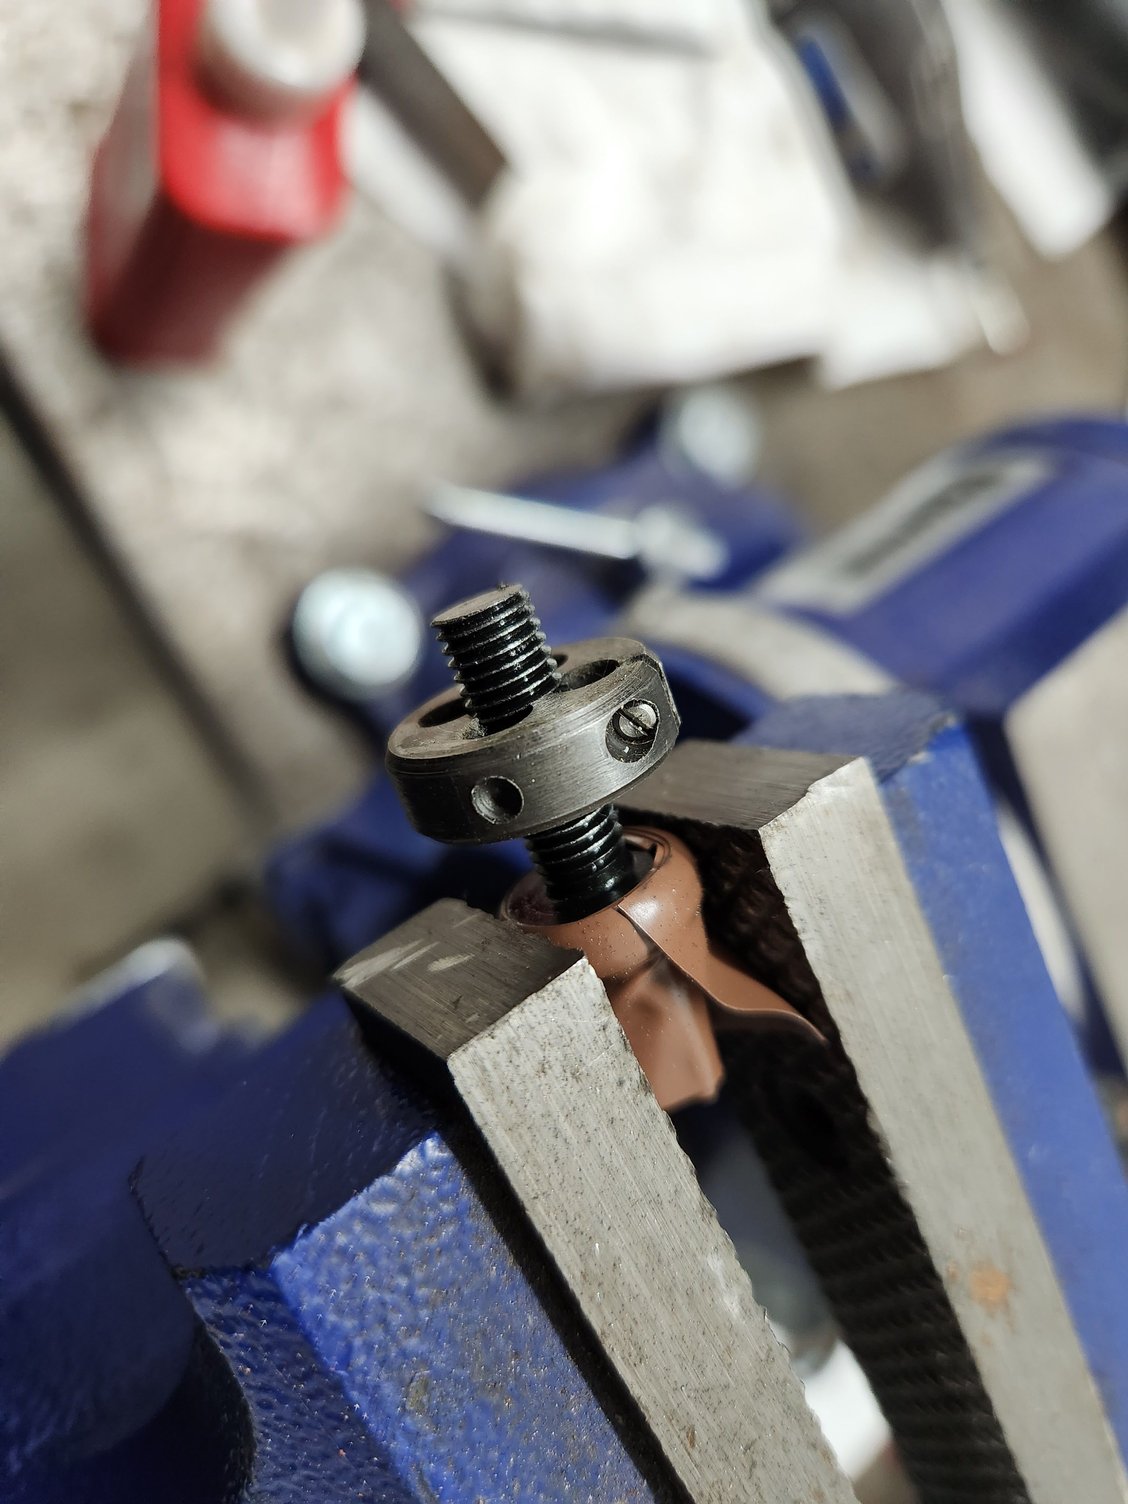
Here's the original aluminum bolts used in the variable timing actuator...
Thanks. I don't think these have the centrally located anti-tamper feature inside the Torx recess that deilenberger posted about earlier in this thread.
Thanks. I don't think these have the centrally located anti-tamper feature inside the Torx recess that deilenberger posted about earlier in this thread.
I believe those were only on the Cayennes. It looks like the 9A1s got regular torx head bolts.
@BGB Motorsports I know this is an old thread, but I'm wondering if this is what happened to my car. 2014 981 Cayman S, was at the track and all of sudden dash lit up like a christmas tree, PSM disabled, okay to drive, so I dropped way down in speed got off line and putted back to the pits. When I stopped in the pits engine just quit. Pulled codes and saw a bunch of mis-fires and a cam position not detected or the like. Shop has started on it now and says the Cam Acuator has failed, the exhaust valve are moving. It appears from borescope that nothing has hit (no sign on cylinders or bent valves) no chunks in oil filter, and they've sent oil off for analysis. They're continuing to take it apart now, but it seems given that the intake cam shaft isn't turning maybe this happened.
@BGB Motorsports I know this is an old thread, but I'm wondering if this is what happened to my car. 2014 981 Cayman S, was at the track and all of sudden dash lit up like a christmas tree, PSM disabled, okay to drive, so I dropped way down in speed got off line and putted back to the pits. When I stopped in the pits engine just quit. Pulled codes and saw a bunch of mis-fires and a cam position not detected or the like. Shop has started on it now and says the Cam Acuator has failed, the exhaust valve are moving. It appears from borescope that nothing has hit (no sign on cylinders or bent valves) no chunks in oil filter, and they've sent oil off for analysis. They're continuing to take it apart now, but it seems given that the intake cam shaft isn't turning maybe this happened.
This happened to my car this past summer in June. Two big downshifts and my check engine light came on, car went into limp mode. I was able to get it back into the pits, but it stalled when I stopped and wouldn't start again. There was plenty of metal in the oil filter and lots more found when we dropped the oil pan. Fortunately there wasn't too much damage in the head and we were able to save the engine. Regardless, not a cheap repair.
If this was your problem, I'd be surprised there was no metal in your filter.
Interesting thread. I recently picked up a higher mileage (100k) 2014 Cayman S that I'm building for track/HPDE. My last track car was a 2011 BMW 128i which suffered from the exact same cam bolt failure as described in this thread. There was an actual TSB from BMW which resulted in a revised steel bolt and a 10 year extended warranty for affected engines. If this is the same OE manufacturer of the cam gears with the same failure, I'm surprised Porsche hasn't addressed it in the same way as BMW. I know that these engines are generally regarded as reliable but I have a feeling this issue will start to become more common as these cars age. Bone stock BMW N52 engines that never see a track have these type of bolts back out all the time, I don't see how this is any different.
I didn't respond to this after I asked, but this is exactly what happened to my car. In my case I got lucky no bent valves, or other contact in the pistons, so we were able to just clean up where the bolt hit the header and put it back together I had better bolts put in on both sides (it only backed out one side) and we cleaned the metal out of the engine and re-installed. It was around 7.5K, but could've been way worse if there had been contact. I reached out to Porsche about any good will since it seems to be a pretty well documented issue, and they wouldn't discuss due to my having taken it to an independent shop instead of the dealer. So if this happens to your car take it to a dealer first.
Well, based on the scary pictures posted earlier, I decided to swap out the cam adjuster screws myself. My car is semi-retired from track duty now that I have the SPB, but I did track it pretty heavily when I first got it, so I was a little concerned about those screws. I did this work in conjunction with other maintenance work -- I also installed new plugs, coils and Soul street headers (with cats) while I was at it.
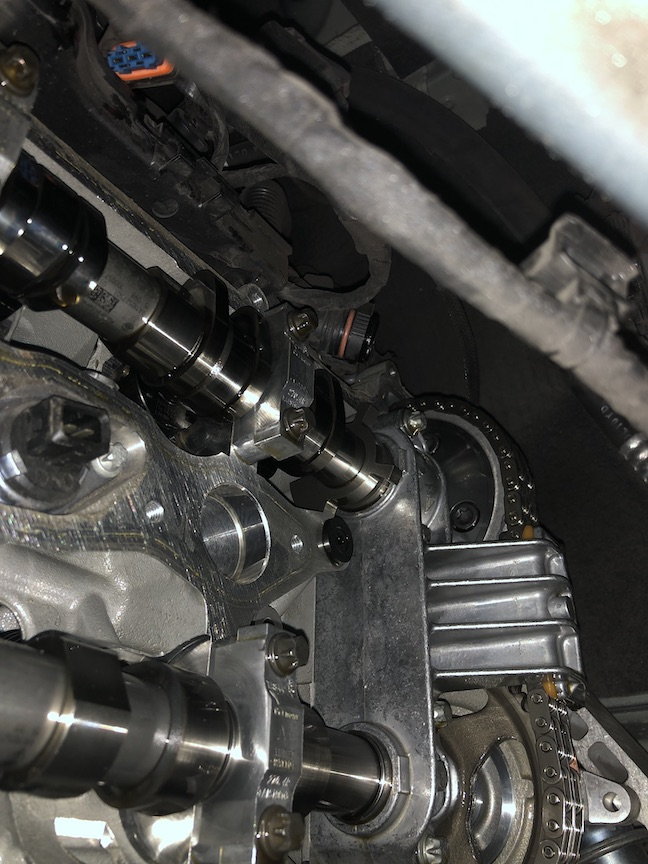
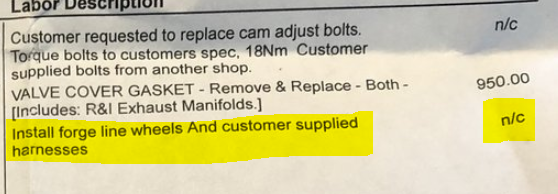
The screws in question are M7-1.0 x 20mm, in case anyone is wondering. I got them from McMaster-Carr, and they weren't cheap (figures, right?). If I had the correct screws to start with, I could have finished the job in one weekend. Unfortunately for me, I guessed wrong on the size initially and had to order the correct size after I pulled the first screw, so it took two weekends to get everything done. As shown in one of the earlier pics, I torqued the new screws to 18 NM and used red loctite.
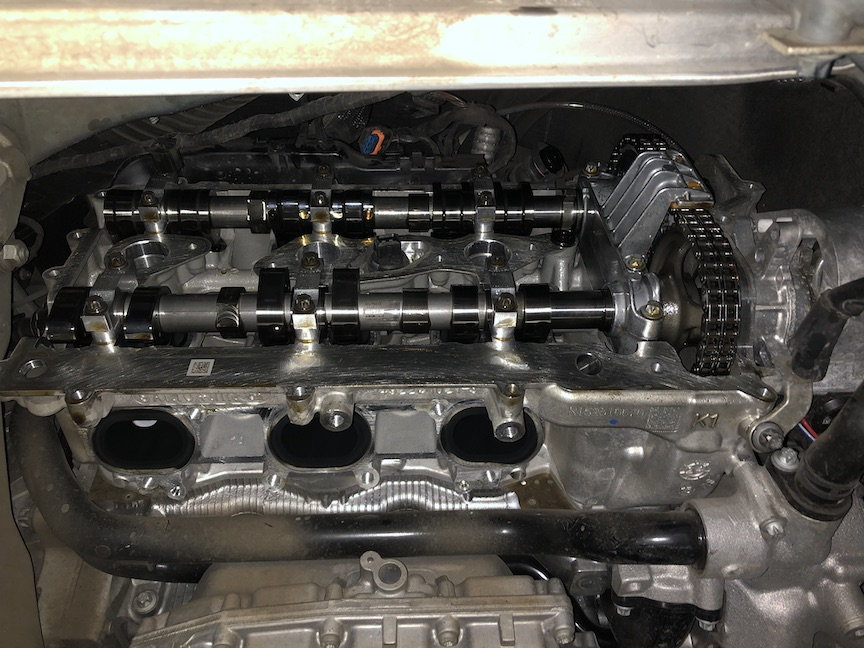
Doing the swap with the engine in place is a long, tiresome, frustrating, persnickety job. But, unlike that other shop, I had no problem rotating the engine via the rear wheels. I was able to do that putting the car in 6th gear and releasing the parking brake, then pulled the spark plugs. Then, I worked one side at a time, with the wheel on the other side sitting on a wheel crib to hold it in place, rotating the engine via the free wheel -- the side I was working on was on a jack stand, so that wheel was hanging free and I was never under the car without it being properly supported. The hardest part of the job was actually removing each valve cover. There are a lot of screws holding each cover on, and some of them are very hard to access. Plus, there isn't a lot of room to manuever in there. And, the passenger side has a plastic breather cover bolted on the front of the engine that has to be removed before the valve cover can come out. If you decide to do this yourself, I strongly recommend taking plenty of "before" pictures so you know where to reinstall all the "extra" bolts for the grounds and bracket mounts. I also recommend removing the aluminum diagonal brace that connects the subframe to the body on each side, one side at a time, just to give extra room to work (plus, you can't get the right-side header out with the brace still in there). I installed new valve cover gaskets while I was at it, but the old ones looked virtually new and probably could have been reused without a problem (saved them as spares, just in case).
Turns out all 8 of my screws were still tight, which was good news. However, since I put in all that effort into getting in there, I replaced them all anyway. Also, the job would be quite a bit easier with a proper lift instead of jack stands and wheel cribs, but you'd have to get creative to lock the wheel on the other side when turning the engine. My next house will definitely have a lift!
Well, based on the scary pictures posted earlier, I decided to swap out the cam adjuster screws myself. My car is semi-retired from track duty now that I have the SPB, but I did track it pretty heavily when I first got it, so I was a little concerned about those screws. I did this work in conjunction with other maintenance work -- I also installed new plugs, coils and Soul street headers (with cats) while I was at it.
The screws in question are M7-1.0 x 20mm, in case anyone is wondering. I got them from McMaster-Carr, and they weren't cheap (figures, right?). If I had the correct screws to start with, I could have finished the job in one weekend. Unfortunately for me, I guessed wrong on the size initially and had to order the correct size after I pulled the first screw, so it took two weekends to get everything done. As shown in one of the earlier pics, I torqued the new screws to 18 NM and used red loctite.
Doing the swap with the engine in place is a long, tiresome, frustrating, persnickety job. But, unlike that other shop, I had no problem rotating the engine via the rear wheels. I was able to do that putting the car in 6th gear and releasing the parking brake, then pulled the spark plugs. Then, I worked one side at a time, with the wheel on the other side sitting on a wheel crib to hold it in place, rotating the engine via the free wheel -- the side I was working on was on a jack stand, so that wheel was hanging free and I was never under the car without it being properly supported. The hardest part of the job was actually removing each valve cover. There are a lot of screws holding each cover on, and some of them are very hard to access. Plus, there isn't a lot of room to manuever in there. And, the passenger side has a plastic breather cover bolted on the front of the engine that has to be removed before the valve cover can come out. If you decide to do this yourself, I strongly recommend taking plenty of "before" pictures so you know where to reinstall all the "extra" bolts for the grounds and bracket mounts. I also recommend removing the aluminum diagonal brace that connects the subframe to the body on each side, one side at a time, just to give extra room to work (plus, you can't get the right-side header out with the brace still in there). I installed new valve cover gaskets while I was at it, but the old ones looked virtually new and probably could have been reused without a problem (saved them as spares, just in case).
Turns out all 8 of my screws were still tight, which was good news. However, since I put in all that effort into getting in there, I replaced them all anyway. Also, the job would be quite a bit easier with a proper lift instead of jack stands and wheel cribs, but you'd have to get creative to lock the wheel on the other side when turning the engine. My next house will definitely have a lift!
Great work!! Kudos
__________________
2016 GT4-R
Rick DeMan
DeMan Motorsport
Upper Nyack, NY
845 727 3070
Porsche Sales & Service
Porsche Race services and parts www.DeManMotorsport.com
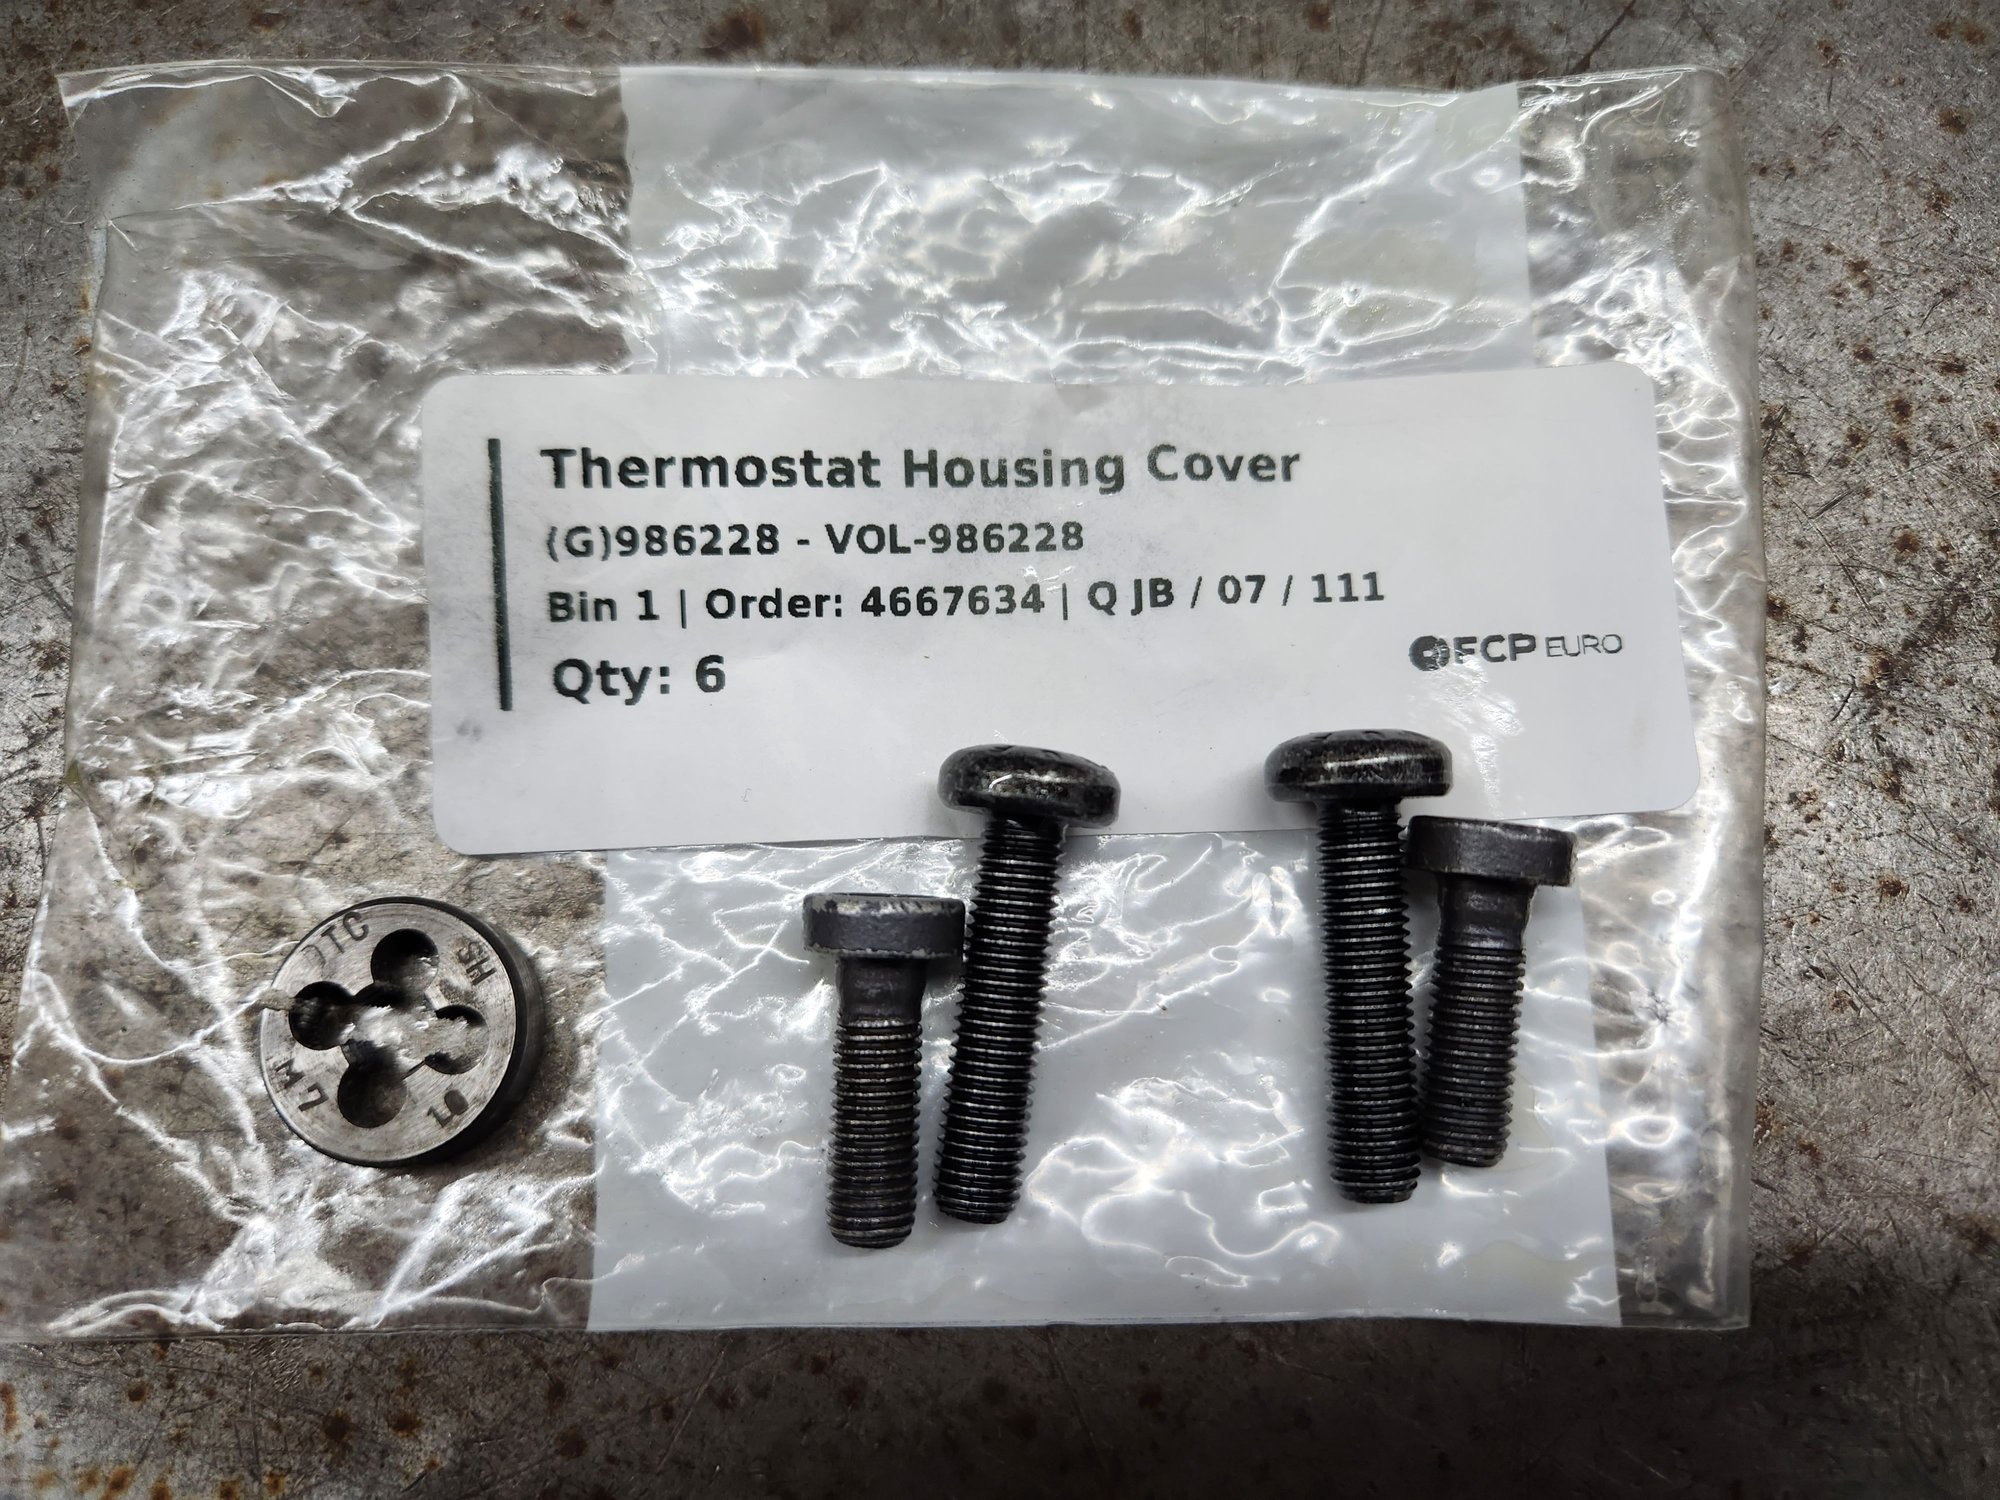
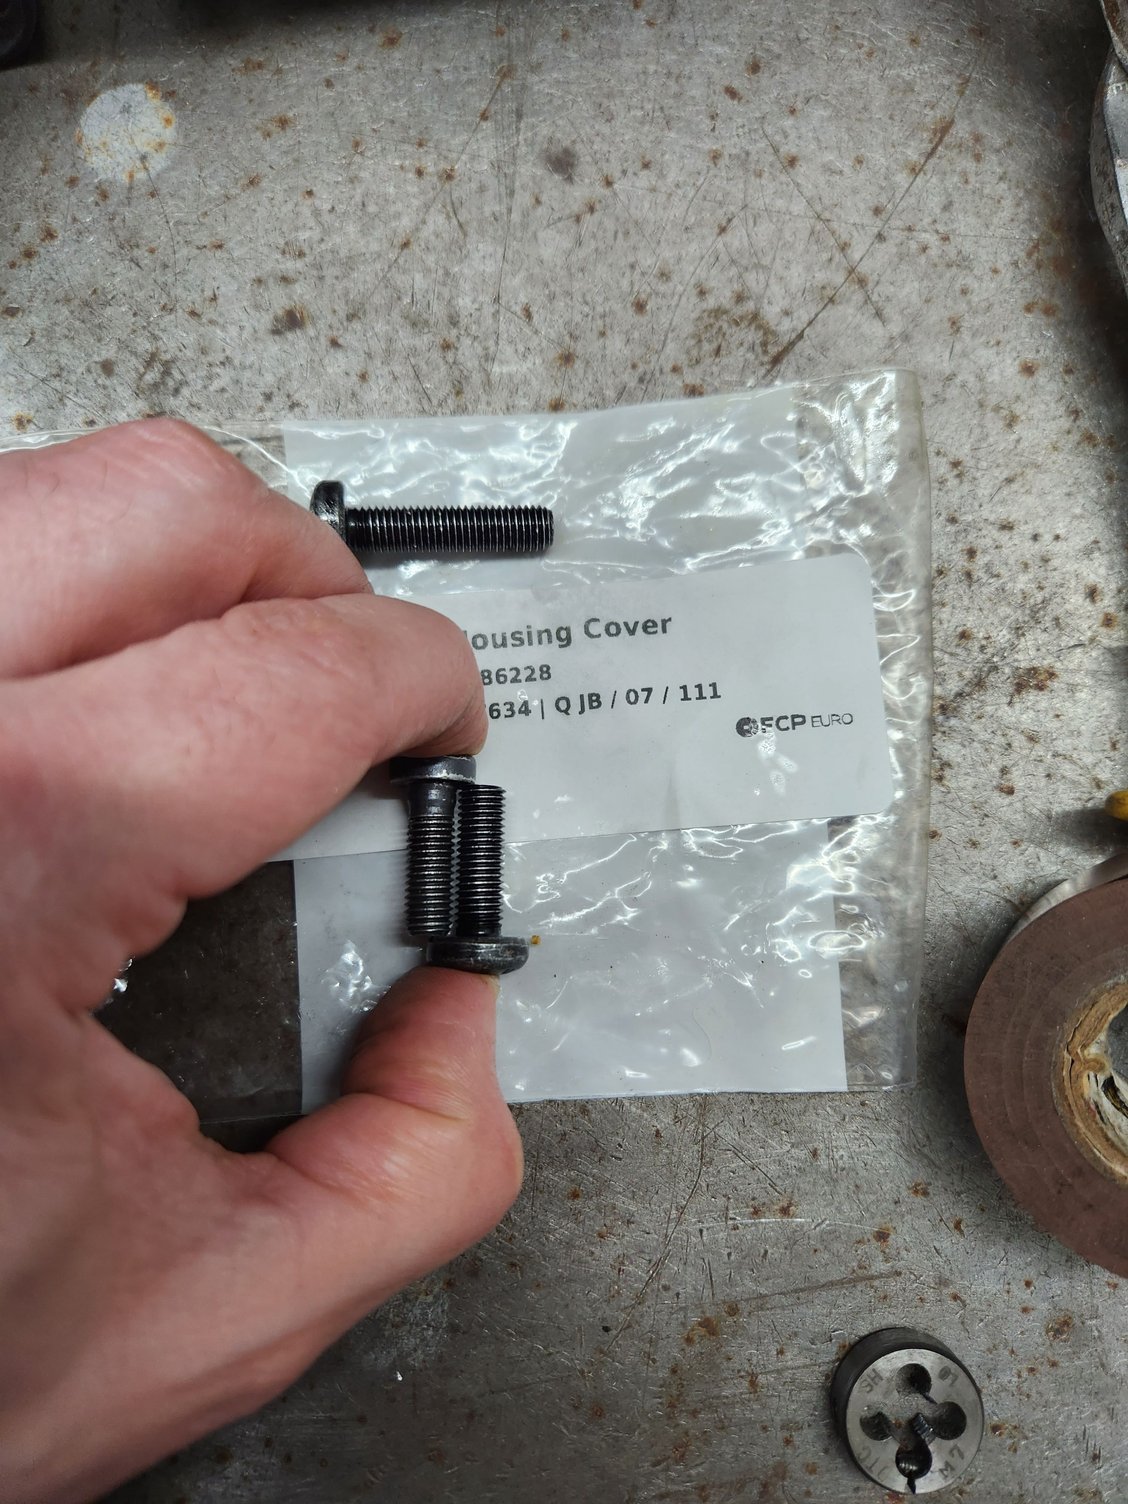
I also did the bolt replacement myself over the winter. I unfortunately was replacing my engine with a used engine after a failure so I had it out making it much easier to do. I was directed to purchase Volvo Thermostat Housing Cover bolts and trim to fit. I would have loved a direct replacement.
So I was at Thompson Speedway yesterday. Came off the track and everything was fine (2014 981 Cayman S). Let the car down a fair amount after coming off track before turning off. Upon starting it up for the final run, I have a terrible rattle and squeal coming from what sounds like the driver side front of the engine. I'm beginning to suspect that one of these bolts has come undone. Do I have a chance of doing less harm by shutting the engine off pretty much right away and not being on track running at speed? I'm really hoping I haven't knackered the whole motor. I guess the only way to tell for sure is to pull the valve covers and see what I'm dealing with but wondering if folks have seen less damage based on how the motor was run when the bolts come out in the first place. @yebokmj was there with me when it occurred. I'm kinda hoping for the best but fearing the worst.


 10-09-2020, 11:28 PM