
DIY – GT3RS fabric door pull conversion
 11-26-2010 | 06:46 PM
#1
Thread Starter
Pro
Joined: Jun 2009
Posts: 567
Likes: 67
From: Earth
As most Porsche guys know, the new red fabric door pulls are standard equipment on the 997.2 GT3 RS and Boxster Spyder. They are a reminder of the past where a minimalist approach was utilized by Porsche on race cars and street variants such as the Carrera RS from the 70's.
While it is unfortunate that the fabric pull is more for show than go, they make for a enjoyable modification. Especially for anyone who is looking to add some "sport" to their cockpit or to simply confuse the heck out of unsuspecting passengers.
Personally, I've never really liked the plastic door levers in the 997. They don't match any of the graphite grey accents on the dash, steering wheel or gear shift ****/trim. Since I ordered my 997.2 with the guards red seatbelts (option code XSX), I thought the red RS fabric pulls would be the perfect accent (carpets matching the drapes). The pulls also seem more befitting of an alcantara clad interior.
Although the conversion has some intimidating aspects, the overall swap is really quite simple. Especially since all the parts are Porsche; making it mostly a bolt-on modification. To me it was a no brainer.
Summary of conversion:
1. Remove door panel
2. Remove and replaces door insert (plastic that surrounds window switches and door lever)
3. Remove and replace door axel mount (door lever actuator that opens car door)
Difficulty: 4 wrenches out of 10 (oil change = 3 wrenches)
Time: 2-3 hours
Tools:
* Torx T-20
* Phillips screw driver
* Drill with 5/64th bit
* Butane torch (w/pointed tip) or soldering gun
* Razor blade or sharp cutting blade
* Round file
* Needle nose pliers
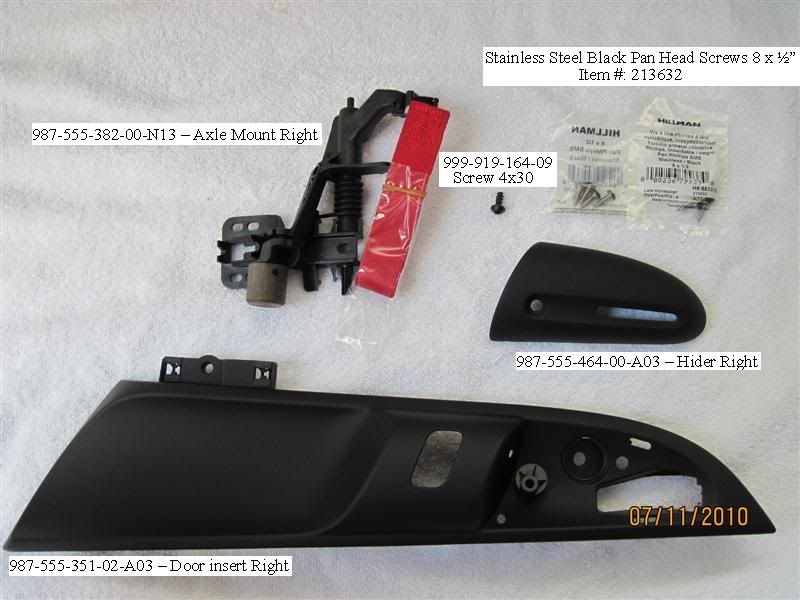
Parts List:
SunCoast Motorsport (http://www.suncoastparts.com)
1 Qty 987-555-351-01-A03 – Door Insert Left
1 Qty 987-555-351-02-A03 – Door Insert Right
1 Qty 987-555-381-00-N13 – Axle Mount Left (latch release w/fabric pull)
1 Qty 987-555-382-00-N13 – Axle Mount Right (latch release w/fabric pull)
1 Qty 987-555-463-00-A03 – Hider Left (cover slot for fabric pull)
1 Qty 987-555-464-00-A03 – Hider Right (cover slot for fabric pull)
2 Qty 999-919-164-09 – Screw 4x30 (secures door pull slot cover)
EDIT (7/14/2010): Looks like it is now available as a kit: Click Here.
Lowe's
4 Qty Item #: 213632 – Hillman Stainless Steel Black Pan Head Screws 8 x ˝”
Quick view of the parts
Pre-step: Remove door panels.
Before you can begin the conversion, you will need to remove both door panels. For a step by step DIY guide CLICK HERE.
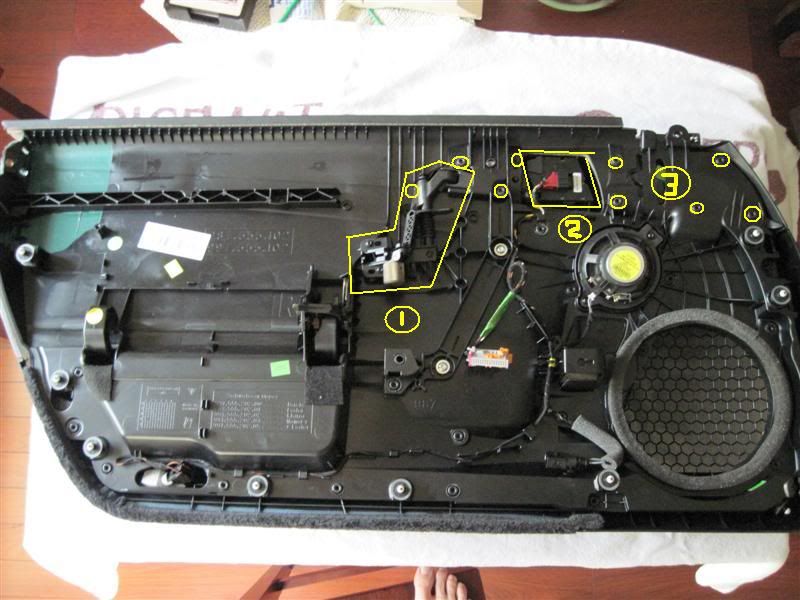
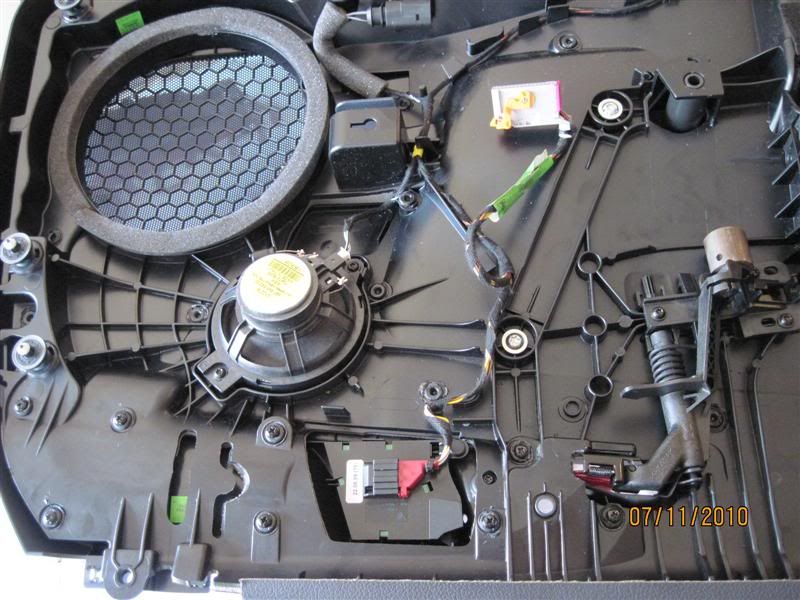
YOU ARE HERE: A removed 997 door panel – the business end.
Areas of concentration are
1. Axel mount
2. Power window rocker switch
3. 9 plastic pop rivets
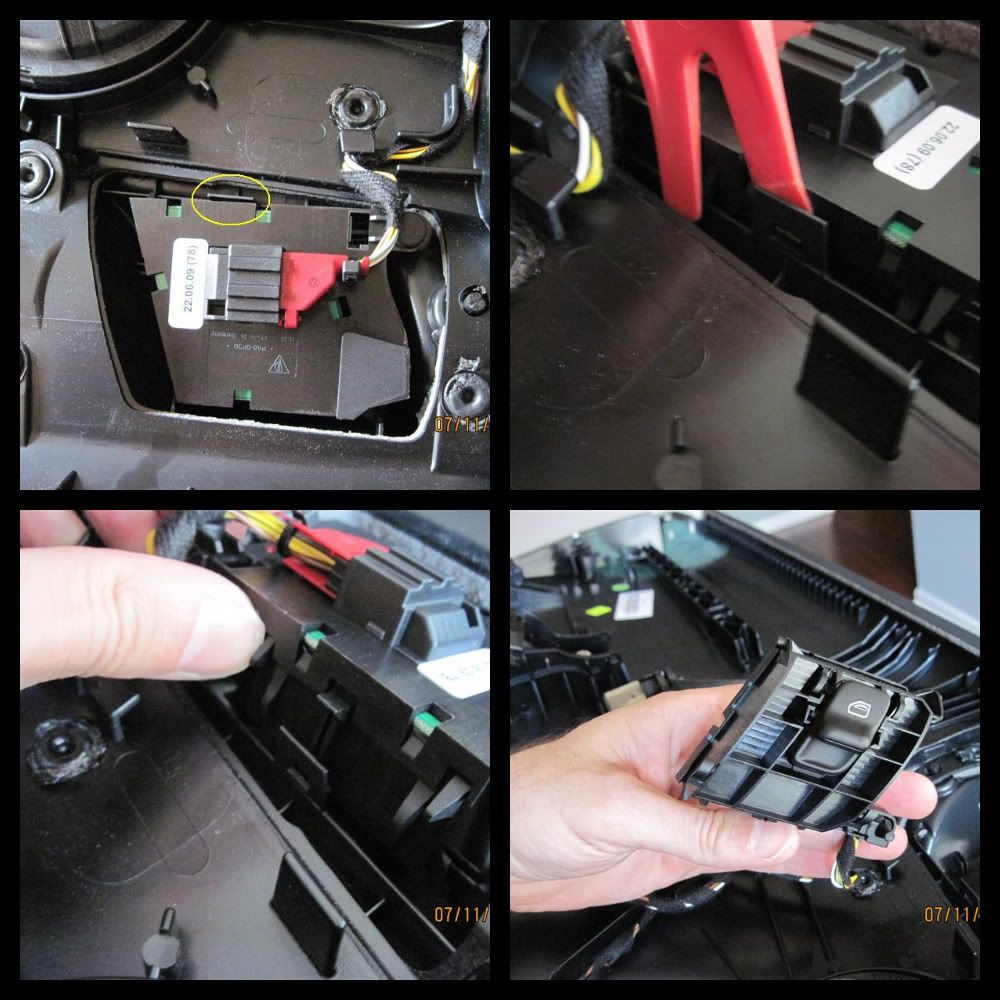
Step 1: Remove the window rocker switch
With the door panel laying face down (ugly part exposed), locate the power window rocker switch box. There is only one clip and two hinges securing the box to the door panel. Once you gently pry the clip, you should be able to rotate the box up and away. Move the switch aside to avoid damage
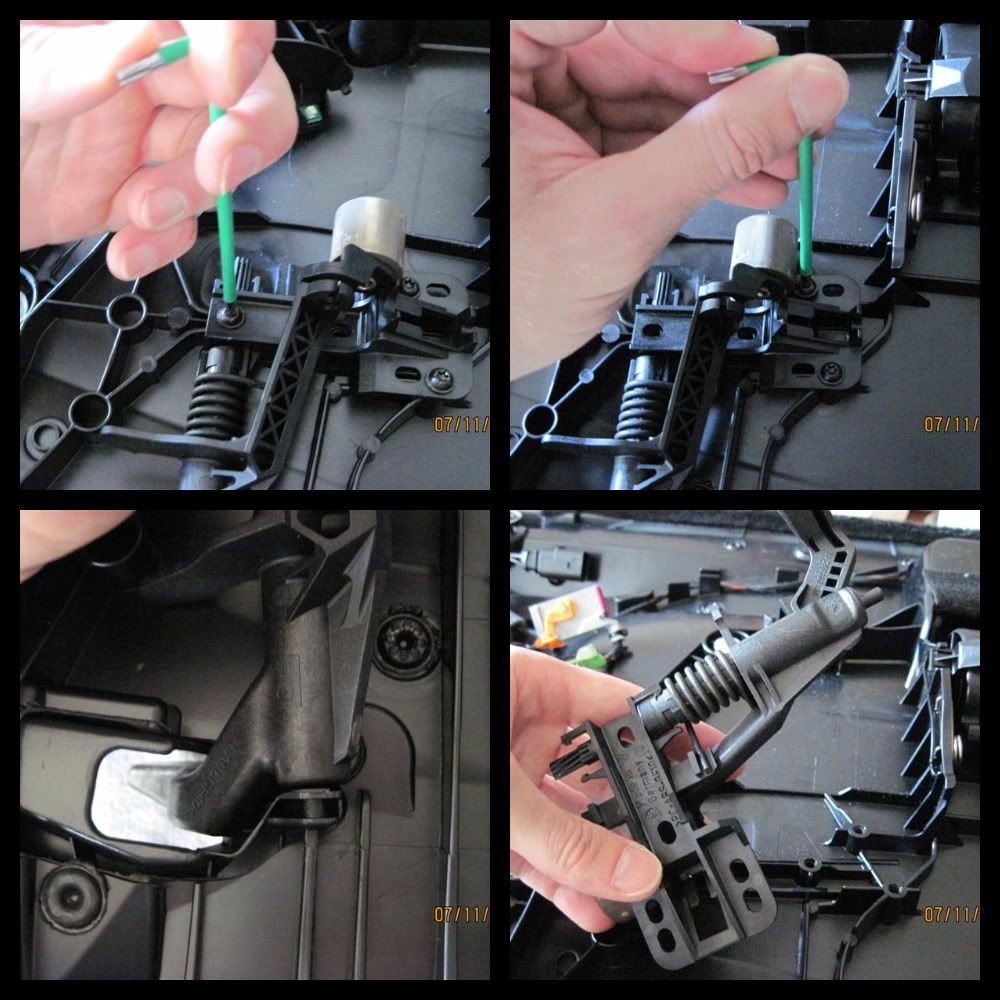
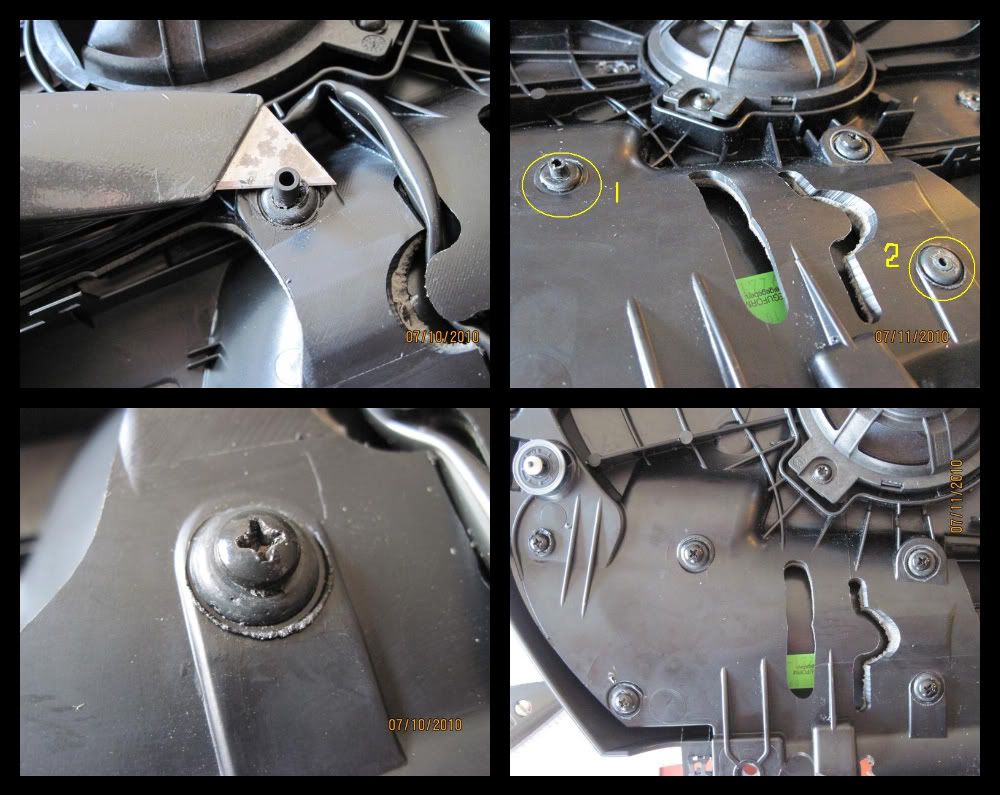
Step 2: Remove the existing axel mount.
The axel mount is actually the door lever actuator. The base of the mount is held to the door panel with three screws. Using a torx T-20 wrench, remove each of the screws and the assembly will begin to lift away from the door panel. The very tip of axel mount is held to the door by a plastic pivot bracket. Pull and wiggle the axel mount carefully to remove the axle mount tip. At that point, you can box up or discard the removed axel mount.
Step 3: Remove the door insert.
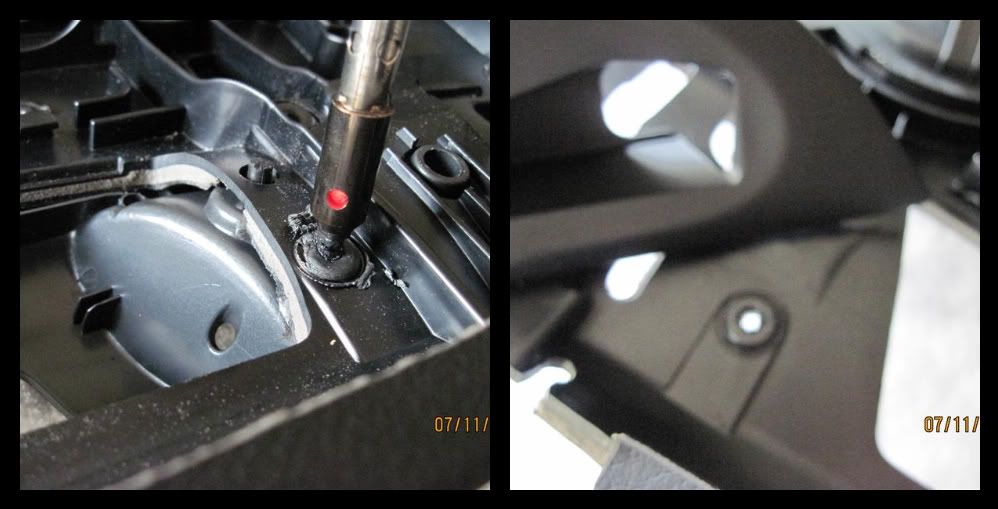
I didn't like this part. From the factory, the door insert is melted to the door panel via 9 attachment points that look like small doughnuts. There may be more than one way to skin this cat, but I found the easiest way to remove them was to drill out and melt the center.
For drilling, I used a small 5/64th bit. You don't really need to drill down too far or you will drill completely through the insert; ask me how I know. Drill slowly and you will feel the bit drop into a cavity inside the doughnut, at that point STOP DRILLING!!!

Next fire up butane torch with a tapered pointed tip set on low heat. Start at one side of the insert and aim the tip of the torch to the center of the doughnut. Use your free hand to leverage the door insert away from the door panel while applying the heat. Once the inside of the rivet begins to melt it will break free from the door panel. Remove the torch and let the plastic cool while still keeping the insert pried away from the door panel. Repeat this 8 more times. The picture on the right shows the detached door insert and a spent rivet where the insert was once attached.
Step 4: Prep the door panel for the RS insert.
After melting the plastic, each of the 9 rivet holes where a little rough with burs and charred plastic. The rivet holes need to be filed down so they can accept the 9 attachment posts on the back side of the RS door insert. I used a set of needle nose pliers to remove large burs and then a round file to bore and smooth out the edges. The goal here is to make sure the new door insert fits into the door panel without excessive binding. For me this meant a repetitive cycle of dry fitting/removing the insert and filing the doughnut holes.

Step 5: Secure the door insert.
When the door insert and all 9 posts are in place, it creates a pretty snug fit. To ensure the panel doesn't separate from the door, it needs to be secured. There are two approaches to accomplish this. One is to melt each of the attachment post to the doughnuts. The other, and the one I chose, is to trim down the attachment posts and secure them with screws. I did this so that I could easily reverse the modification if I ever wanted to go back to the original door insert and handle.
At this point, the new door insert should be secured on the door panel with all 9 attachment posts visible and poking through the doughnuts. While applying pressure from underneath (pressing on the door insert), use a razor to trim the excess post leaving it flush with the doughnut. The more you press the insert up and the closer the "shave" and the better overall fit the insert will have. After trimming the post flush, use one of the 8x1/2" screws to affix the insert to the panel. Adding the screws as you go will help to get a tighter fit all the way around the insert.
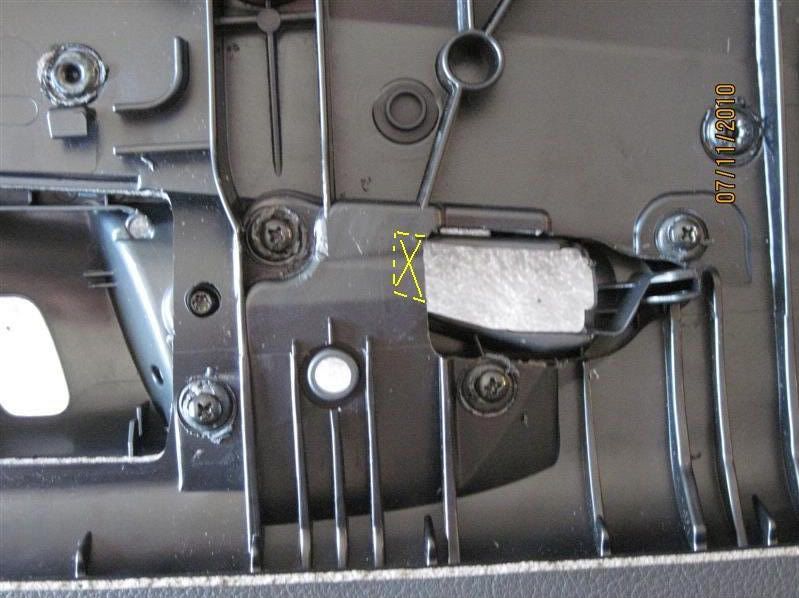
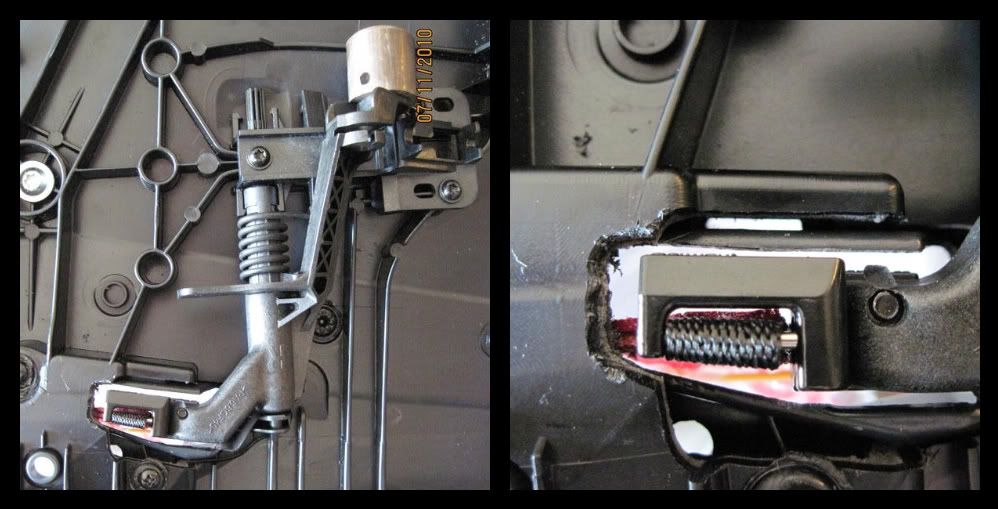
Step 6: Install RS axel mount with fabric pull.
Before you can install the RS axel mount, you need to remove a small amount of material from the door panel (see highlighted area in yellow). Doing so insures the new lever won’t bind on the door panel internals. Admittedly, I was apprehensive about making the cuts, however, when I looked at it from finished side, I realized that my hack would never be visible - even with the original handle.
After removing the excess material, install the new RS axel mount using the reverse actions from 'Step 2' above. Test the mechanism for smooth operation and remove more door panel material if necessary. Up near the pivoting tip, you may find that there is slight contact between one of the newly added screws (hidden) and the axel mount. I ended up omitting the screw altogether since the door insert retained a tight fit with the axle mount in place. Worth noting, the three screws that secure the axle mount to the door panel can be used to make micro adjustments for the lever operation.
Step 7: Complete the door assembly
Install the window switch box in reverse order of 'Step 1'. Check all screws and then the axel mount for smooth operation.
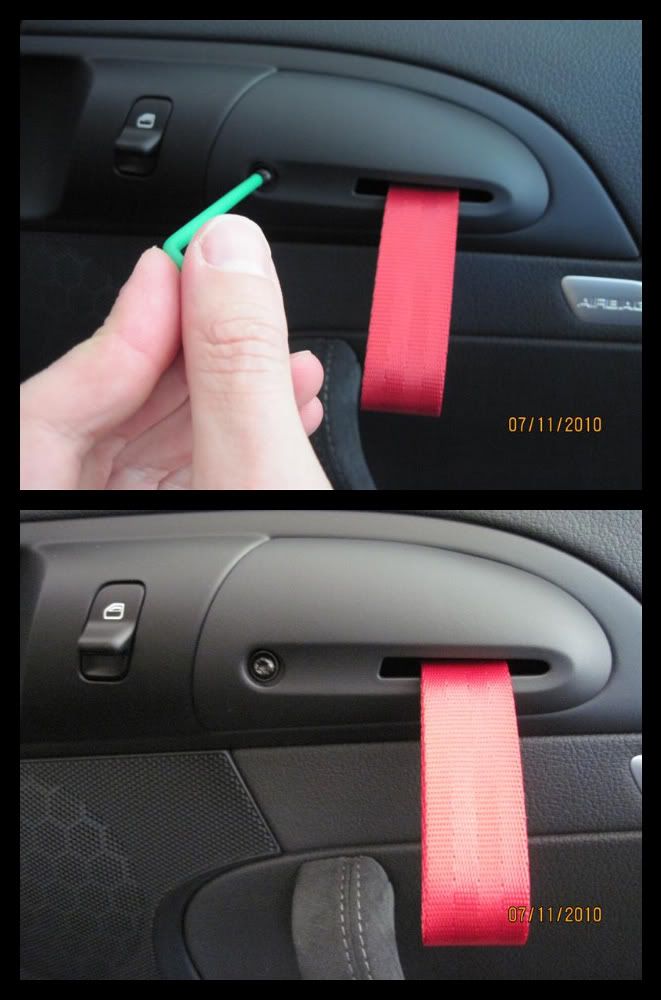
Step 8: Reinstall door panel and attach pull strap hider/cover.
At this point it is time to reinstall the door panel using the DIY guide referenced above. Once the door panel is in place feed the "red tongue" through the slit opening on the hider cover and snap it into place (two tabs at the top and bottom). Once attached, use the 4x30 screw and a T-20 torx wrench to tighten.
Test the operation of the fabric pull; you should hear the latch mechanism engage/disengage. Test with the door closed to ensure the pull will open the door. The door pull may require a little more effort, but this is normal.
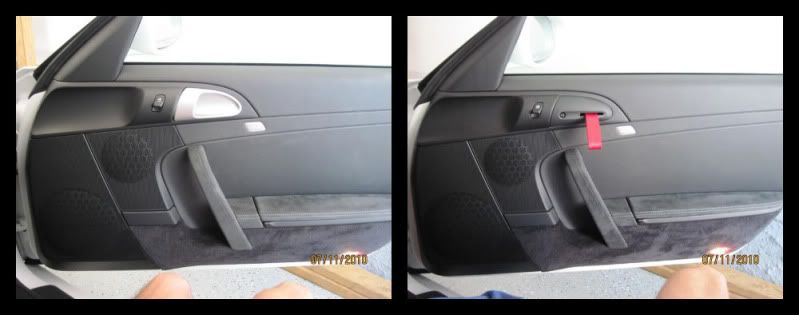
Completed door before/after
Special Thanks – I can't thank Ryan at SunCoast Motorsports enough for his help on this project. I sent him a picture of what I wanted to do and he responded with a detailed parts list right down to the screws I needed. He was easy to work with, quick to respond to my emails and most importantly, knew his stuff; i.e., IT WORKED!!!!
Good luck
Regards,
Clifton
While it is unfortunate that the fabric pull is more for show than go, they make for a enjoyable modification. Especially for anyone who is looking to add some "sport" to their cockpit or to simply confuse the heck out of unsuspecting passengers.
Personally, I've never really liked the plastic door levers in the 997. They don't match any of the graphite grey accents on the dash, steering wheel or gear shift ****/trim. Since I ordered my 997.2 with the guards red seatbelts (option code XSX), I thought the red RS fabric pulls would be the perfect accent (carpets matching the drapes). The pulls also seem more befitting of an alcantara clad interior.
Although the conversion has some intimidating aspects, the overall swap is really quite simple. Especially since all the parts are Porsche; making it mostly a bolt-on modification. To me it was a no brainer.
Summary of conversion:
1. Remove door panel
2. Remove and replaces door insert (plastic that surrounds window switches and door lever)
3. Remove and replace door axel mount (door lever actuator that opens car door)
Difficulty: 4 wrenches out of 10 (oil change = 3 wrenches)
Time: 2-3 hours
Tools:
* Torx T-20
* Phillips screw driver
* Drill with 5/64th bit
* Butane torch (w/pointed tip) or soldering gun
* Razor blade or sharp cutting blade
* Round file
* Needle nose pliers
Parts List:
SunCoast Motorsport (http://www.suncoastparts.com)
1 Qty 987-555-351-01-A03 – Door Insert Left
1 Qty 987-555-351-02-A03 – Door Insert Right
1 Qty 987-555-381-00-N13 – Axle Mount Left (latch release w/fabric pull)
1 Qty 987-555-382-00-N13 – Axle Mount Right (latch release w/fabric pull)
1 Qty 987-555-463-00-A03 – Hider Left (cover slot for fabric pull)
1 Qty 987-555-464-00-A03 – Hider Right (cover slot for fabric pull)
2 Qty 999-919-164-09 – Screw 4x30 (secures door pull slot cover)
EDIT (7/14/2010): Looks like it is now available as a kit: Click Here.
Lowe's
4 Qty Item #: 213632 – Hillman Stainless Steel Black Pan Head Screws 8 x ˝”
Quick view of the parts
Pre-step: Remove door panels.
Before you can begin the conversion, you will need to remove both door panels. For a step by step DIY guide CLICK HERE.
YOU ARE HERE: A removed 997 door panel – the business end.
Areas of concentration are
1. Axel mount
2. Power window rocker switch
3. 9 plastic pop rivets
Step 1: Remove the window rocker switch
With the door panel laying face down (ugly part exposed), locate the power window rocker switch box. There is only one clip and two hinges securing the box to the door panel. Once you gently pry the clip, you should be able to rotate the box up and away. Move the switch aside to avoid damage
Step 2: Remove the existing axel mount.
The axel mount is actually the door lever actuator. The base of the mount is held to the door panel with three screws. Using a torx T-20 wrench, remove each of the screws and the assembly will begin to lift away from the door panel. The very tip of axel mount is held to the door by a plastic pivot bracket. Pull and wiggle the axel mount carefully to remove the axle mount tip. At that point, you can box up or discard the removed axel mount.
Step 3: Remove the door insert.
I didn't like this part. From the factory, the door insert is melted to the door panel via 9 attachment points that look like small doughnuts. There may be more than one way to skin this cat, but I found the easiest way to remove them was to drill out and melt the center.
For drilling, I used a small 5/64th bit. You don't really need to drill down too far or you will drill completely through the insert; ask me how I know. Drill slowly and you will feel the bit drop into a cavity inside the doughnut, at that point STOP DRILLING!!!
Next fire up butane torch with a tapered pointed tip set on low heat. Start at one side of the insert and aim the tip of the torch to the center of the doughnut. Use your free hand to leverage the door insert away from the door panel while applying the heat. Once the inside of the rivet begins to melt it will break free from the door panel. Remove the torch and let the plastic cool while still keeping the insert pried away from the door panel. Repeat this 8 more times. The picture on the right shows the detached door insert and a spent rivet where the insert was once attached.
Step 4: Prep the door panel for the RS insert.
After melting the plastic, each of the 9 rivet holes where a little rough with burs and charred plastic. The rivet holes need to be filed down so they can accept the 9 attachment posts on the back side of the RS door insert. I used a set of needle nose pliers to remove large burs and then a round file to bore and smooth out the edges. The goal here is to make sure the new door insert fits into the door panel without excessive binding. For me this meant a repetitive cycle of dry fitting/removing the insert and filing the doughnut holes.
Step 5: Secure the door insert.
When the door insert and all 9 posts are in place, it creates a pretty snug fit. To ensure the panel doesn't separate from the door, it needs to be secured. There are two approaches to accomplish this. One is to melt each of the attachment post to the doughnuts. The other, and the one I chose, is to trim down the attachment posts and secure them with screws. I did this so that I could easily reverse the modification if I ever wanted to go back to the original door insert and handle.
At this point, the new door insert should be secured on the door panel with all 9 attachment posts visible and poking through the doughnuts. While applying pressure from underneath (pressing on the door insert), use a razor to trim the excess post leaving it flush with the doughnut. The more you press the insert up and the closer the "shave" and the better overall fit the insert will have. After trimming the post flush, use one of the 8x1/2" screws to affix the insert to the panel. Adding the screws as you go will help to get a tighter fit all the way around the insert.
Step 6: Install RS axel mount with fabric pull.
Before you can install the RS axel mount, you need to remove a small amount of material from the door panel (see highlighted area in yellow). Doing so insures the new lever won’t bind on the door panel internals. Admittedly, I was apprehensive about making the cuts, however, when I looked at it from finished side, I realized that my hack would never be visible - even with the original handle.
After removing the excess material, install the new RS axel mount using the reverse actions from 'Step 2' above. Test the mechanism for smooth operation and remove more door panel material if necessary. Up near the pivoting tip, you may find that there is slight contact between one of the newly added screws (hidden) and the axel mount. I ended up omitting the screw altogether since the door insert retained a tight fit with the axle mount in place. Worth noting, the three screws that secure the axle mount to the door panel can be used to make micro adjustments for the lever operation.
Step 7: Complete the door assembly
Install the window switch box in reverse order of 'Step 1'. Check all screws and then the axel mount for smooth operation.
Step 8: Reinstall door panel and attach pull strap hider/cover.
At this point it is time to reinstall the door panel using the DIY guide referenced above. Once the door panel is in place feed the "red tongue" through the slit opening on the hider cover and snap it into place (two tabs at the top and bottom). Once attached, use the 4x30 screw and a T-20 torx wrench to tighten.
Test the operation of the fabric pull; you should hear the latch mechanism engage/disengage. Test with the door closed to ensure the pull will open the door. The door pull may require a little more effort, but this is normal.
Completed door before/after
Special Thanks – I can't thank Ryan at SunCoast Motorsports enough for his help on this project. I sent him a picture of what I wanted to do and he responded with a detailed parts list right down to the screws I needed. He was easy to work with, quick to respond to my emails and most importantly, knew his stuff; i.e., IT WORKED!!!!
Good luck
Regards,
Clifton
Last edited by Clifton; 05-09-2012 at 12:37 PM.