
DIY – 997 Door panel removal
 07-13-2010, 01:10 AM
#1
Pro
Thread Starter
It's not very often that one needs to remove the interior door panels on a 997. In my case I had a project lined up (another DIY coming soon) where I needed to access to the inner workings of the door.
When I take on a DIY project, I like to read as many DIY guides as I can get my hands on so that I can view the task from multiple perspectives. Even though the topic of removing door panels may not be new, I figured I'd add another from my perspective. Hopefully the added detail will only make things easier for the next guy.
Special thanks to Suncoast Motorsports for providing me with a 2010 997.2 PET diagram and help with my other DIY project. Also thanks to 'Gundo' on 6speed who created a similar DIY that was very helpful during disassembly.
Difficulty: 2 wrenches out of 10 (oil change = 3 wrenches)
Time: 20 min
Tools:
*Torx T30 wrench
*Torx T20 wrench
*Phillips head screw driver
*Plastic trim and molding pry tools
Optional:
*Soft Towel
*Razor blade
*Six Bell's Two Hearted Ales
WARNING: Working around airbags can be dangerous. Disconnecting the negative terminal lead on your battery and waiting 30 mins for resistor discharge may help prevent accidental deployment.
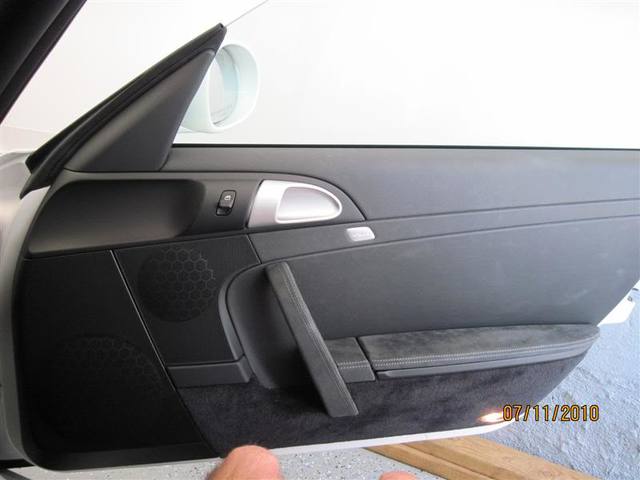
YOU ARE HERE: A 997 door panel.
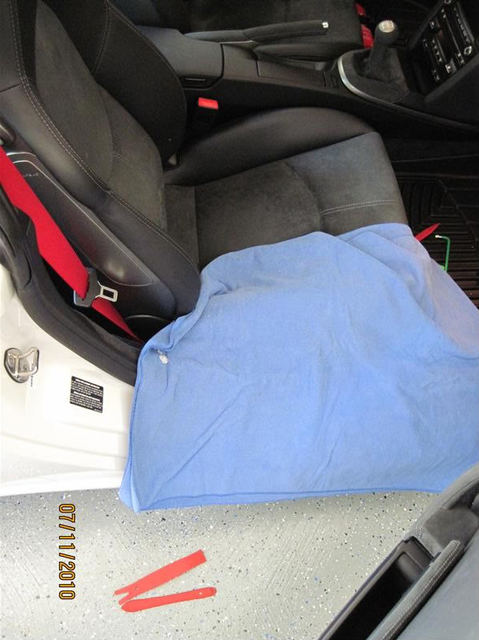
Protect the Car: Before beginning, I used a clean microfiber towel to protect the seat and paint.
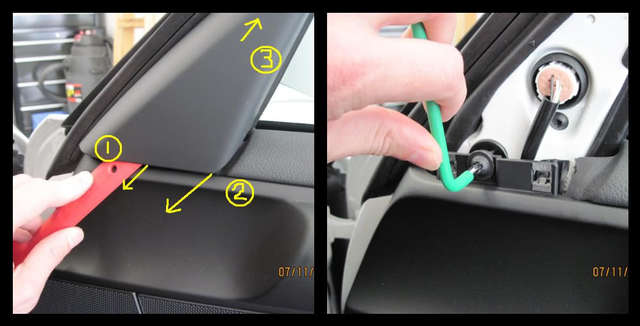
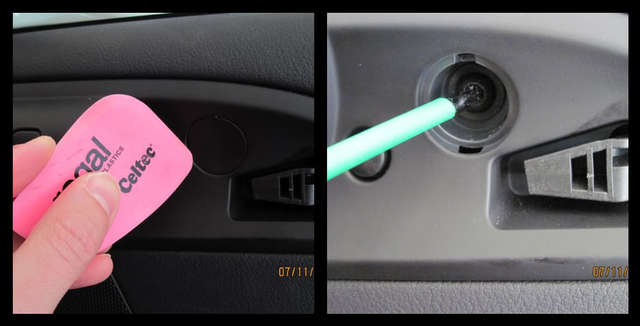
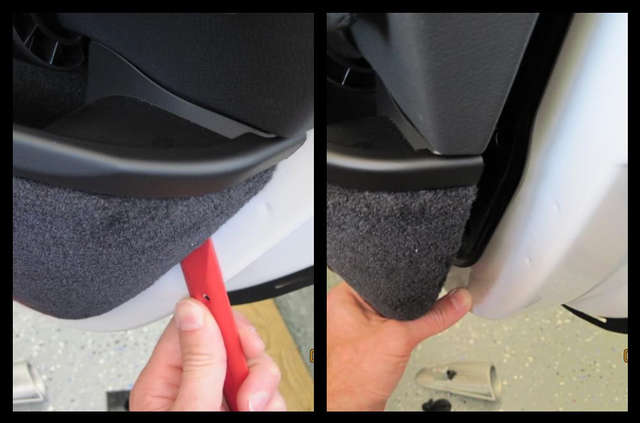
Step1: Remove the side mirror access cover and securing screw.
Using a plastic trim tool, pry up from the bottom (fig. 1) then gently pull out toward you (fig. 2). There should be two securing tabs on the left and right. As these free from their clips, carefully push the plastic cover up (fig. 3) to remove it from the car. Be gentle here because there is a small plastic mini-tab hidden from view at the top tip of the cover that is easily broken. The mini-tab secures the top portion of the cover to the rubber trim. Remove the securing screw with the T30 wrench
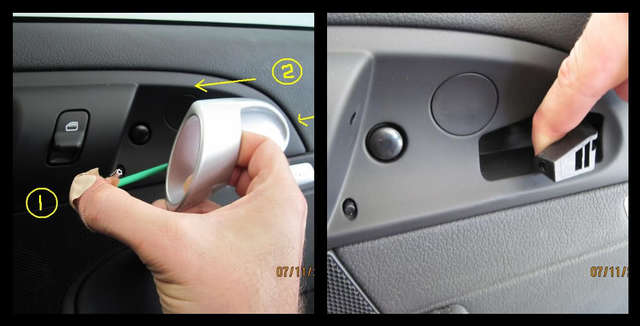
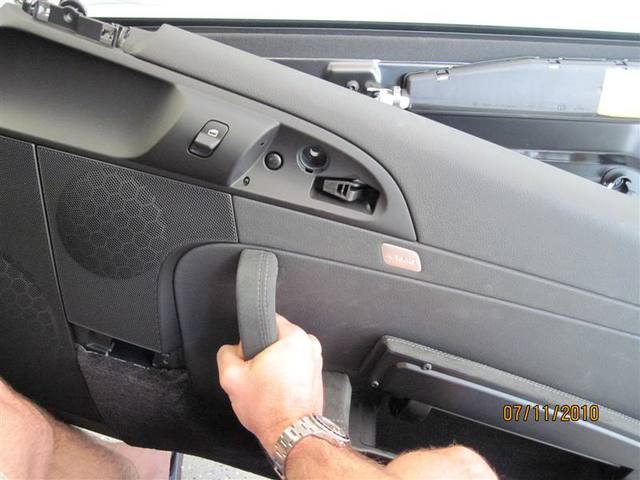
Step 2: Remove the door lever assembly screws.
Pull the door handel out and look inside for a small screw that affixes is to the black lever mechanism. Use a T20 wrench to remove the screw (fig.1) then gently pull laterally (fig. 2). The handle should slide away from the black lever. You may want to keep your thumb behind the lever to make it easier when removing the handle. The right image is the lever sans handle.
Next remove the round quarter sized cover. This plastic cover has a tab at the top and bottom and is a pretty tight fit. I used a thin plastic edging tool, but ultimately found that straight razor blade does the trick. It does not require much to poop it off; the tool you use just needs to be strong and paper thin. Remove the securing screw with the T30 wrench.
Step 3: Remove lower speaker trim and securing screw.
Next using a plastic trim tool, pry the trim piece below the smaller speaker grill toward you; the piece is held on by two prongs. Remove the securing screw with the T30 wrench.
Step 4: Remove armrest securing screw.
Flip open the armrest storage compartment lid. Shim a plastic trim tool underneath the non-moveable section just behind the "hang on" handle. This piece does not come all of the way off so once you unclip it you only need to raise it enough to get the Torx wrench in the opening. Remove the securing screw with the T30 wrench.
Step 5: Remove top door trim cover and securing screw.
At rear of the door, there is another plastic cover to be removed. There are two prongs holding the panel. It should pry away with the plastic trim tool; use more wiggle than force. Remove the securing screw with the T30 wrench.

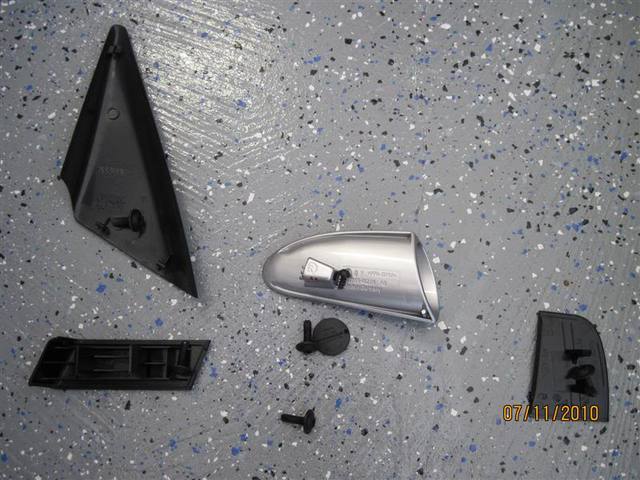
Parts Layout: At this point, all 5 of the securing screws and handle screw have been removed. Since most are the same size, it does not really matter how you store them. To keep things straight in my mind for reassembly, I placed them in order, as I removed them, with the associated cover etc.
Step 6: Remove plastic panel fastener nipples from door shell.
To free the door panel from the door shell there are a series of plastic fasteners around the perimeter of the panel. I found no real magical way to "pop" them free other than to add multiple trim pry tools to a concentrated area. It will sound like you are breaking plastic, but once one "pops" you will create more of a gap to get your hand behind the panel. From there you can slide your fingers every few inches and gently pull the panel away from the shell. You will hear the same pop for each fastener until the panel is hanging on itself at the top most strip near the glass.
Step 7: Disconnect wired connections.
Almost there – lifting the door panel upwards should now float away from the door shell with the exception of a three wired attachment points.
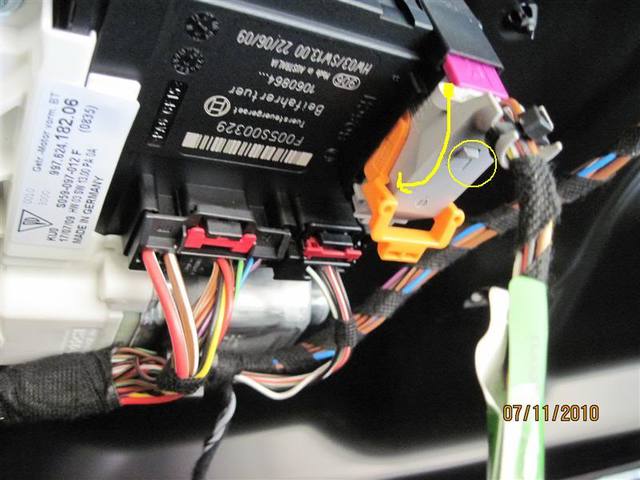
Power window harness - At the center of the of the door shell, you should see a black module with a grey/orange harness connected. The wires from the plug harness are attached to the door panel and need to be disconnected. To remove it from the module, depress the plastic tab (circled) and rotate the orange lever forward, toward you. You should feel the orange lever causing the harness to push itself away from the module as you rotate. The harness should be loose enough to fully un-plug from the module.
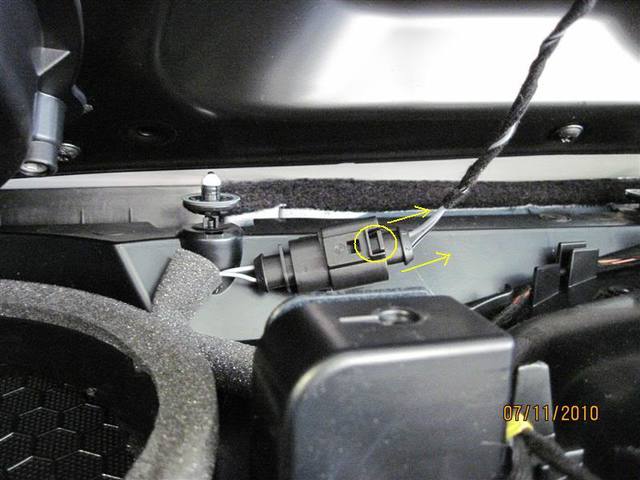
Speaker harness - Next disconnect the black plastic dongle connecting the speaker wire. It is located at the bottom of the door panel right next to the speaker grill. Depress the plastic tab (circled) and then pull the side of the plastic dongle until the two pieces separate away from each other.
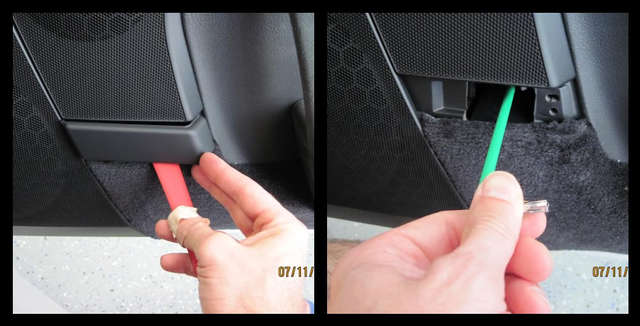
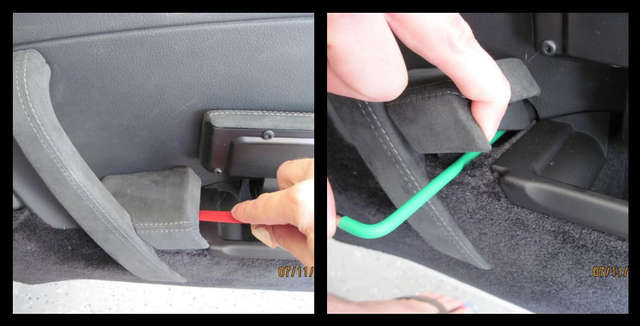
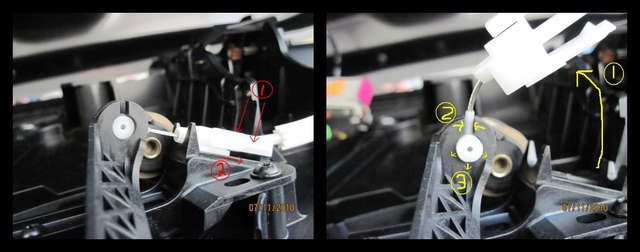
Actuator latch cable - The latch cable is a white nylon covered cable running the length of half of the door. This cable is the trigger that releases the door from the strike plate on the body. It should be attached to the lever mechanism via a white plastic clip. If you study the white clip, you will notice it has two prongs on each side. Pinch the prongs at the same time (left fig.1) and slide the clip away from the lever mechanism (left fig.2). Doing so should free the cable from the door panel allowing it to rotate on the axis of dowel connector.
Rotate (right fig. 1) the latch cable so that the cable aligns with the opening on the lever mechanism (right fig. 2). Once aligned, lift the dowel toward you (fig. 3) and it should free the latch cable completely from the door panel. Viola, the door is detached!!!
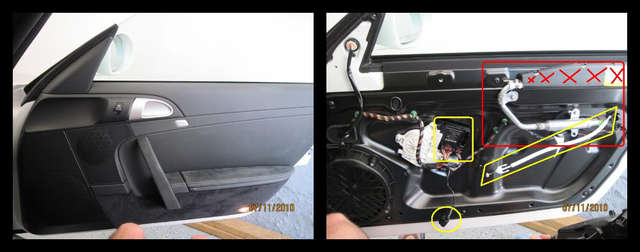
Door Shell: Below is the exposed the door shell with the door panel removed. The yellow highlights are black module, speaker dongle and white latch cable. The red boxed items are part of the head restraint system that was unknowingly lurking beneath. Be VERY careful not to bump or disturb this guy.
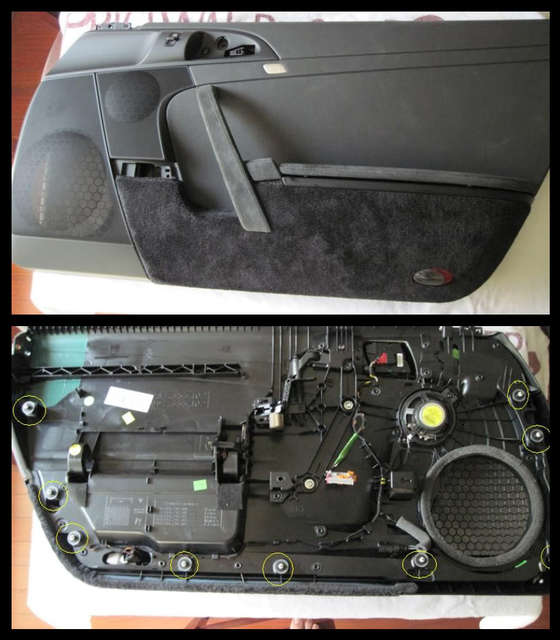
Front/Back of door panel: Note the plastic fasteners circled in yellow.
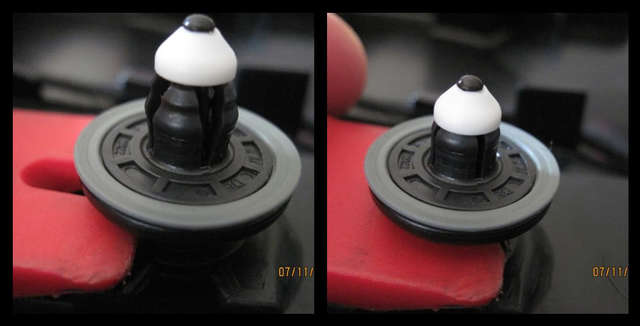
Reassembly: Is pretty much the reverse of the aforementioned steps. One tip here is to inspect the position of plastic door fasteners. Some of mine were still engaged and needed to be reset with a trim pry tool. This will make fastening them to the door shell much easier.
Nipple fastener 'Popped'/Reset
Good luck.
Regards,
Clifton
When I take on a DIY project, I like to read as many DIY guides as I can get my hands on so that I can view the task from multiple perspectives. Even though the topic of removing door panels may not be new, I figured I'd add another from my perspective. Hopefully the added detail will only make things easier for the next guy.
Special thanks to Suncoast Motorsports for providing me with a 2010 997.2 PET diagram and help with my other DIY project. Also thanks to 'Gundo' on 6speed who created a similar DIY that was very helpful during disassembly.
Difficulty: 2 wrenches out of 10 (oil change = 3 wrenches)
Time: 20 min
Tools:
*Torx T30 wrench
*Torx T20 wrench
*Phillips head screw driver
*Plastic trim and molding pry tools
Optional:
*Soft Towel
*Razor blade
*Six Bell's Two Hearted Ales
WARNING: Working around airbags can be dangerous. Disconnecting the negative terminal lead on your battery and waiting 30 mins for resistor discharge may help prevent accidental deployment.
YOU ARE HERE: A 997 door panel.
Protect the Car: Before beginning, I used a clean microfiber towel to protect the seat and paint.
Step1: Remove the side mirror access cover and securing screw.
Using a plastic trim tool, pry up from the bottom (fig. 1) then gently pull out toward you (fig. 2). There should be two securing tabs on the left and right. As these free from their clips, carefully push the plastic cover up (fig. 3) to remove it from the car. Be gentle here because there is a small plastic mini-tab hidden from view at the top tip of the cover that is easily broken. The mini-tab secures the top portion of the cover to the rubber trim. Remove the securing screw with the T30 wrench
Step 2: Remove the door lever assembly screws.
Pull the door handel out and look inside for a small screw that affixes is to the black lever mechanism. Use a T20 wrench to remove the screw (fig.1) then gently pull laterally (fig. 2). The handle should slide away from the black lever. You may want to keep your thumb behind the lever to make it easier when removing the handle. The right image is the lever sans handle.
Next remove the round quarter sized cover. This plastic cover has a tab at the top and bottom and is a pretty tight fit. I used a thin plastic edging tool, but ultimately found that straight razor blade does the trick. It does not require much to poop it off; the tool you use just needs to be strong and paper thin. Remove the securing screw with the T30 wrench.
Step 3: Remove lower speaker trim and securing screw.
Next using a plastic trim tool, pry the trim piece below the smaller speaker grill toward you; the piece is held on by two prongs. Remove the securing screw with the T30 wrench.
Step 4: Remove armrest securing screw.
Flip open the armrest storage compartment lid. Shim a plastic trim tool underneath the non-moveable section just behind the "hang on" handle. This piece does not come all of the way off so once you unclip it you only need to raise it enough to get the Torx wrench in the opening. Remove the securing screw with the T30 wrench.
Step 5: Remove top door trim cover and securing screw.
At rear of the door, there is another plastic cover to be removed. There are two prongs holding the panel. It should pry away with the plastic trim tool; use more wiggle than force. Remove the securing screw with the T30 wrench.
Parts Layout: At this point, all 5 of the securing screws and handle screw have been removed. Since most are the same size, it does not really matter how you store them. To keep things straight in my mind for reassembly, I placed them in order, as I removed them, with the associated cover etc.
Step 6: Remove plastic panel fastener nipples from door shell.
To free the door panel from the door shell there are a series of plastic fasteners around the perimeter of the panel. I found no real magical way to "pop" them free other than to add multiple trim pry tools to a concentrated area. It will sound like you are breaking plastic, but once one "pops" you will create more of a gap to get your hand behind the panel. From there you can slide your fingers every few inches and gently pull the panel away from the shell. You will hear the same pop for each fastener until the panel is hanging on itself at the top most strip near the glass.
Step 7: Disconnect wired connections.
Almost there – lifting the door panel upwards should now float away from the door shell with the exception of a three wired attachment points.
Power window harness - At the center of the of the door shell, you should see a black module with a grey/orange harness connected. The wires from the plug harness are attached to the door panel and need to be disconnected. To remove it from the module, depress the plastic tab (circled) and rotate the orange lever forward, toward you. You should feel the orange lever causing the harness to push itself away from the module as you rotate. The harness should be loose enough to fully un-plug from the module.
Speaker harness - Next disconnect the black plastic dongle connecting the speaker wire. It is located at the bottom of the door panel right next to the speaker grill. Depress the plastic tab (circled) and then pull the side of the plastic dongle until the two pieces separate away from each other.
Actuator latch cable - The latch cable is a white nylon covered cable running the length of half of the door. This cable is the trigger that releases the door from the strike plate on the body. It should be attached to the lever mechanism via a white plastic clip. If you study the white clip, you will notice it has two prongs on each side. Pinch the prongs at the same time (left fig.1) and slide the clip away from the lever mechanism (left fig.2). Doing so should free the cable from the door panel allowing it to rotate on the axis of dowel connector.
Rotate (right fig. 1) the latch cable so that the cable aligns with the opening on the lever mechanism (right fig. 2). Once aligned, lift the dowel toward you (fig. 3) and it should free the latch cable completely from the door panel. Viola, the door is detached!!!
Door Shell: Below is the exposed the door shell with the door panel removed. The yellow highlights are black module, speaker dongle and white latch cable. The red boxed items are part of the head restraint system that was unknowingly lurking beneath. Be VERY careful not to bump or disturb this guy.
Front/Back of door panel: Note the plastic fasteners circled in yellow.
Reassembly: Is pretty much the reverse of the aforementioned steps. One tip here is to inspect the position of plastic door fasteners. Some of mine were still engaged and needed to be reset with a trim pry tool. This will make fastening them to the door shell much easier.
Nipple fastener 'Popped'/Reset
Good luck.
Regards,
Clifton
Last edited by Clifton; 08-19-2018 at 08:10 PM. Reason: Updated image hosting, again....

The following 6 users liked this post by Clifton:
Flea7 (11-11-2023),
fluxdon (04-01-2024),
ohmyggg (05-23-2021),
RABjr (04-29-2021),
tegraphile (04-27-2020),
and 1 others liked this post.
07-13-2010, 01:22 AM
#2
Rennlist Member
Great write-up, now the main question is... why did you removed the door panel?  speaker upgrade?
speaker upgrade?
The following users liked this post:
Summerjack (08-08-2022)
07-13-2010, 07:49 AM
#4
Instructor


The following users liked this post:
Summerjack (08-08-2022)
Trending Topics
07-13-2010, 12:38 PM
#8

Is the carpeting on the lower part of the door panel mounted/glued to a plastic panel that could be replaced for the purpose of changing the color of the lower door??????
I wanted to change out the beige carpeting to black to tone down all the beige in the cockpit....
just a thought...
I wanted to change out the beige carpeting to black to tone down all the beige in the cockpit....
just a thought...
07-13-2010, 01:20 PM
#9
Three Wheelin'
Nice write up - thanks.
07-13-2010, 06:23 PM
#10
Pro
Thread Starter
Thanks guys!!! I appreciate the feedback.
No, no speaker upgrade. I should finish writing up the other DIY tonight - stay tuned.
I believe that the carpeting is glued on to some degree. From the back (unfinished side) it appears that the storage bin is heat welded on to the door panel and carpet edges are glued down. That leads me to believe the rest of the of the carpet is glued as well.
I believe that the carpeting is glued on to some degree. From the back (unfinished side) it appears that the storage bin is heat welded on to the door panel and carpet edges are glued down. That leads me to believe the rest of the of the carpet is glued as well.
07-13-2010, 11:21 PM
#12
Pro
Join Date: Nov 2006
Location: SAN CARLOS, CALIFORNIA
Posts: 611
Likes: 0
Received 0 Likes
on
0 Posts
Good write up. I like the details. Here
is my write up.
http://www.renntech.org/forums/index...-micro-switch/
Paul
is my write up.
http://www.renntech.org/forums/index...-micro-switch/
Paul
 01-08-2012, 09:02 AM
#14
5th Gear

Join Date: Jan 2012
Posts: 5
Likes: 0
Received 0 Likes
on
0 Posts
Hi guys I need to remove the sport chrono clock from the dashboard on my Porsche 997 as there is a horrible buzzing noise coming from underneath or within the clock. Does anybody have any ideas on how to do this? I would take it to a dealer but I am in a remote part of Taiwan and would rather not risk driving the car through landslide prone and rockslide prone mountainous roads. Many thanks in advance for any pointers.
01-08-2012, 09:35 AM
#15
Newbies Hospitality Director
Lifetime Rennlist
Member
Lifetime Rennlist
Member
Join Date: Apr 2005
Location: Winston-Salem, NC
Posts: 18,084
Likes: 0
Received 34 Likes
on
33 Posts
Hi guys I need to remove the sport chrono clock from the dashboard on my Porsche 997 as there is a horrible buzzing noise coming from underneath or within the clock. Does anybody have any ideas on how to do this? I would take it to a dealer but I am in a remote part of Taiwan and would rather not risk driving the car through landslide prone and rockslide prone mountainous roads. Many thanks in advance for any pointers.
The following users liked this post:
Summerjack (08-08-2022)