9x7.1 Center Console Removal/Shifter Removal
 05-16-2012, 01:48 PM
#1
Racer
Thread Starter
9x7.1 Center console removal/Shifter Install DIY Guide. Guide applicable to 987.1, but also 997.1 because of shared parts. Guide should also be applicable for the 2nd generation (2009 - 2012 MY), though I have not confirmed myself.
Note some of the pictures are rotated the wrong way - I couldn't fix them. However, you can download the PDF (pictures right-side up) here: https://www.box.com/s/25aa98e5bdceda3589c0
There are a few articles out there for DIY�ers to remove the 987.1 center console & short shift installation. A number of them instruct the DIY�er to take apart the shift **** and also unplug multiple connectors under the console. This step-by-step guide differs in that it shows how to remove the shift ****/boot in one piece, along with other tips that will, hopefully, help make entire process more straight forward. Applicable to: 987.1 Boxster and Cayman. Cayman may require subwoofer removal not captured here. May also apply to 987.2.
DISCLAIMER: This guide (anything written in these pages) is offered as a general guidance and makes no guarantee it will work for your vehicle. The author is not responsible and will not be liable for anything that results from the following procedure.
Remove the shift ****/boot in one piece
1)Remove the shift boot from the silver horseshoe by pulling up on the leather (alcantara in my picture) boot. Start from front of the boot - use your fingers to feel for the plastic boot trim and get an even grip on left/right side of trim and pull vertically up.
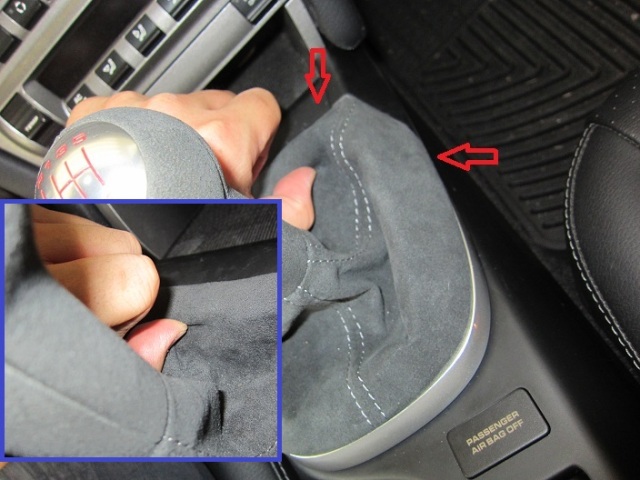
2) Notice the boot trim is attached to 4 metal clips: 2 front, 2 side (**** removed to for photo illustration). The 2nd picture shows where plastic boot trim attaches to metal clips on horseshoe and notice hooks that �catches� the rear of horseshoe.

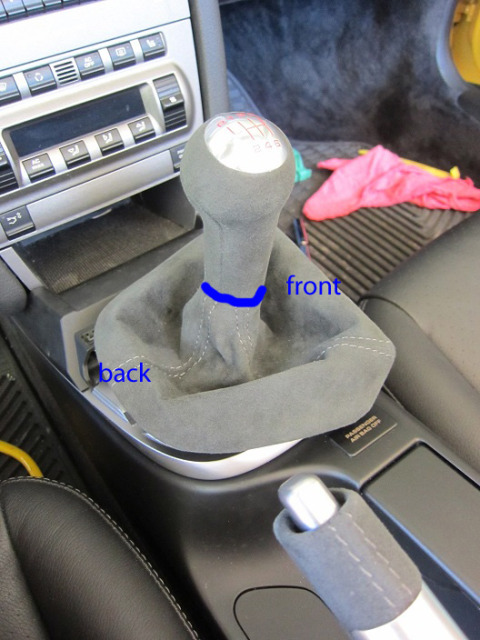
3) Once the boot is completely free from the horseshoe, you can removing the **** and boot at once. With the boot �skirt� down, grip just below the ****/boot seam meet (blue line in picture) and turn it clockwise 90 degrees. You should feel a �soft� click when you turn full 90 degrees. By now, you should see that the front of the boot is now facing passenger door, and back of boot is now facing driver side door (on RHD car). This confirms you did this correctly. Nice job! Note the **** is still facing front of car.
4) At this point, you can remove the **** and boot by pulling straight up (vertically). I found it was easier for me to pull the **** off by �skirt up�, gripping the black plastic grommet (as pictured below) and pull up. This way, I don�t have to worry about damaging the leather either. How hard you need to pull really depends. But as long as you have turned the boot at 90 degrees in step 4, the ****/boot should just come off as you pull.
Removing the horseshoe:
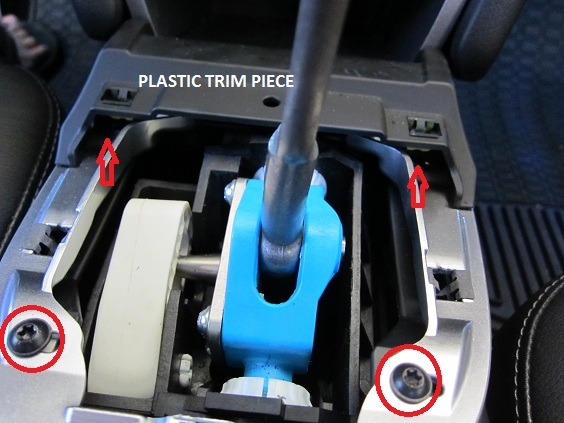
1) After you remove the boot, you�ll notice 2 torx screws. There are actually 4 of them holding the horseshoe. The rear 2 screws are exposed, and the front 2 screws are underneath the plastic trim piece. To get to the front two screws, remove the plastic trim piece (noted in picture).
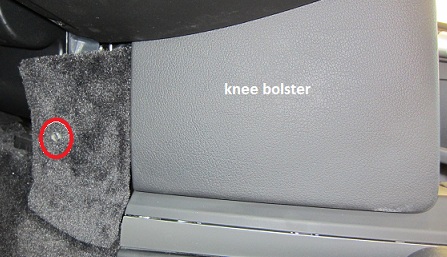
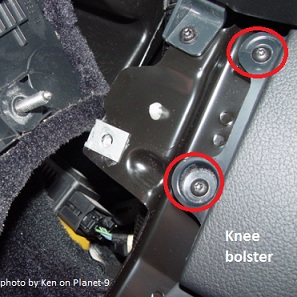
2) But to remove plastic trim, you need to first remove both side knee bolsters. Undo a torx screw that holds the carpet cover. Then remove the two torx screws holding the knee bolster. Then just pull (direction to rear of car) to separate knee bolster from radio frame. Repeat for passenger side.
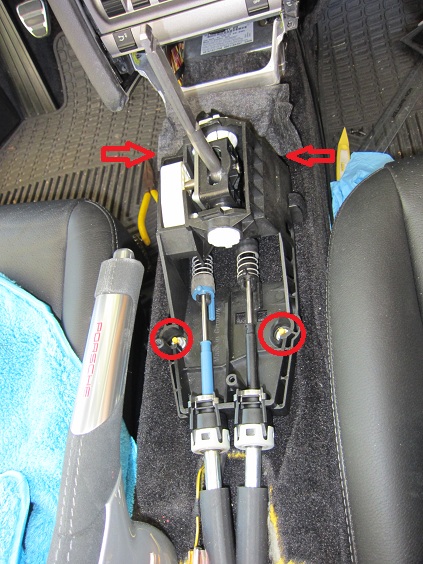
3) With the side bolsters removed, you can pull up on the aforementioned plastic trim. That plastic trim is also held down by 4 metal clips (2 per side � see red arrows for approx. locations), but trim should come up easily. Note: the bolster in picture below should have been removed already � it is still in the picture because I took picture after putting everything back together.

4) After you separate the plastic trim from the horseshoe, the trim should just slide out (in direction to rear of the car).
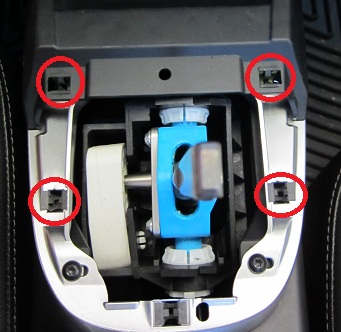
5) This should now expose the remaining 2 screws that were under the plastic trim. Remove the 4 screws holding the horseshoe and the horseshoe can now be removed.
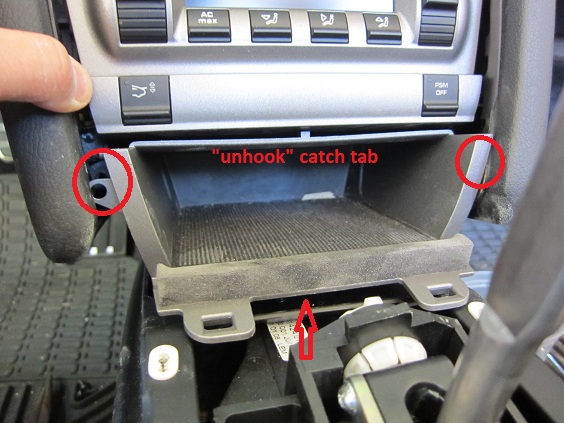
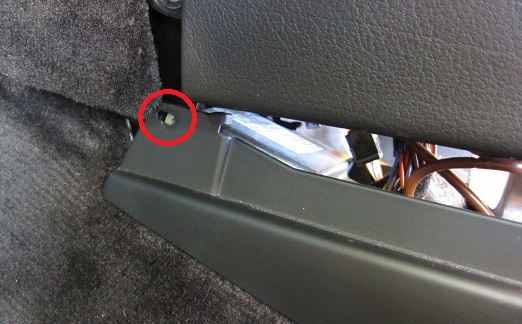
6) One more thing to do before you can start removing center console. There is a torx screw just beneath the cubbie bin. To get to this, you can either bend the cubbie plastic or remove it. I�m risk adverse, so I decided to remove the storage bin. To do so, remove two torx screws on the sides (circled in pic below), then gently pull the bin out � that will also pull the spoiler/PSM switch plate out about ��. Press down on top of the cubbie bin to �unhook� the small tab that catches the switch plate, and the cubbie should just slide out complete.
7) Once the cubbie bin is out, you�ll see 1 torx screw in middle holding the console down.
Removing Center Console:
There are total of 8 torx screws holding the center console. We�ll start from front, working to back.
1) 2 screws in the foot well � one on each side
2) Remove the 1 screw that was underneath the cubbie bin (if you haven�t done so already).
3) Remove the �banana trim� under the e-brake. You�ll find one screw towards the front.

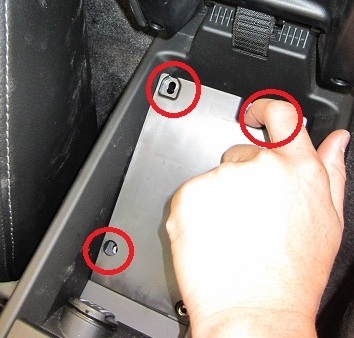
4) Under arm rest, remove the plastic cover to expose 4 more torx screws. Remove them. Pull up on the plastic plate from the back as illustrated.
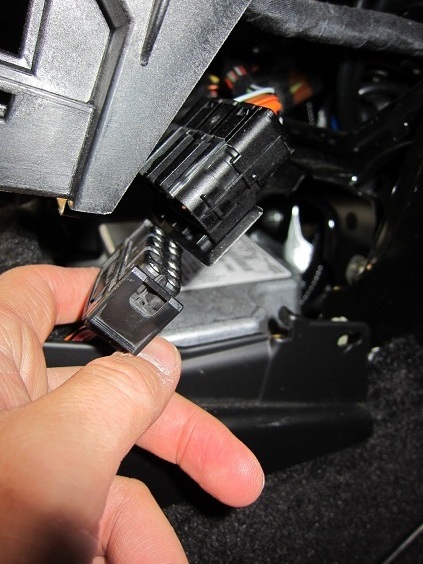
5) Disconnect the power connector that powers all the stuff in the center console. Go back to passenger side foot well, you�ll find a big connector with a bunch of wires. I found it easier to unhook the connector from the metal frame to give me more wiggle room to disconnect this connector.

6) Now the entire console should just slide out. Start by pulling up (vertically) from the back/arm rest area. Ideally, you want to do this with the top down (Boxster owners) to avoid hitting your soft top. The console is pretty long.
Removing/replace shifter housing - Make absolutely your car is IN NEUTRAL at this point!
Depending on your shifter unit (OE or aftermarket), you may need to note the # of notches to ensure your new shifter goes back on in the neutral position. OE short shift kit should come with a green bracket to make sure the shifter is in neutral during the installation. Do not remove that green bracket until re-installation of the shifter is complete.
NOTE: If you are not 100% sure, contact with your vendor. Hopefully, you are smart and got all that info before you took everything apart. ;-)
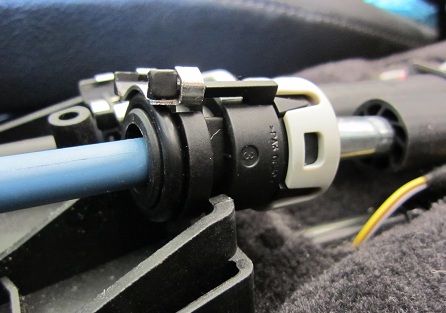
1) Disconnect the shifter cable from the shifter housing connector. You can keep the connector on right in open position by compressing the spring and turning in clockwise. Depending on your shifter unit. After that, simply pull up on the cables to remove from the � housing.
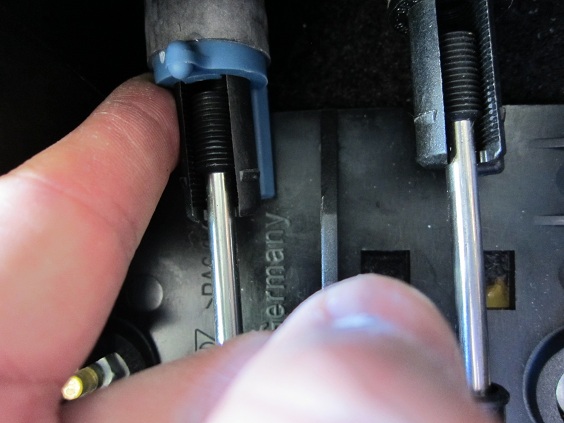
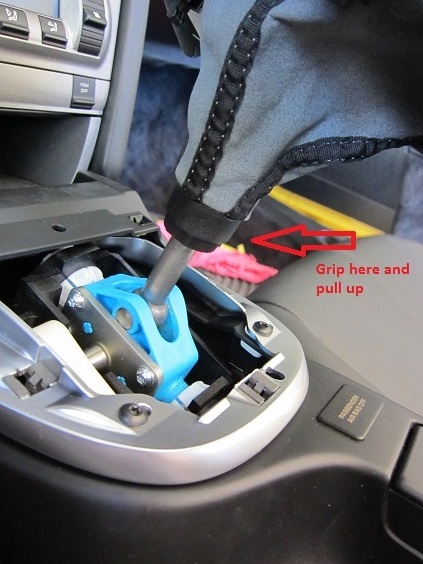
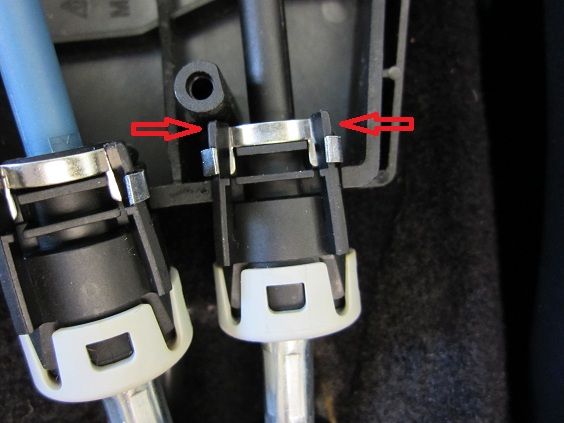
2) Unlatch the shifter cables by pinching the grommet as illustrated by red arrows and gently pulling up at the same time:
3) Unbolt the shifter housing by removing the 4 nuts holding the shift housing to the transmission tunnel with a 10mm socket.
4) You should now able to lift up on the shifter housing, and put in your new one.
Reinstallation is the reverse. Good luck!
If you have questions, I�ll try to help if I can. I can be reached at lithium(underscore)1330(at)yahoo(dot) com
Note some of the pictures are rotated the wrong way - I couldn't fix them. However, you can download the PDF (pictures right-side up) here: https://www.box.com/s/25aa98e5bdceda3589c0
There are a few articles out there for DIY�ers to remove the 987.1 center console & short shift installation. A number of them instruct the DIY�er to take apart the shift **** and also unplug multiple connectors under the console. This step-by-step guide differs in that it shows how to remove the shift ****/boot in one piece, along with other tips that will, hopefully, help make entire process more straight forward. Applicable to: 987.1 Boxster and Cayman. Cayman may require subwoofer removal not captured here. May also apply to 987.2.
DISCLAIMER: This guide (anything written in these pages) is offered as a general guidance and makes no guarantee it will work for your vehicle. The author is not responsible and will not be liable for anything that results from the following procedure.
Remove the shift ****/boot in one piece
1)Remove the shift boot from the silver horseshoe by pulling up on the leather (alcantara in my picture) boot. Start from front of the boot - use your fingers to feel for the plastic boot trim and get an even grip on left/right side of trim and pull vertically up.
2) Notice the boot trim is attached to 4 metal clips: 2 front, 2 side (**** removed to for photo illustration). The 2nd picture shows where plastic boot trim attaches to metal clips on horseshoe and notice hooks that �catches� the rear of horseshoe.
3) Once the boot is completely free from the horseshoe, you can removing the **** and boot at once. With the boot �skirt� down, grip just below the ****/boot seam meet (blue line in picture) and turn it clockwise 90 degrees. You should feel a �soft� click when you turn full 90 degrees. By now, you should see that the front of the boot is now facing passenger door, and back of boot is now facing driver side door (on RHD car). This confirms you did this correctly. Nice job!
Note the **** is still facing front of car. 4) At this point, you can remove the **** and boot by pulling straight up (vertically). I found it was easier for me to pull the **** off by �skirt up�, gripping the black plastic grommet (as pictured below) and pull up. This way, I don�t have to worry about damaging the leather either. How hard you need to pull really depends. But as long as you have turned the boot at 90 degrees in step 4, the ****/boot should just come off as you pull.
Removing the horseshoe:
1) After you remove the boot, you�ll notice 2 torx screws. There are actually 4 of them holding the horseshoe. The rear 2 screws are exposed, and the front 2 screws are underneath the plastic trim piece. To get to the front two screws, remove the plastic trim piece (noted in picture).
2) But to remove plastic trim, you need to first remove both side knee bolsters. Undo a torx screw that holds the carpet cover. Then remove the two torx screws holding the knee bolster. Then just pull (direction to rear of car) to separate knee bolster from radio frame. Repeat for passenger side.
3) With the side bolsters removed, you can pull up on the aforementioned plastic trim. That plastic trim is also held down by 4 metal clips (2 per side � see red arrows for approx. locations), but trim should come up easily. Note: the bolster in picture below should have been removed already � it is still in the picture because I took picture after putting everything back together.
4) After you separate the plastic trim from the horseshoe, the trim should just slide out (in direction to rear of the car).
5) This should now expose the remaining 2 screws that were under the plastic trim. Remove the 4 screws holding the horseshoe and the horseshoe can now be removed.
6) One more thing to do before you can start removing center console. There is a torx screw just beneath the cubbie bin. To get to this, you can either bend the cubbie plastic or remove it. I�m risk adverse, so I decided to remove the storage bin. To do so, remove two torx screws on the sides (circled in pic below), then gently pull the bin out � that will also pull the spoiler/PSM switch plate out about ��. Press down on top of the cubbie bin to �unhook� the small tab that catches the switch plate, and the cubbie should just slide out complete.
7) Once the cubbie bin is out, you�ll see 1 torx screw in middle holding the console down.
Removing Center Console:
There are total of 8 torx screws holding the center console. We�ll start from front, working to back.
1) 2 screws in the foot well � one on each side
2) Remove the 1 screw that was underneath the cubbie bin (if you haven�t done so already).
3) Remove the �banana trim� under the e-brake. You�ll find one screw towards the front.
4) Under arm rest, remove the plastic cover to expose 4 more torx screws. Remove them. Pull up on the plastic plate from the back as illustrated.
5) Disconnect the power connector that powers all the stuff in the center console. Go back to passenger side foot well, you�ll find a big connector with a bunch of wires. I found it easier to unhook the connector from the metal frame to give me more wiggle room to disconnect this connector.
6) Now the entire console should just slide out. Start by pulling up (vertically) from the back/arm rest area. Ideally, you want to do this with the top down (Boxster owners) to avoid hitting your soft top. The console is pretty long.
Removing/replace shifter housing - Make absolutely your car is IN NEUTRAL at this point!
Depending on your shifter unit (OE or aftermarket), you may need to note the # of notches to ensure your new shifter goes back on in the neutral position. OE short shift kit should come with a green bracket to make sure the shifter is in neutral during the installation. Do not remove that green bracket until re-installation of the shifter is complete.
NOTE: If you are not 100% sure, contact with your vendor. Hopefully, you are smart and got all that info before you took everything apart. ;-)
1) Disconnect the shifter cable from the shifter housing connector. You can keep the connector on right in open position by compressing the spring and turning in clockwise. Depending on your shifter unit. After that, simply pull up on the cables to remove from the � housing.
2) Unlatch the shifter cables by pinching the grommet as illustrated by red arrows and gently pulling up at the same time:
3) Unbolt the shifter housing by removing the 4 nuts holding the shift housing to the transmission tunnel with a 10mm socket.
4) You should now able to lift up on the shifter housing, and put in your new one.
Reinstallation is the reverse. Good luck!
If you have questions, I�ll try to help if I can. I can be reached at lithium(underscore)1330(at)yahoo(dot) com
 10-23-2012, 01:58 AM
#3
Cruisin'

Join Date: Oct 2012
Posts: 9
Likes: 0
Received 0 Likes
on
0 Posts
This could really be helpful for starters. Detailed instructions on the installation. I just bought a few parts for my car(visit partstrain here) to add mods and alterations to my ride. I am just starting this weekend hope it would turn out well. Best of luck. Thanks again mate for sharing.

The following users liked this post:
rdcyclist (02-07-2023)