When you click on links to various merchants on this site and make a purchase, this can result in this site earning a commission. Affiliate programs and affiliations include, but are not limited to, the eBay Partner Network.
I didn’t realize the DIY subforum wasn’t open for posts/replies, so if a mod could move this thread there that would be great! If you have questions/comments, here’s my original thread on this work. I took fewer photos than I intended to, but I think these should be sufficient for a decently handy DIYer to figure everything out. Also, I’ve been writing this on an iPad on a plane, so forgive any formatting issues until I can get back to a computer and fix it all up.
Obviously, the usual caveats with a DIY guide apply here: I’m a professional keyboard toucher, not a mechanic nor mechanical engineer. What worked for me may not work for you, and what happens to your car as a result of trying to follow this guide is not my responsibility.
Parts
- Spark plugs
- Dielectric grease
Recommended Tools
- Lift & Wheel Removal tools.
- 1/4” and 3/8” drive ratchets
- 1/4” ratcheting combo wrench
- 1/4”, 7mm, and 10mm hex sockets
- E-Torx E10 socket
- 14mm 12-point spark plug socket
- Torx T25 and T30 bits
- Torque wrench
- Flathead screwdriver
- An epic collection of 1/4” and 3/8” wobble extensions or U-joints.
- Spark plug gap tool
Notes
- These tools got the job done for me, but YMMV – you may need fewer (or more). For example, I only have T25/T30 drill bits (i.e. not in socket form), so I attached the bits to a 1/4” socket and ratchet with extensions. If you do this, I highly recommend a socket that grabs the bit so it doesn’t just fall out if you point it the wrong way. It’s easy to lose things in the heat shielding around this work area.
- I ordered plugs from Suncoast, which came in Porsche-branded boxes and were already gapped to the factory recommendation of 0.028”.
- I used this snazzy gap tool to tighten the gap to just below 0.022” (M-Engineering recommendation), then opened it up using the provided spacers until the 0.022 spacer fit in snugly. This is way better than the old coin-style gap tools I’ve used previously!
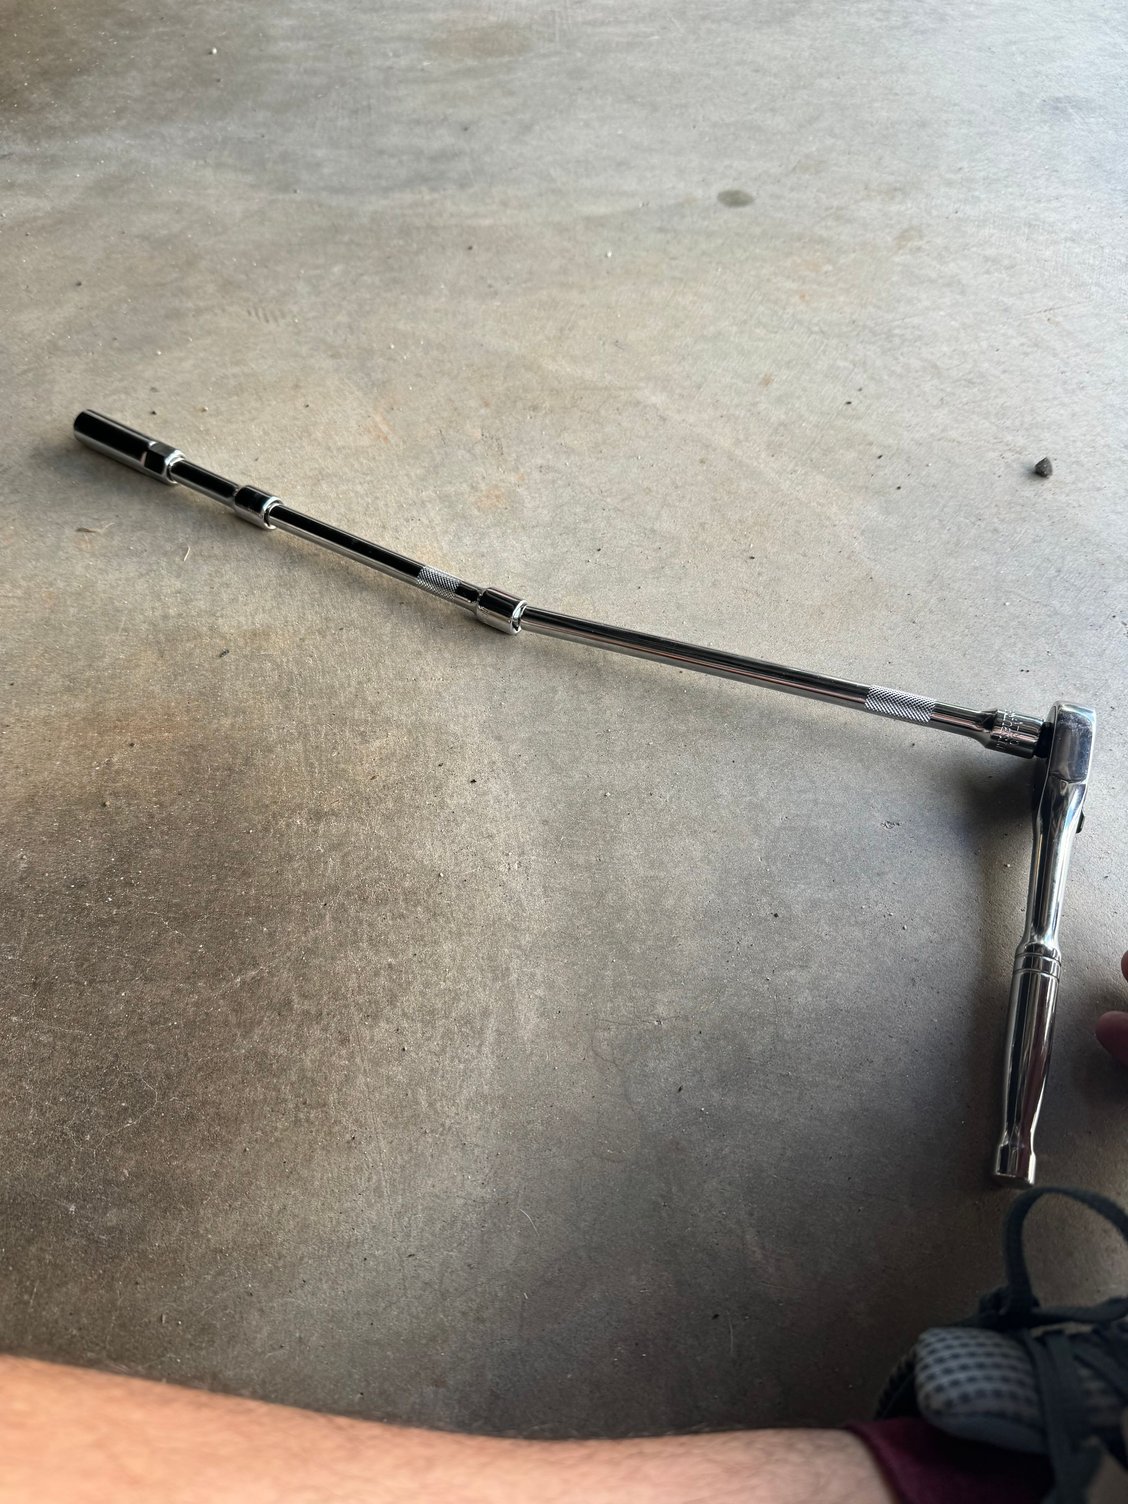
- Your T30 will need to be very stubby. There’s perhaps 1” of space behind one of the ignition coil bolts that you’ll need to remove and reinstall. I used an allen key style L-shaped T30 to break it loose, and the ratcheting 1/4” combo wrench to tighten it back into place. There’s not much room to twist between the plumbing in this space either, so the ratcheting end was very helpful.
- I used this spark plug socket, which I noticed after ordering uses a leaf spring retention system inside it. I would not recommend this, at least with my cheap collection of wobbles. I had a couple of scares after tightening the plug where one or more components of my silly daisy chain of extensions came loose before the socket released the plug. After those, I took out some frustration by clobbering the springs with an extension to loosen them up, and made sure to rub some of the dielectric grease all the way down the ceramic part of the spark plug. Lesson learned.
- I don’t have official torque specs for any of these things, but found some reasonable numbers by looking at the 991.2 and other vehicles. If you have the official torque specs, please PM me with the source and I’ll update accordingly!
Once you’ve got the car in the air and rear wheels removed, the high level procedure is as follows:
Remove rear wheel arch covers
Remove turbo inlets
Remove ignition coil packs
Remove and replace spark plugs
Reverse to reinstall.
With apologies to the color blind among you, I have color coded my markups on the photos below using this key:
- E10: Cyan
- 7mm: Yellow
- 10mm: Purple
- T25: Orange
- T30: Blue
Let’s get started!
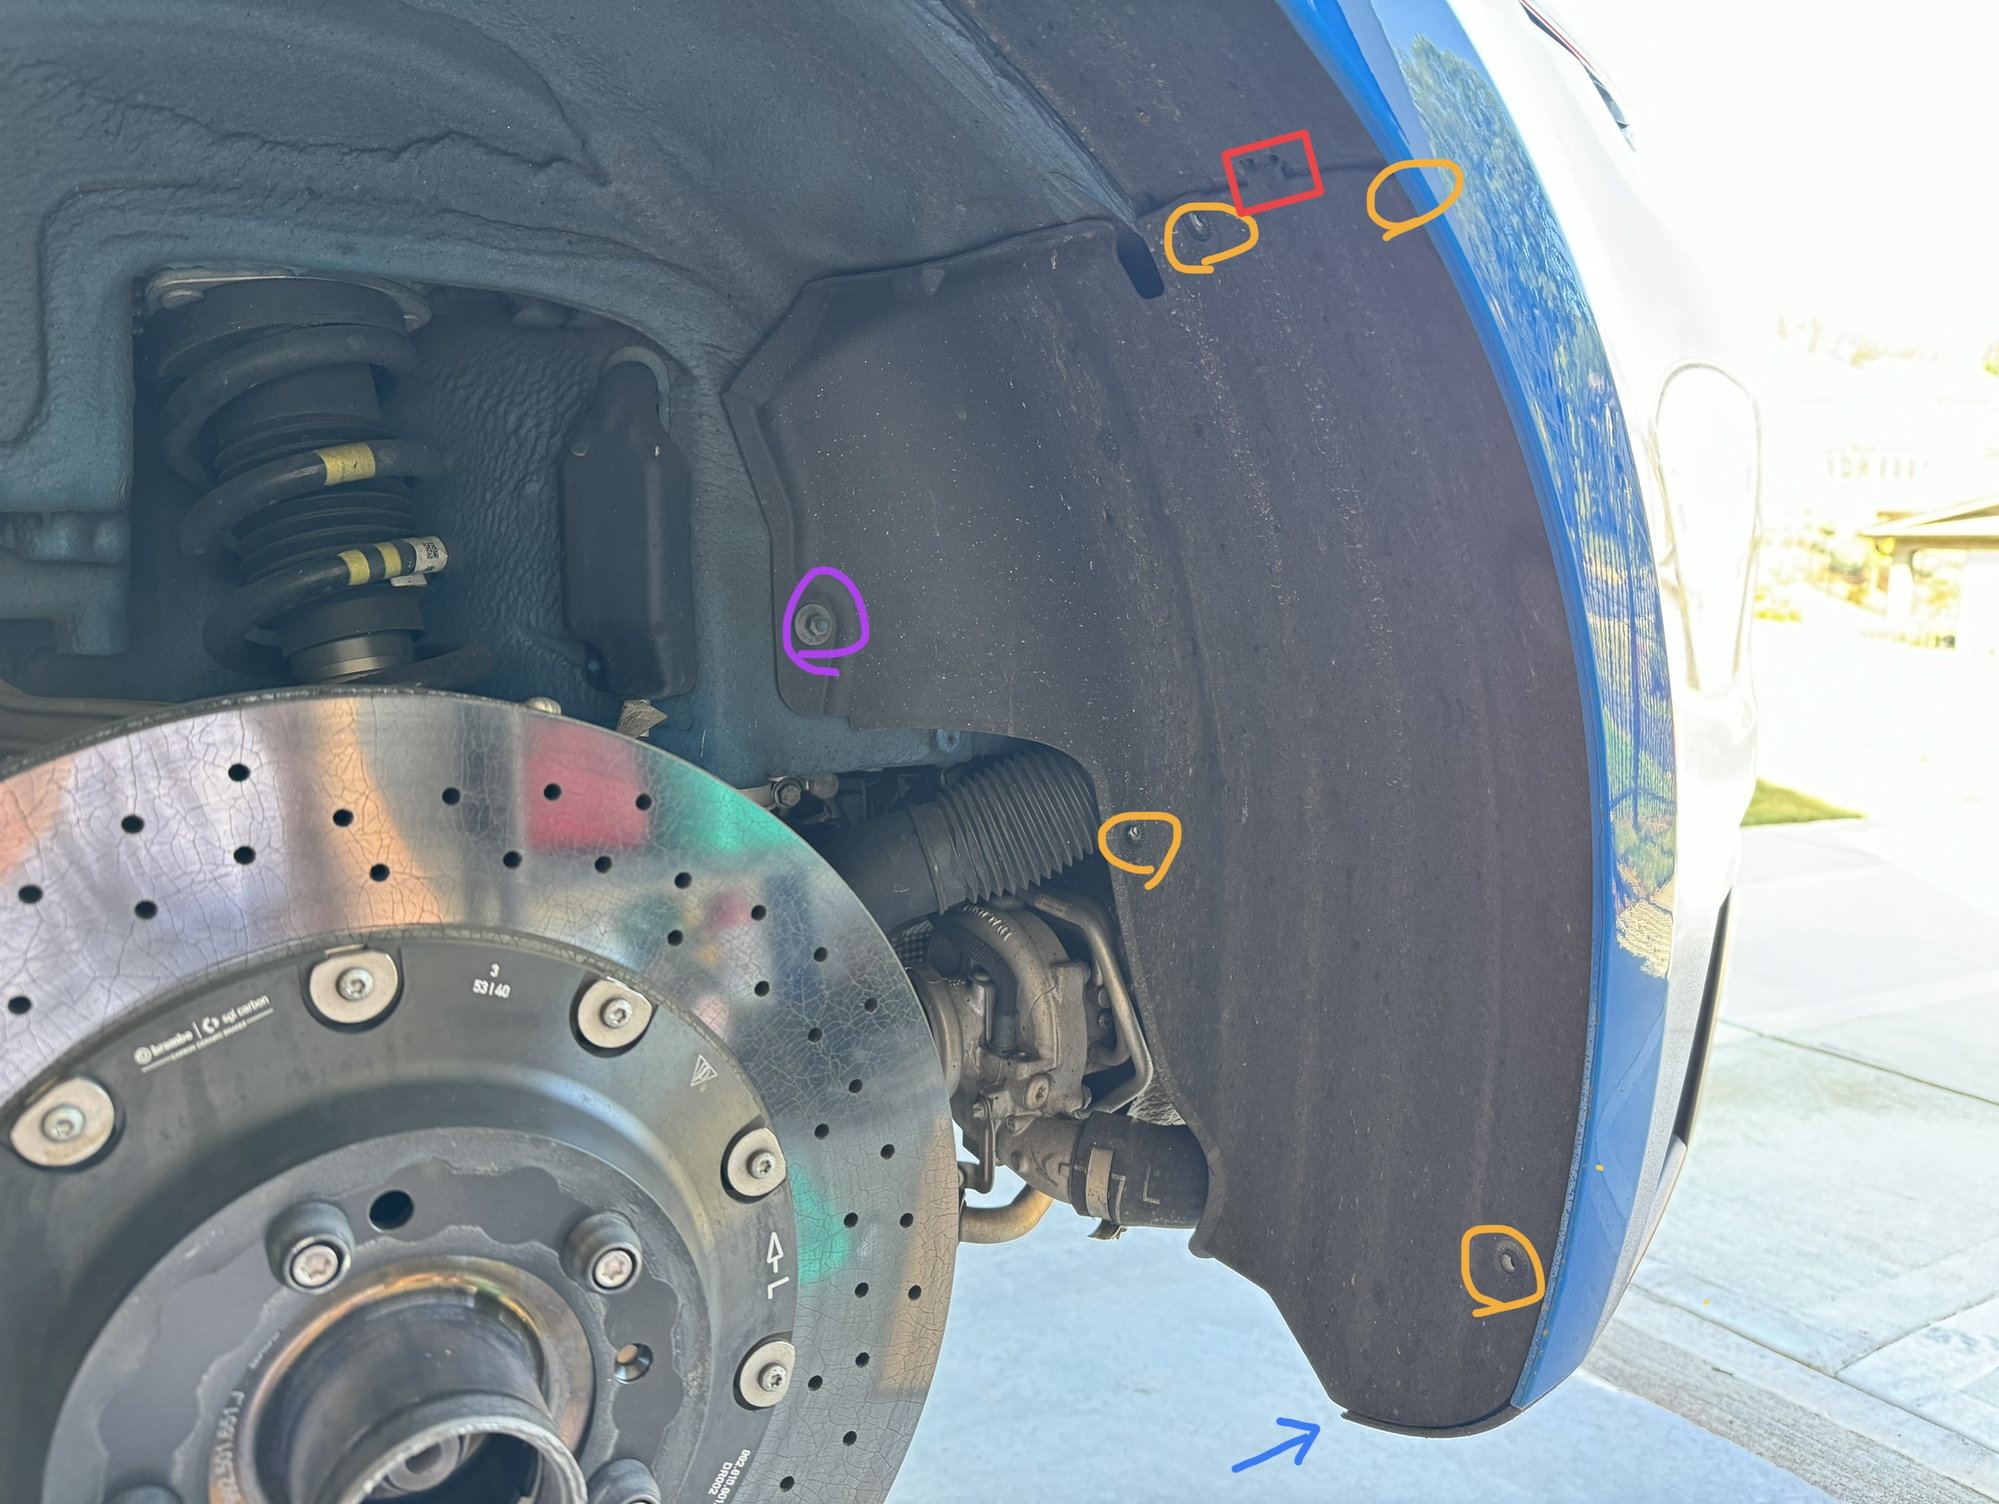
Step 1: Remove the wheel arch cover.
There are four T25 screws, a T30 screw at the bottom, and the 10mm nut on the left. Take care not to damage the tab at the top (see the red square) when pulling off the cover. A. Driver’s side wheel arch cover. The passenger side is symmetrically identical.
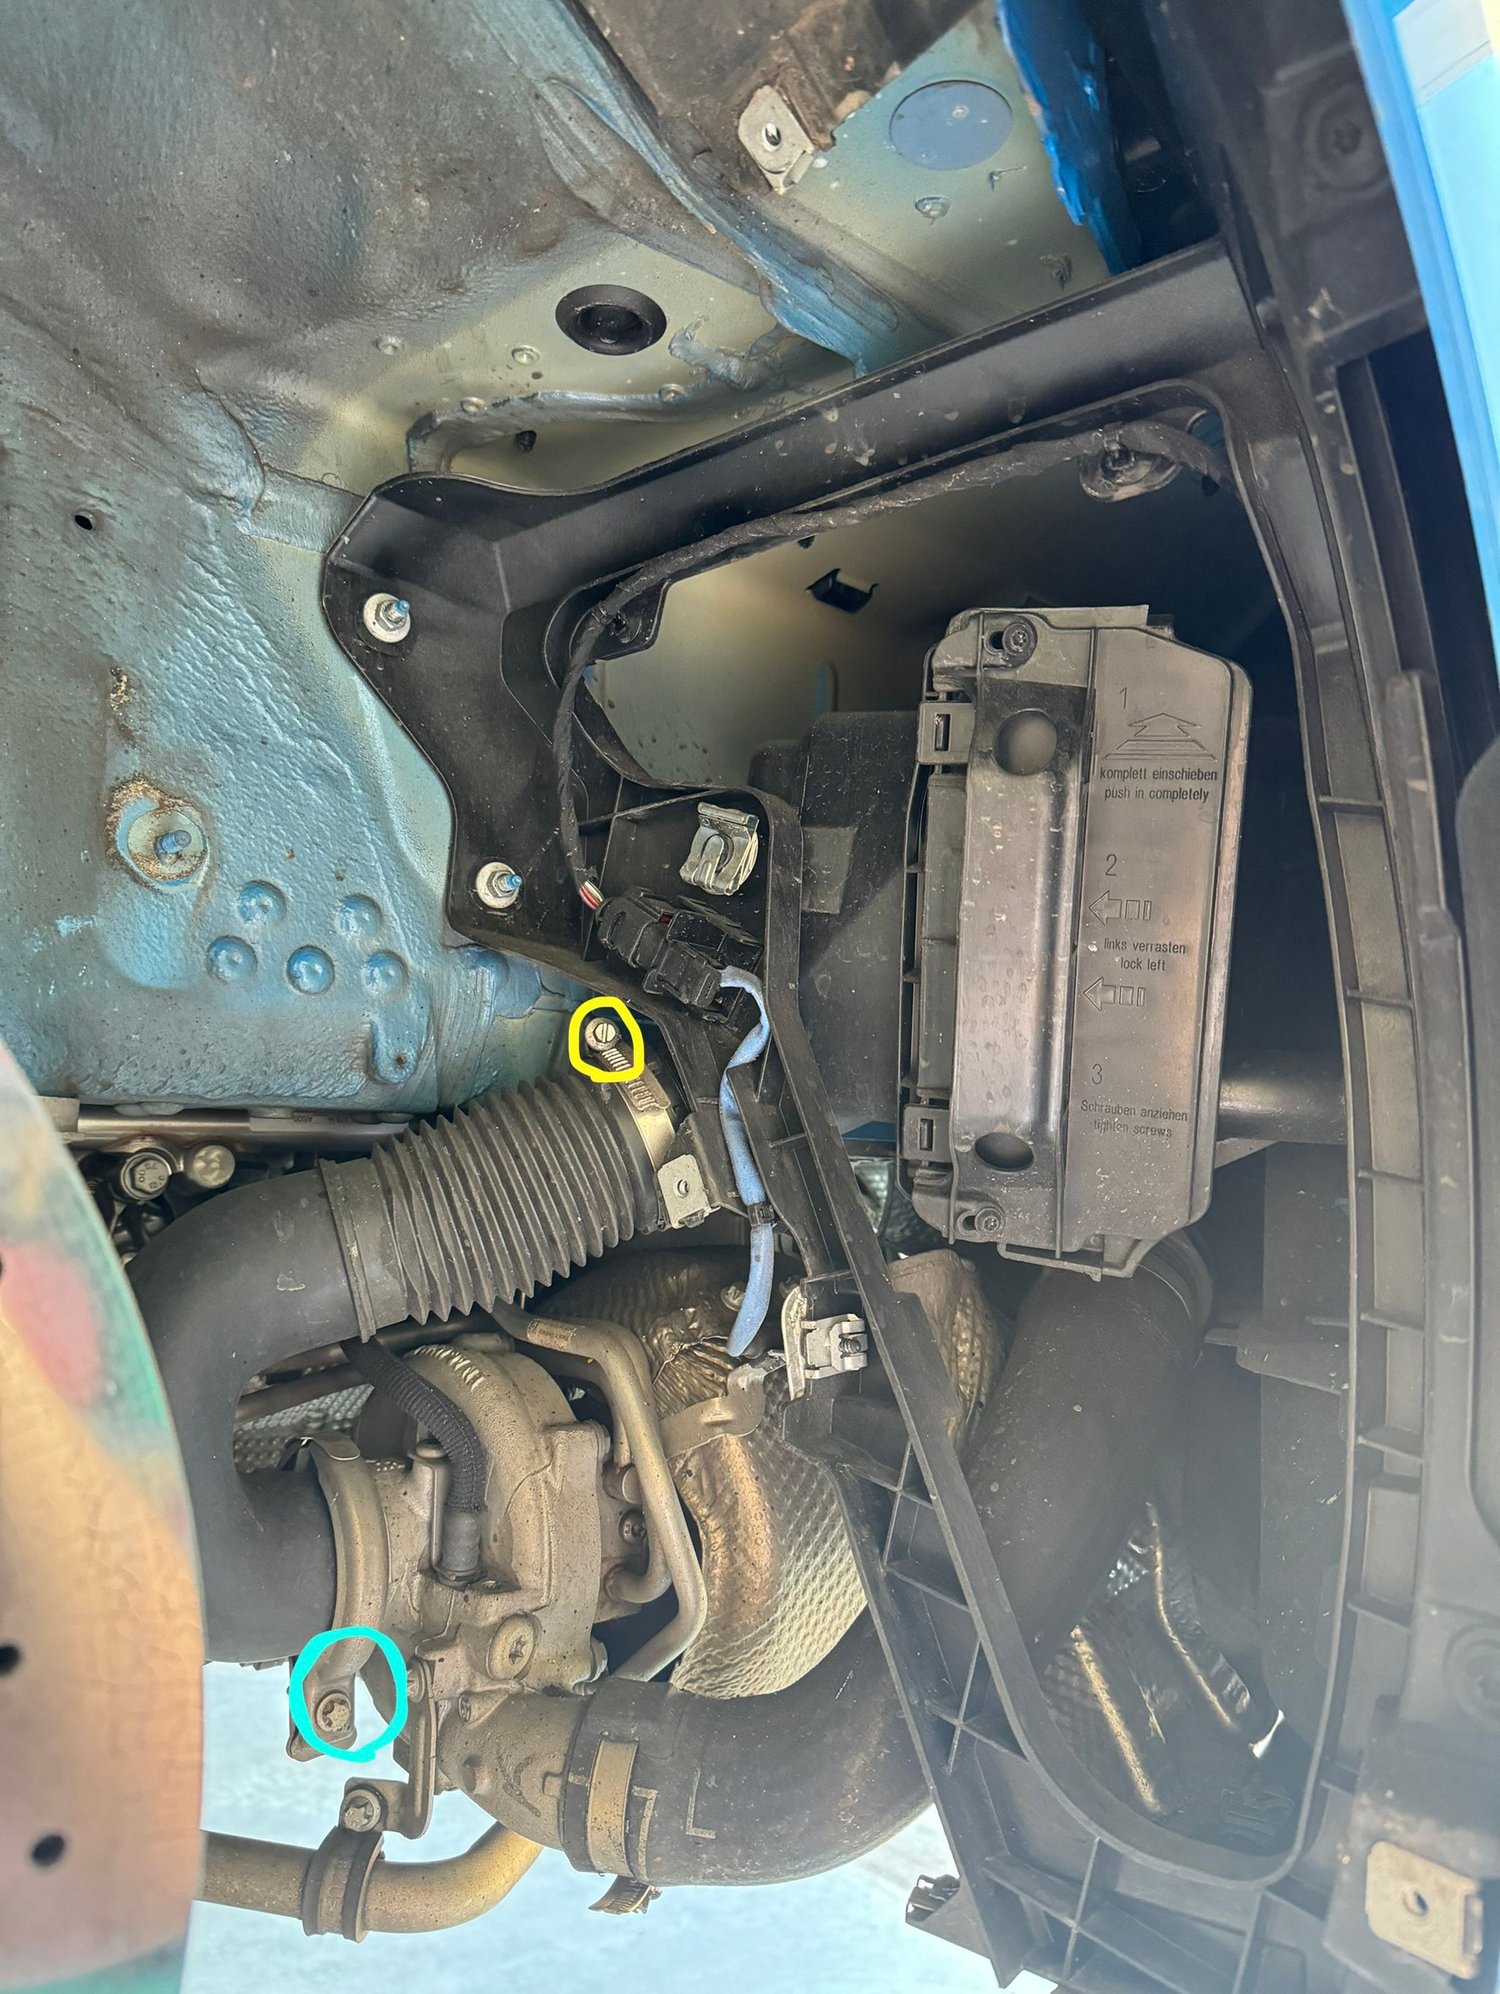
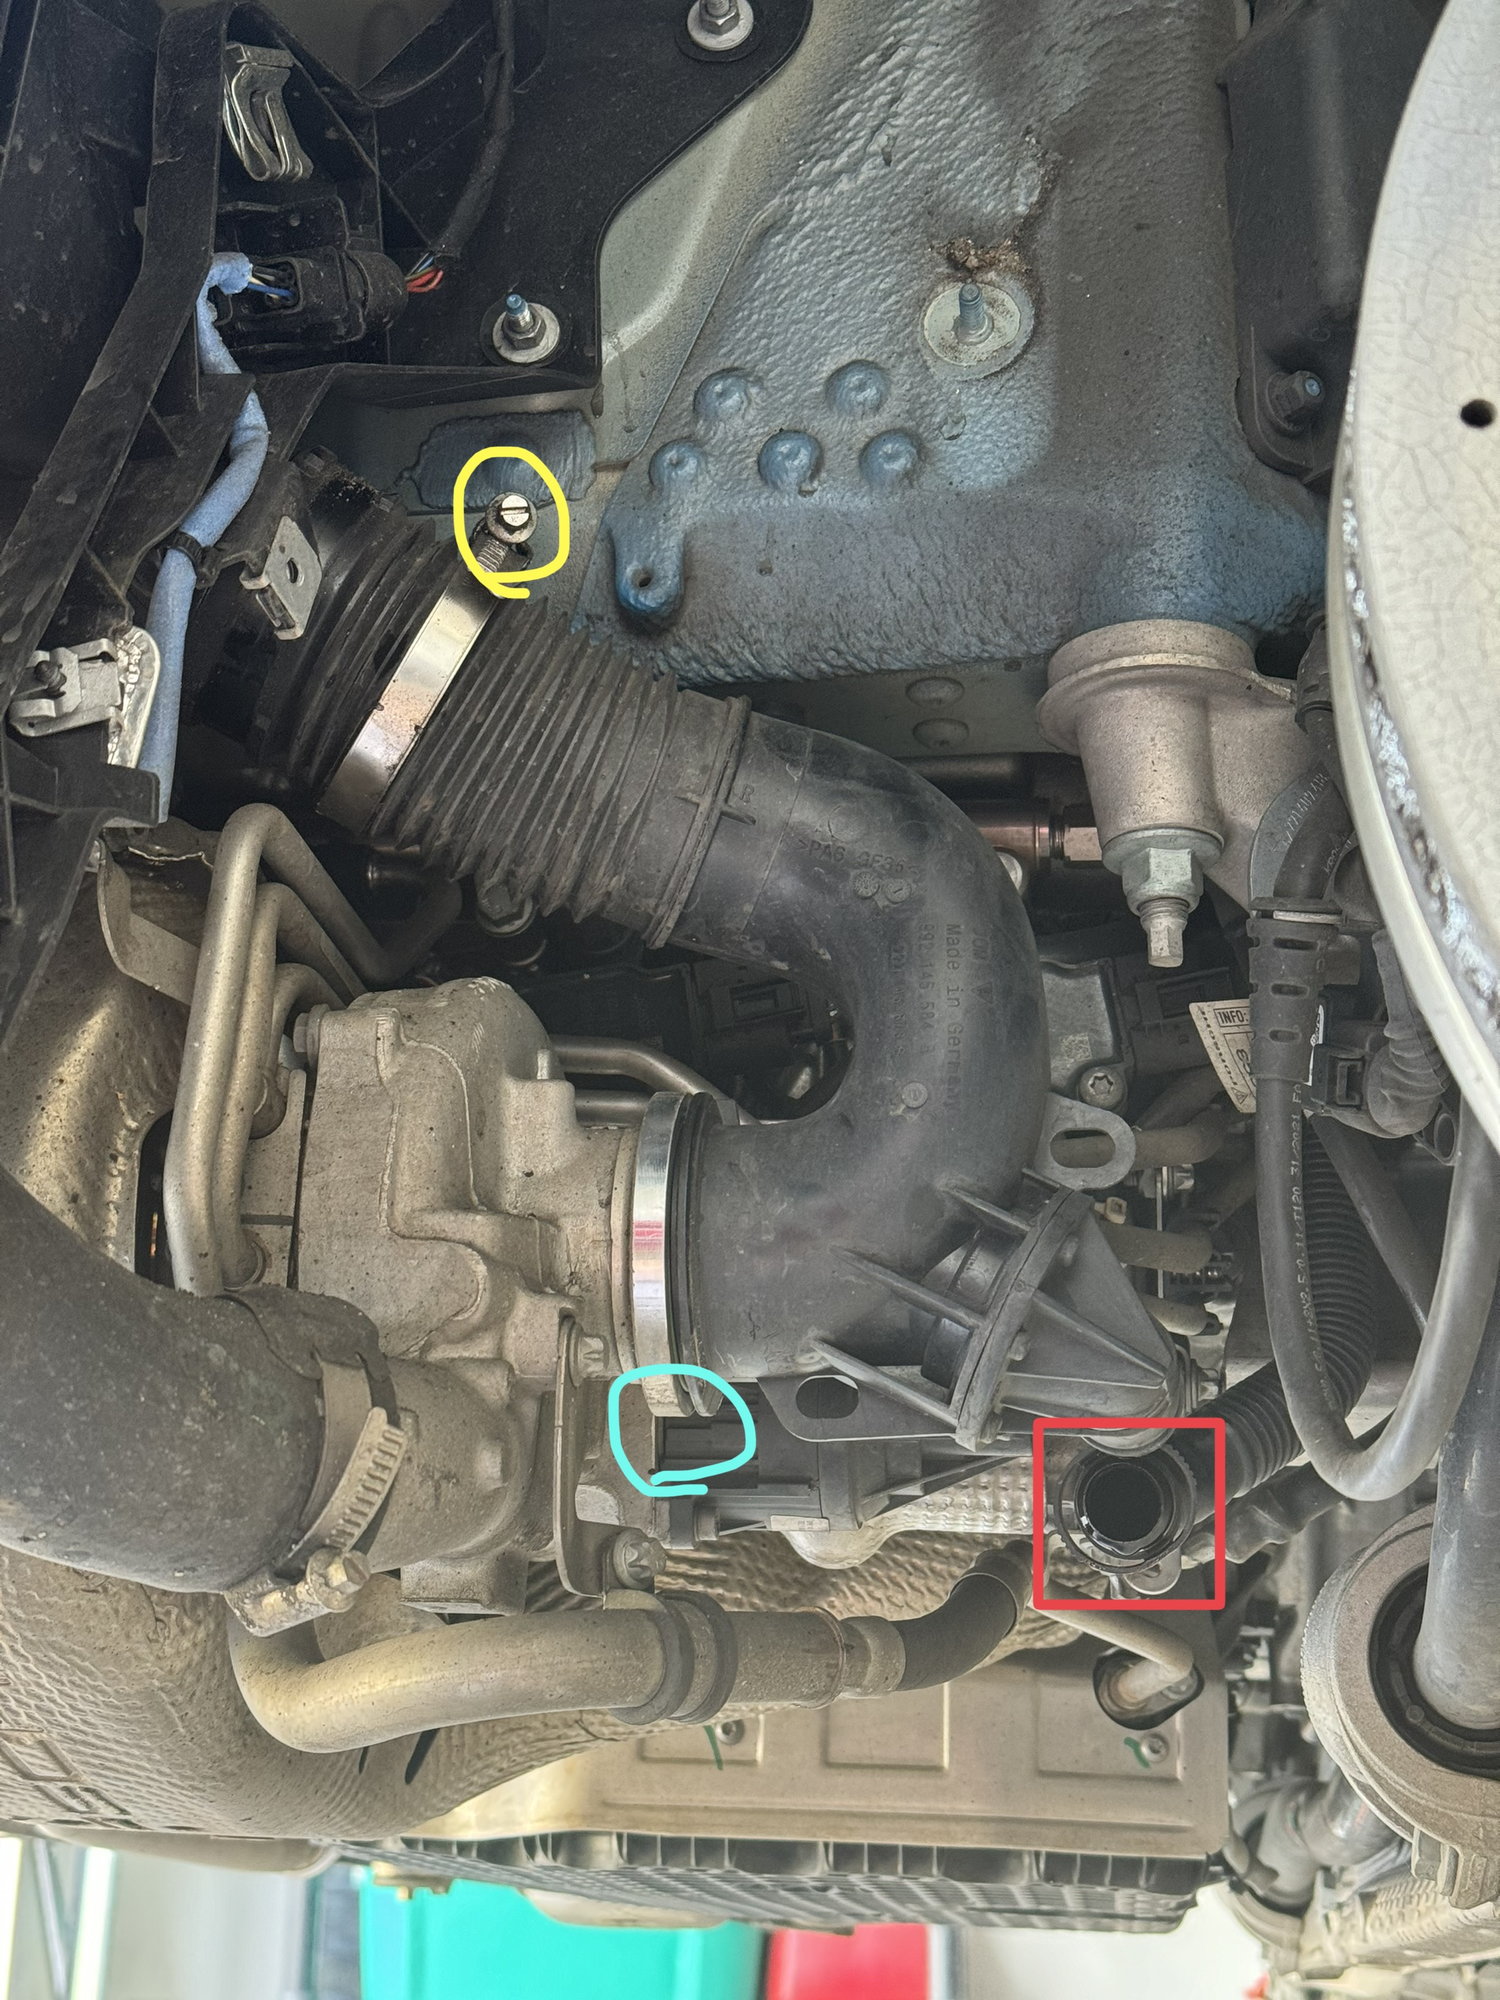
Step 2: Remove the turbo inlets.
There’s a hose clamp at the top near the airbox which you’ll loosen using a flathead or 7mm socket, and a V-clamp at the bottom connecting to the turbo that is fastened with an E10 bolt. At the top the inlet fits over the airbox exit tube, and you’ll need to do some twisting and wiggling while tugging it free.
On the passenger side, there’s an additional hose (red square) running to the top of the motor that connects to the inlet. Simply squeeze the clip on the sides and tug to release this hose. Mine had some oil dripping out; I’m told this is normal.
When reinstalling, take care to get the inlet hose all the way onto the airbox exit tube; there will be a raised edge stopping you from going any further. Similarly at the turbo, be sure the inlet is fully seated onto the turbo with no gap whatsoever before placing the V-clamp. You may want to hold these into place while tightening too, just to be safe.
I don’t have a torque spec for either of these fasteners, so I went for the classic German gutenteit (“good and tight!”) spec. I found pretty small numbers (<5 ft-lb) in an APR (I think) installation guide for a carbon fiber airbox/inlet, so I wouldn’t use too much muscle here. It’s plastic, after all. B. Driver’s side turbo inlet. C. Passenger side turbo inlet. I’d already removed the V-clamp on this side before this photo, so just pretend that cyan circle is around that E10 bolt .
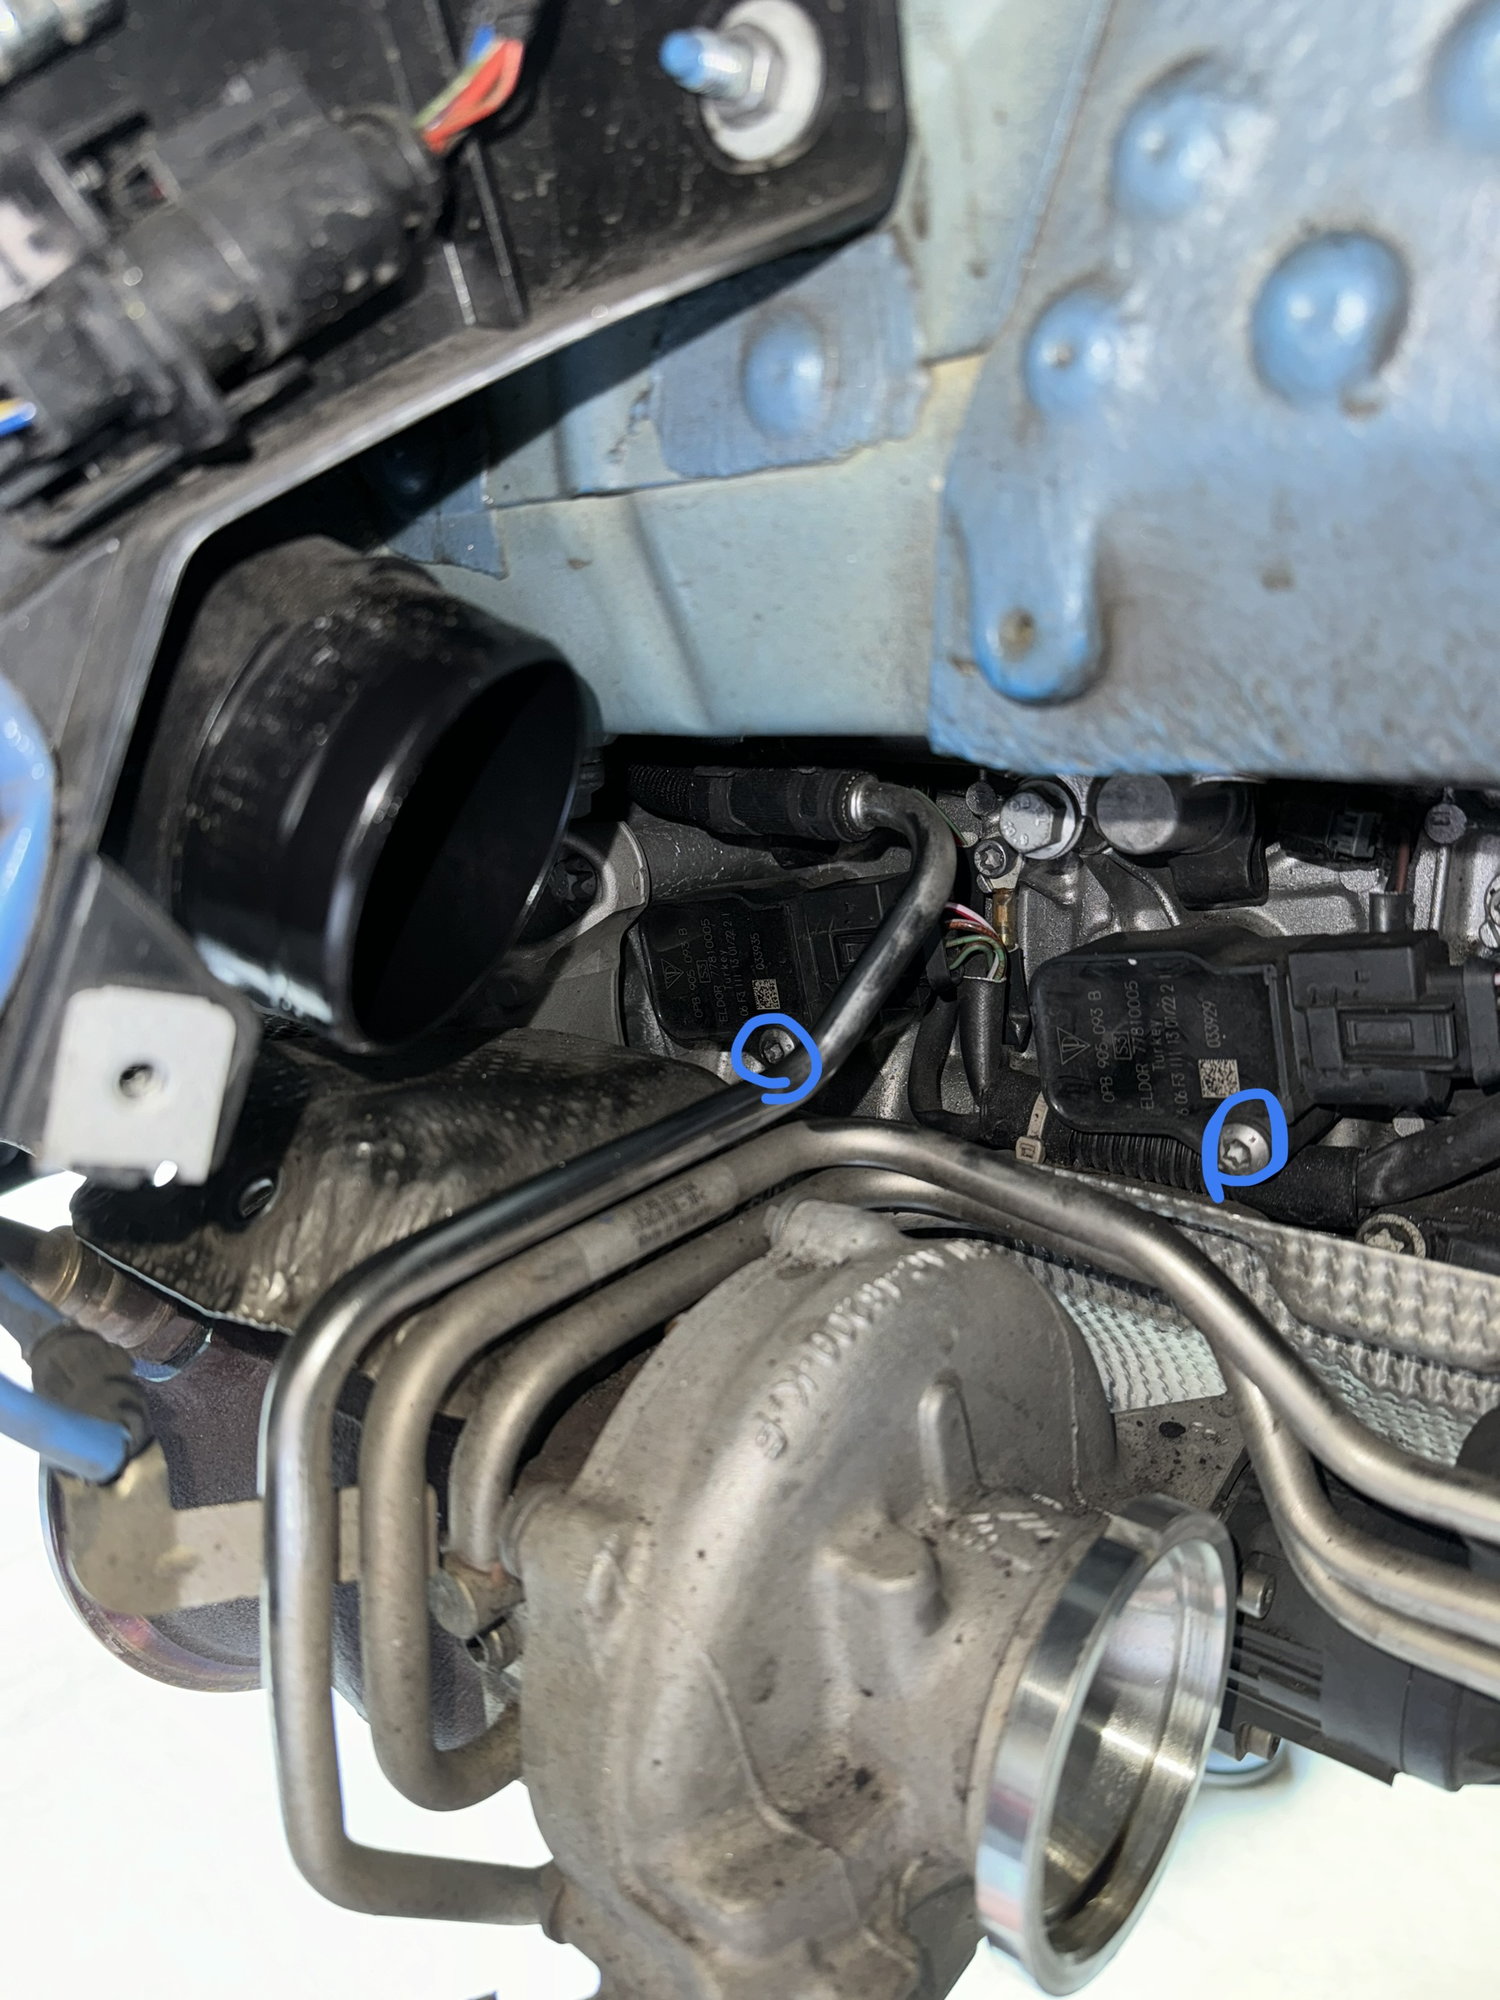
Step 3: Remove ignition coils.
Each ignition coil has a wiring harness clipped in (photo D, red square), and is held in place by a long T30 bolt (blue circles).
Remove the wiring harnesses by pressing in on the tab and pulling, again wiggling the sides back and forth with some elbow grease. There are some tight spaces here, but these harnesses shouldn’t be too difficult to release.
With the harnesses removed, use a T30 to break the mounting bolt loose. Once it’s loose, the bolt should spin easily by hand. The bolt fastens to the engine, but the coils are also threaded, so once you’ve unscrewed the bolt from the engine entirely the bolt should move in and out freely but won’t come out all the way. I recommend leaving the bolts in this state rather than removing them entirely so you don’t have to keep track of them. Once the bolt is loose, the ignition coil is only held in by its suction to the surrounding cylinder head. Twist and tug until it pops free and pull it out to reveal the spark plug.
On the driver’s side, this whole operation is quite easy. On my car there was one wire bundle clipped to the heat shield, circled in green. I used a flathead screwdriver to unclip it, but this seemed suboptimal – if there’s a trick to removing this type of clip, I haven’t found it yet. I also forgot to clip this back into place when reassembling, so I need to get back in there and remedy that. Don’t be like me!
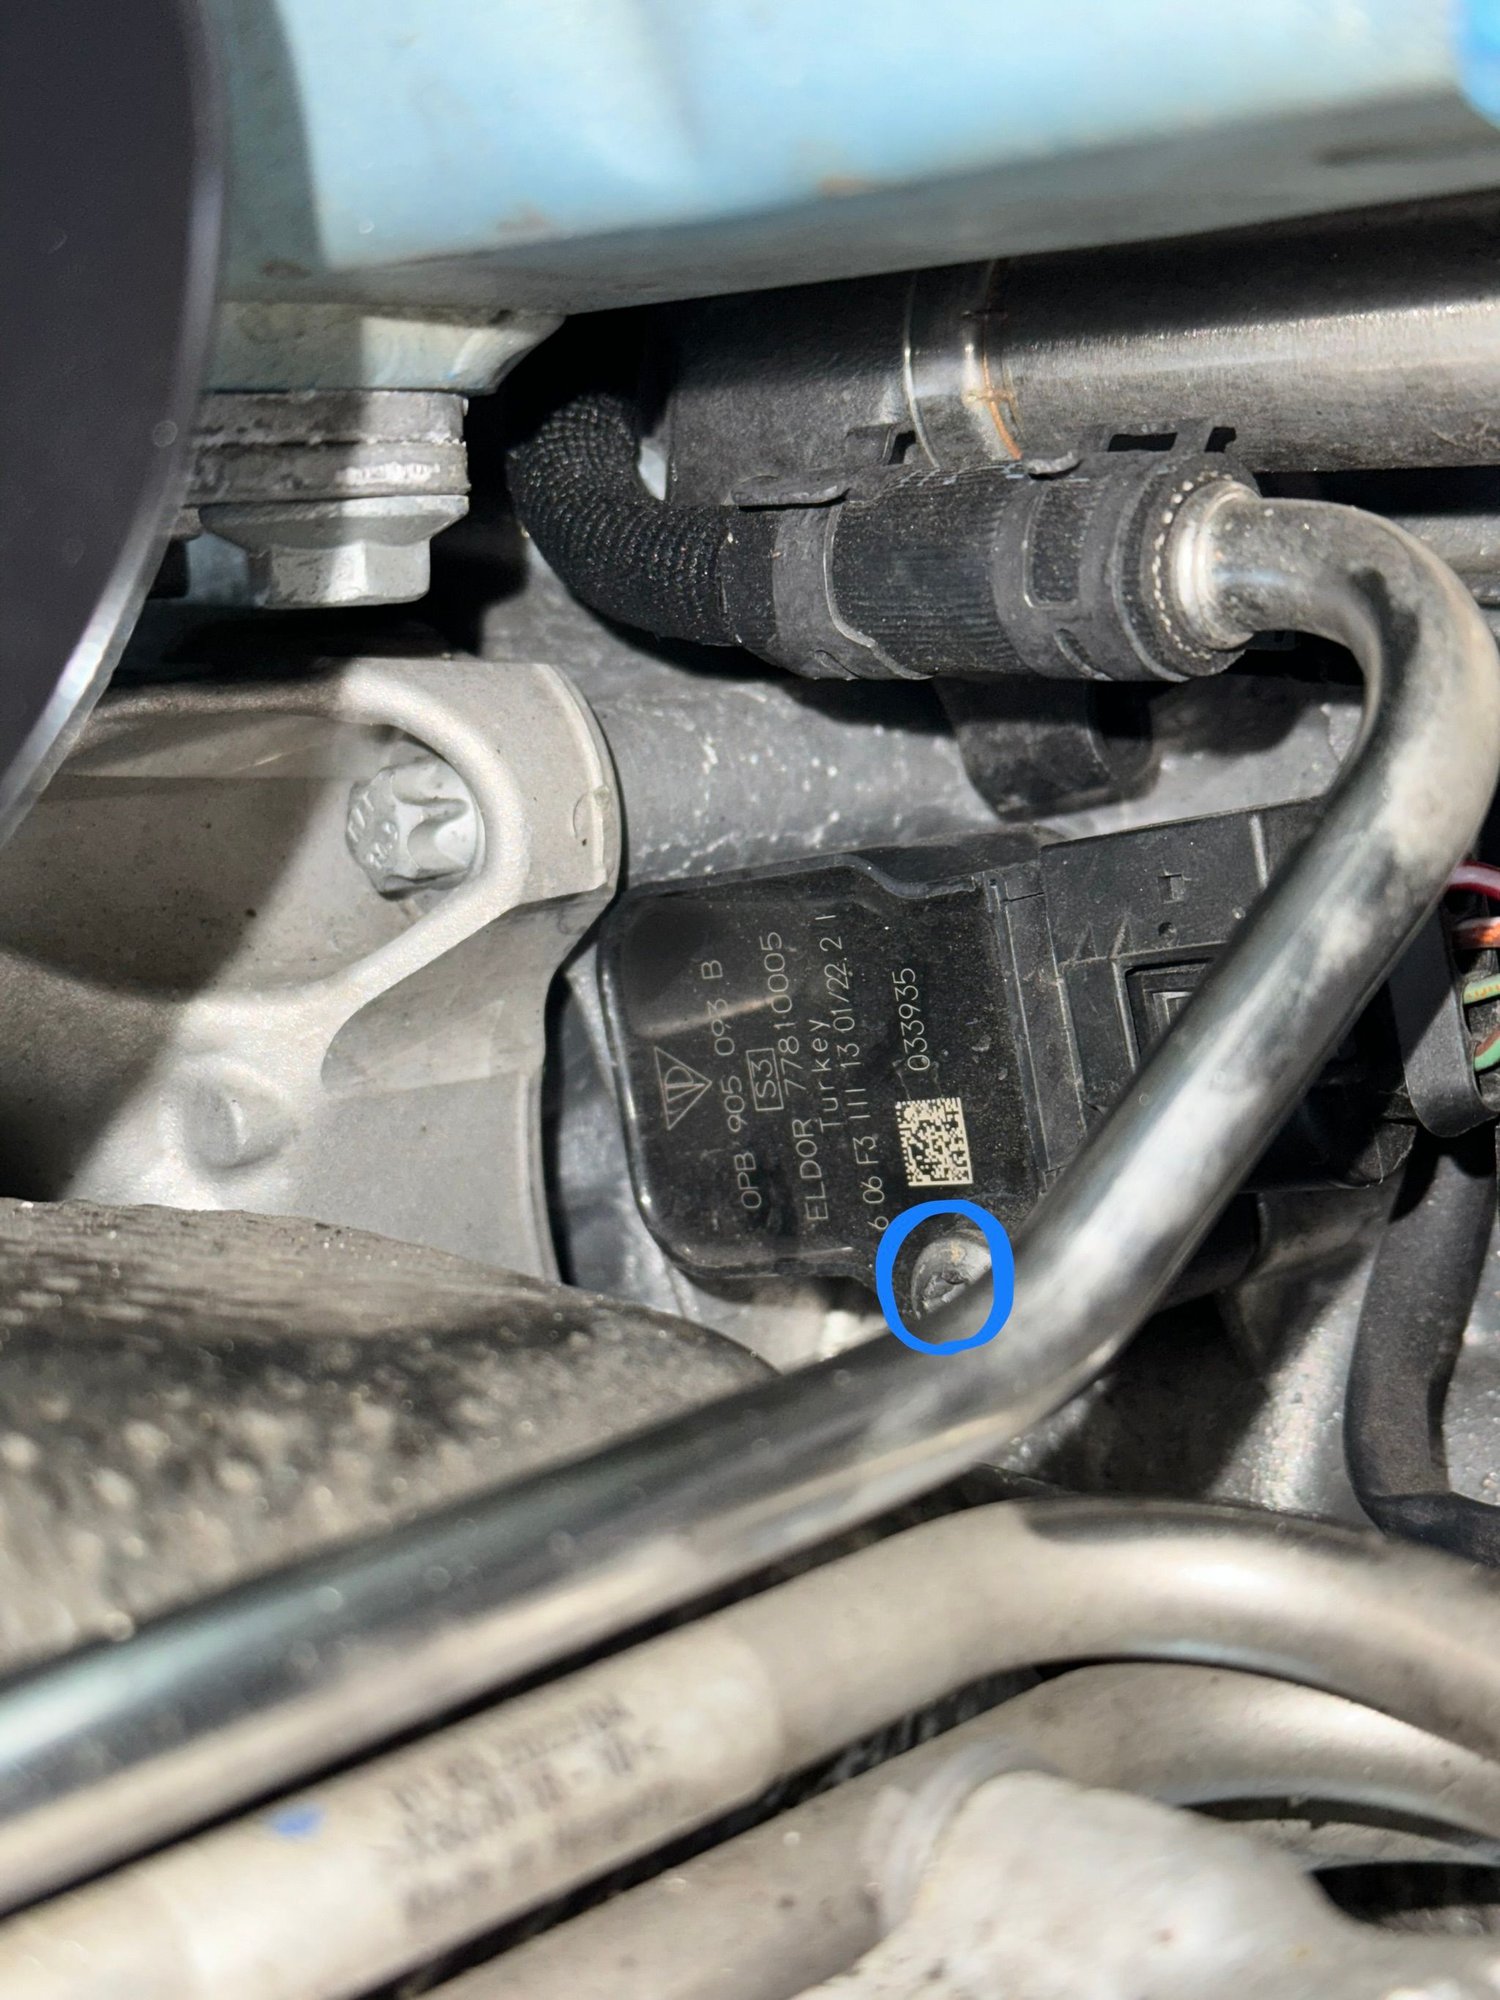
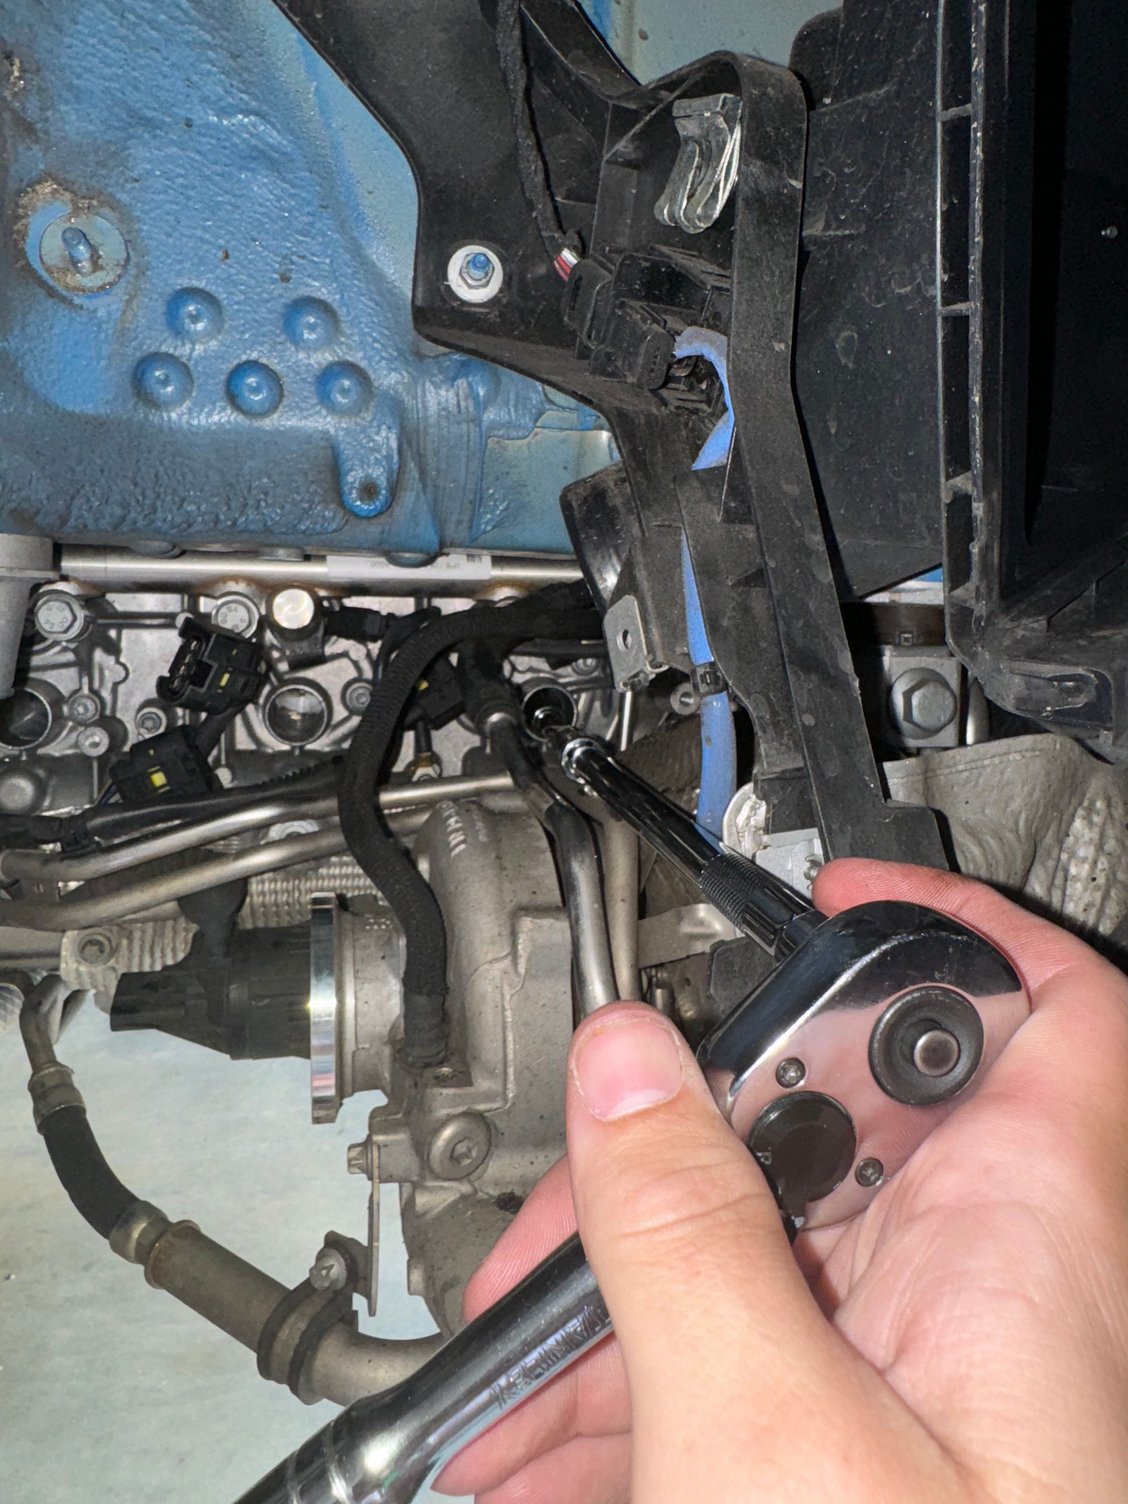
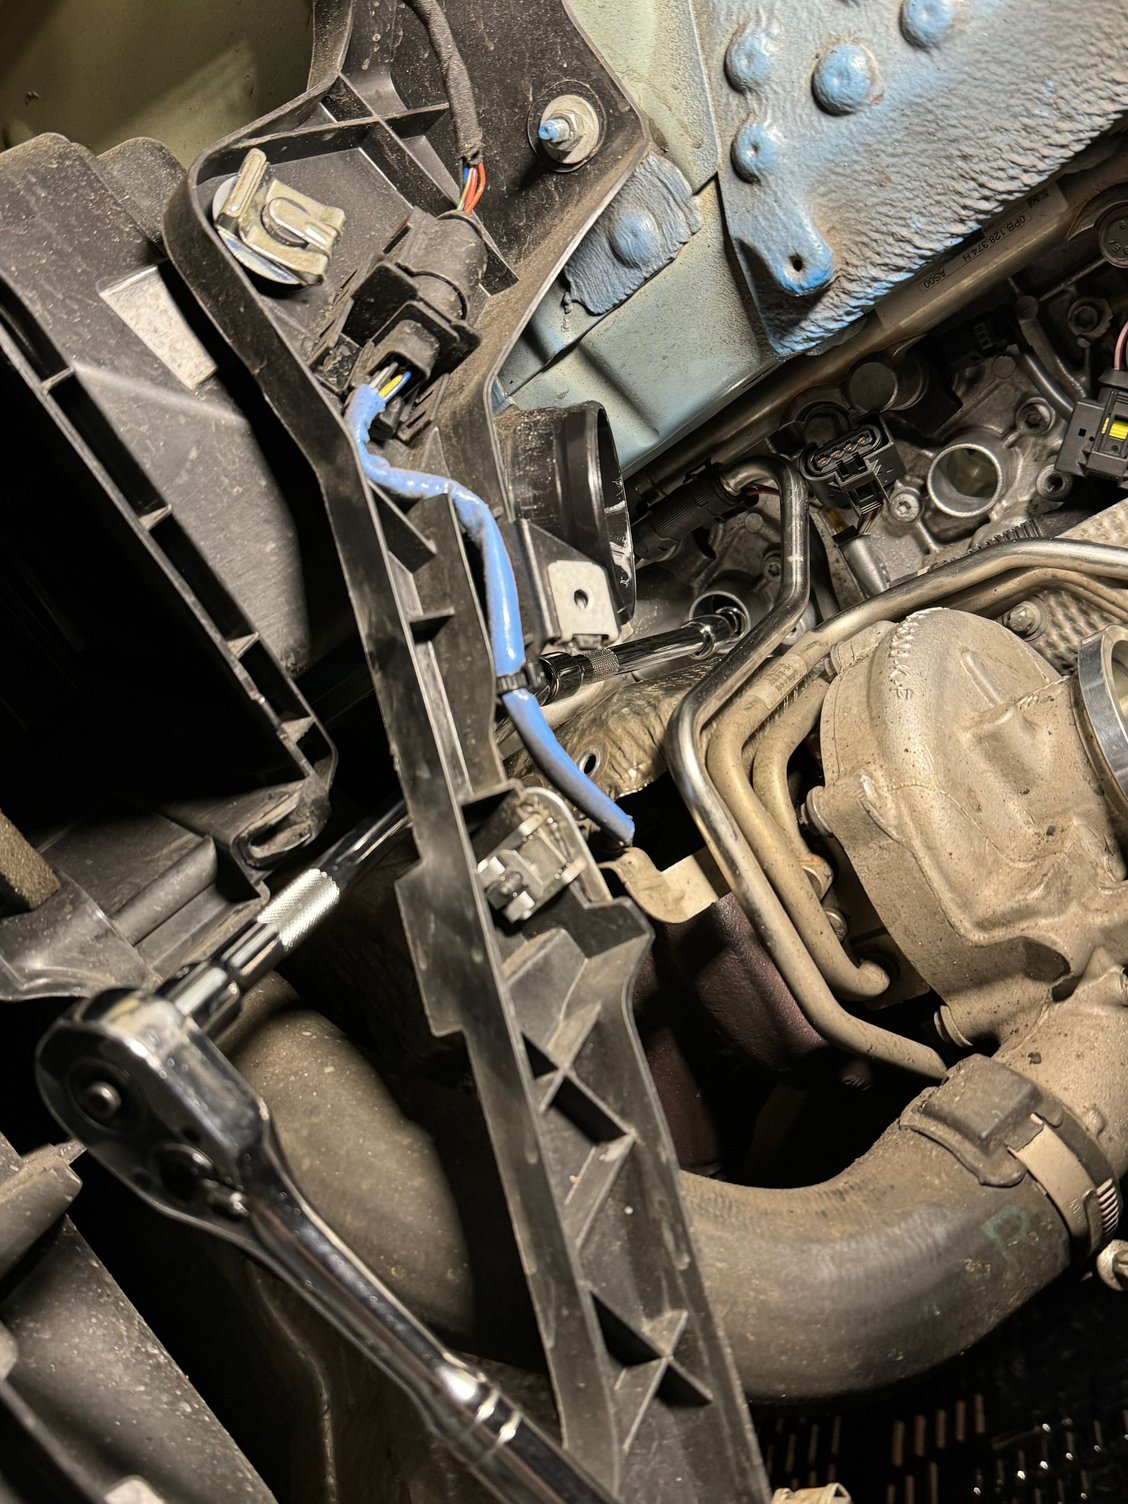
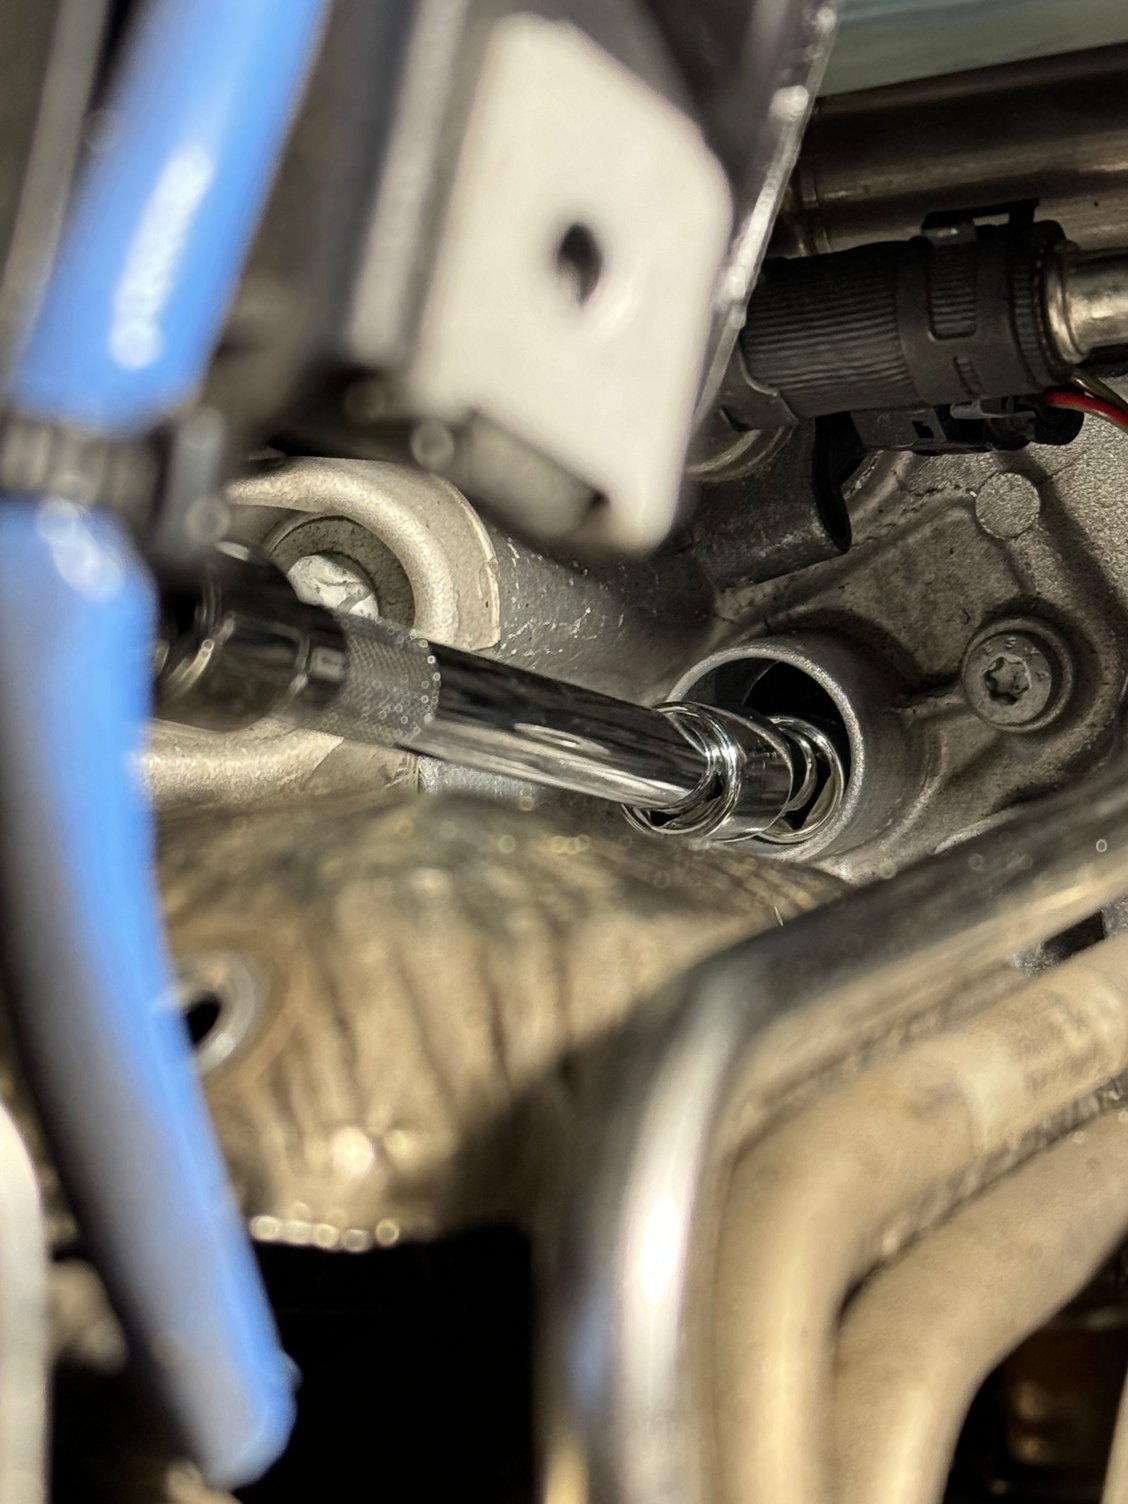
On the passenger side…well, at least two out of the three are easy. I’m pretty sure Satan himself designed the fitment of all the plumbing and heat shielding ahead of the rear-most ignition coil. See the attached video at the bottom (coming soon, when I get to a real computer) to get a good idea of how much space you have: it’s maybe an inch or so, and the angle is such that I don’t see how any wobbles or flexy extensions could help.
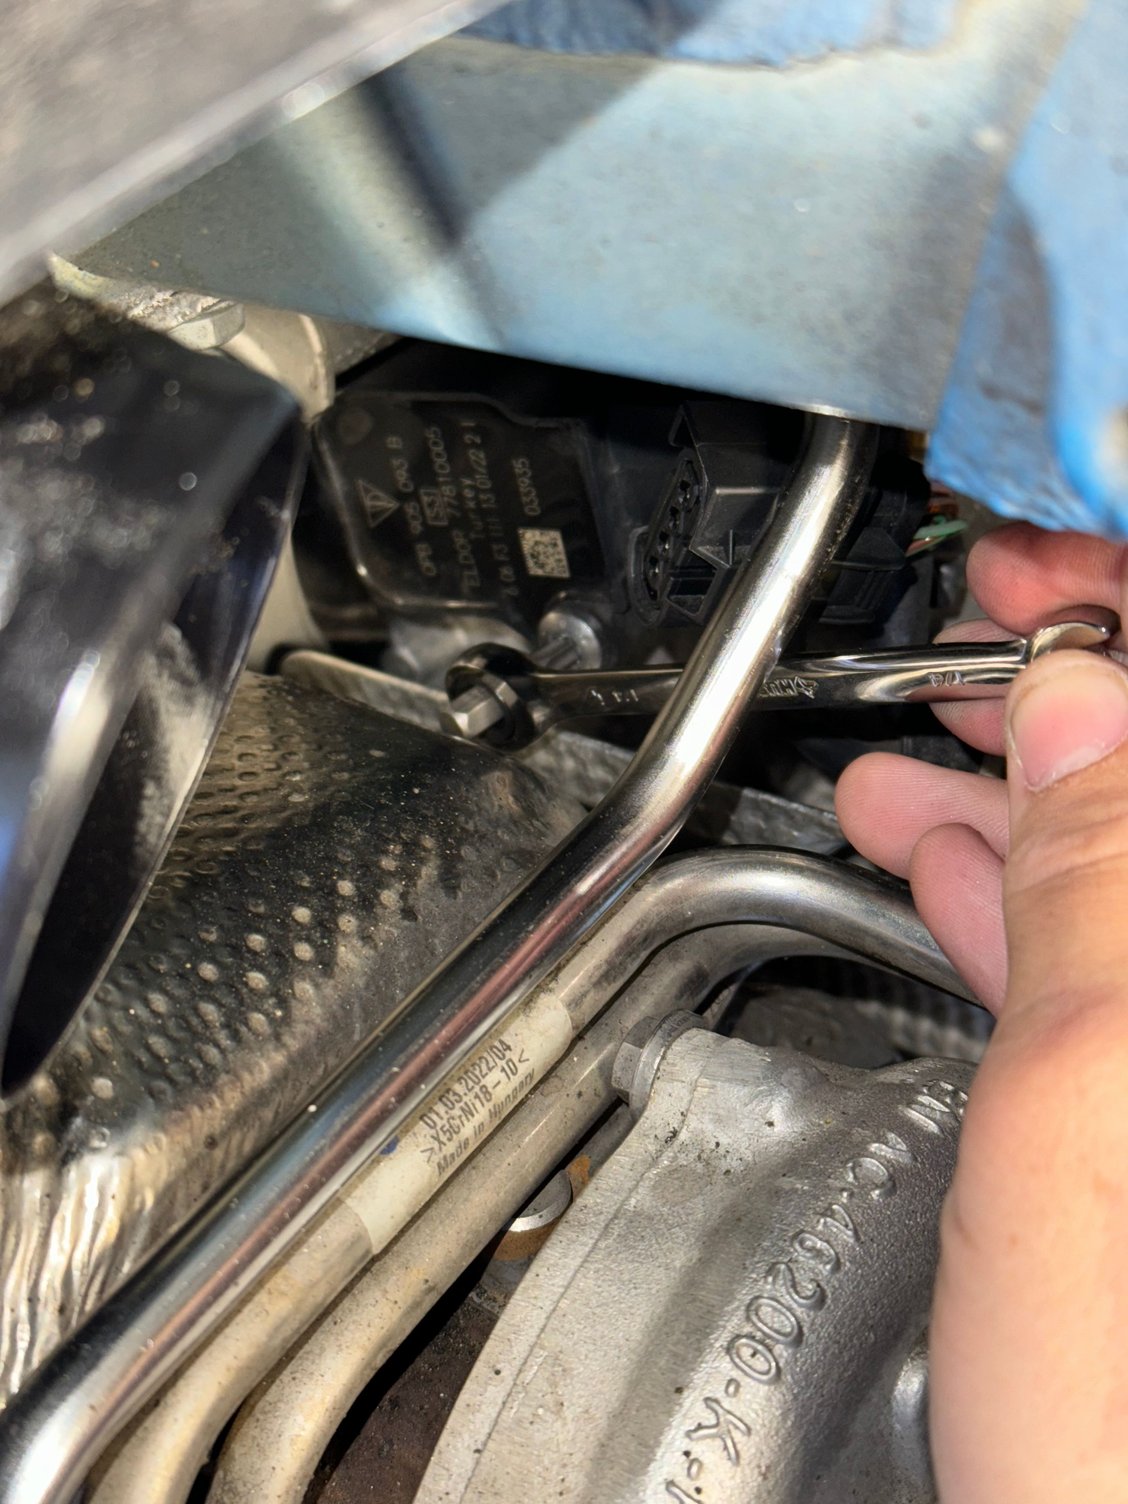
I spent an embarrassing amount of time trying to eliminate the obstacles (and getting sidetracked with other work on the car), but the turbo itself would need to be removed to get the offending heat shield out of the way and that was a bridge too far for me. Finally, I went to the store and picked up an L-shaped Torx set (like allen keys). With the right tool in hand, it still took another 10 minutes to get this bolt loose because there is such limited space for hands and for rotation.
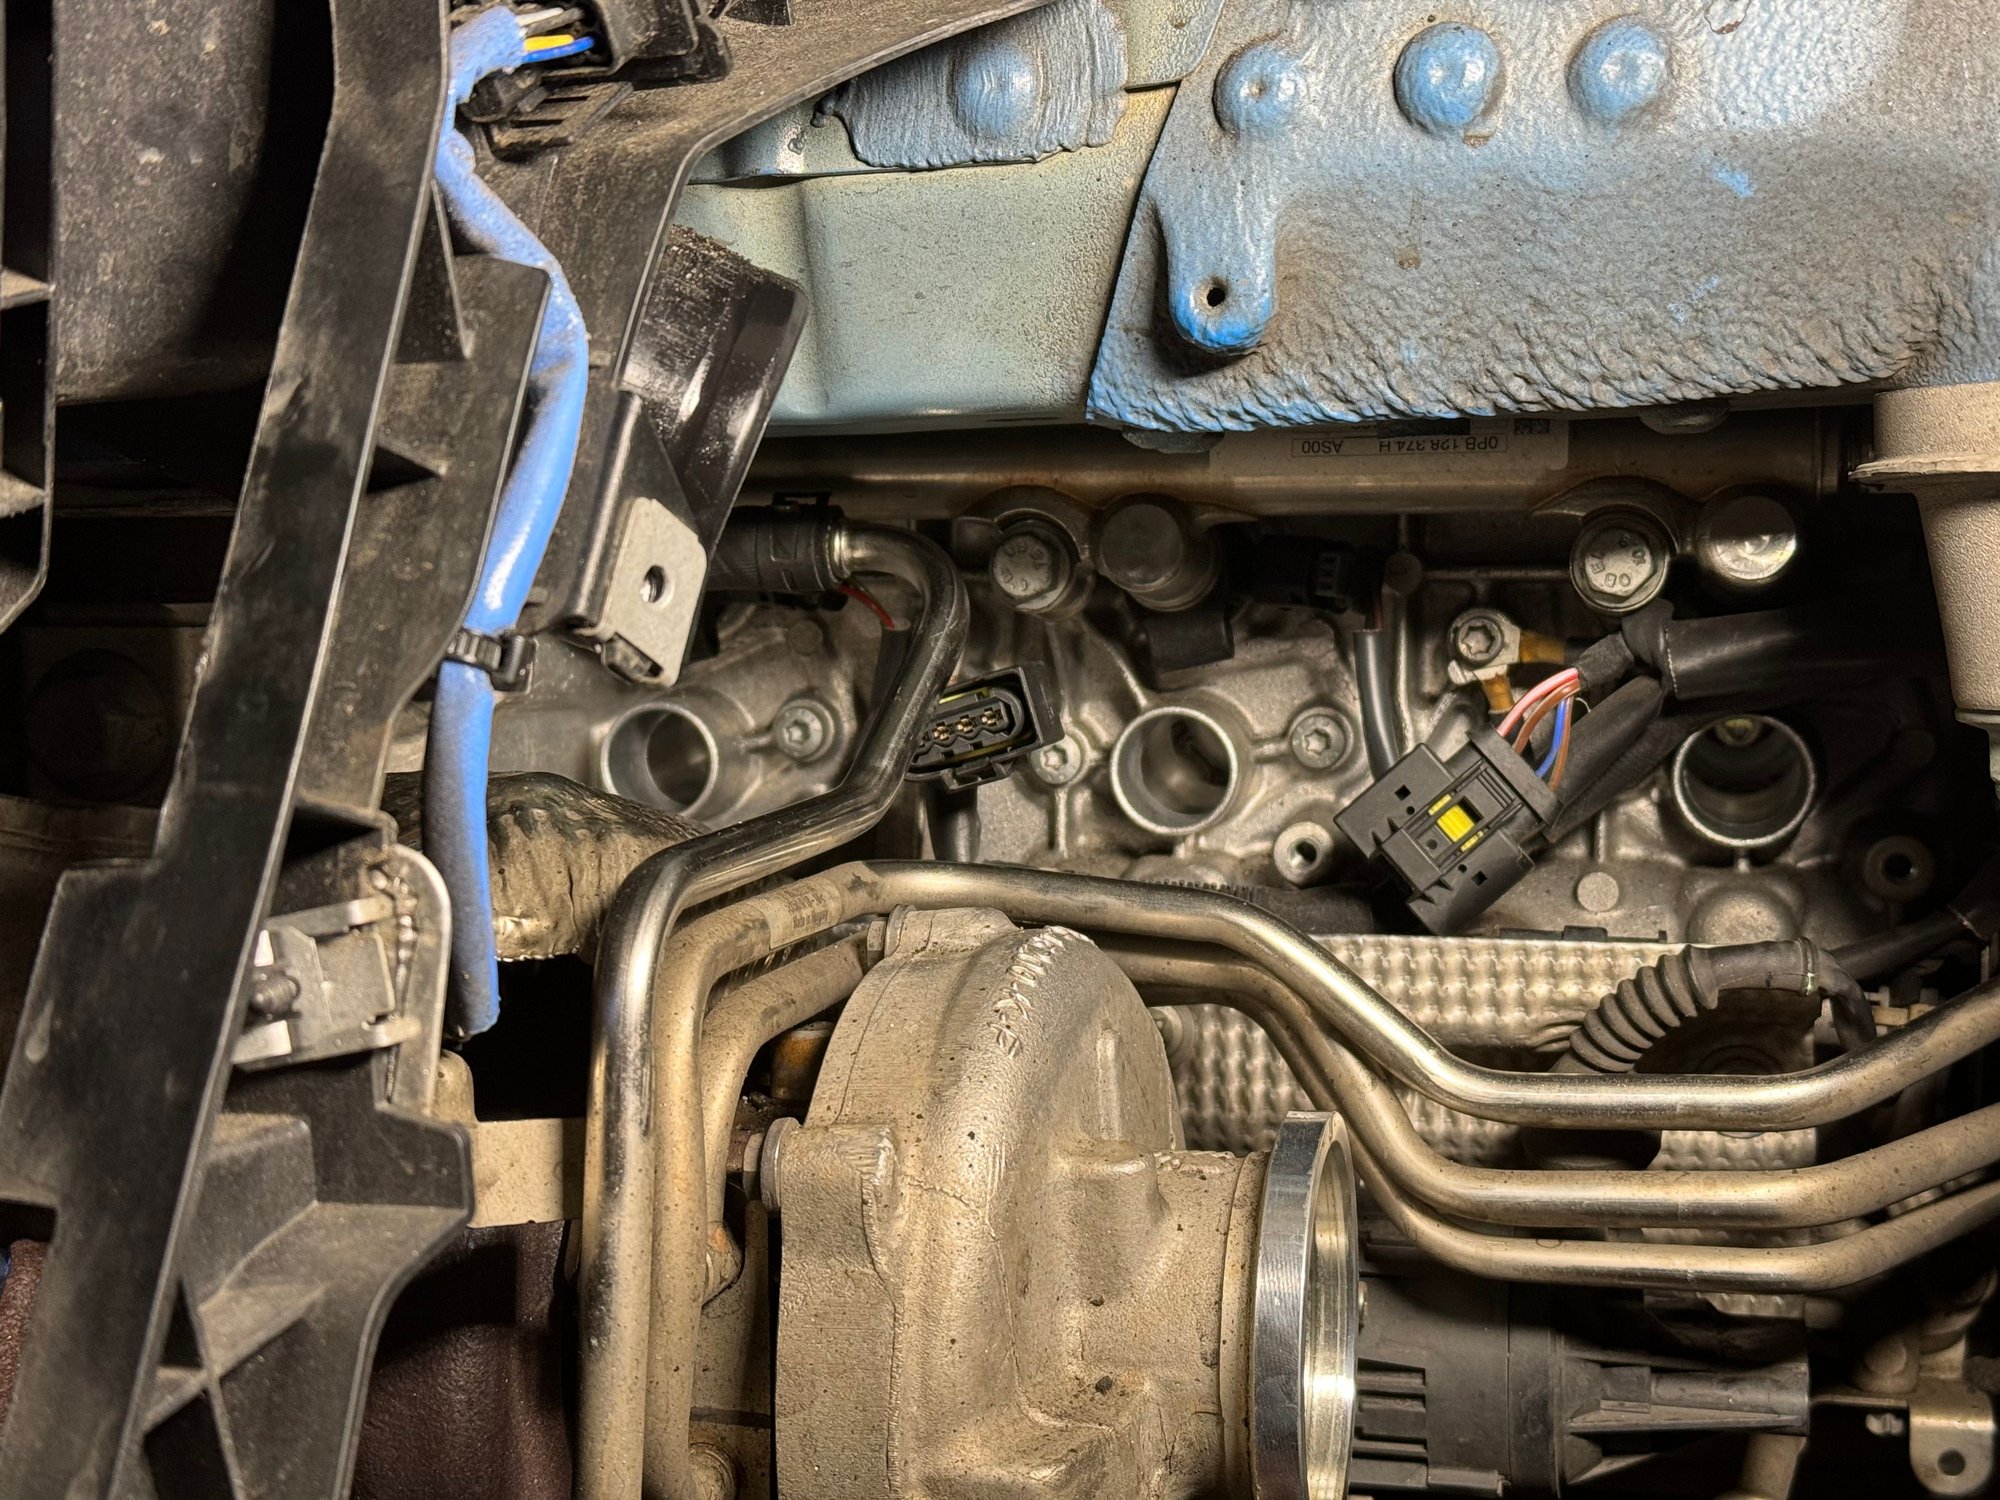
When reinstalling, I spread a dab of dielectric grease around the rim of the coil tip before inserting the coil. (Watch a youtube video if you’re having trouble picturing this). Push and twist until the coil is fully seated and the bolt aligns with its hole, then use your fingers to thread the bolt until it is finger tight. Again, I don’t have a torque spec for this bolt, but on other cars I’ve seen specs in the ~18-24 ft-lb range. Tighten to your heart’s content with a T25. D. Driver’s side. I’d already removed the coils when I took this photo, but I need to go back in to re-clip that wire so I may update this guide with a better picture. E. Passenger side, rear two coils. For the left coil, note the limited space between the plumbing (vacuum lines?) and limited vertical space above the leftmost coil. There’s just not much room to spin any kind of ratchet or wrench here. F. Passenger side, rear coil. This is surely Satan’s ignition coil placement. The short side of an L-shaped T30 wrench (like an allen key), or a 1/4” ratcheting combo wrench with a T30 bit, should make this possible but still not easy. G. The ratcheting combo wrench approach was useful when my L-shaped wrench couldn’t seat onto the bolt due to the limited rotational space. There wasn’t even enough room there for my T30 drill bit to fall out, provided I kept it at least somewhat level!. H. Passenger side cylinder heads with all the coils removed.
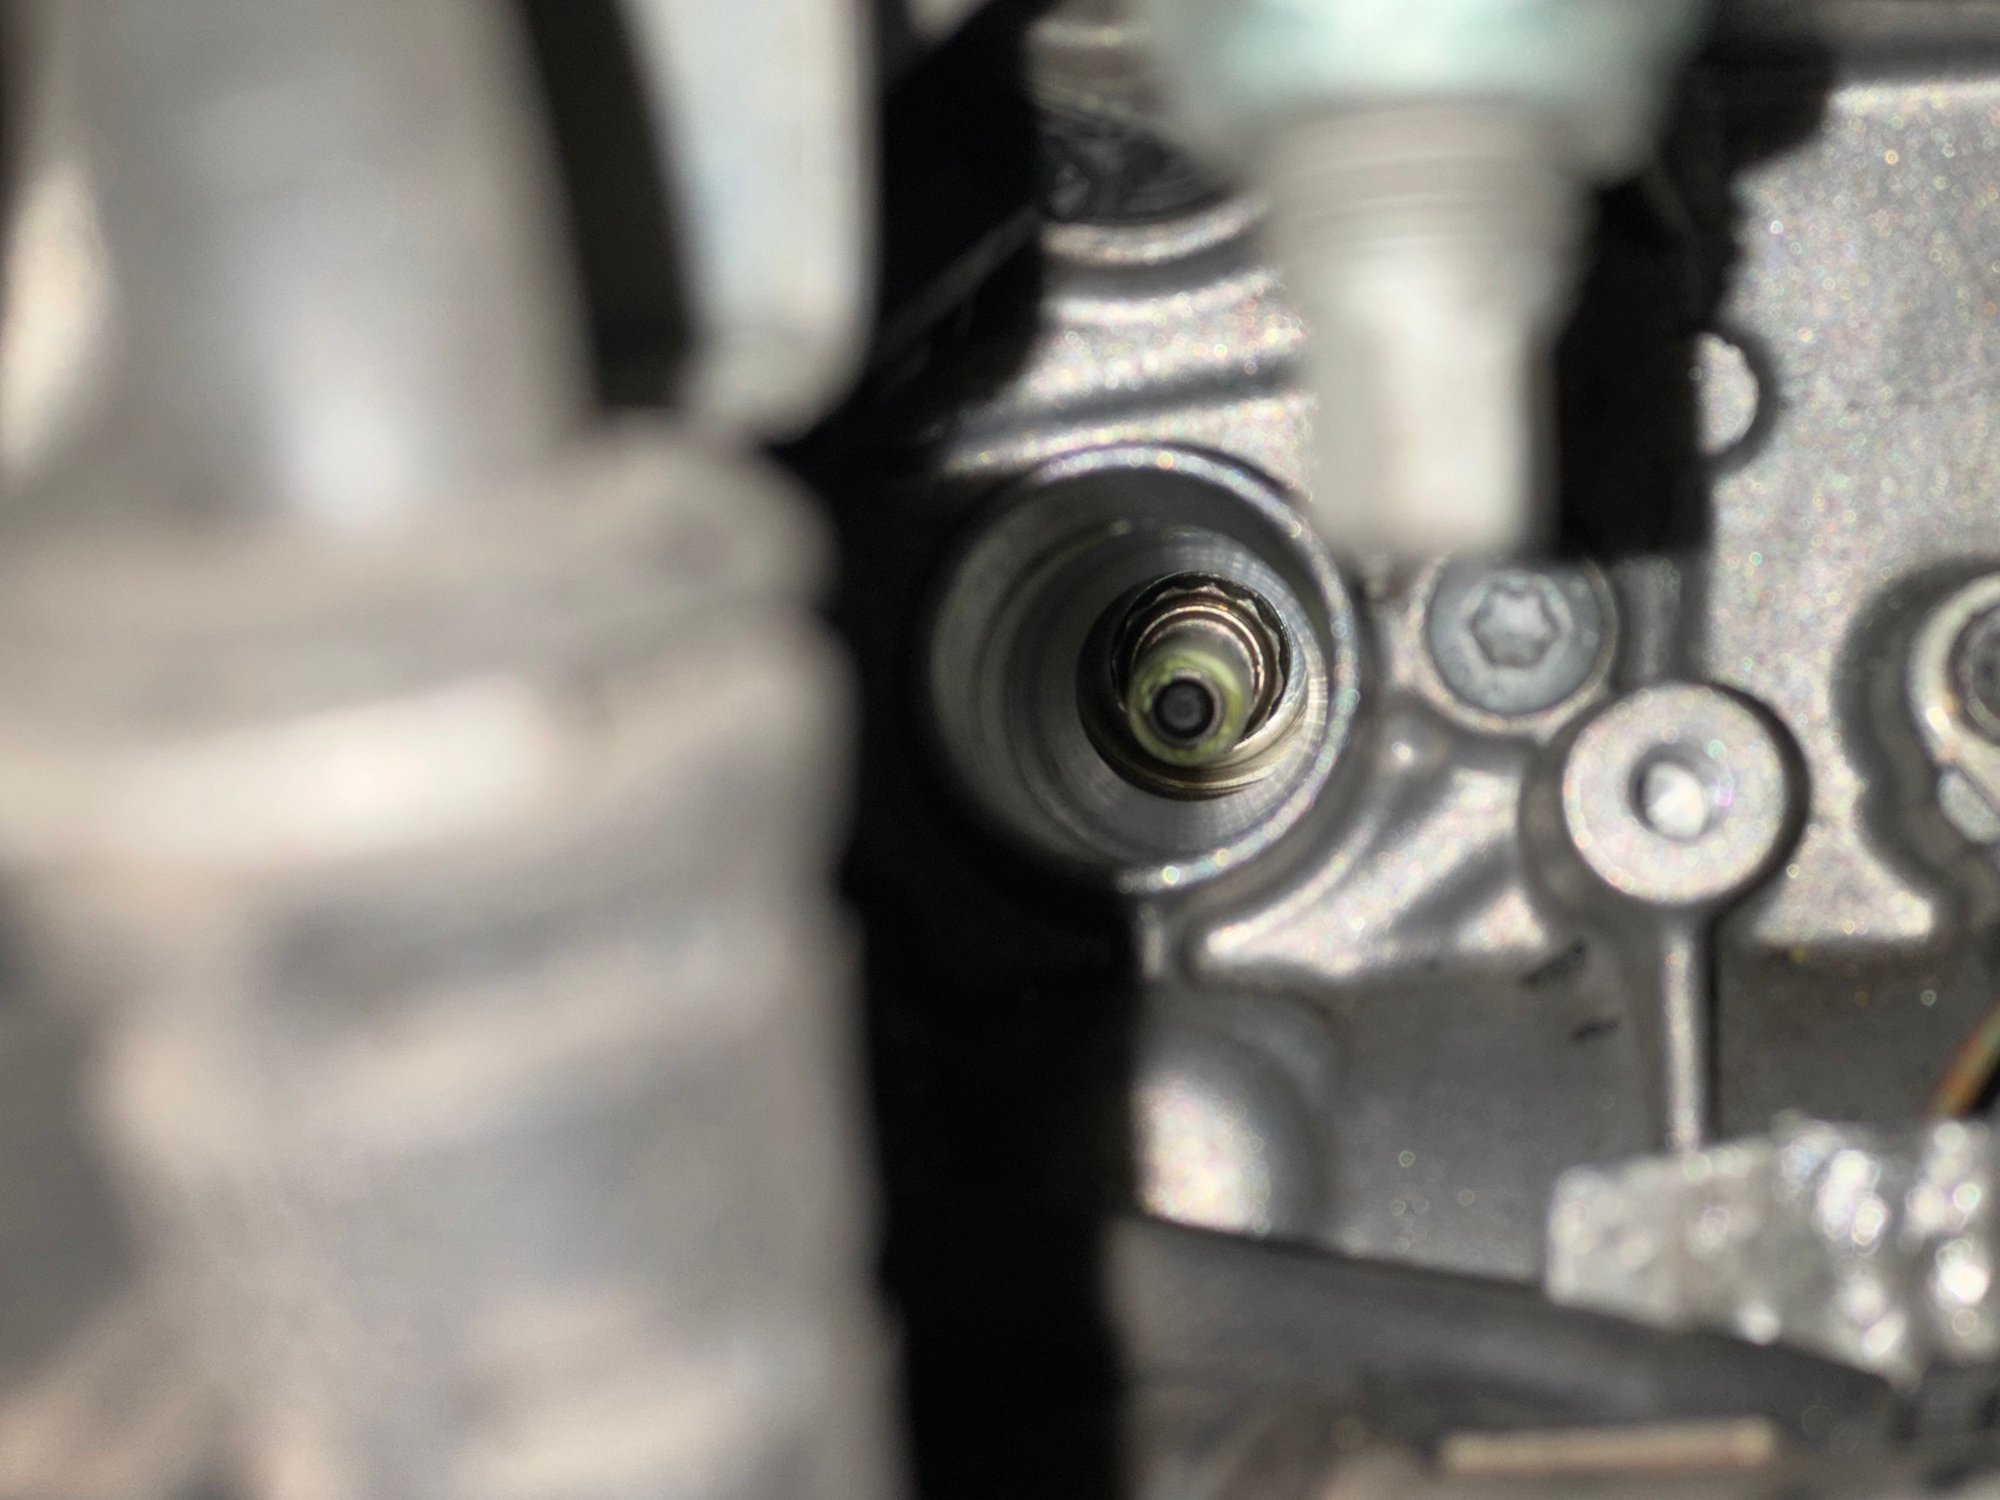
Step 4: Remove and replace spark plugs
In each cylinder head you should now see the spark plugs. Grab your 14mm spark plug socket and whichever extensions and/or U-joints you need to reach each one. I used a collection of cheap wobble extensions from Harbor Freight that I’ve had since I did this job on a BMW many moons ago, and found them mostly satisfactory.
Check the gap on each spark plug before installing, and adjust it if necessary using a gap tool.
When reinstalling, use a dab of dielectric grease along the top and ceramic part of the plug. (Again, a youtube video will help you picture this if you’re having trouble). Be sure each spark plug is threaded properly before using any amount of force. My strategy with most fasteners is to counter-rotate while pushing lightly until you feel the threads pop into place, then begin to tighten.
As noted above, my spark plug socket had a leaf spring system that held onto the plug. In an engine where the plugs are aiming down this would be a life saver, but I found it frustrating because my cheap wobble extensions would come loose before the plug would, leaving the socket and perhaps some extensions in the cylinder head. This is not a fun situation to be in, so I’d just recommend finding a less fancy spark plug socket.
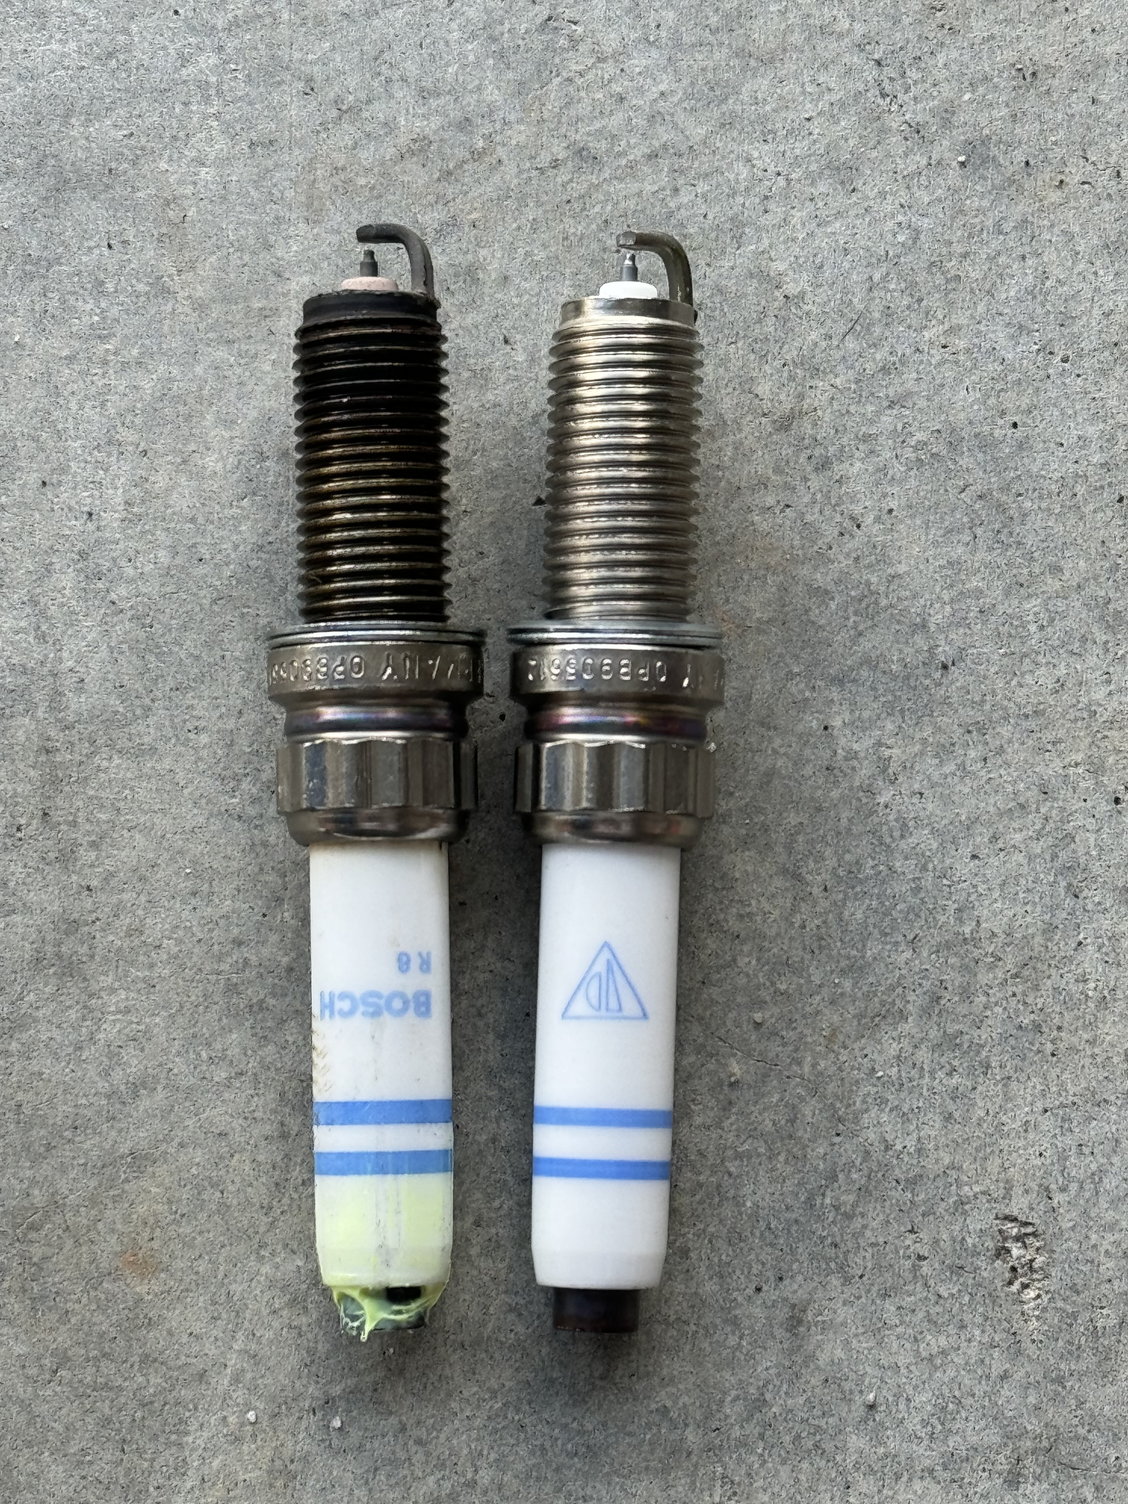
Once again, I wasn’t able to find a definite source for the spark plug torque spec, but I did find one for the 991.2. I went with 17 lb-ft, matching the 991.2 specs I found. I. A spark plug! Huzzah! J. Wobbles galore. I don’t recommend this sequence specifically – I think the cylinder head is about 6”, so you’re best off using a 6” straight extension at the front and wobbles afterward wherever you need them. K. Driver’s side rear plug removal. This one is a pretty straight shot, but you do need long extensions and at least one pivot point for it. The other two on this side can be done with only straight extensions if I recall correctly. L. An old spark plug compared to a new one. All in all, mine were in excellent shape and could have gone many more miles. M. Passenger side, working on Satan’s cylinder head. This was the best route I found to reach this plug given everything that’s in the way. N. Close-up of Satan’s cylinder head. A really stubby wobble came in handy here to pivot back upward immediately after the end of the cylinder head.
Once you’ve done all six spark plugs, follow this guide in reverse to reinstall everything you’ve removed and you’re done! Grab a beer or three and relish the moment.
 10-02-2023, 10:16 PM
 .
.