When you click on links to various merchants on this site and make a purchase, this can result in this site earning a commission. Affiliate programs and affiliations include, but are not limited to, the eBay Partner Network.
Tips on 2 Ch Dashcam Install Cayenne 92A 2016 with PICS
Hey all, just sharing my experience of installing a 2 channel dashcam (Vantrue S1 on dash) on my 92A 2016 CD(s).
Since there were not many helpful pictures online or YouTube videos of diyers attempting to take off the interior trim and panels, i decided to take some risks. (alert-the trickiest is the a pillar as reported by a lot of people)
Here a bit of summary with pictures:
1) I started with the rear cam. Firstly i planned to get the cable routed via the tailgate grommet for a super nice installation but soon realized this was impossible. The cables typically have USB mini connectors on both ends and to fish this with the grommet is impossible in my case. The 92A model tailgate grommets are full of cables as shown in pictures below. I took off the tailgate top interior trim and the grommets themselves to rule out this possibility. Before starting this job i suggest to have a trim removal tool kit handy as it makes the job so much easier and less risky against damages and scratches to your trim / leathers. I had decided to wire the rear cam from passenger side of the car and also front cam and power via passenger side fuse panel.
2) Having established that, i decided that rear cam will be routed externally and proceeded to unclip the D pillars to try to fish the cable on. My decision of routing the cable to front was from the door sills and not through the roof liner - reasons: a)roof liners have curtain airbags and to drop the roof liner there a bit of complex process. b) in my case the camera had 20ft of rear cable which a measured beforehand was dead on with length that i needed.
3) To ensure the cable length is correct at both ends, you can temporarily cable tie the rear end after fixing the length that you need till the rear window so that while fishing the cable through footwells you do not drag the cable incorrectly and have to do the whole process again. Also please account for about a foot of cable overhanging on the passenger side of the tailgate for opening action of the tailgate.
4) For some reason i could not get the d pillar trim off as a weird looking clip (with a plastic allen socket) wouldn't come off as shown in the picture. Luckily i had an alternative choice and i took the d pillar grill out. Caution - this grill has clips which are not actually meant to be pulled off and set back again but in my case i cut the clips that were damaged and pushed back the grill in with no issues.
5) Continue taking apart the d pillar trim from rear seat side they will just pop right out. To make it easier you can pull apart the weather seal a bit. fish the cable BEHIND the rear seat seat-belt as this will not interfere with seat belt function.
6) Now it becomes easier for a bit. Check your cable length once again to be sure to the front so that there are no surprises later on. Continue pushing the cable under the sill plates from the INSIDE end. It is easy with a trim tool and continue doing that past B pill to the front door sill.
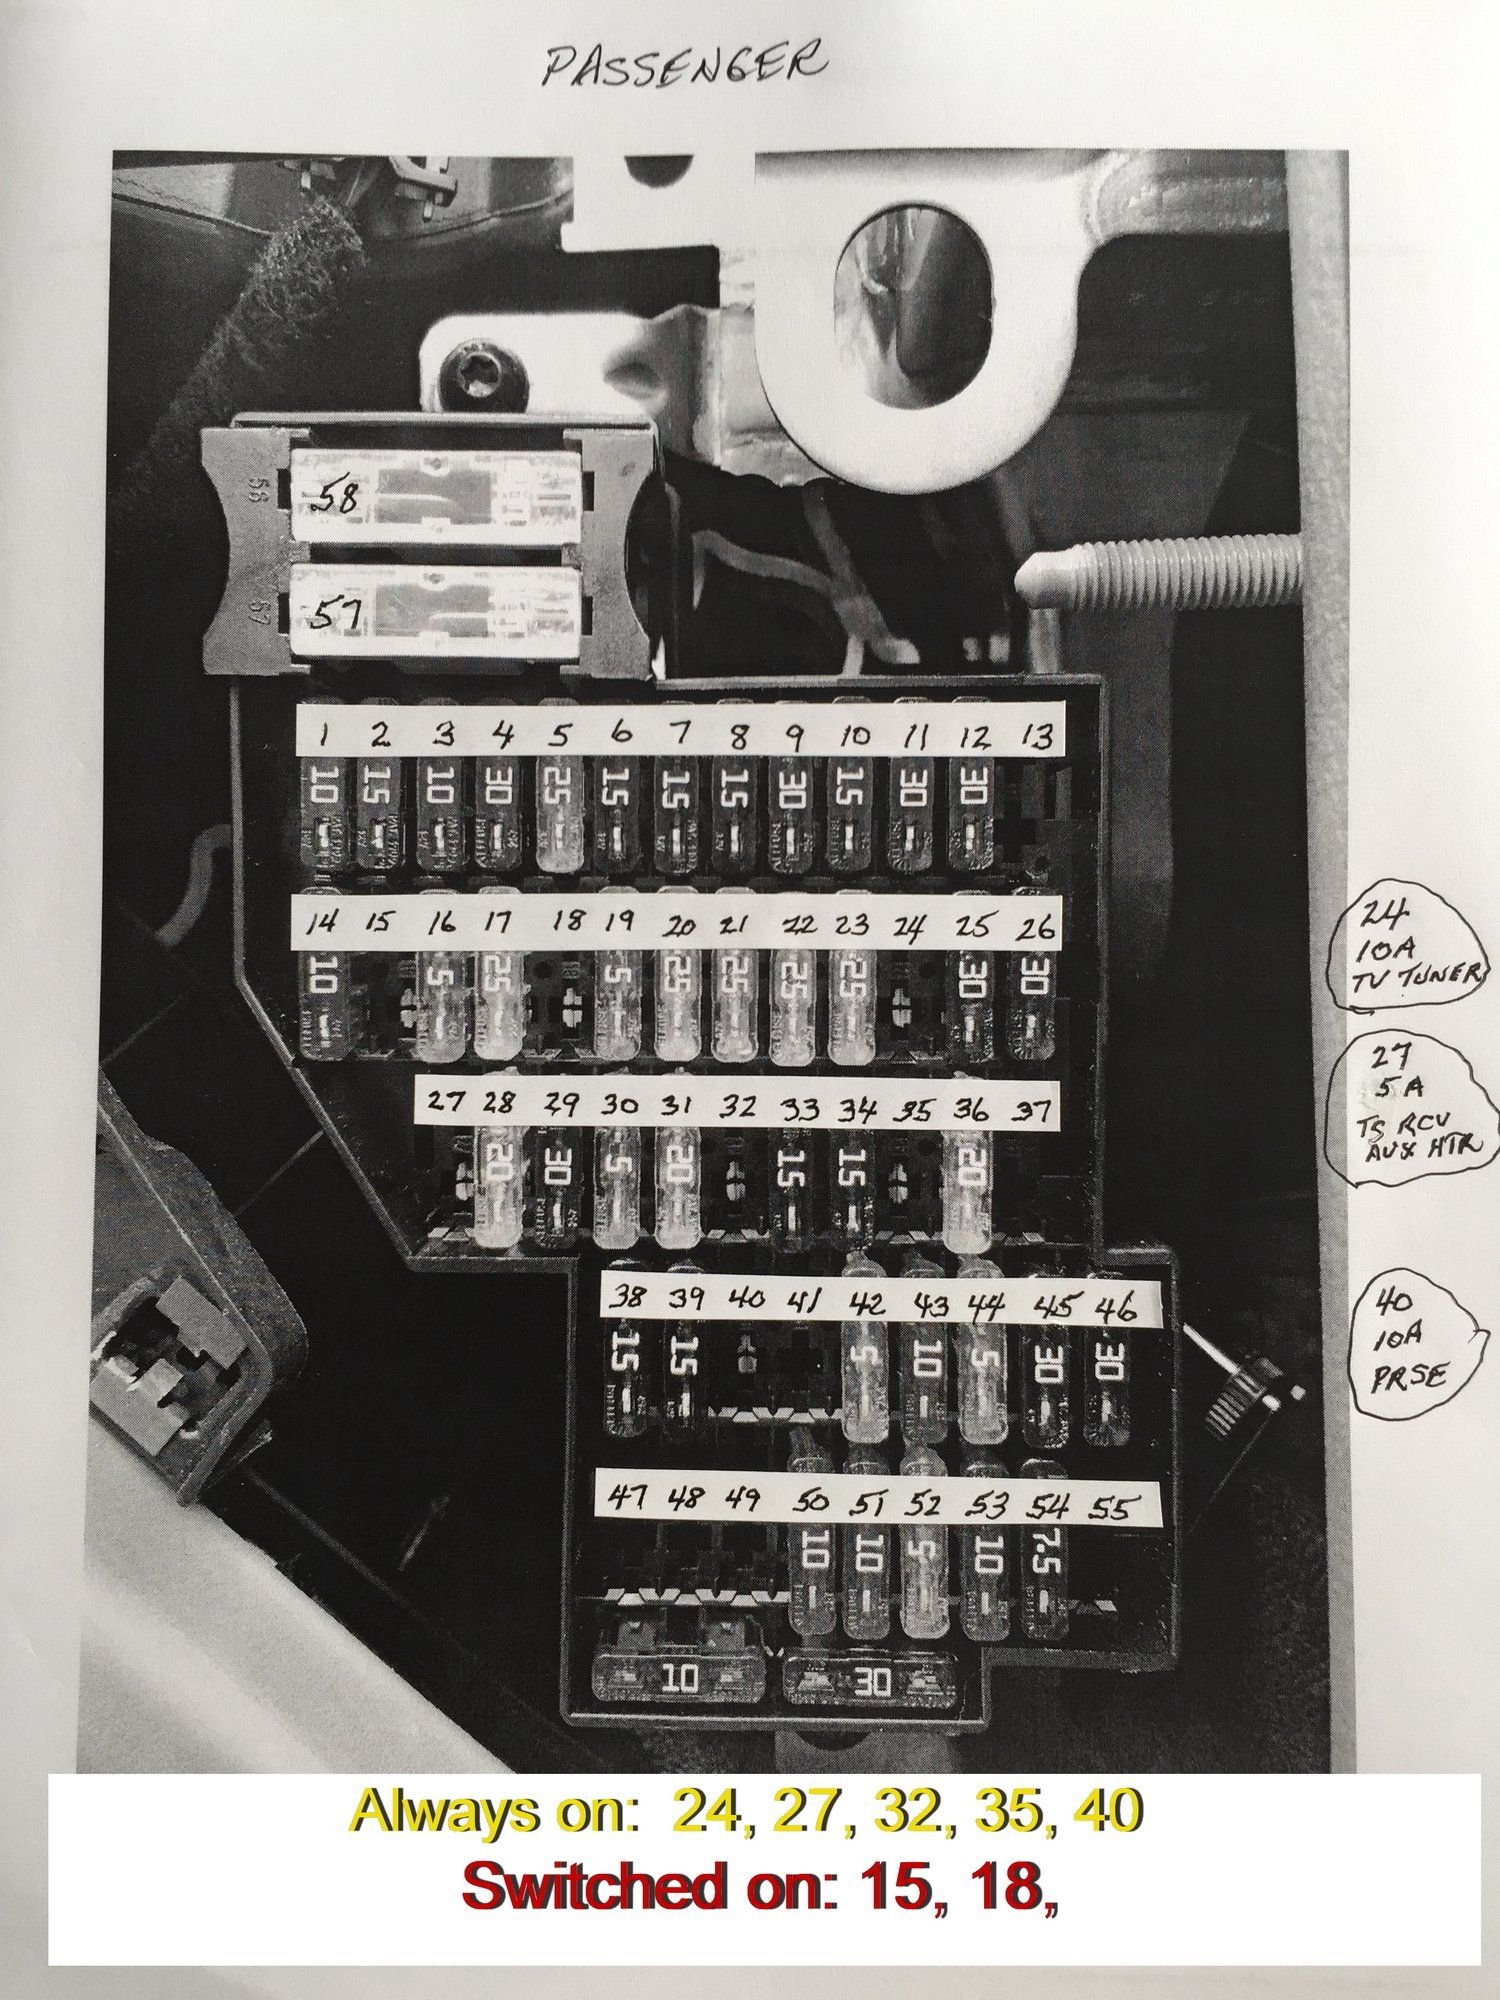
7) Take off the right side fuse panel cover. DO NOT attempt to take off the vent that is directly on TOP of the fuse cover as some other posts suggest. It is internally bolted and you will damage this vent severely if you attempt taking it off. it has plastic screws inside of it and some older cayenne forms suggest to take it off to make it easier to remove the a pillar.
8) there is a small (8 inch) trim section just adjacent to the fuse cover. This can be popped off easily with careful prying. This will make it easier to fish both cables (from here on you will have 2 cable - rear camera usb cable and the power cable from the hardwiring port - both of which will need to go to front dash cam.
9) Fix and decide a position for your front dash cam in my case it was on right side of the dome console so about 1.5ft from the passenger a pillar.
10) Now you can take the two ends (USB from rear cam and power USB from hardwire) and zip tie them together at the end (temporarily to measure correct length).
11) This zip tied end will become your starting point now but you will NOT start from the dome console.
12) the Zip tied end of 2 cables to the front now needs to be fished from the fuse box side up into the A pillar. But now comes the TRICKY part. The A pillar clips in this car (and all 958s) is a bit tricky. You can get it off but in my case i did without it. However if you need to take it off, there is only ONE YouTube video that i found for this here
. In some older forums it is suggested that you take off the ''airbag'' logo and pry it to get access to screws of the a pillar. But it is NOT the case for 958 92As and people have damaged a pillar doing this. Technically the most correct way of wiring under a pillar is to take this pillar trim off via a long nose plier used to rotate the top clip as shown in the vide but i didn't do it. i fished the cable end (2 usb ends zip tied) from the bottom via the fuse housing up behind the a pillar trim. i popped the a pillar trim just enough to make space to push the wires to the windshield side and avoid the bottom airbag side. But i did not take the a pillar completely apart as I'm not sure that this clip (as shown in vide) is fully reusable or not after you have removed it.
13) After you succeed in fishing the cable to top end of the loosened a pillar trim, you have almost made it. From here on you can continue pushing the cables up behind the head liner against the windshield till the point you need. To avoid the cables slipping out in behind the windshield what you can do is zip tie the cables at every 2 inches and the zip tie knot will then get stuck behind the headliner and not let the thin cables slip out in future.
14) Now you can install the rear and front dash cams with their mounting and i suggest to use a level to ensure your footage stays square.
15) For hardwiring your specific camera i suggest to go to YouTube there are good tutorial. I intended my info to be more on the trim side than the electrical part. the right side fuse panel has both ACC and continuous power. I chose ACC as my car battery is not in top health.
16) The electrical part with he hardwire kit is easiest after the above steps. One quick tip for this car though. In 985s, there are two types of ACC outputs i figure. The first is where 12v+ is on and off with your key position instantly (like in most other vehicles). The second type is the tricky one and these fuse outputs are related to the PCM and accessory sockets in front dash. These have a 20-30 minute delay after which they go off, even after you have put ignition in OFF and locked the car. You need to clearly distinguish between these three types of 12v+ DC outputs which you can have on the fuse panels ( 1- ACC on and off with key, 2 - PMC on with key or unlock but off after a delay after IGN OFF, 3 - continuous 12 v+ DC power)
17) For overhanging length on the rear cam you can use self adhesive anchors to mount the cable to the rear glass to make it look clean (I'm really sad i could not fish these via the tailgate grommet still )
Nice install and good job with the pics, but you are incorrect about the rear camera installation, it isn't difficult to run the micro USB cable through the factory grommets in a 958, there is a lot of room in them. I used the left hand side one for my installation.
I don't have pics as I did this in a dark garage where lighting makes taking pics very tedious but here's what I did for my 958 with a Thinkware U1000 dual cam setup.
Front cam is placed on the right hand side of the rear vision mirror (drivers side in my case) as this allows access to the SD card and can reach the control buttons when required.
1. Ran the power acc/+12 from the right side fuse panel using mini blade fuse taps. There are empty slots for both ACC and constant 12V which you can use. This way all factory fuses remain in their location.
2. Tucked the power cable for front camera up into the A pillar trim, head liner as per most installations.
3. Unclipped the top surround panel of the tail gate, so cable for rear could go to the middle of the glass.
4. Unclipped the left hand side tailgate wiring grommets at both ends.
5. Unclipped the rear of the head liner, didn't need to remove the rear most light.
6. Ran the USB cable from the head liner through a hole in metal just behind the left tail light grommet.
7. Ran the cable through the grommet and into the tailgate, along to the middle, clipped it in to the camera which I had mounted on the glass already.
8. Unclipped the head liner around the panoramic sunroof, using lots of trim tools, controlled force and care. Also took left side grab handles out to allow a bit more freedom of the headliner.
9. Ran a cable snake through from rear head liner to middle of sunroof, attached USB cable to end of snake and pulled through to the middle of the car.
10. Unclipped left side A trim top. Ran the cable snake until it came out the top of the A pillar on the front windscreen side. Attached USB cable to end of snake and pulled through.
11. Ran USB cable along the left front head liner as per a normal install etc.
12. Clipped the sunroof head lining back in using lots of trim tools, care and pushing.
13. Clipped all other trim pieces back in and the grab handles.
Hardest part of the job is removing the head lining around the panoramic sunroof. Running the USB cable here keeps it away from SRS airbags etc. It takes controlled force. You can't see any cables except where they exit trim pieces to connect to cameras.
Did either of you have issues with FM radio reception after installation? I installed a Rexing Wi-Fi cam front and rear but it kills my reception. Now using Bluetooth audio instead. I tried putting magnetic ferrules on the wires with no success. My rear cam is center top of rear hatch window and wires run inside grommet and boot. Wondering if wiring path is too close to antenna and if a better location is recommended? This is my unit Rexing V1P 4K Dual Channel Dash Cam 4K+1080p with Wi-Fi
Did either of you have issues with FM radio reception after installation? I installed a Rexing Wi-Fi cam front and rear but it kills my reception. Now using Bluetooth audio instead. I tried putting magnetic ferrules on the wires with no success. My rear cam is center top of rear hatch window and wires run inside grommet and boot. Wondering if wiring path is too close to antenna and if a better location is recommended? This is my unit Rexing V1P 4K Dual Channel Dash Cam 4K+1080p with Wi-Fi
I have not. Which wiring boot did you use, the left or right hand side? I used the left hand side. I made sure to adhere the rear camera on the glass in-between the glass wires, not that this should make any difference given mounting surface materials are not metal.
I went through the right one. I may try getting the wire further away from the electrical components that are right in the middle top of the hatch. My guess is that is likely most of the issue
I see several posts here that state that the right side (passenger in the US, driver in the UK) fuse box has both ACC switched and permanent live spare fuse locations but the fuse numbers aren't given...
Could anyone advise the location for one of each please, I need an immediate power-off ignition switched and also a permanent live location to tap into...
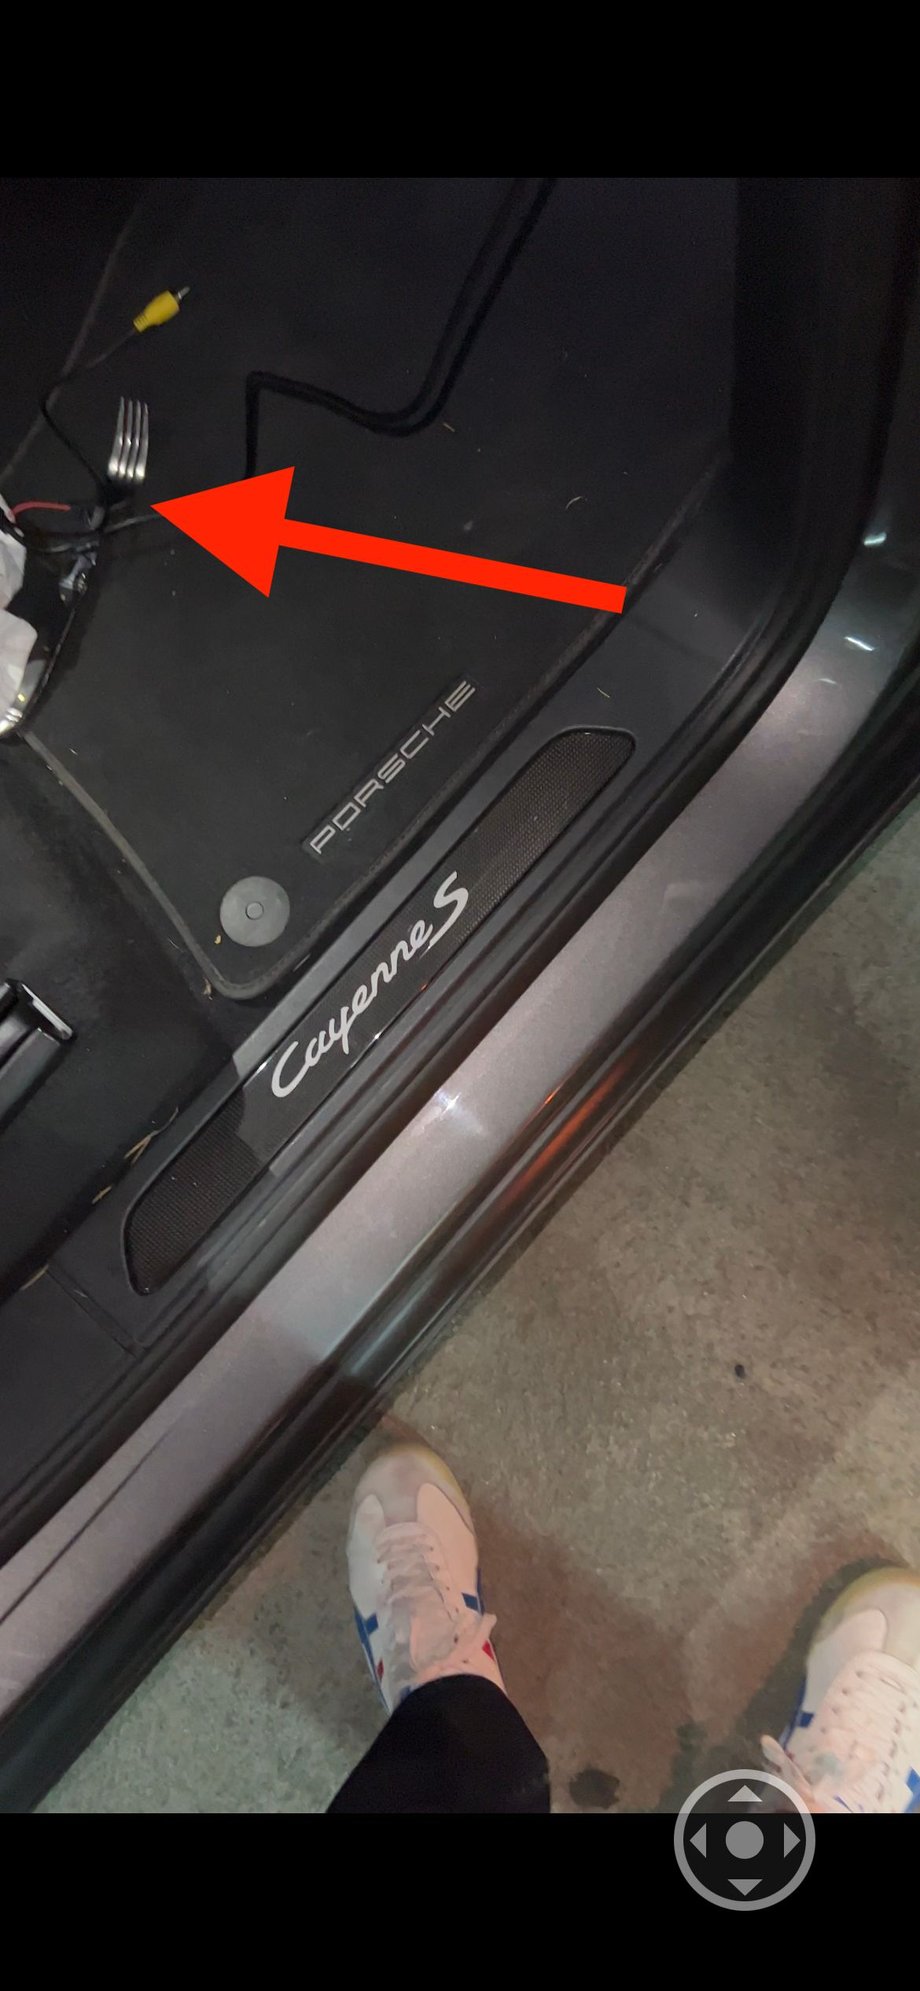
PS: dont worry if you see a fork on the floor on the picture, you really do need a fork to twist the nylon security airbag clip 90 degrees, to get the A-pillar off, to access the cable harness rails over the airbag

 08-14-2021, 05:49 AM

 )
)