When you click on links to various merchants on this site and make a purchase, this can result in this site earning a commission. Affiliate programs and affiliations include, but are not limited to, the eBay Partner Network.
..Back again, ..where I really love to Boxster around !
The morning, with some fog during the very first session :
In the CorkScrew..
..With 6pt harness, 2010 SA helmet, Hans, gloves, 4pt roll bar, tow hook, kill switch, extinguisher, etc..
But NOT secure enough for the PCA guys !
(as no roof : PCA **request** arm restraints !)
Note that with a Spyder roofed, PCA is happy, no arm restraints are requested !!! ..or simply a bad joke.
May be time to quit PCA, as it looks like it becomes BCA (a bottom "bubble" on the "P" !!)
Btw, the Big Brake Brembo kit, with 6 pistons caliper is a **REAL** great to have.
Down on the corner, Happy on the street !
A REAL GREAT day in Laguna Seca with ETD, a real super great team, highly recommended.
Good track time (3 groups), less crowded track, great and fast drivers, ..just as track days should be.
For info : http://www.exclusivetrackdays.org
As usual, the last lap of each session, after checkered flag, no touch on brake, use the air to cool them down.
Note, imo, this should be simply a good track habit to have.
For ETD members : FREE Photos, credit to 4theriders.com, thank you very much.
Back again to my favorite place to drive the Boxster..
Bumpy surprise last week at the entry of the Corkscrew : do not stick too much in at the entry, ..or face rubber bumps !
I was not able to read on it, to check if it says “weathertech”, ..but the material looks “familiar” !!
Well, ..need to trim out the line a bit !
By the way, about the entry in the Corkscrew, reading my recorder, I'm asking myself if the data can be correct :
1.5 lateral G, ..on a low speed corner, first session on the morning, (not a fast lap time) this seems to be wrong to me.
I really doubt that it could be so much !
It is true that some time, exiting these (fabulous downhill curves), I do feel physically the lateral Gs !
Looking at the data, (the envelope) we can really see that the car brakes real well (I love my 6 pistons Brembo big brake kit), ..but the accelerations are "Grand Fa" style ! (Yes, I'm am )
Still, I really want to do something good in the engine area, now that the "rest" of the car is doing real good !
Laguna Seca is a real great track, love it big time.
When I removed it, I did followed the DIY from a guy named Maurice, that were for me excellent explanations :
See his text below :
Boxster How to remove the entire roof with the mechanism
It's not difficult to remove and re-install the old top with its mechanism, and there is no comparison between that job and replacing the canvas top. After you have your old top off you can take your old top to an upholsterer to sew in a new vinyl window (should cost between $100 to $200 if you bring them the top and re-install it yourself). That will also give you time to decide whether you later want to "upgrade" to a glass-windowed top, without having to rush into it.
Here is how to proceed:
1. Put the top in the service mode (if you are not sure how to do this, it's in the owner's manual), and make sure the clamshell is at it highest position (45 degree angle, as far back as possible). Unlatch the black/gray vinyl apron from its two plastic retainers on the rear firewall and pop off the two tension cables from their steel ***** at the base of the cables. Now, reaching under the B-pillar round black knuckle at its base, pull off the white plastic cups (maybe red plastic if yours have never been replaced) from the steel ***** that they are pressed on to. If you have too much trouble popping those off, you can undo the 10mm bolt (with thick washer) from the middle of the connecting arm that leads to the white plastic cups on one end and the front of the V-lever on the rearmost end of it. Before you undo that bolt, mark the point where the two halves of the connect arm are joined so that you don't have to guess at the correct length later. I have attached a photo, where the white arrow shows the 10mm bolt with thick washer. The yellow arrow shows where you should mark the position of the two halves of the connecting arm. The red circles show two of the three large bolts that must be removed (see step #3 below)
2. Now, from the inside of the passenger compartment (behind the outboard side of the driver's seat), remove the semi-circular carpet-covered plastic trim panel from around the base of the roll bar. This trim panel is attached with an 8mm bolt at the top (just loosen it, you don't have to remove it completely) and there is a phillips screw near the bottom that is well hidden in the carpet covering. The screw is about 6 or 8 inches from the floor and just forward of the firewall. Remove the panel. This will remove the defroster hook up, and you will see the B-pillar microswitch, which must be disconnected from its connector near the floor. There is also a zip-tie that will have to be cut, as the zip-tie holds the wire to the roll-bar.
3. Unbolt the 3 large bolts that are visible on the backside of top frame, looking under the rear of the B-Pillar while the top is in the service mode. Some Boxsters have a plastic box covering these three bolts, and this plastic box comes off with removal of two Phillips screws. The large bolts are self-centering, so it will not be difficult to re-install them in the correct position. The top, with the mechanism attached is still very light, but it is a little bulky, so you might want to have someone help you lift it off.
4. You may find a Phillips screw just ahead of the rearmost large bolt (visible in the photo indicated by the green arrow) on each side, and possibly another Phillips screw just aft of the forward most lower large bolt . Unscrew those Phillips screws and set them aside for later reassembly. You may also have to gently separate the foam liner from the metal bracket that has been pressed on for many years. Proceed carefully to insure that you do not rip, cut, or tear the foam liner.
5. Once the 3 bolts on each side (left and right) have been removed (and the two Phillips screws, one on each side), just slide the top back about one inch and then lift it straight up.
Being off topic, in the "garage sale" mode, I can add :
I also have a pair of front rotors that have about 3'000 miles (I removed these, to put a Brembo "Big brake" kit. (OEM calipers sold already)
And, ..about the "heavy stuff", I have also my original starter, (64'000 miles) that I changed recently thinking that it was making noise, ..but the noise came some somewhere else, so, this starter is still fully good !
Due to weight or large item, I would much prefer to find "local" customer for these items !
Transforming a “BK” roll bar ..into a 6 points roll bar:
First, (see previous posts), the bar was mounted in reverse position (in the back of the OEM “hoops” instead of the front.
OK, roof removed, this was good anyway, i.e.: 18kg (40 pounds) removed from quite an up position.
(For those asking about the roof, a solution is coming soon.)
Then, to add 2 more solid points (from 4pt to 6pts), design of a plate :
Then cut, as usual, at Marcus Frys Enterprise, Redwood City : laser cut :
The result :
And the result in place :
As you can see, the transverse bar is in the perfect position to be a very strong "harness bar".
(I was in search of a 986 good harness bar for some time, using pull down cables with rollers, on the back of my seat for some time, but now, beside having this transverse bar that helps the structure at the top of the rear suspension point, I'm very happy to have also a good fixation with the good angle.)
And, the (electric) cover system, ..still work very well :
The quality of the soldering of Marcus is simply amazing. I was a welding guy (building go-karts when very young), and I also have seen a lot of welding, ..but Marcus is well above the super welders that I have seen. Highly recommended if you have demand for perfect weld and super craftsmanship !
The whole thing can be removed easily, as nothing is soldered into the car, just all bolt-in !
Note that between the left and right “plates”, there is an “Harness bar” that plays also the role of adding strongness to the structure.
(Now, the rear points of my harness pulls naturally with a good angle. Before, I had "pull down" cables with rollers, on the back of the seat, in order to have a good pull back angle, this was “ok” as I had the 2 rear points anchored on the OE “Hoop bar”, ..but not really perfect !)
A rear view :
and a side view :
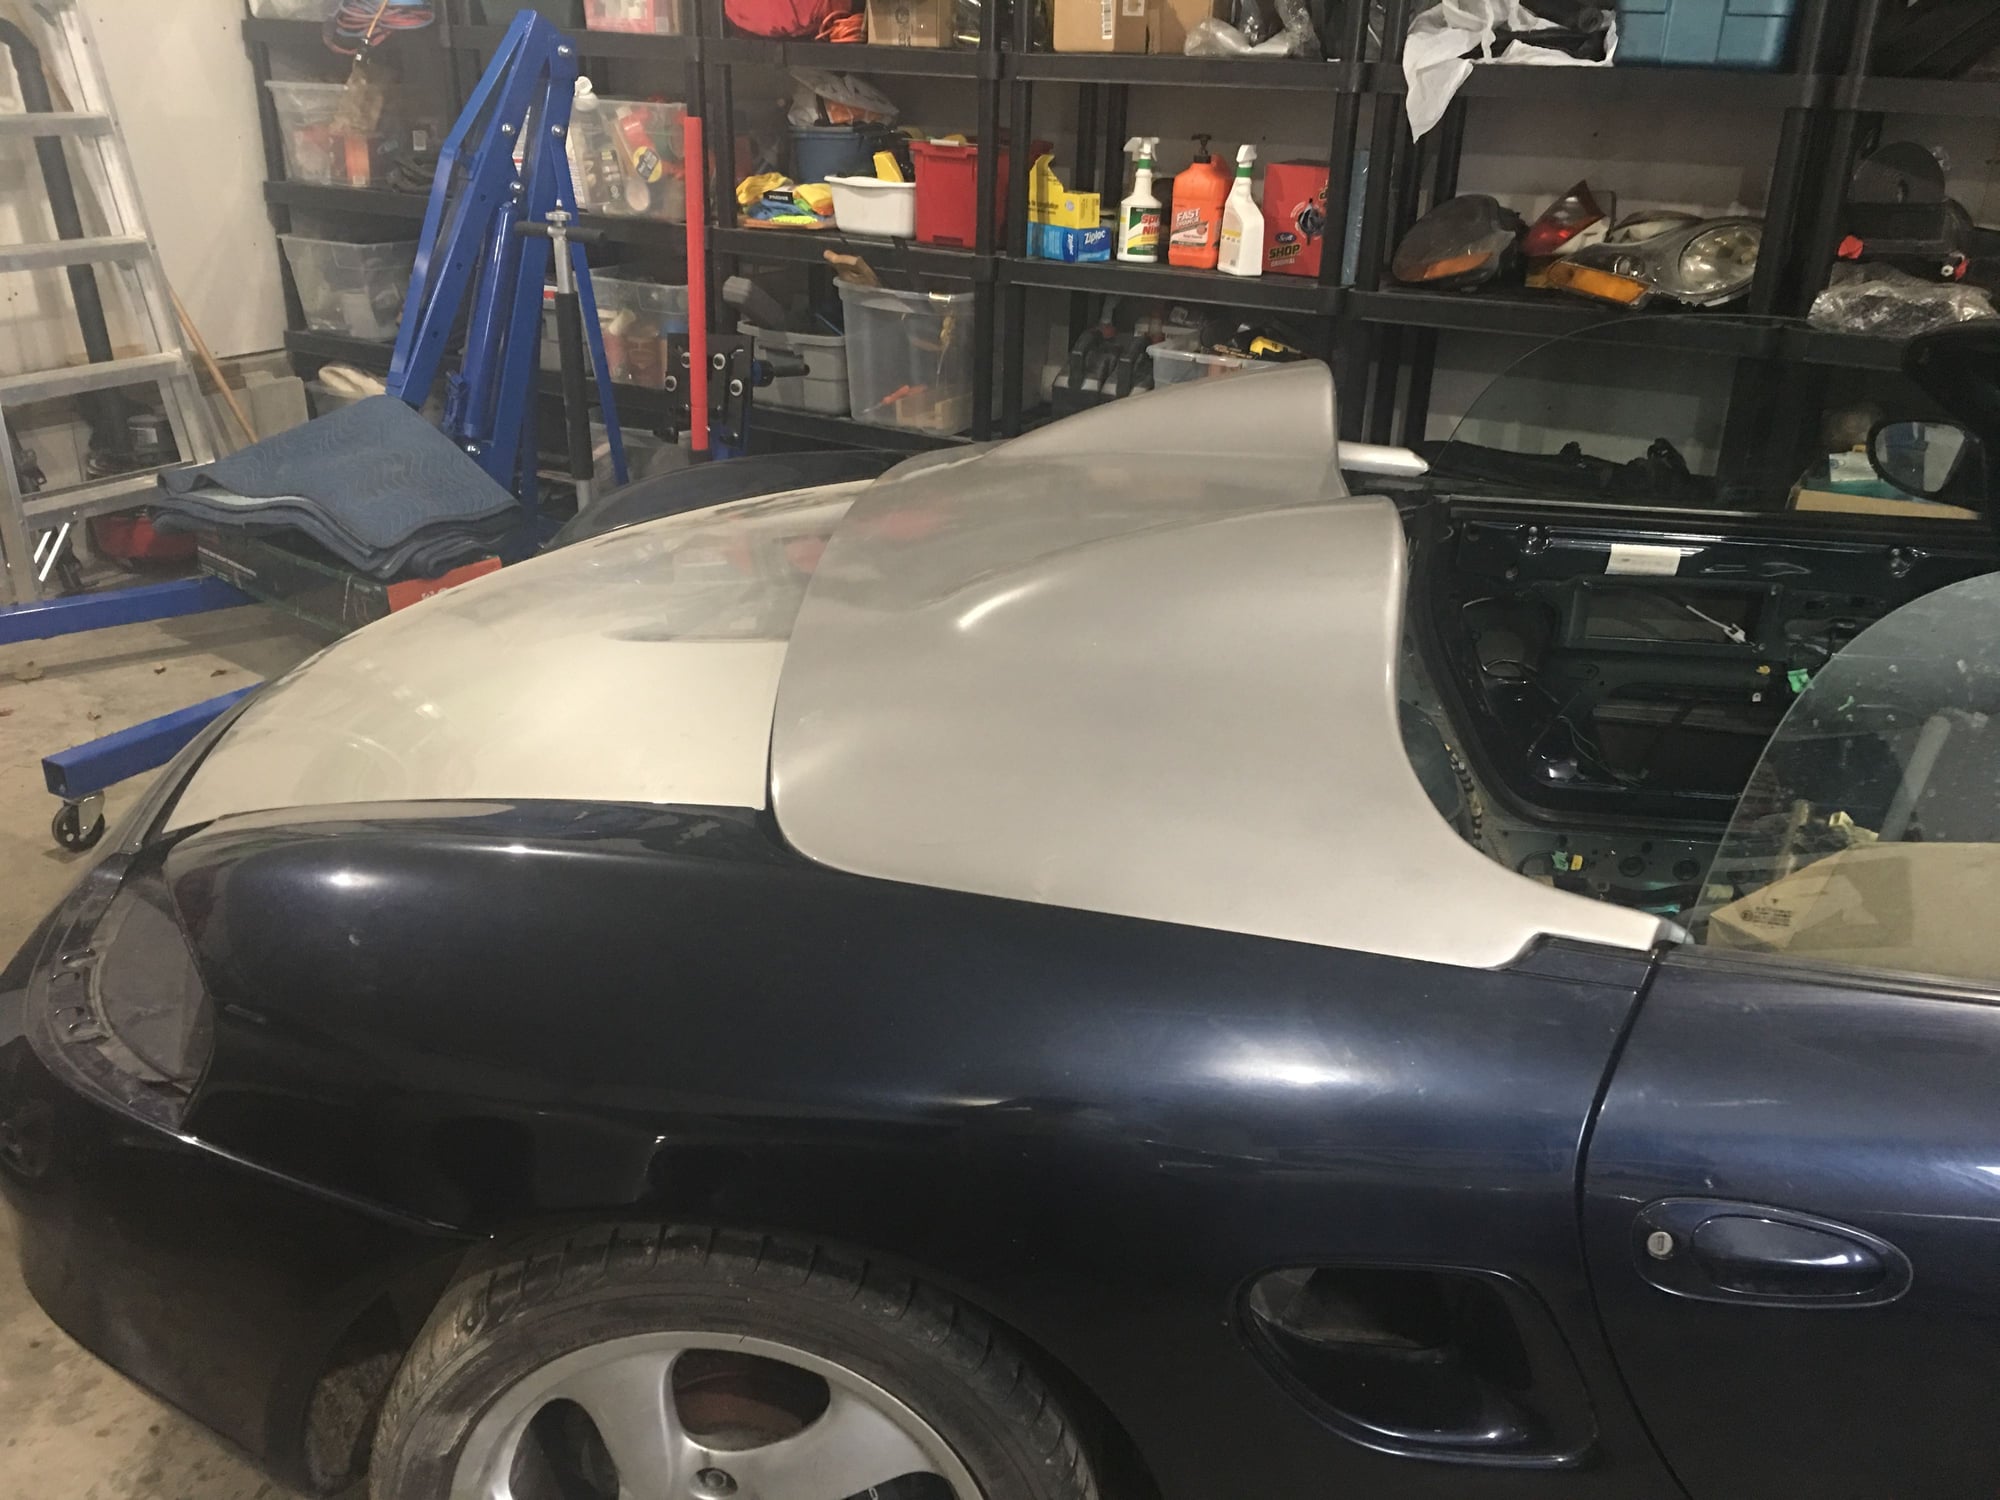
Well, at this point, I guess you will foresee what is the replacement roof that I'm planning to use !
(Parts currently on order.)
Body, Frame :
. Sparco sport bucket seats, with Alcantara "diamonds" white stitched hand made cushions
. Driver seat on OEM rails, with thick aluminum L shaped mounting plate (Alcantara covered)
. Passenger seat on fixed aluminum frame, L shaped plate (Alcantara covered) mounted on hinges in front, bolted (OEM) in back (to have "easy" access to firewall door)
. B&K Rollbar fixed in reverse position, and bolted on 6 points, with a harness bar (Markus Fry Racing)
. Suppress OEM roof (18kg), not compatible with 6pt rollbar
. adapted 2011 Spyder OEM roof (changed OEM side windows against OEM Spider side windows)
. Schroth 6 point Racing Harness on driver seat (good to 2021 !)
� Brey-Krause Extinguisher quick release mounting kit on front passenger seat frame
. OEM Steering wheel, shifter and handbrake covered with Alcantara, white stitched
� Hella External Kill Switch, on front hood top
. 911 type, 5 gauges instrument cluster adapted (VIN and odometer data transferred)
� Alcantara white stitched top gauge cluster cover and around base of steering wheel
. Change plastic hoops OEM padding with black leather ones
� Victon TPMS (Pressure and temperature) display & sensors installed on both OZ wheels set
. See through top engine cover
� Rennline Front license plate adapter on front tow hook
. Ram Mount heavy duty iPhone6 mounting kit, on side of center console
. 986 Soft Top Roof Half Cover
Engine, power train :
. LN Double Row Pro Ceramic ISB upgrade
. Tarett � Quart oil extension with “X-51” type metal oil baffle, metal doors & magnetic drain plug
� IPD Plenum with a 74mm OEM Throttle Box and a 74mm IPD intake tube (to filter)
. AFe Performance Intake and oil Filter kit
� Low temp thermostat, with metal impeller water pump
. 4” RS solid Underdrive pulley
. Modified racing exhaust headers using high flow 200 Cell cats (exhaust cats = Smog Check OK)
. Modified secondary cats using also 200 Cells Cats (exhaust sound = 91dB sound test compatible, i.e.: at Laguna Seca)
Weight : . with the mods on seats, wheels, roof, battery, the gain of weight is estimated to be in the range of 170 lbs (80 kg).
On track, removing spare wheel & toolbox : approx. gain of 190 lbs (90 kg)
Performances :
May be, I can say, lap time at Laguna Seca : depending temp of the day, in the mid of the 1.48
(..easy no sweat, ..Grand Fa style ! Best lap till now : 1.47.7)
But, about 1,500 miles driven there.
The Winter and the need to have a roof !
The decision of removing the OEM roof on my car was triggered by my desire to have a roll bar.
But, sometime, (it is true, quite rarely) even in Beautiful California, ..I would be happy to have a roof still !
Thinking and then working on an old plan, I decided to use an OEM solution, ..i.e.: the roof of the Spyder, and using the roll bar as support to have the roof in shape.
It took some time to make it happen. Porsche USA do not stock such parts of the 2010-2011 Spyder.
These had to be ordered in the factory in Germany, (via Sunset Porsche in Beaverton, OR)
And, beside the roof, it was clear that the lateral windows had also to be changed, as the OEM Boxster glasses have a different shape then the Boxster Sypder lateral glasses. (Ordered the same way !)
Still, I had to add a additional (thin) "bars" to shape the roof in the side space, between the roll bar and the side windows (quite easy, as there is a place to anchor it !)
Or : Yes, it is possible to have a 2010-2011 Spyder roof on a “regular” 2001 986 Boxster, ..but it is not so easy, not so convenient, and the place above the engine access also needs a kind of cover (I will opt for a canvas fixed in typical “boat style”, and this in what I call “phase 2” !)
The good point is that all the windshield side are directly 100% compatible.
In the mean time, the “phase 1” is on place and I can say, that I’m happy with it.
(I just need to have a better anchor system for the two rear attachments of the roof.)
By the way, I still have for sale in the garage a complete OEM original Boxster roof, with �ts frame (easy to change).
It is dark blue, with black liner at the interior. It is in great shape (with a very good rear window, car was always garaged, it the the roof was changed just before I bought the car). PM me if you are interested, thanks.
..I forgot to mention, that if you are looking for an OEM side window (left or right !) I have them both in "stock" in perfect shape, in the garage!
Just PM me.
Beg. of this month, PCA (GGR Chapter) did organized a FunRun, with ALL the proceed sent to the victims of the Camp Fire (Paradise, CA).
I never did any PCA FunRun before, (still be a track lover !) but thanks to be for such GREAT cause, I jumped to be among the firsts to register for this event.
We had a REAL GREAT day participating to this event.
Congratulations and thank to Robert (PCA GGR) for organizing such great event.
Thanks also to Brad (PCA GCR President) for leading our group (with a nice Carrera T) through the beautiful roads, like ..PCH1.
ah - re-read your post - it does fit. good stuff - do you have cost and part #? i've been looking at the same thing. on my end, i have been working on bonding oem speedster humps to a clamshell panel to create a lightweight rear panel. the problem is, i started with a 987 clamshell by accident (ebay guy sent me the wrong part) so have to start again from scratch ...
Zero problem on the front, i.e.: joint and setting on the windshield.
Note that the central latch that is needed for the Spyder roof frame is very different than the latch of the Boxster OEM. I was hoping to use a OEM Boxster latch (easy to find on eBay), ..but this is not compatible (shape, holes) to be fixed in the Spyder frame (an expensive part by itself, but beautifully made in carbon fiber, extremely light, I like it). The latch locking mechanism of the 2011 Spyder is fully compatible with the center fixation of the 2001 Boxster.
The lateral windows need to be changed (quite easy). No windows dimension problem as the total move distance, i.e.: the front, on A pilars ..do remain the same.
In the back, it is more difficult !
In my case, the rollbar (reason of roof removal) keep the roof in shape in the top, but aluminum bar is needed to keep the roof in shape on the sides.
Then, tensioners are needed on the back.
I kept the back cover in function, and use the move (to service position) to fix the roof, ..and then lowering it ..to apply the tension on the rear fixations !
About the part list :
I bought the canvas at a Los Angeles third party seller
and
All other parts at a Porsche Dealer (Porsche Beaverton, OR).
Note that none of the Spyder parts were in stock in the USA, ..including the side glasses !
Plan to have a delivery time in the range of 4 to 8 weeks.
By the way, the only small problem on the windshield side, is the Spyder central latch, that goes a bit deeper in, ..and tend to bind the switch that control the rear cover, i.e.: on the Boxster, if the latch is engaged, you cannot start the roof retracting process !
The easy trick is to remove the connection to the switch when you use a Spyder roof.
the other problem on the rear is for me, to have an additional cover, (will go canvas, boat style), ..where you have your home designed cover extension.
Do you know that there is a company in florida that sells complete spyder conversion kit ?
(I did not consider them, ..again because of the 6pt rollbar Incompatibility.)

 05-10-2018 | 09:38 PM


 )
)


