When you click on links to various merchants on this site and make a purchase, this can result in this site earning a commission. Affiliate programs and affiliations include, but are not limited to, the eBay Partner Network.
Brembo rebuild kits have come way down in price which I assume is due to Euro conversion. Was looking on the FVD site last week and price was affordable. Might still try the RB piston seals as the brembo ones do not last a full season.
I assume you're referring to the OUTER seals? They crack pretty quick, but the factory pistons, pucks, and inner seals I've not had any issues with. The key on the pucks is installing the puck retainers when new. This keeps the pucks from falling off and cracking.
Also, watch your brake temps. Use heat paint and/or stickers. If you're getting your brakes too hot it kills the seals. Look at your cooling f/r.
Put in Racing Brake Kit on my 2007 GT3, in February 2015. Car is dedicated track car, about 10K track miles, 15K total miles. Very happy with the kit.
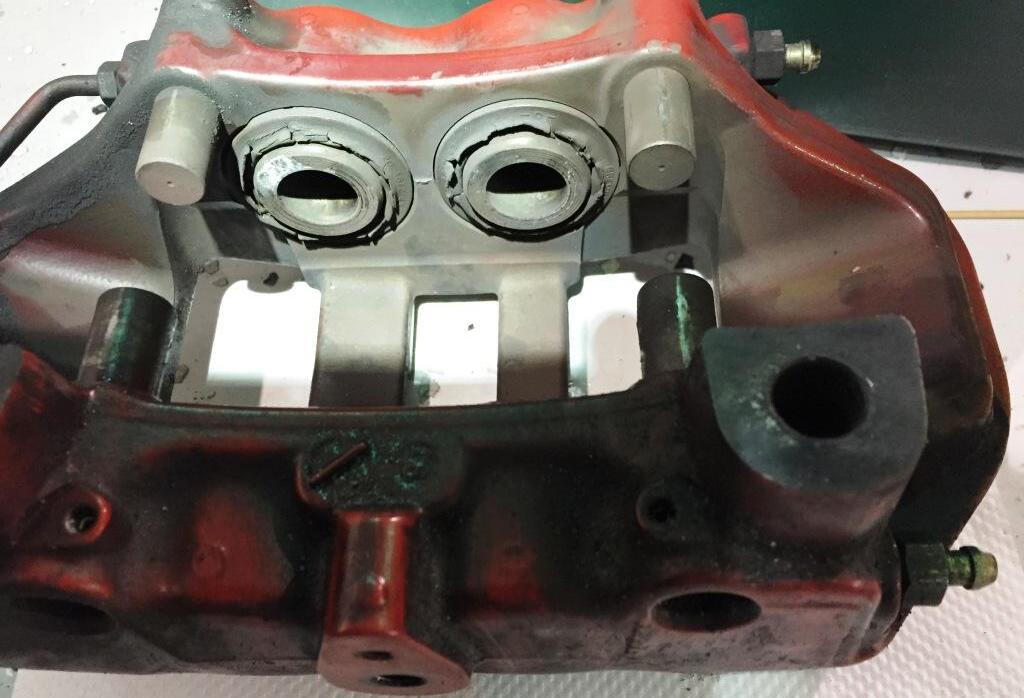
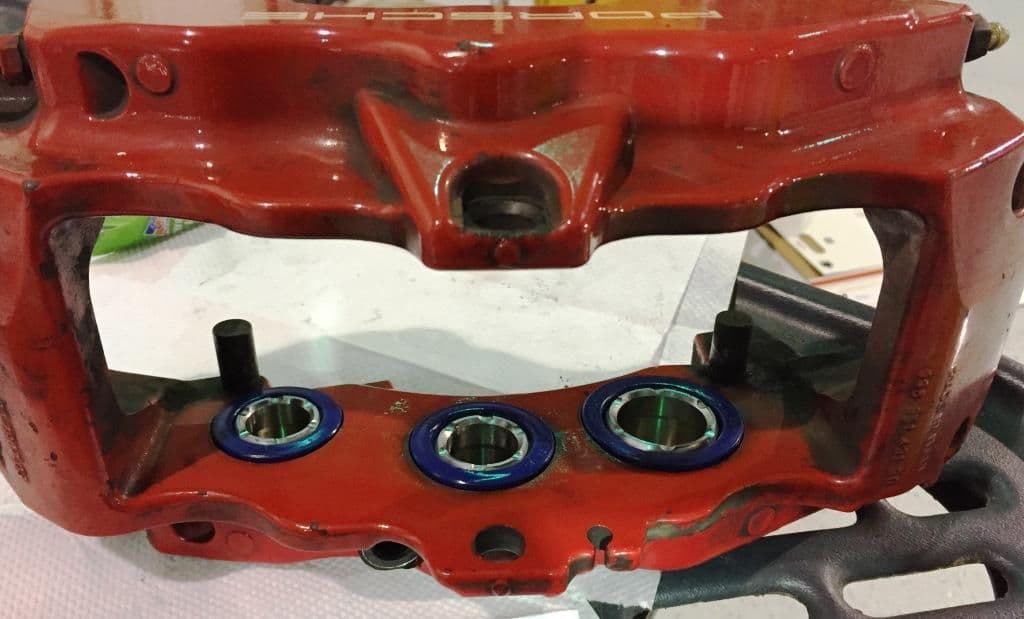
How the calipers looked after 10K track miles:
Racing Brake Kit as received:
raceing brake caliper kit
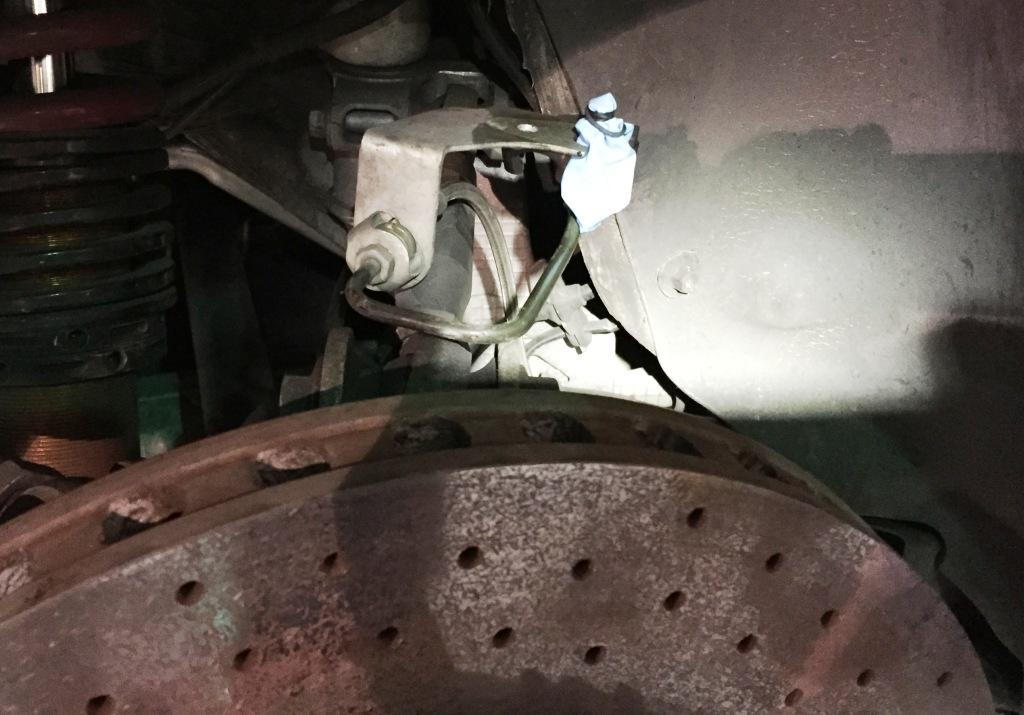
After you pull the caliper, press on a plastic cap/nib to cover the brake line. Wheels are downhill from the master cylinder, so all the fluid will leak out otherwise (and you have to go through a much more intensive bleeding procedure for the master cylinder and ABS system). The system is not pressurized, so any snug fit cap should work. Line capped:
cap brake line
Line capped with glove finger and rubber band - works fine too:
alt cap line
Rear caliper with old pistons out:
rear caliper ready for piston
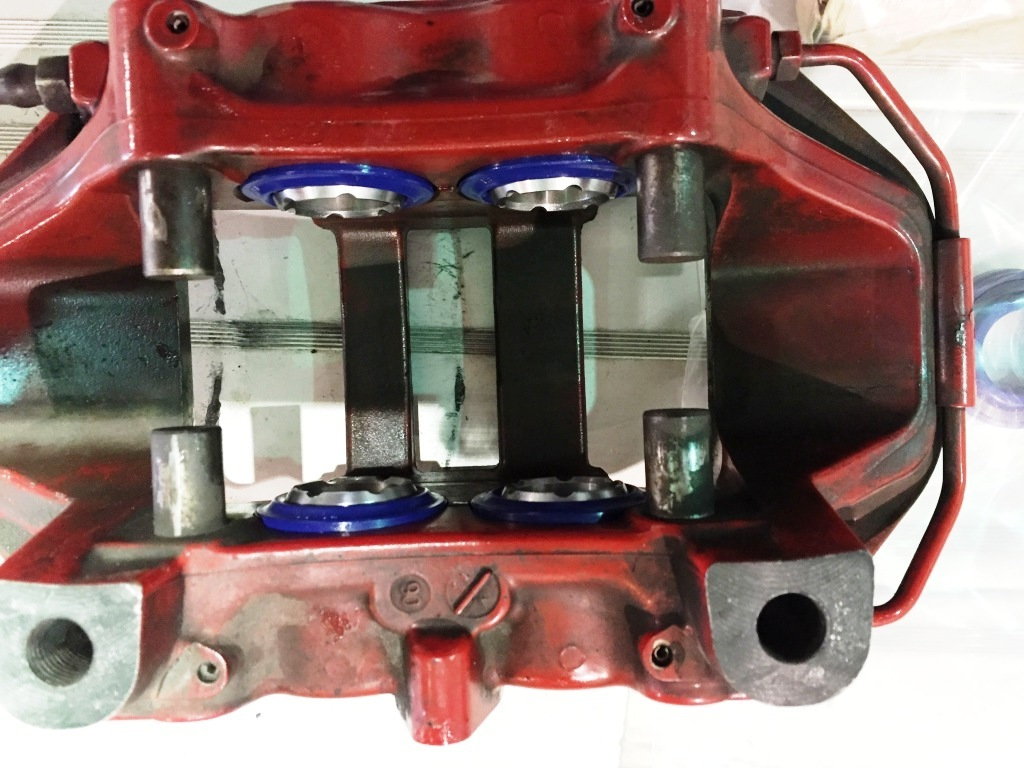
To remove the pistons, typical advice is to use compressed air to blow them out. Tip from my experience: Wedge a 1x6 board in the center of the caliper, then apply air pressure; otherwise, whichever piston moves the easiest will blow all the way out, relieving the pressure, leaving the rest of the pistons seated and VERY hard to get out. Once a piston is substantially extended, it is easy to get out - especially if you are throwing it away - just grab with pliers. Both in removing and putting in new - remember that the pistons are pretty much a machine fit - if you apply pressure at an angle, they can wedge in place. Kit ready to install:
racing brake kit ready to install
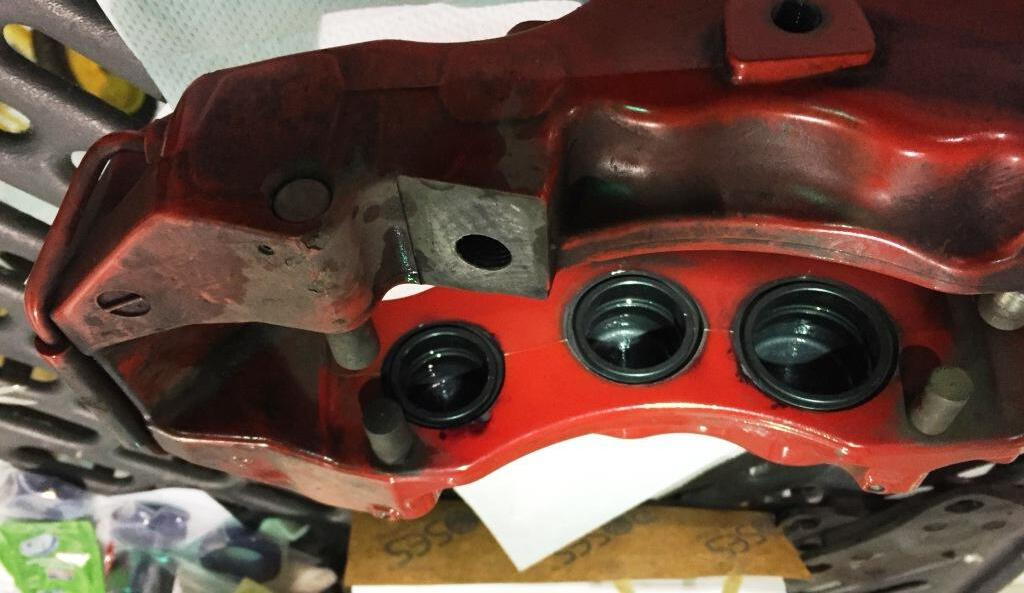
Rear caliper done (note: track car not pretty car; just going for function, on track two days later...):
rear done
Rear:
rear caliper done
Front ready:
front ready
Front different piston sizes:
different piston sizes
Fronts in process:
Front done:
pistons done front caliper
Then, calipers back on, bleed and go. Very satisfied.
Make sure the inner pressure seal recess groove is spotless, any dirt or alloy corrioson here binds the pistons and generates heat and excessive pad and disc wear.
Use proper rubber grease on assemble of all seals and pistons as well.
Put in Racing Brake Kit on my 2007 GT3, in February 2015. Car is dedicated track car, about 10K track miles, 15K total miles. Very happy with the kit.
......
Excellent write up.
Here are some tips and advantage about RB caliper rebuild kit:
Pistons are machined from stainless steel bar stock with thin wall cut to save the weight and 6-vents cuts provide for easy brake release.
Pistons top has 6-vents:
Thin wall cut:
Piston surface is chrome plated, never corrode like aluminum to assume the smooth movement against the seal.
Chrome Plating:
Since stainless steel only transmits 1/10 of heat vs. aluminum so it helps to keep the brake fluid temperature low which in turn can extend the seal life and fluid replacements due to the high heat.
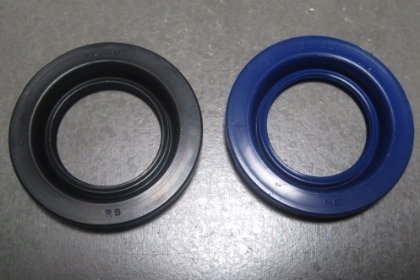
High temperature dust boots are made of Silicon (in blue color so to distinguish with standard boots in black color). It can resist up to @450 deg F vs. 300 deg F of standard boots (made of EPDM), but caution must be exercised not to be in contact with brake fluid or it will rupture.
High temperature dust boots: (blue on right)
Stainless steel pistons and high temperature dust boots is a better combination for track racers.
I changed out my inner and outer seals (no piston Chang needed, had them on hand just in case) to the RB brand (blue outer) towards the end of 2014, everything went well at the track after install. Then over the winter temps in Cincinnati Ohio dropped and all 4 calipers started to leak fluid.... RB gave me a full refund said they had made a change to the rubber. But then stopped answering email when I told them to send me the shipping label so they could inspect the seals... Which previously they said they were interested in doing.
Your mileage may vary....
To provide a little background. I am very matriculate about car work, I'm a mechanical engineer and I previously lead a team that overhauled the landing gear of commercial and military planes... So I know a thing or two about pressure seals.
FYI Centric is the OEM for porsche rotors and brembo brake seals. Confirmed (unofficially) at APEXX with one of their reps...
Put in Racing Brake Kit on my 2007 GT3, in February 2015. Car is dedicated track car, about 10K track miles, 15K total miles. Very happy with the kit.
How the calipers looked after 10K track miles:
Racing Brake Kit as received:
raceing brake caliper kit
After you pull the caliper, press on a plastic cap/nib to cover the brake line. Wheels are downhill from the master cylinder, so all the fluid will leak out otherwise (and you have to go through a much more intensive bleeding procedure for the master cylinder and ABS system). The system is not pressurized, so any snug fit cap should work. Line capped:
cap brake line
Line capped with glove finger and rubber band - works fine too:
alt cap line
Rear caliper with old pistons out:
rear caliper ready for piston
To remove the pistons, typical advice is to use compressed air to blow them out. Tip from my experience: Wedge a 1x6 board in the center of the caliper, then apply air pressure; otherwise, whichever piston moves the easiest will blow all the way out, relieving the pressure, leaving the rest of the pistons seated and VERY hard to get out. Once a piston is substantially extended, it is easy to get out - especially if you are throwing it away - just grab with pliers. Both in removing and putting in new - remember that the pistons are pretty much a machine fit - if you apply pressure at an angle, they can wedge in place. Kit ready to install:
racing brake kit ready to install
Rear caliper done (note: track car not pretty car; just going for function, on track two days later...):
rear done
Rear:
rear caliper done
Front ready:
front ready
Front different piston sizes:
different piston sizes
Fronts in process:
Front done:
pistons done front caliper
Then, calipers back on, bleed and go. Very satisfied.
I have rebuild my calipers with the same setup. I do 15-20 track fast track days a year and have to rebuild annually. The pucks have held up amazingly well, no issues, and the dust boots of course perish from heat/time. My second rebuild I used the Stop Tech dust boots, so let's see if they last longer.
With normal use, or normal DE (5-10 moderate speed days) these should last for a long time. Overall nice upgrade.
Can you please share your source for the parts kit you use (RB and Stoptech)?
I have rebuild my calipers with the same setup. I do 15-20 track fast track days a year and have to rebuild annually. The pucks have held up amazingly well, no issues, and the dust boots of course perish from heat/time. My second rebuild I used the Stop Tech dust boots, so let's see if they last longer.
With normal use, or normal DE (5-10 moderate speed days) these should last for a long time. Overall nice upgrade.
For the same set up as the pics shown the pistons were replaced with RB 1-pc stainless steel pistons, so there is "NO PUCKS" like OE piston that held up "amazingly" well unless I mis-read your comment. In fact this is the first time we heard that RB high temperature boots failed due to brake heat since we started shipping them 4-5 years ago, nor has any customer ever re-purchased the replacement boots.
Can it be due to brake fluid contact? or can you post a picture of the burnt boots so we can take a look to verify your claim; or contact us with your order number so we can verify your purchase and send you the replacement boots.
All RB High Temperature (Blue) boots are guaranteed against heat fracture for 12 month at any braking conditions; including racing & track application and/or pccb with higher heat braking.
Can you please share your source for the parts kit you use (RB and Stoptech)?
Hey, if I understood your question...I got the Performance Brake rebuild kids for 997.2 GT3 direct from their website. I think the kit part # was:
BP-60BSP and BP-408BSP. Both kits included the pistons, lube and high temperature dust boots. I think the Piston sizes for 997.2 GT3 with iron brakes was 28-30-32 front and 34 rear.
The Stoptech dust boots were purchased from Ohio Performance Solutions in same sizes.
I will let you reach out to those vendors about pricing, as it could have changed.
For the same set up as the pics shown the pistons were replaced with RB 1-pc stainless steel pistons, so there is "NO PUCKS" like OE piston that held up "amazingly" well unless I mis-read your comment. In fact this is the first time we heard that RB high temperature boots failed due to brake heat since we started shipping them 4-5 years ago, nor has any customer ever re-purchased the replacement boots.
Can it be due to brake fluid contact? or can you post a picture of the burnt boots so we can take a look to verify your claim; or contact us with your order number so we can verify your purchase and send you the replacement boots.
All RB High Temperature (Blue) boots are guaranteed against heat fracture for 12 month at any braking conditions; including racing & track application and/or pccb with higher heat braking.
Yes, I am referring to the stainless pistons, those are still in pristine condition. The dust boots did deteriorate on the rear first and I will replace front soon.
My order # was 23612 and placed on 9/6/2016. I honestly would not expect you to send me replacements as those seals and boots can logically not last forever, so the longevity for my use case seemed reasonable.
As for what caused the damage I cannot get sure but the car is driven hard and pads, rotors, etc. get swapped often and things get inspected all the time.

 01-07-2016, 04:05 PM