

Centerlocks - I'm out! ....Hello 5-lug conversion!
 02-02-2014 | 11:19 AM
#332
Rennlist Member
Joined: Jan 2003
Posts: 301
Likes: 2
Okay�much bigger job than expected. The hub and bearing fit in your hand and seem so innocent�
A couple of questions:
1. Rear: Is it possible to remove the rear axle without complete disassembly of the suspension hardware and basically removing the entire carrier/upright? The aluminum subframe limits the ability to angle it down and slide it out like I did on my 964. Can't imagine race teams do this; there must be a way�
2. Front: It appears that the entire corner needs to be removed, including the entire strut from the car. For cars with Front Axle Lift:
(a) it is a pneumatic system, not hydraulic, correct?
(b) Can the little line at the bottom just be disconnected without causing any issues?
3. I have read (need to search more) that camber range can be shifted by "rotating the tops". What is the available range in each position, and do most people do this? I think my desired camber is about -2.5, +/-.5 degree.
Thank you!
Eric
02-02-2014 | 12:46 PM
#333
Nordschleife Master
Joined: Dec 2009
Posts: 5,929
Likes: 22
From: Limehouse, ON
Rear axle: Not sure about the newer cars, but on mine, just disconnecting the lower shock mount allows to move the whole wheel carrier up, which gives you enough angle to slide the half-shaft front and down.
Disconnecting the sway bar might also give a bit more room.
Disconnecting the sway bar might also give a bit more room.
02-04-2014 | 11:42 AM
#335
Rennlist Member
Joined: Jan 2003
Posts: 301
Likes: 2
I have been keeping some notes and will post a summary when complete. At this point, I have all four corners off the car; the rear hubs are being converted today, and the front hubs converted tomorrow.
My research indicates that these axles are quite robust and failures are rare. However, since they are such a bear to remove and reinstall, to further enhance reliability I am taking the steps of having the CV's cleaned out and re packed with NEO HPCC1 synthetic CV grease prior to reinstall.
General impressions:
1. Big and complicated job, one that in many cases needs to people to be sure items are handled and supported properly.
2. Performance doesn't come free. This car is 17 years and technically four generations newer than my RSA; the performance leap is significant, but so is the complexity.
3. There are very fragile little parts that you really need to be careful with, such as the PASM potentiometer mechanisms. Those are fine; however, there is also a very small vacuum line connection to the Brake Booster that isn't. It snapped off at the housing when trying to remove the axle. And it wasn't the first time - when the previous owner had the LSD upgraded apparently they broke it off and tried to repair it with JB Weld. Trying to effect a proper fix, as it appears replacing the line may be complicated.
4. I was able to remove the front carriers without removing the struts. This required removing everything else, then carefully sliding the carrier down the strut. My car has Front Axle Lift, so it required removing the 12mm nut connecting the line near the bottom of the strut in order to slide the carrier off.
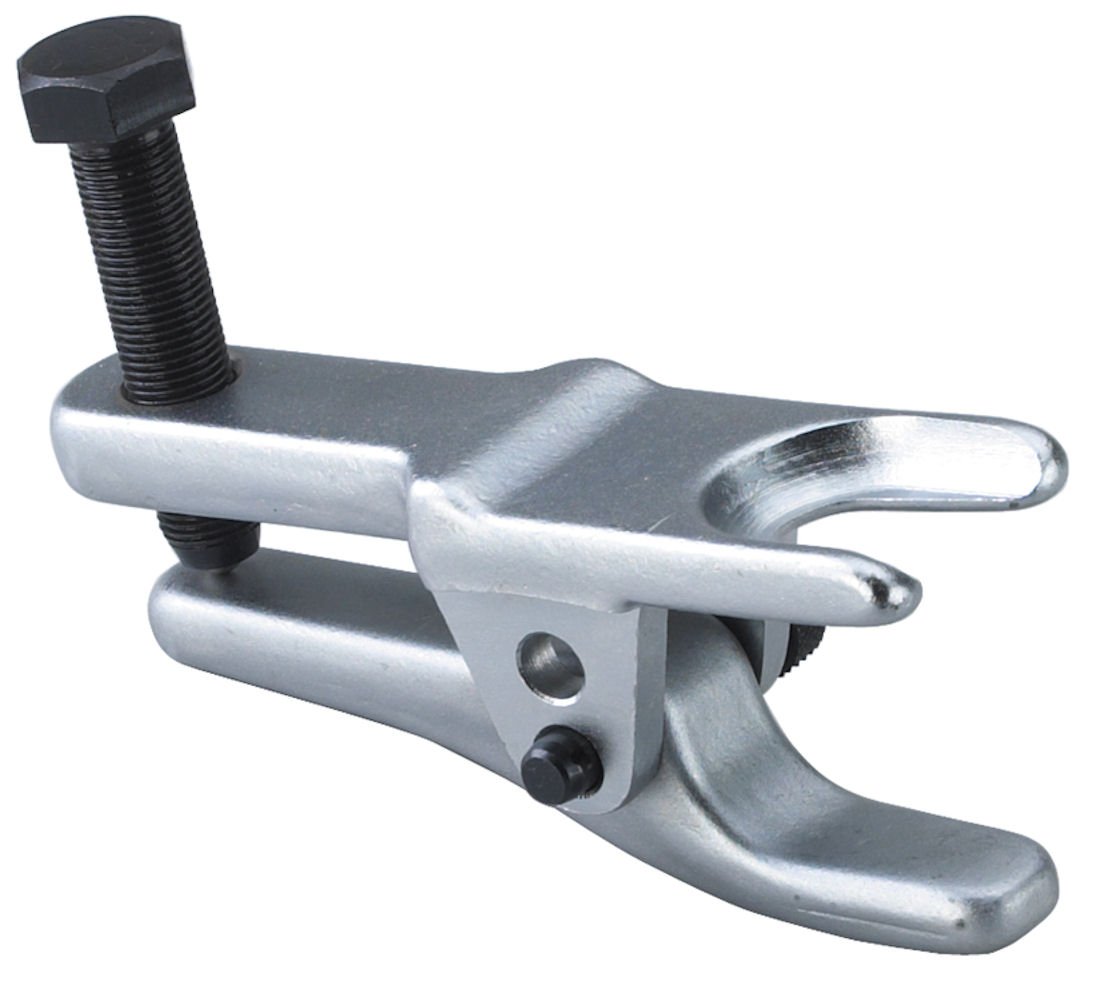
5. Question: Who knows the best/proper tool for removing tapered ball joint and toe link pins? Holy crap; my first experience with these and they are a bitch to remove. There is supposedly a simple tool that essentially squeezes them and presses them out, and I need to get one before I attempt this again.
My research indicates that these axles are quite robust and failures are rare. However, since they are such a bear to remove and reinstall, to further enhance reliability I am taking the steps of having the CV's cleaned out and re packed with NEO HPCC1 synthetic CV grease prior to reinstall.
General impressions:
1. Big and complicated job, one that in many cases needs to people to be sure items are handled and supported properly.
2. Performance doesn't come free. This car is 17 years and technically four generations newer than my RSA; the performance leap is significant, but so is the complexity.
3. There are very fragile little parts that you really need to be careful with, such as the PASM potentiometer mechanisms. Those are fine; however, there is also a very small vacuum line connection to the Brake Booster that isn't. It snapped off at the housing when trying to remove the axle. And it wasn't the first time - when the previous owner had the LSD upgraded apparently they broke it off and tried to repair it with JB Weld. Trying to effect a proper fix, as it appears replacing the line may be complicated.
4. I was able to remove the front carriers without removing the struts. This required removing everything else, then carefully sliding the carrier down the strut. My car has Front Axle Lift, so it required removing the 12mm nut connecting the line near the bottom of the strut in order to slide the carrier off.
5. Question: Who knows the best/proper tool for removing tapered ball joint and toe link pins? Holy crap; my first experience with these and they are a bitch to remove. There is supposedly a simple tool that essentially squeezes them and presses them out, and I need to get one before I attempt this again.
Last edited by RedRSA; 02-04-2014 at 11:57 AM.
02-04-2014 | 04:41 PM
#337
Nordschleife Master
Joined: Dec 2009
Posts: 5,929
Likes: 22
From: Limehouse, ON
5. Question: Who knows the best/proper tool for removing tapered ball joint and toe link pins? Holy crap; my first experience with these and they are a bitch to remove. There is supposedly a simple tool that essentially squeezes them and presses them out, and I need to get one before I attempt this again.
 02-05-2014 | 02:35 AM
#338
Rennlist Member
Joined: Jan 2003
Posts: 301
Likes: 2
The fronts are a whole different story altogether as the pin is buried inside the channel of the carrier. Perhaps an advantageous design in terms of suspension geometry, but difficult to access.
They may have advantages, and I am certain these were over-torqued, but they are such a pain that I'm not sure I'm a fan.
03-12-2014 | 10:53 AM
#339

Pro
Joined: Aug 2010
Posts: 542
Likes: 25
I just finished the conversion on my own RS. I want to thank the OP for this thread.
By the way the Front wheel hub 997 341 605 01 now has a new part number 991 341 605 02 - and the best part is that its cheaper too!
I ordered all my parts on Sonnen and saved ~$500-$600 vs. the prepackaged kit prices. The part numbers are all listed.
By the way the Front wheel hub 997 341 605 01 now has a new part number 991 341 605 02 - and the best part is that its cheaper too!
I ordered all my parts on Sonnen and saved ~$500-$600 vs. the prepackaged kit prices. The part numbers are all listed.
03-16-2014 | 02:13 AM
#340
Rennlist Member
Joined: Jan 2003
Posts: 301
Likes: 2
I also found that there is a new 991 part number that supersedes the 997 part and it is indeed cheaper. But the ones I received were also bare steel; I opted to return them and reorder the 997 parts with the black anti-corrosion coating.
03-17-2014 | 08:06 PM
#341
Thread Starter
Rennlist Member
Joined: Aug 2008
Posts: 923
Likes: 113
From: Las Vegas
I just finished the conversion on my own RS. I want to thank the OP for this thread.
By the way the Front wheel hub 997 341 605 01 now has a new part number 991 341 605 02 - and the best part is that its cheaper too!
I ordered all my parts on Sonnen and saved ~$500-$600 vs. the prepackaged kit prices. The part numbers are all listed.
By the way the Front wheel hub 997 341 605 01 now has a new part number 991 341 605 02 - and the best part is that its cheaper too!
I ordered all my parts on Sonnen and saved ~$500-$600 vs. the prepackaged kit prices. The part numbers are all listed.

+1 on kudos to Doug, and also to Steve, as both were responsive when I ran I to questions. I need to update my entry with a few things that I discovered.
I also found that there is a new 991 part number that supersedes the 997 part and it is indeed cheaper. But the ones I received were also bare steel; I opted to return them and reorder the 997 parts with the black anti-corrosion coating.
I also found that there is a new 991 part number that supersedes the 997 part and it is indeed cheaper. But the ones I received were also bare steel; I opted to return them and reorder the 997 parts with the black anti-corrosion coating.
Cheers!
Doug N
03-19-2014 | 03:18 PM
#342
Race Car
Joined: Nov 2005
Posts: 3,918
Likes: 10
From: Calgary...Under my car... :)
+1 on kudos to Doug, and also to Steve, as both were responsive when I ran I to questions. I need to update my entry with a few things that I discovered.
I also found that there is a new 991 part number that supersedes the 997 part and it is indeed cheaper. But the ones I received were also bare steel; I opted to return them and reorder the 997 parts with the black anti-corrosion coating.
I also found that there is a new 991 part number that supersedes the 997 part and it is indeed cheaper. But the ones I received were also bare steel; I opted to return them and reorder the 997 parts with the black anti-corrosion coating.

 07-25-2014 | 12:10 AM
#344
Race Car
Joined: Nov 2005
Posts: 3,918
Likes: 10
From: Calgary...Under my car... :)