
GMG Exhaust
 08-16-2007, 12:18 AM
#1
Needs to Get a Life
Rennlist Member
Rennlist Member
Thread Starter
I installed the GMG Exhaust I bought a couple of weeks ago. Here are some pics I took while I was installing it. Overall, it is not a hard job. I have not worked on 911 exhausts before so it was all a learning experience for me. I still do not have it adjusted correctly. It needs to go to the left about 1/3" to 1/2 ". I will probably take it into my shop and have them tweak it as I doubt I will have any more time to play with it for a week or so.
It sounds great. It is just enough and just loud enough. The sport button can still be used to engage a louder sound, which is awesome. As good as the stock sound is I am really excited about what I heard after installing this exhaust!
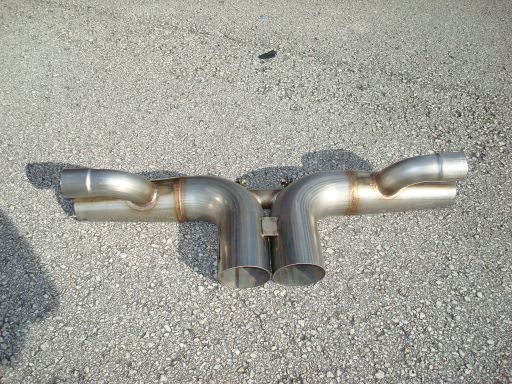
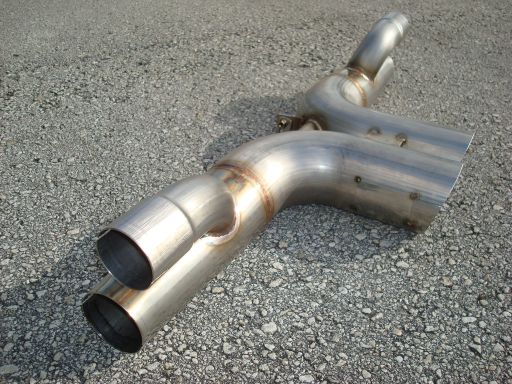
Pics of the exhaust
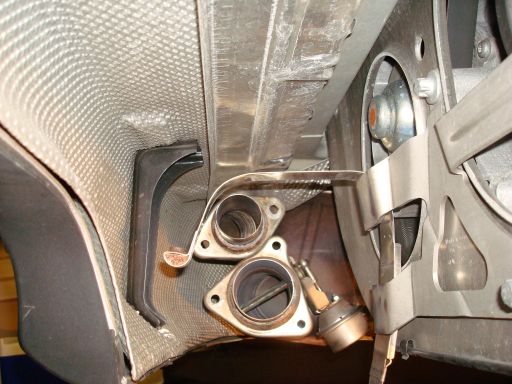
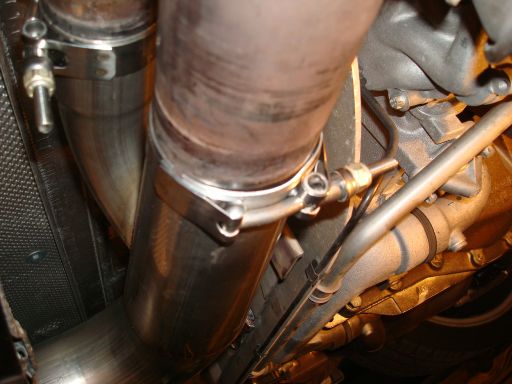
The point where the exhaust joins the muffler I am about to replace. Remove bolts from top and bottom pipes.

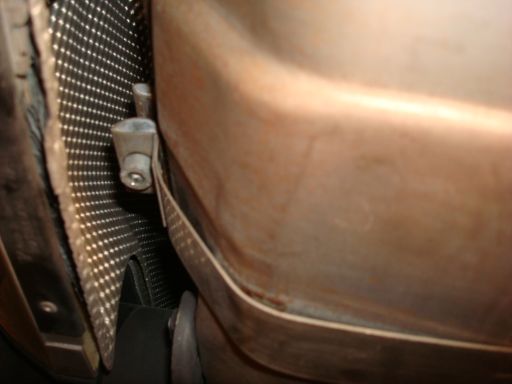
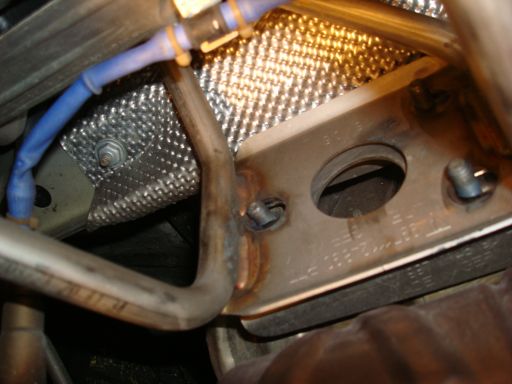
This is a picture of the steel strap that holds the muffler in place. Loosen the bolt and the strap comes off easily.
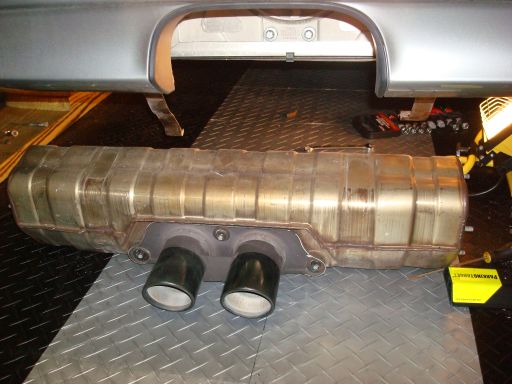
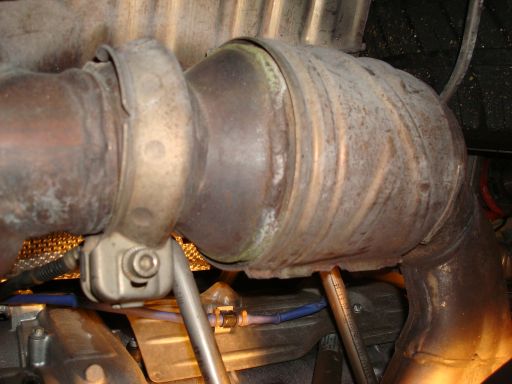
Picture of the muffler removed.
Picture of cavity after muffle is removed. Note the valve in the lower pipe. This is the vacuum assisted valve that changes the exhaust sound.
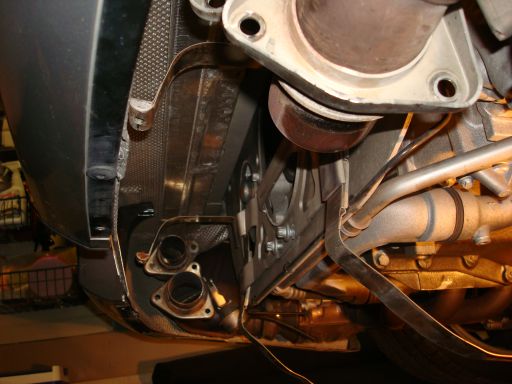
After you remove the bolts and the straps you have to loosen the bolts that hold the rest of the exhaust so that you can wiggle the assembly a little to drop the muffler.
About to mount the new exhaust
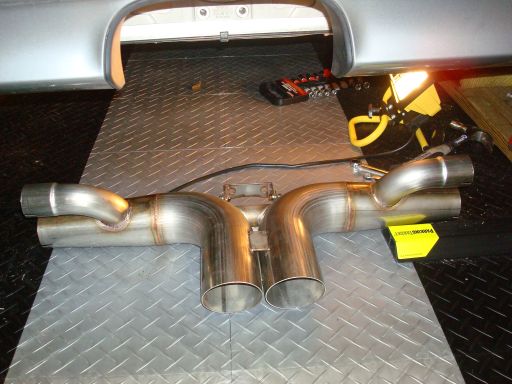
Picture of exhaust dry fitted into place

GMG Clamps
Overall, I am really happy with the sound. I can't wait to get it out on the road.
It sounds great. It is just enough and just loud enough. The sport button can still be used to engage a louder sound, which is awesome. As good as the stock sound is I am really excited about what I heard after installing this exhaust!
Pics of the exhaust
The point where the exhaust joins the muffler I am about to replace. Remove bolts from top and bottom pipes.
This is a picture of the steel strap that holds the muffler in place. Loosen the bolt and the strap comes off easily.
Picture of the muffler removed.
Picture of cavity after muffle is removed. Note the valve in the lower pipe. This is the vacuum assisted valve that changes the exhaust sound.
After you remove the bolts and the straps you have to loosen the bolts that hold the rest of the exhaust so that you can wiggle the assembly a little to drop the muffler.
About to mount the new exhaust
Picture of exhaust dry fitted into place
GMG Clamps
Overall, I am really happy with the sound. I can't wait to get it out on the road.

 08-16-2007, 12:44 AM
#3
Great write up and photos.
Did you get any weights of the rear muffler section vs the GMG exhaust? I have heard conflicting info. GMG claims a 20 lbs weight reduction with their exhaust, but according to the AWE tuning post regarding their upcoming exhaust, the stock rear muffler section weighs 20 lbs. Either someone is wrong or the GMG exhaust can float on air.
Did you get any weights of the rear muffler section vs the GMG exhaust? I have heard conflicting info. GMG claims a 20 lbs weight reduction with their exhaust, but according to the AWE tuning post regarding their upcoming exhaust, the stock rear muffler section weighs 20 lbs. Either someone is wrong or the GMG exhaust can float on air.
08-16-2007, 12:54 AM
#4
Addict
Lifetime Rennlist
Member
Lifetime Rennlist
Member
I know Fabryce's stuff is fantastic I wear his GMG Racing hat to work everyday
(I am the only engineer wearing a cap to work)
How is the sound and what is he HP pick up according to GMG?
If I could I would take my GT3 and just leave it with Fabryce for a couple weeks-his stuff is that good.
Now If I could win the lotto!!
(I am the only engineer wearing a cap to work)
How is the sound and what is he HP pick up according to GMG?
If I could I would take my GT3 and just leave it with Fabryce for a couple weeks-his stuff is that good.
Now If I could win the lotto!!
08-16-2007, 01:05 AM
#5
Needs to Get a Life
Rennlist Member
Rennlist Member
Thread Starter
I just weighed the exhaust I removed and it is 20 lbs exactly, with the steel straps. There may be another pound in some of the other items that came off too. I did not weigh the new exhaust but it was very lite.
I do not know about the claims on HP increase. There might be something there but I have never been much of a believer in those claims so I don't pay much attention to them.
I do not know about the claims on HP increase. There might be something there but I have never been much of a believer in those claims so I don't pay much attention to them.
08-16-2007, 01:06 AM
#6
Needs to Get a Life
Rennlist Member
Rennlist Member
Thread Starter
Originally Posted by fc-racer
Any in-car resonance?
I am not sure what you mean.
I have not driven it any distance yet so I will let you know what is different when in the car.
08-16-2007, 01:17 AM
#7
Addict
Lifetime Rennlist
Member
Lifetime Rennlist
Member
in car resonance would be when the exhaust hits a note that is compatible with the cabins resonant frequency and they combine to make a louder more annoying droning sound. You'd know it-it it several db higher than the regular exhaust note. it will be at some RPM everytime. My 993TT had one at 4000 rpm with the muffler bypasses. It drops off after that.
Trending Topics
09-30-2013, 01:26 AM
#8
Rennlist Member
Reviving this thread since it encouraged me to go this route- installed my FVD center bypass without removing the bumper. It was a pretty tough job-completely loosened both side mufflers and finally got it. But it sure killed me being under the car, up on ramps and it got pretty claustrophobic- it's cramped down there 
I used some u joint attachments on my ratchet to get to the 13mm nuts. If i had to do it again I think I'd go ahead and remove the bumper.
Liquid wrench on the nuts is a must-slipping the pipe in was a mission, the hardest part
But, after a lot of time, sweat and pain with the install, I have to say it's super awesome
I have the Carnewal remote and it's good to be able to switch back to spare the neighbors.
Thanks to Renlist member ivs who had the stainless steel FVD for sale- I had considered buying the titanium version, but their introductory promo price was no longer available.
09-30-2013, 12:52 PM
#9
Rennlist Member
Thanks for reviving this thread. My '07 came with a a new in-the-box Fabspeed center muffler delete that the PO never got around to installing. I haven't decided whether or not to use it as I got one of the RSS tips that were on sale a couple months ago and I like the way they look much better than the double wall polished tips that came with the Fabspeed. But I guess I could have my muffler guy fab some nice plain stainless tips.
I do most of my own wrenching so after reading GT3CAR's post, it appears that it will be easy enough to swap it back if I don't like it. I would like more sound but not too loud like the M&K sport muffler that I had on my modded '87 Carrera.
In a perfect world (meaning excess disposable income...) I'd already have one of Eddie's M&M center mufflers with the side deletes. And a set of E88's.
09-30-2013, 01:13 PM
#10
Rennlist Member
Removing the rear bumper and side heat shields is about a 15 min job (its really easy) and makes this a much easier job. You don't need to jack the car up except to get the torx on the upper inner wheel well. Then all you need to do is loosen 1 muffler, slide it out of the way and remove the center then do the swap. I recently did the side muffler bypass install with stock steel center, removing a sharkwerks bypass in the process took me about 4 hours, including doing a bunch of cleaning while I was in there.
10-10-2015, 11:44 AM
#11
Advanced
Join Date: Apr 2015
Location: CO
Posts: 63
Likes: 0
Received 0 Likes
on
0 Posts
Sorry for resurrecting this thread again
I ended up purchasing a used GMG center bypass and was wondering if anyone knows size of those clamps. I think it needs 4 clamps but can't figure out how big are those pipes.
I will probably have to source those clamps before I do the DIY.
Thanks!
I ended up purchasing a used GMG center bypass and was wondering if anyone knows size of those clamps. I think it needs 4 clamps but can't figure out how big are those pipes.
I will probably have to source those clamps before I do the DIY.
Thanks!