
Radiator Grill Intake DIY/Bumper Removal
 11-14-2010, 09:15 PM
#46

2009 C2S made my own mesh grills. Project took about 4 hours from start to finish and I installed them without removing the front bumper cover. Total cost of parts around $6. Center grill is quickly removable so I can clean what gets through the outer ones easily.
The question is why were not they installed from the factory? Porsche does put them on the new GT3 and has also put them on the "cup" cars for several years.
The question is why were not they installed from the factory? Porsche does put them on the new GT3 and has also put them on the "cup" cars for several years.
 11-15-2010, 10:52 AM
#47
2009 C2S made my own mesh grills. Project took about 4 hours from start to finish and I installed them without removing the front bumper cover. Total cost of parts around $6. Center grill is quickly removable so I can clean what gets through the outer ones easily.
The question is why were not they installed from the factory? Porsche does put them on the new GT3 and has also put them on the "cup" cars for several years.
The question is why were not they installed from the factory? Porsche does put them on the new GT3 and has also put them on the "cup" cars for several years.
12-07-2010, 05:14 PM
#48
Addict
Rennlist Member
Rennlist Member
additional DIY info https://rennlist.com/forums/997-foru...e-install.html
And a transformation from my track-day quick&dirty workaround (just compare the first pic to the last!). This is one of the most useful threads on RL!
Instead of using glue, screws or rivets, I drilled 4 small holes around the perimeter of each intake, and secured the mesh with cable ties. I used the same material that Mike found at Lowe's, but decided to try out the white instead.
02-21-2011, 01:42 PM
#49
Intermediate

Join Date: Jun 2010
Location: UK
Posts: 49
Likes: 0
Received 0 Likes
on
0 Posts
The screw holds the bumper guide to the body - that's all. If you do remove it, screw it back in BEFORE you re-attach the bumper and the job will be alot simpler
 02-21-2011, 07:00 PM
#50
Rennlist Member
Thread Starter

 07-23-2012, 03:59 PM
#52
Hi All,
I am updating this older topic.
Presently (July 2012), Orchard Supply Hardware as mentioned in previous posts does not ship this product. So, while it is great for the CA folks, the rest of us have to look elsewhere.
Hillman Group is the manufacturer whose WWW site can be found here:
hillmangroup.com
Smaller pieces from the mfg. are sold at Lowe's (unfinished), but I could not find a "local" vendor of the powdercoated sheets.
~~~~~~~
However, earlier posts also mention:
customcargrills.com
I went with customcargrills.com and am using the "Perforated Hex with Black Powdercoat." They have several styles (oval, hex, diamond weave, etc) and finishes. Plus, they list the "openess," which can help understand potential air-flow restriction.
I am not affiliated with these vendors, but this was a great solution for me at about $70 shipped.
...still much less than the $300-ish options.
07-25-2012, 02:25 AM
#54
Racer
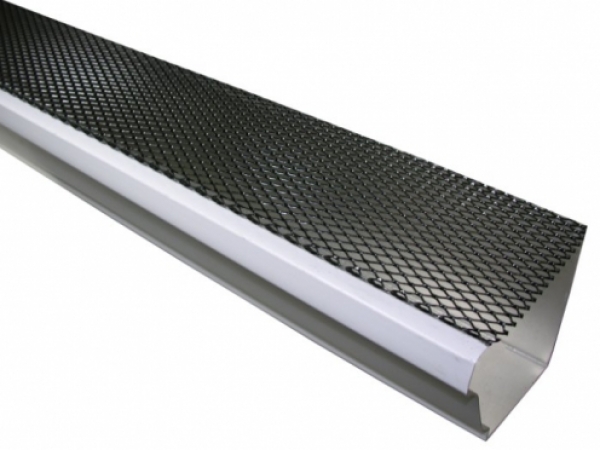
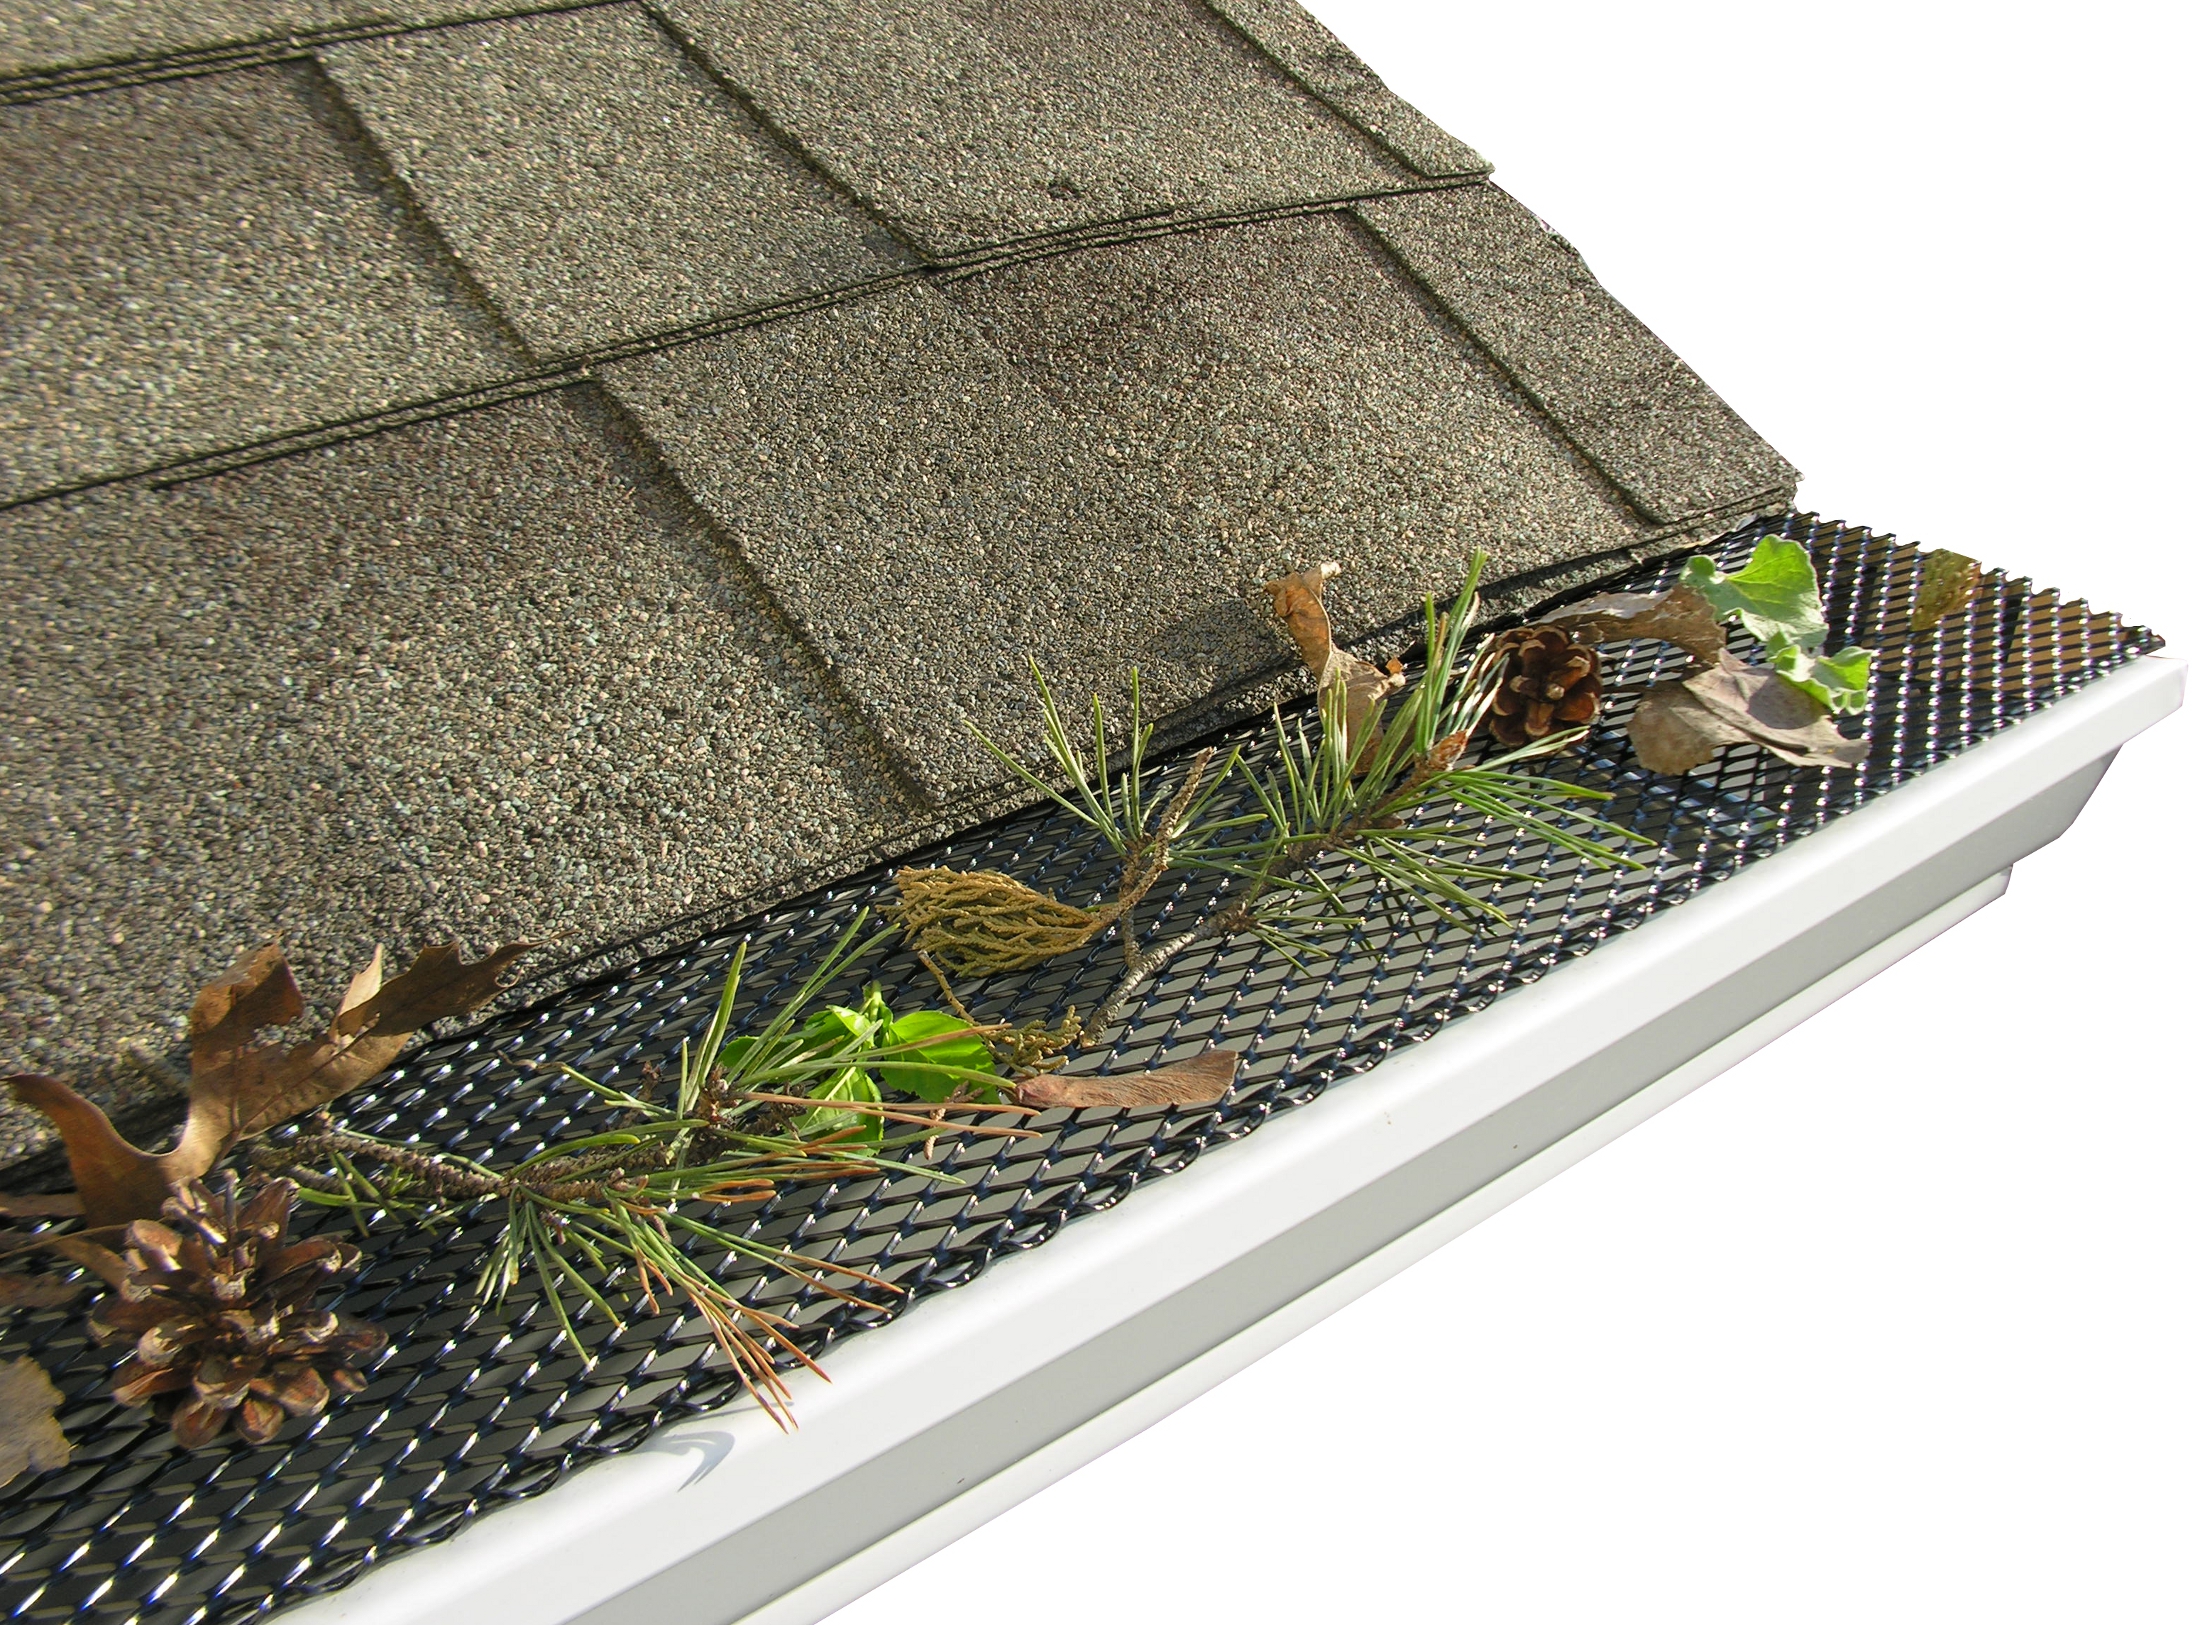
Get the gutter screens from www.guttersupply.com. They are a black powder coated fine gauge expanded diamond mesh steel with a large 85% open area percentage. The diamond dimensions are perfectly sized at 1/2" x 1/3". $5.29 per 8" x 48" piece, plus shipping. Use two pieces for one car.
http://www.guttersupply.com/p-gutter...-lock-on.gstml
http://www.guttersupply.com/p-gutter...-lock-on.gstml
07-25-2012, 02:42 AM
#55
^^^^^^
Nice find!!
I should have asked first!!
Heh, at least mine are a little different, so I can pretend to justify the extra $50 I spent to get "hex."
...however, I might get some of that stuff for my gutters!
Nice find!!
I should have asked first!!
Heh, at least mine are a little different, so I can pretend to justify the extra $50 I spent to get "hex."
...however, I might get some of that stuff for my gutters!
07-25-2012, 07:45 PM
#56
Rennlist Member

Shout Out to Ryan for a Great DIY (w/ pics)!
just did the job, and it was so helpful.
I had Porsches' tech bulletin on how-to, and it was WAY too Vague!
just did the job, and it was so helpful.
I had Porsches' tech bulletin on how-to, and it was WAY too Vague!
 01-07-2013, 10:36 PM
#57
AutoX

Join Date: Mar 2011
Posts: 11
Likes: 0
Received 0 Likes
on
0 Posts
The gutter supply product is awesome! I would never pay for a preformed product given how easy it was to trim and shape. If you own a vise, this is definitely a doable DIY. I paid less than $25 for 2 pieces 8 inches by 48 inches. I had enough for all 3 pieces and still have 32 inches extra in case I need to replace anything or if I made a mistake during fabrication.
Great info on the bumper removal. Thank you for everyone's input. In order to install the mesh correctly, you have to remove the bumper. In addition, remove the rubber around the radiators and clean them. I was shocked at how much debris was packed into the upper section of the radiator. You can't see the upper section without removing the rubber surround. Cleaning the radiators is part of the benefit of this DIY.
Great info on the bumper removal. Thank you for everyone's input. In order to install the mesh correctly, you have to remove the bumper. In addition, remove the rubber around the radiators and clean them. I was shocked at how much debris was packed into the upper section of the radiator. You can't see the upper section without removing the rubber surround. Cleaning the radiators is part of the benefit of this DIY.
