When you click on links to various merchants on this site and make a purchase, this can result in this site earning a commission. Affiliate programs and affiliations include, but are not limited to, the eBay Partner Network.
I was looking to blow out the water drain areas. I was told by a service tech there is a service position that you can put the top into. This would give some access to blow the drains out.
I don't know if there is a specific way of reaching the position but I have only read that the service position is reached by pushing the remote until the rear hatch is completely open and the roof is detached so that there is a 12 cm gap to the front attachment / hook.
Please attach some photos if possible. I did not know about cleaning these drain holes. It would be really good to see where they are. P.s remove key from ignition and put it somewhere where the top cannot be accidentally operated for safety reasons
Last edited by Racetwin2; Dec 13, 2014 at 03:56 AM.
Will do. I learnt the hard way. Found waterpuddling in the rear seat bowls. I took off the rear wheels to access the Lower drains to see if it was clogged. A bit dirty but no enough to allow water to back up. So I brought it to a convertible top place to search for a leak. They had it under a rain bath, took the interior panels off and had a guy sit inside while another guy was blasting the car with water. They couldn't find a leak.
When I picked up the car, i noticed two trails of water from the rear wheels. I think what they did, though they didn't say, was cleaned out the top access drains. Still, I was charged 3 hours of labour.
I just want to make it a part of my cleaning maintenance duties and not have to pay anyone a couple hundred to do it.
Me thinks I've got an issue with these. Rear passenger side footwell gets damp when it rains. Under the floor mat. It's been maddening. Perhaps I've got some cleaning to do.
I did the internediate service on my car Sunday, including cleaning the front and rear drains, which I had never done. Here's what I learned.
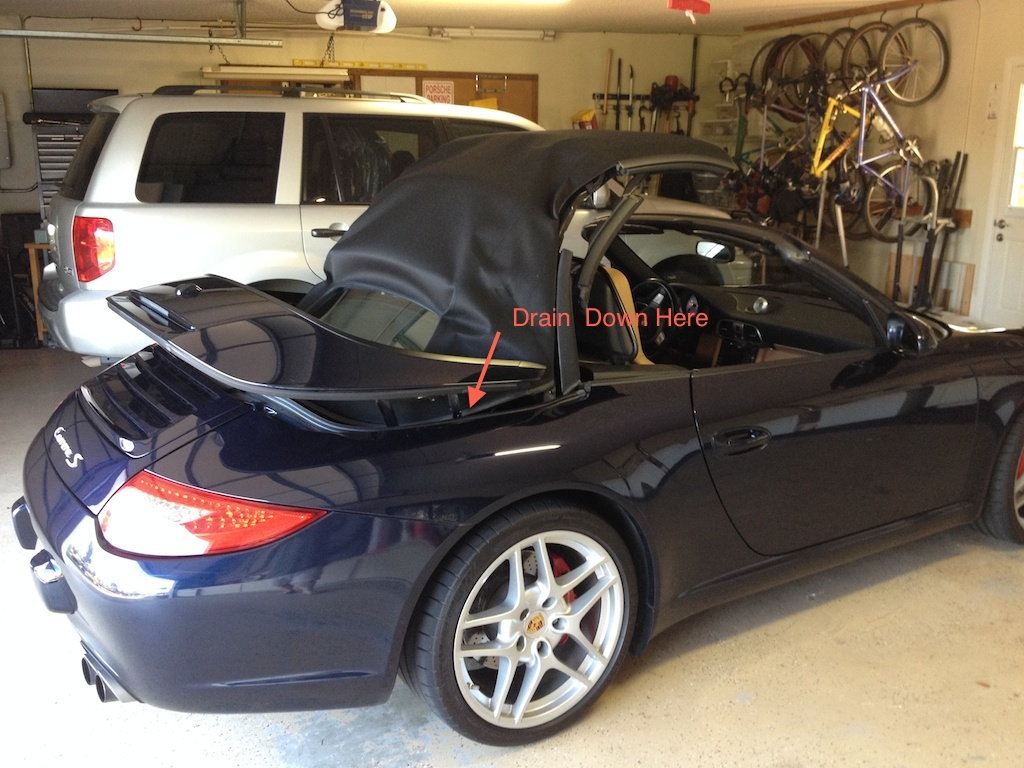
To put the top in service postion, start with the roof closed and hold the switch for the roof until the hard tonneau top raises and you can see down into the carpeted compartment where the top rests when folded.
There is a drain on each side, in a small depression near the rear quarter panel. In the center of each depression is a small (~1/4" diameter) opening in the carpet, which is the top of the drain tube. I was able to fit a small piece of Tygon tubing (like you would use to bleed brakes) snugly into the hole.
I put the other end of the tube in my mouth and blew some air, then took a swig of clean water and forced this down the tube and into the drain. This could also be done with a squirt bottle, but I'm not that fancy
The water will exit beneath the rear-most fender liner in the wheel well, and drip to the floor. Others have recommended removing this panel, as debris from the drains can accumulate and form a "cake", but my drains flowed well and I skipped this.
The front drains are easier. With the frunk lid open, remove the 3 panels with quarter turn fasteners that are in front of the cowl. You may only have to remove the center panel (over the battery), but I had mine off already for other reasons.
On either side of the battery, you will find an opening on the bottom surface about 3/4" in diameter. Unlike in the rear, these drain holes have a rubber flap at the top that acts as a primitive filter to keep debris out of the drain lines. If you stick your pinky in, you can feel this flap move aside. I was able to insert a larger tube (~1/2" OD) into the drain hole, push it past the flap, and proceed with blowing out and clearing the drains. I did not see the distal end of the drain tube, but I believe it exits beneath the trunk and is not obscured behind a panel, as the rear is.
This is maybe a 15 minute job once you know where things are. I'll add some pictures of the drains when I get home tonight.
Good to learn about the need to maintain the drains. I am looking for a Cab now and passed on one because the service records showed water clean up (all carpets out) from clogged drains. I assumed something wasn't right about the car, but apparently the prior owner must not have kept the drains clear as part of routine care.
Excuse the poor quality. These were taken with an iPhone and a flashlight.
Here is the approximate position the top needs to be in.
If you look where the arrow is pointing in the first picture, you will see the passenger side drain. There is another on the driver side in the same relative location.