When you click on links to various merchants on this site and make a purchase, this can result in this site earning a commission. Affiliate programs and affiliations include, but are not limited to, the eBay Partner Network.
Need a little help to pry apart the inner part of my new steering wheel. It's been referred to as the "T". Do you just use pry tools to pop it out or is there a specific way? Searching hasn't given me all the answers. Only found one thread but it was for a Tiptronic and it involved removing the thumb shifters first....
For the record, I tried and gave up for fear of breaking something. Also, like you, I found a few instructions for the other wheel but this thing does not want to budge.
iirc, I was trying to switch over the trim from my original wheel with the controls over to an alcantara wheel. I just gave up and no longer have steering mounted controls.
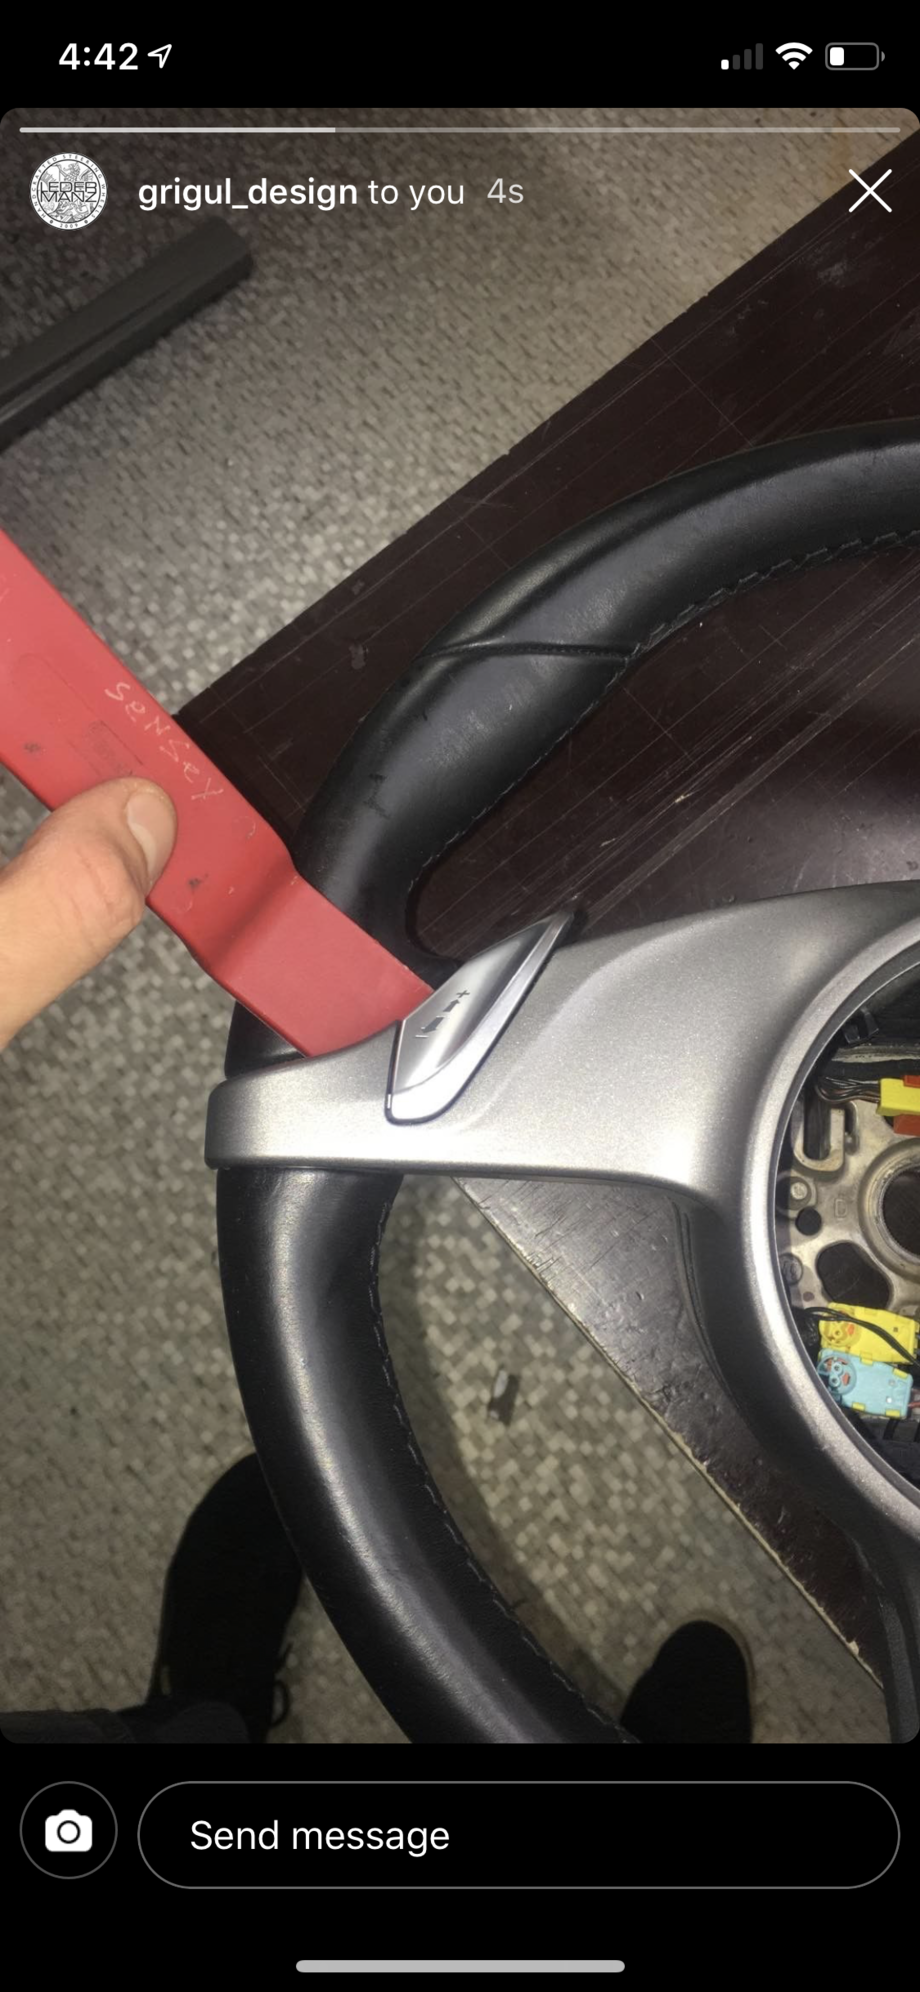
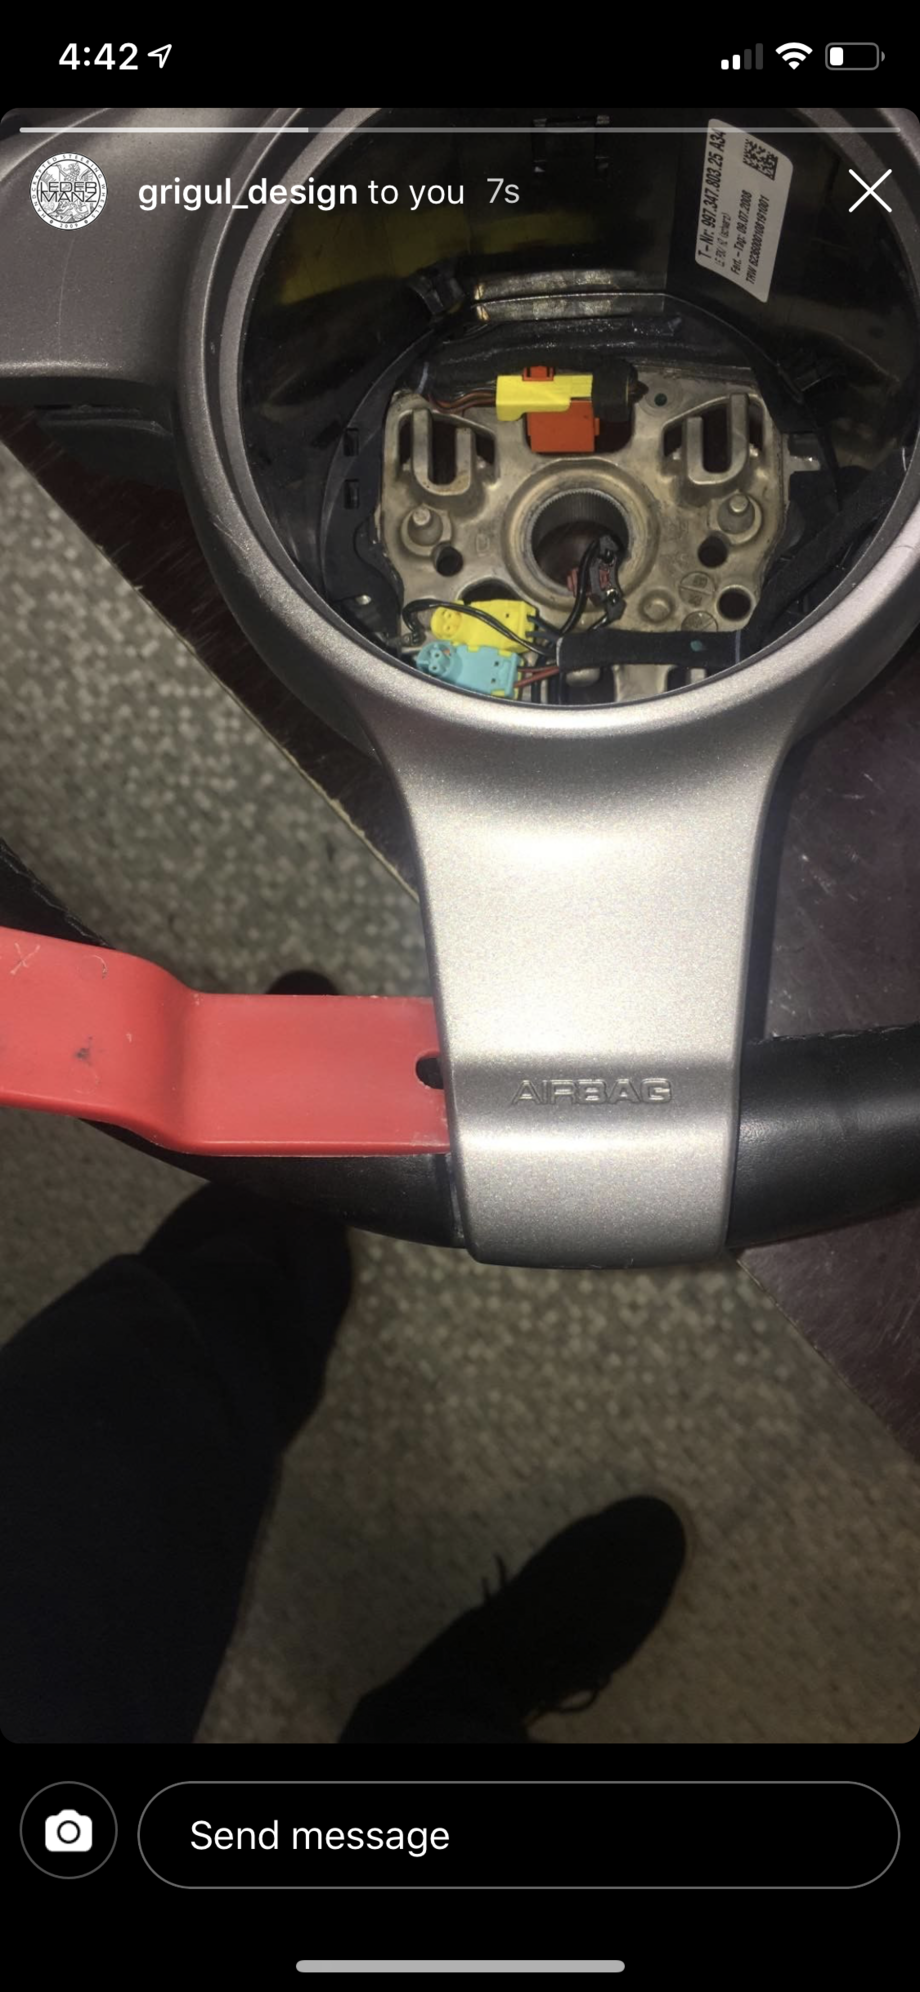
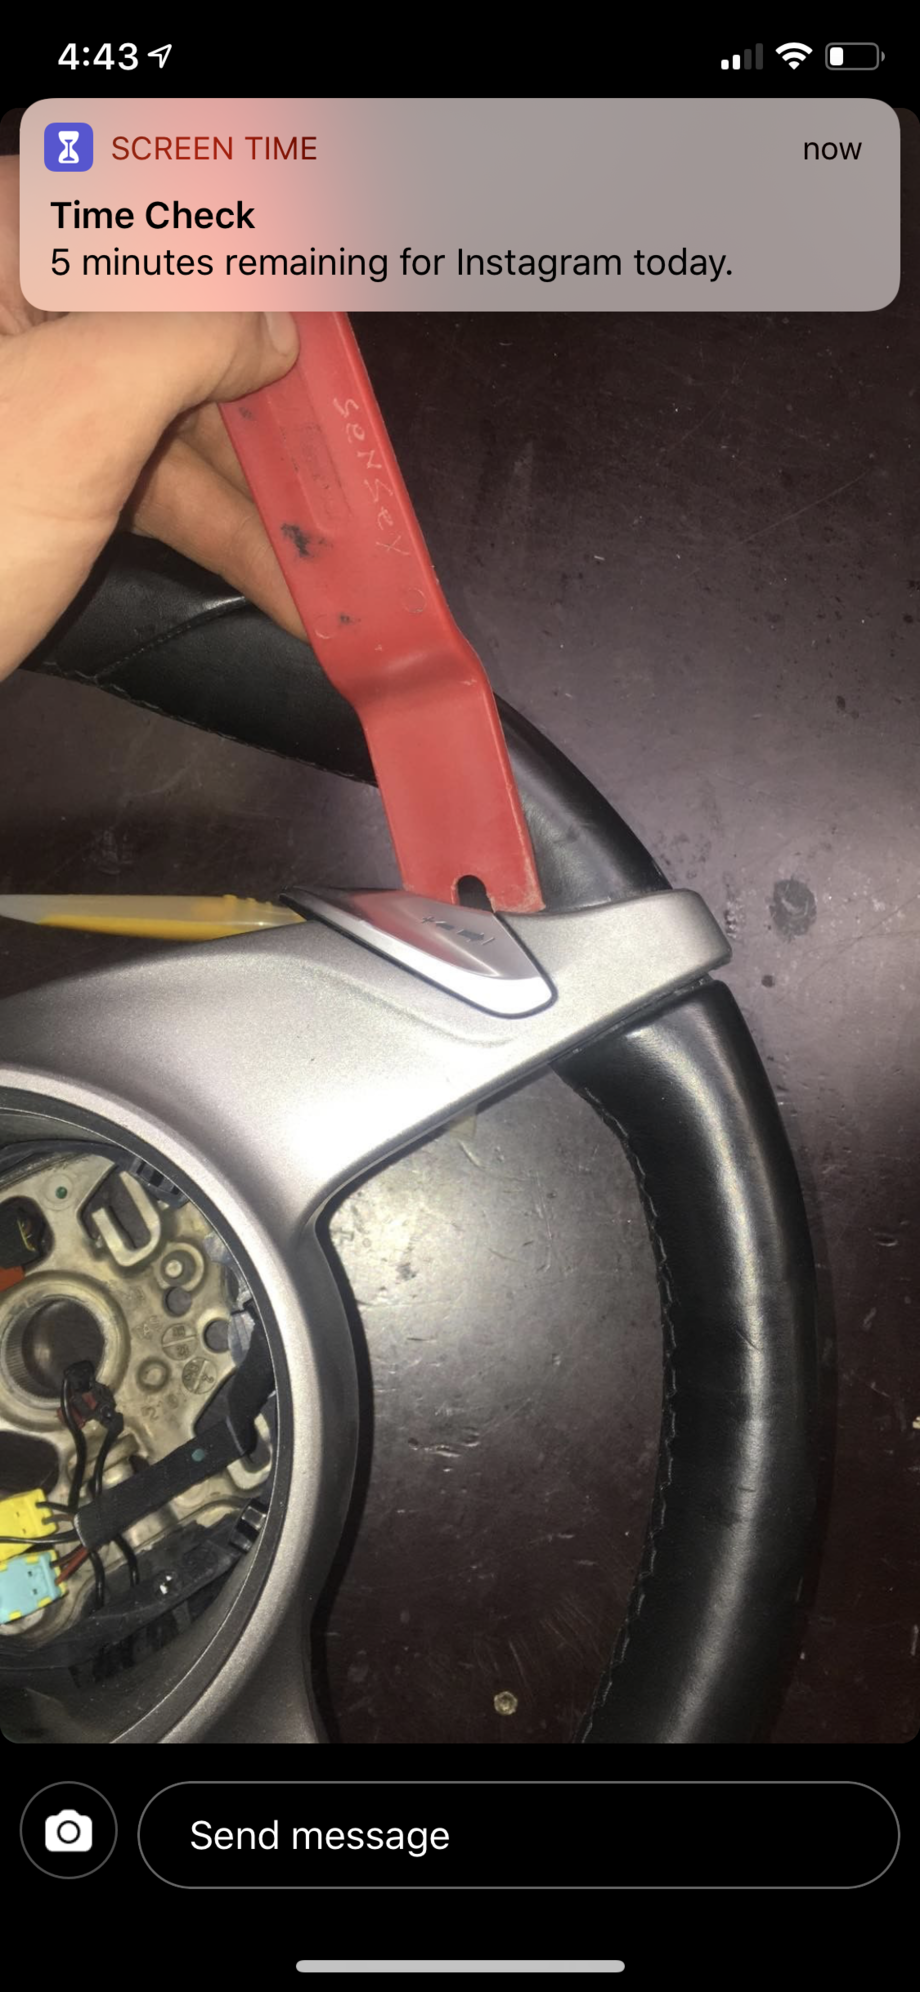
I had to do this to reconnect my heat wire in my wheel. Attached are pictures from LedermanZ indicating where to pry. I recommend the pry tools which are very inexpensive and gentle on the wheel materials. You must pry evenly from all points since the center sits deep into the wheel and it will be difficult to pull off at a sharp angle. Also, you should pry it as �inboard� as possible and not from the outer edges to not break the outside of the trim. The whole thing is secured with pressure clips. So once it pos out, you are ok. Nothing on the inside will break. Hope this helps.
I had to do this to reconnect my heat wire in my wheel. Attached are pictures from LedermanZ indicating where to pry. I recommend the pry tools which are very inexpensive and gentle on the wheel materials. You must pry evenly from all points since the center sits deep into the wheel and it will be difficult to pull off at a sharp angle. Also, you should pry it as �inboard� as possible and not from the outer edges to not break the outside of the trim. The whole thing is secured with pressure clips. So once it pos out, you are ok. Nothing on the inside will break. Hope this helps.
- the images below are the BEST SPOTSs to remove the trim piece as the clips on the back are right there - if you try other spots to pry the trim piece off it may give a little too much stress on the plastic depending on the proximity of the clips that hold the trim piece in (can break). if you stick with the prying spots in the images that will minimize the changes of anything breaking. The next post has a pic of the reverse side of the trim plate, you can see for yourself re sticking with only these 3 prying spots ONLY.
- be patient, its not as hard as it looks and as long as you stick with the above method via the photos it will come out.
- it wouldn't hurt to carefully put some electrical tape (painters tape may not stick enough nor protect enough) on the approximate areas of where the trim piece will get pryed at in case the trim removal tool (or screwdriver) ends up slipping you can scratch your trim piece.
Originally Posted by LISsailor
I had to do this to reconnect my heat wire in my wheel. Attached are pictures from LedermanZ indicating where to pry. I recommend the pry tools which are very inexpensive and gentle on the wheel materials. You must pry evenly from all points since the center sits deep into the wheel and it will be difficult to pull off at a sharp angle. Also, you should pry it as “inboard” as possible and not from the outer edges to not break the outside of the trim. The whole thing is secured with pressure clips. So once it pos out, you are ok. Nothing on the inside will break. Hope this helps.
I believe I've figured out why so many 997.2 trimPlate/steering wheel swap projects end up with 2 common problems/complaints
- airBag sits a few mm too deep inside the steering wheel - horn sensitivity/feel issues
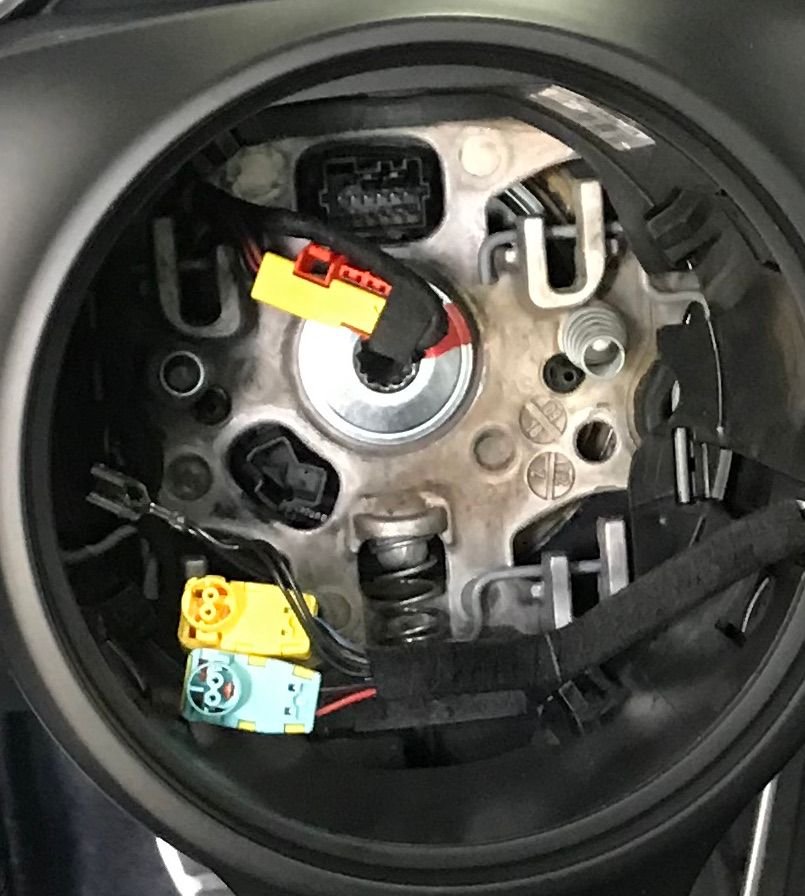
I believe in both the above cases, the steering wheel airbag spring bar has NOT been ATTACHED (snapped into) the back of the steering wheel fascia-trimPlate BEFORE the steering wheel fascia-trimPlate is pushed back into the steering wheel.... and instead leave the airbag spring bar inside the steering wheel thinking it makes no difference re the way the wheel components are put back together... which is incorrect.
Of course, don't forget to make sure that the airbag spring itself is set properly onto the spring bar AND set inside the BOTTOM of the steering wheel well upon installation. If not, the airbag won't snap in place properly.
If the airbag spring bar is left INSIDE the steering wheel and NOT attached to the back of steering wheel fascia-trimPlate.... when putting everything back together, the airbag spring bar will incorrectly rest on the back of the fascia-trimPlate and which causes a extra few mm of incorrect fitment inside the steering wheel (which causes the fitment problems people seem to be having).
Thanks to Jimi from the UK forums for the help, i've helped the OP fix this same issue on his wheel and i suspect all the complaints i've read over the years from those with the same issue just need to make sure the airbag spring bar is attached properly as per the photo below BEFORE installing it back on the wheel.
I believe I've figured out why so many 997.2 trimPlate/steering wheel swap projects end up with 2 common problems/complaints
- airBag sits a few mm too deep inside the steering wheel - horn sensitivity/feel issues
I believe in both the above cases, the steering wheel airbag spring bar has NOT been ATTACHED (snapped into) the back of the steering wheel fascia-trimPlate BEFORE the steering wheel fascia-trimPlate is pushed back into the steering wheel.... and instead leave the airbag spring bar inside the steering wheel thinking it makes no difference re the way the wheel components are put back together... which is incorrect.
Of course, don't forget to make sure that the airbag spring itself is set properly onto the spring bar AND set inside the BOTTOM of the steering wheel well upon installation. If not, the airbag won't snap in place properly.
If the airbag spring bar is left INSIDE the steering wheel and NOT attached to the back of steering wheel fascia-trimPlate.... when putting everything back together, the airbag spring bar will incorrectly rest on the back of the fascia-trimPlate and which causes a extra few mm of incorrect fitment inside the steering wheel (which causes the fitment problems people seem to be having).
Thanks to Jimi from the UK forums for the help, i've helped the OP fix this same issue on his wheel and i suspect all the complaints i've read over the years from those with the same issue just need to make sure the airbag spring bar is attached properly as per the photo below BEFORE installing it back on the wheel.
Hope this helps!
Great info, gave it a like
I am going to switch steering wheels when my new one (997.2 standard wheel) arrives.
Hopefully the airbag spring is already attached correctly.
If not, I'll be using this info for reference!
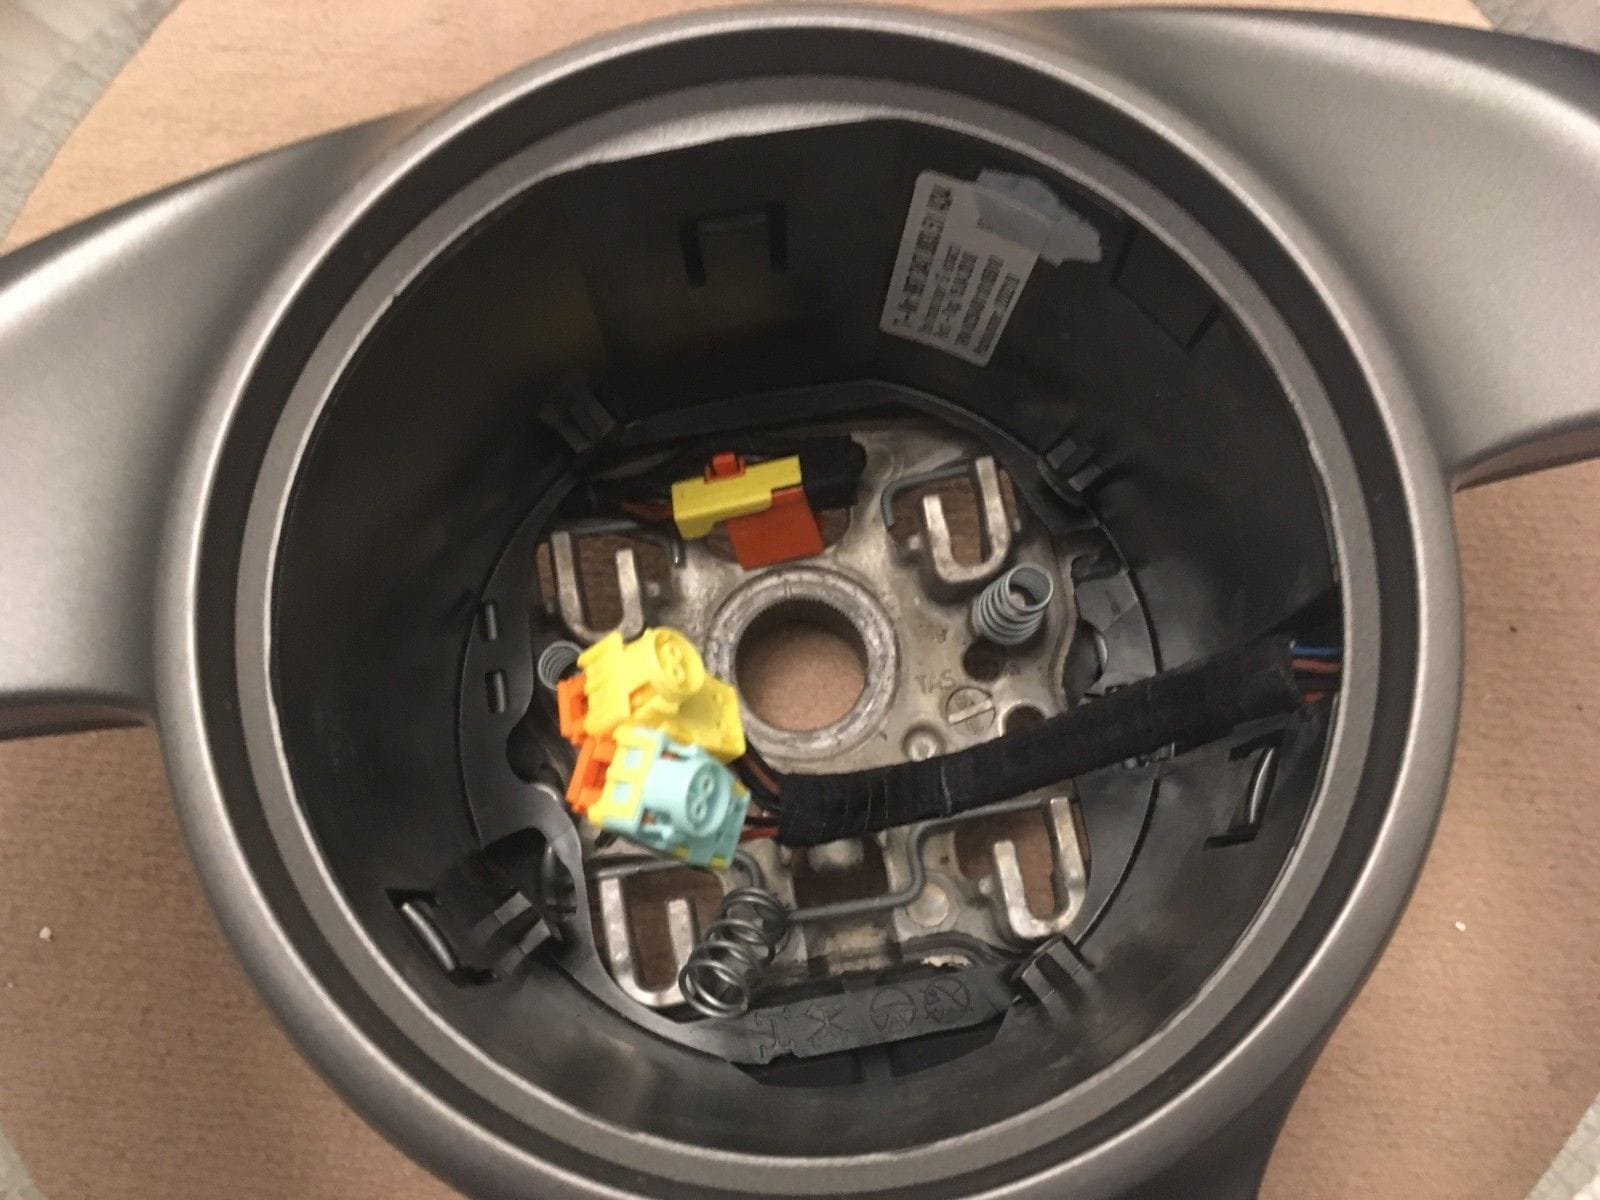
@ Myw: I actually found the airbag spring in a pic of the wheel I am about to receive.
It seems like the spring is not really connected to anything. In another picture, the spring is located on a different part of the bar, so it looks like it can move around freely. Any idea on how to correct this?
HI Zoefhaus - adjust the spring as per the photo below after the fascia-trimPlate is pushed back into the steering wheel. It's purposely designed this way so that the spring has to be latched into the steering wheel afterwords.
There extending metal stud goes into the spring, and the idea is that the spring will ensure that the airbag spring bar STAYS DOWN (locking the airbag properly in place).
When removing the airbag from the steering wheel, the spring bar gets lifted up (which are the clamps that lock in the airbag), releasing the airbag.
My apologies re the photo below as the airbag connectors are somewhat in the way.
Originally Posted by Zoefhaus
@ Myw: I actually found the airbag spring in a pic of the wheel I am about to receive.
It seems like the spring is not really connected to anything. In another picture, the spring is located on a different part of the bar, so it looks like it can move around freely. Any idea on how to correct this?
@ Myw: I actually found the airbag spring in a pic of the wheel I am about to receive.
It seems like the spring is not really connected to anything. In another picture, the spring is located on a different part of the bar, so it looks like it can move around freely. Any idea on how to correct this?
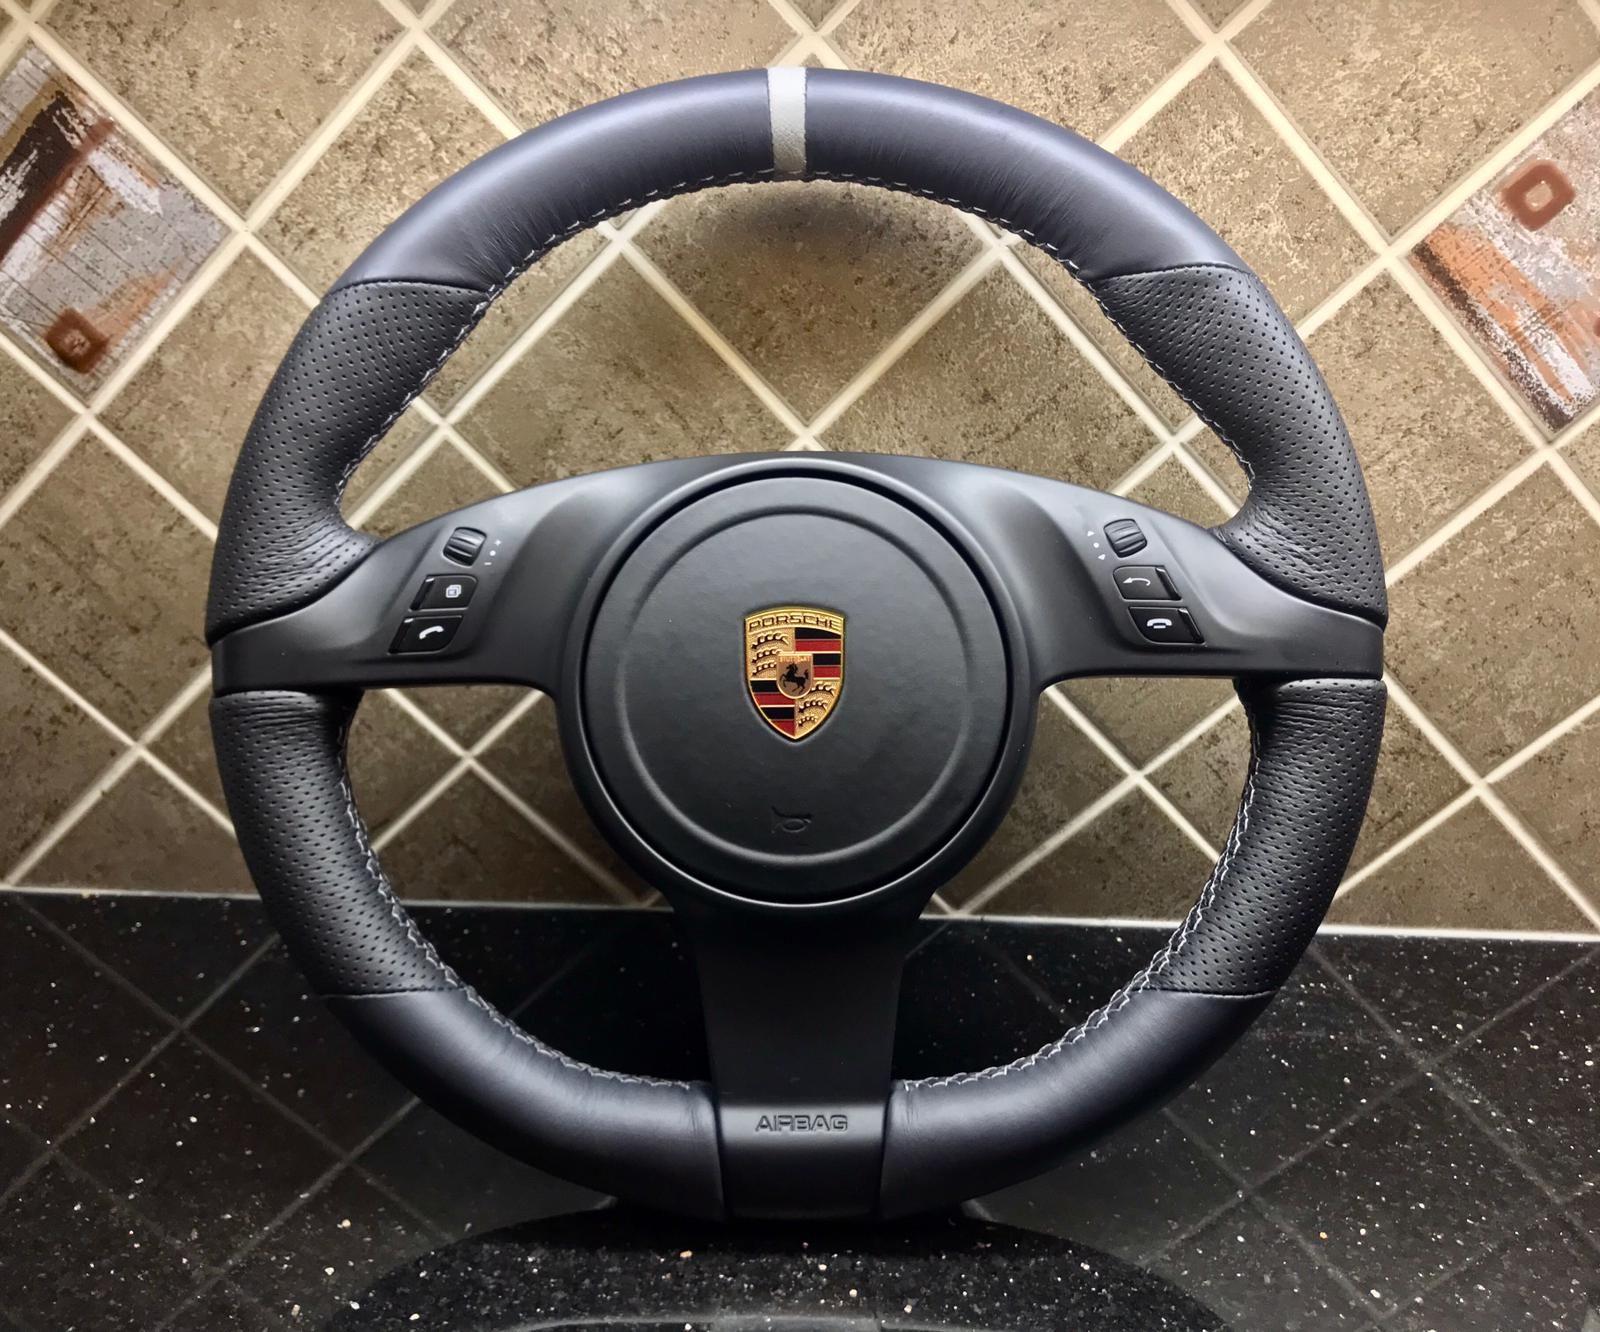
All went back together fine, I located the spring in the correct place and the airbag unit now sits level with the trim.
After having pressed the horn, the airbag comes back out correctly and swiftly.
But... unfortunately the horn itself doesn't work anymore
I'll ask my indie to program the multi-function with PIWIS when the car is due for maintenance (a month from now). Hopefully that will fix it...
which steering computer module are you using? did your old/new steering wheel have multiFunction?
Originally Posted by Zoefhaus
All went back together fine, I located the spring in the correct place and the airbag unit now sits level with the trim.
After having pressed the horn, the airbag comes back out correctly and swiftly.
But... unfortunately the horn itself doesn't work anymore
I'll ask my indie to program the multi-function with PIWIS when the car is due for maintenance (a month from now). Hopefully that will fix it...


 12-11-2018 | 05:48 PM