When you click on links to various merchants on this site and make a purchase, this can result in this site earning a commission. Affiliate programs and affiliations include, but are not limited to, the eBay Partner Network.
1 Big suggestion... Drop the engine as far as possible. I suppose I'm a bit spoiled (since my engine was out), but I can't imagine doing much work in there without taking off the intake plenum - just doing this has to be a bear without a few extra inches of clearance... Just my $.02 Good luck
Not sure why lowering the engine would help? I've replaced all of these components without the need for lowering the motor. Only time I did that was to replace the AOS. Other than that the starter, alternator, and harness are easily changed without doing anything more than removing the airbox.
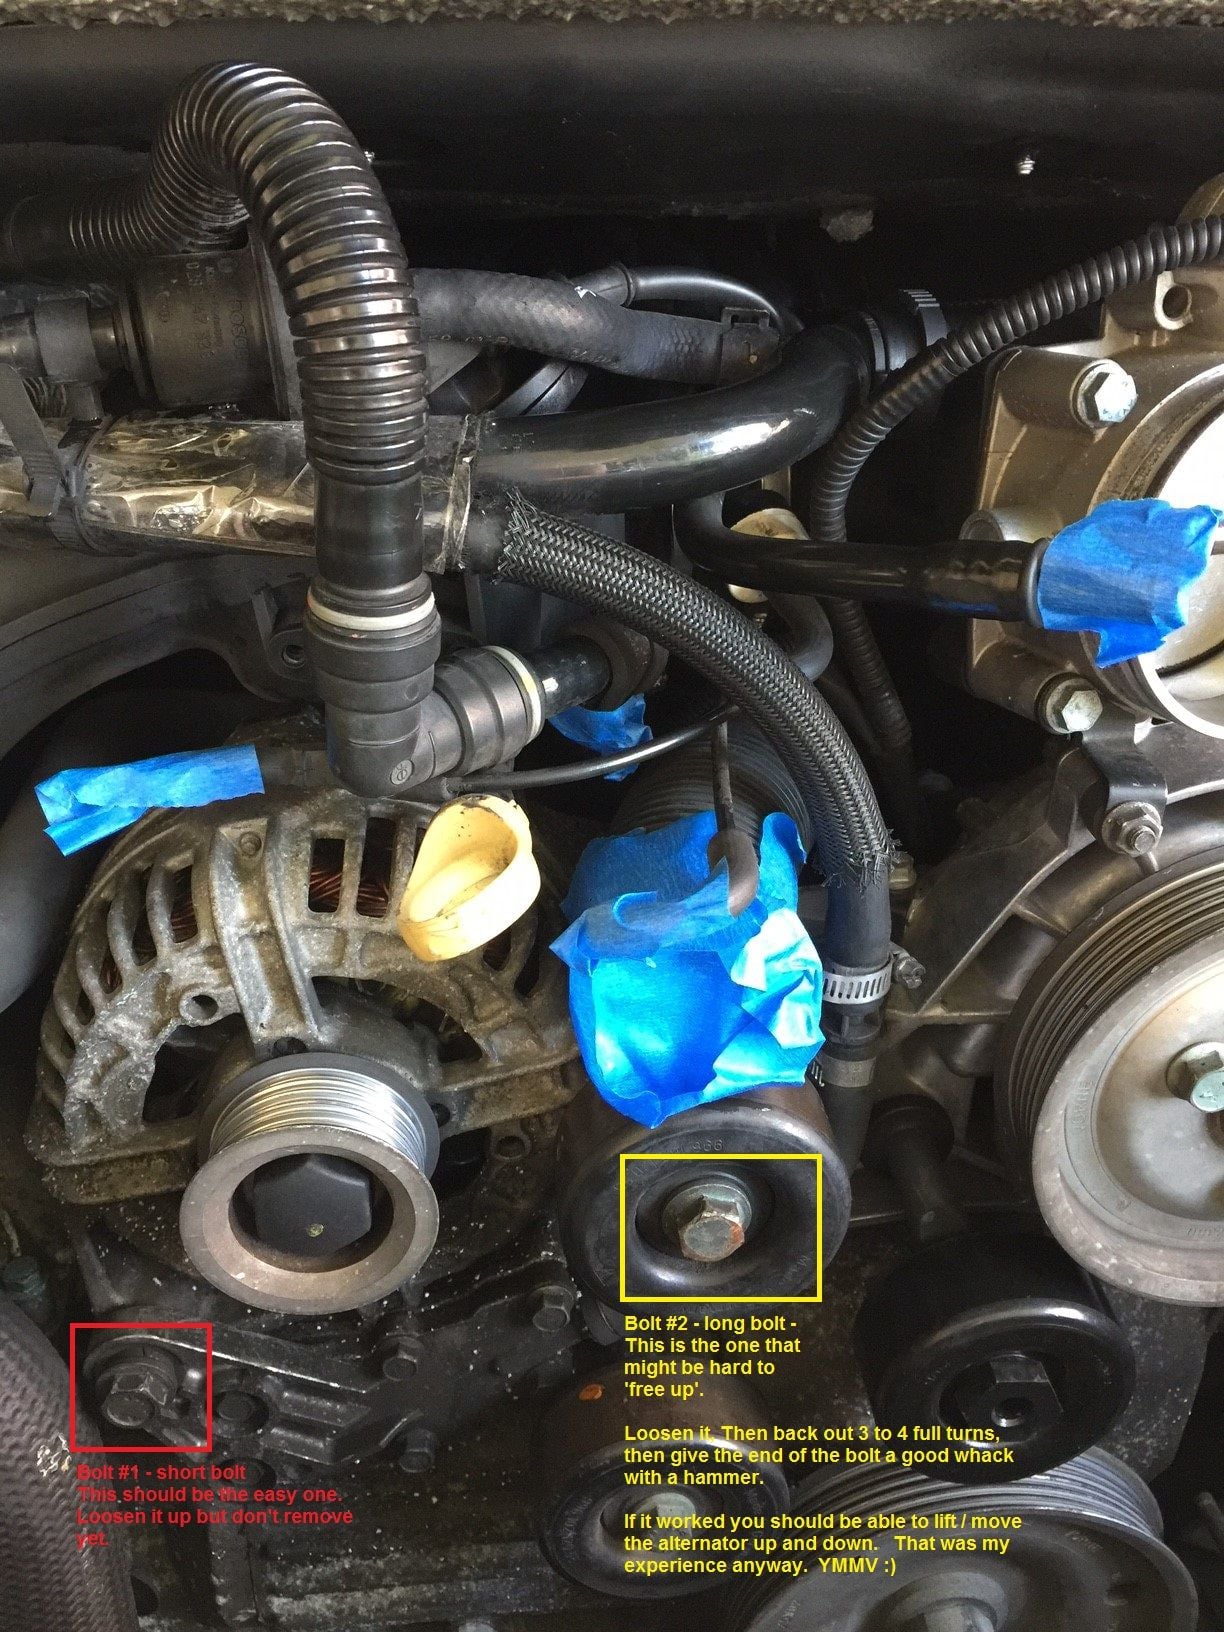
Remove the Alternator. Many users have reported problems with this step. The long bolt gets stuck, the alternator is stuck in place, hard to move out, etc. My alternator came out really easily. I did not experience any problems at all so I can't help much if your alt is stuck.
- Loosen up but don't remove left bolt.
- Loosen up right bolt (the one on the roller, this is the long one)
- After you loosen up the right bolt, back it out three or four full turns
- Now give the end of the bolt a whack with a drift punch or similar object and hammer
- If it worked like it did for me, the alternator should be very loose on the right side and easy to move up and down.
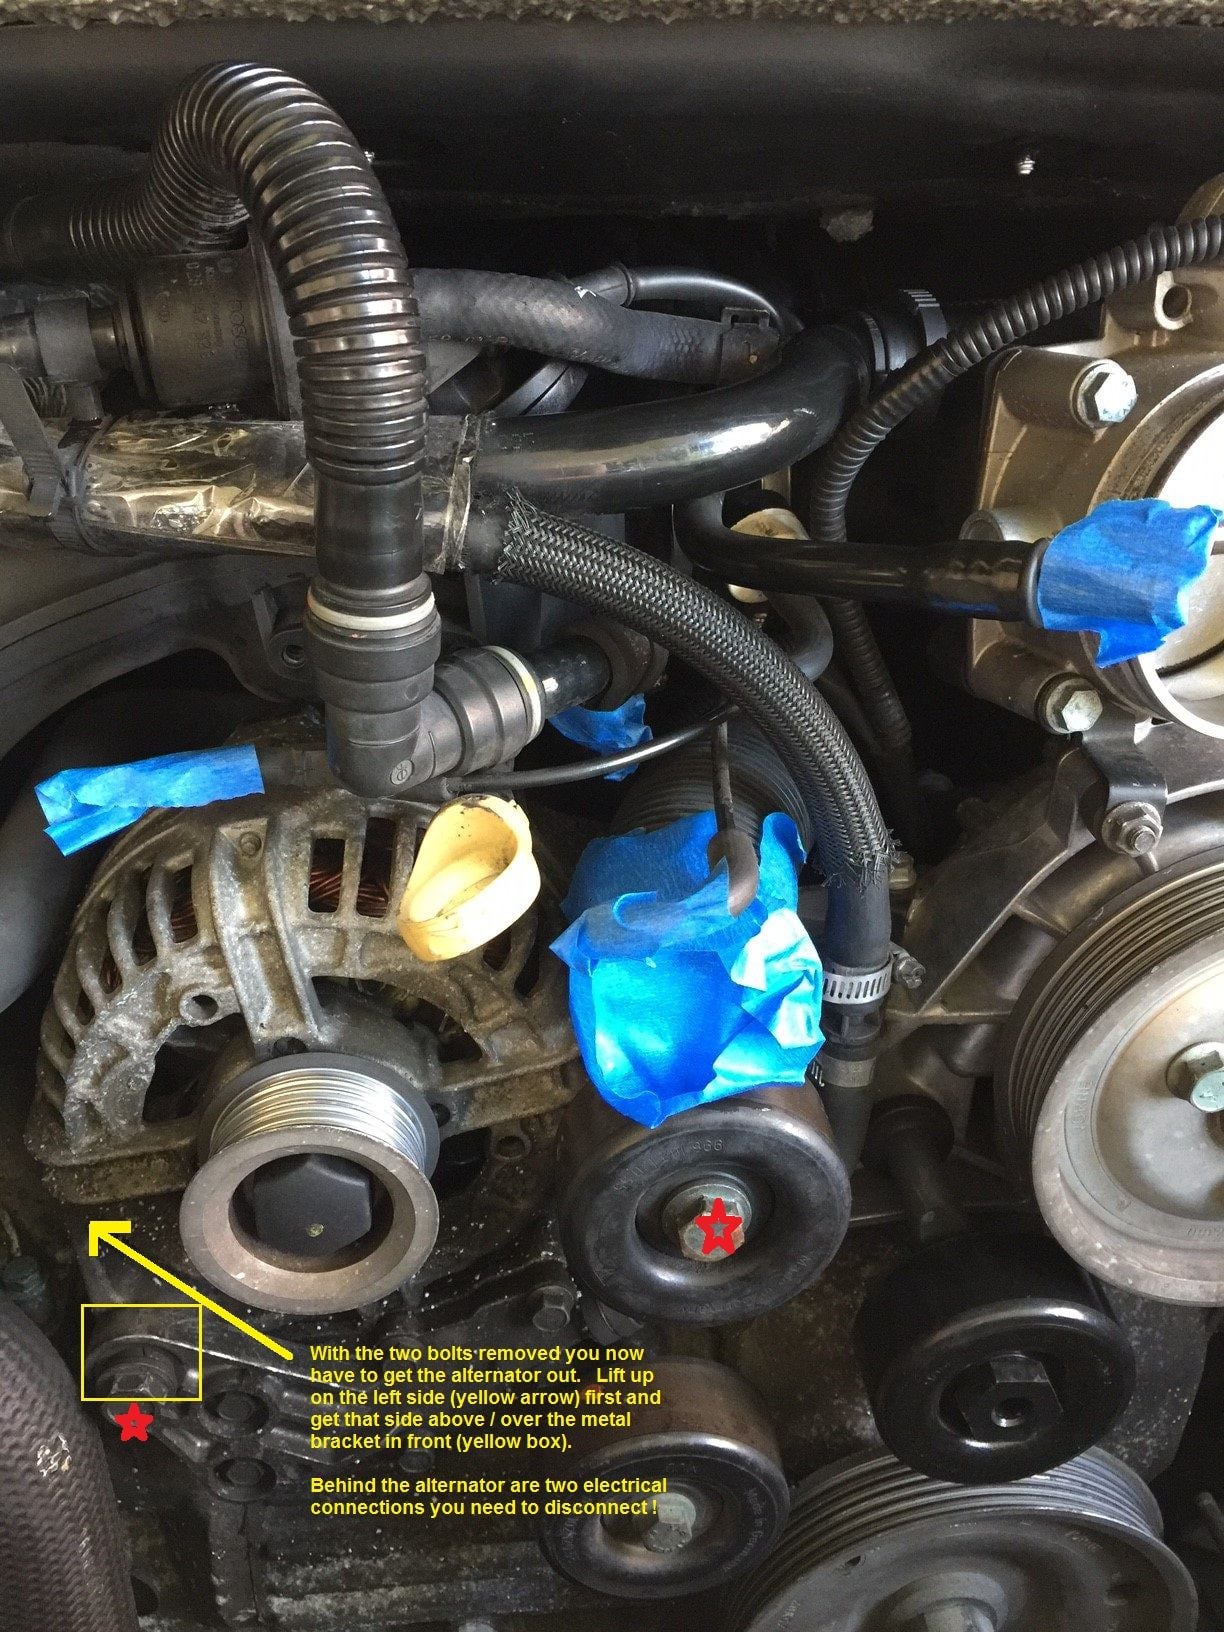
- Remove the bolts
- Remove the alternator part way. Get the left side up and over that bracket, then get the rest out.
- Disconnect the two electrical connections on the back of the alternator and then remove all the way out.
Not sure why lowering the engine would help? I've replaced all of these components without the need for lowering the motor. Only time I did that was to replace the AOS. Other than that the starter, alternator, and harness are easily changed without doing anything more than removing the airbox.
You are correct. I did not end up lowering the engine as it was not necessary at all working on any of these items. The Air Oil Separator (AOS) would of course be a different story and there is no way that's coming out without lowering the engine, at least from what I can see on my 2002.
I have made a lot of progress and will be updating with pictures and tips as soon as I can (may be another week). So far removed: airbox, alternator, throttle body, plenum (t shaped air distributor), wire harness between starter & alt., oil filler tube.
Reinstalled: new starter, new wire harness between starter & alternator, oil filler tube, plenum. I used tips found in other write ups, some of which were very helpful and I will include those in my write up.
Wire harness between starter & alternator - removing the plastic box at the end of this harness, using the hot water technique to loosen it up, WAS ABSOLUTE GENIUS! Props to the Rennlister who posted this DIY tip !!! (i will give credit in my write up later). It worked perfectly and eliminated A LOT of unnecessary extra work.
I used the 150A Bosch AL0815N alternator intended for a 997 in my '02 C2 996.
No trouble with fitment, and I was able to buy it from Amazon w/o a core charge. The old 996 alternator went to the electrical rebuild shop and is on-hand as a spare.
I have made a lot of progress and will be updating with pictures and tips as soon as I can (may be another week). So far removed: airbox, alternator, throttle body, plenum (t shaped air distributor), wire harness between starter & alt., oil filler tube.
Reinstalled: new starter, new wire harness between starter & alternator, oil filler tube, plenum. I used tips found in other write ups, some of which were very helpful and I will include those in my write up.
Wire harness between starter & alternator - removing the plastic box at the end of this harness, using the hot water technique to loosen it up, WAS ABSOLUTE GENIUS! Props to the Rennlister who posted this DIY tip !!! (i will give credit in my write up later). It worked perfectly and eliminated A LOT of unnecessary extra work.
Congrats!!!
I finished my project yesterday...water pump, thermostat, lower idler pulley, upper idler pulley, oil filler tube, stater, starter/alternator cable, and serp belt. Car is running great!
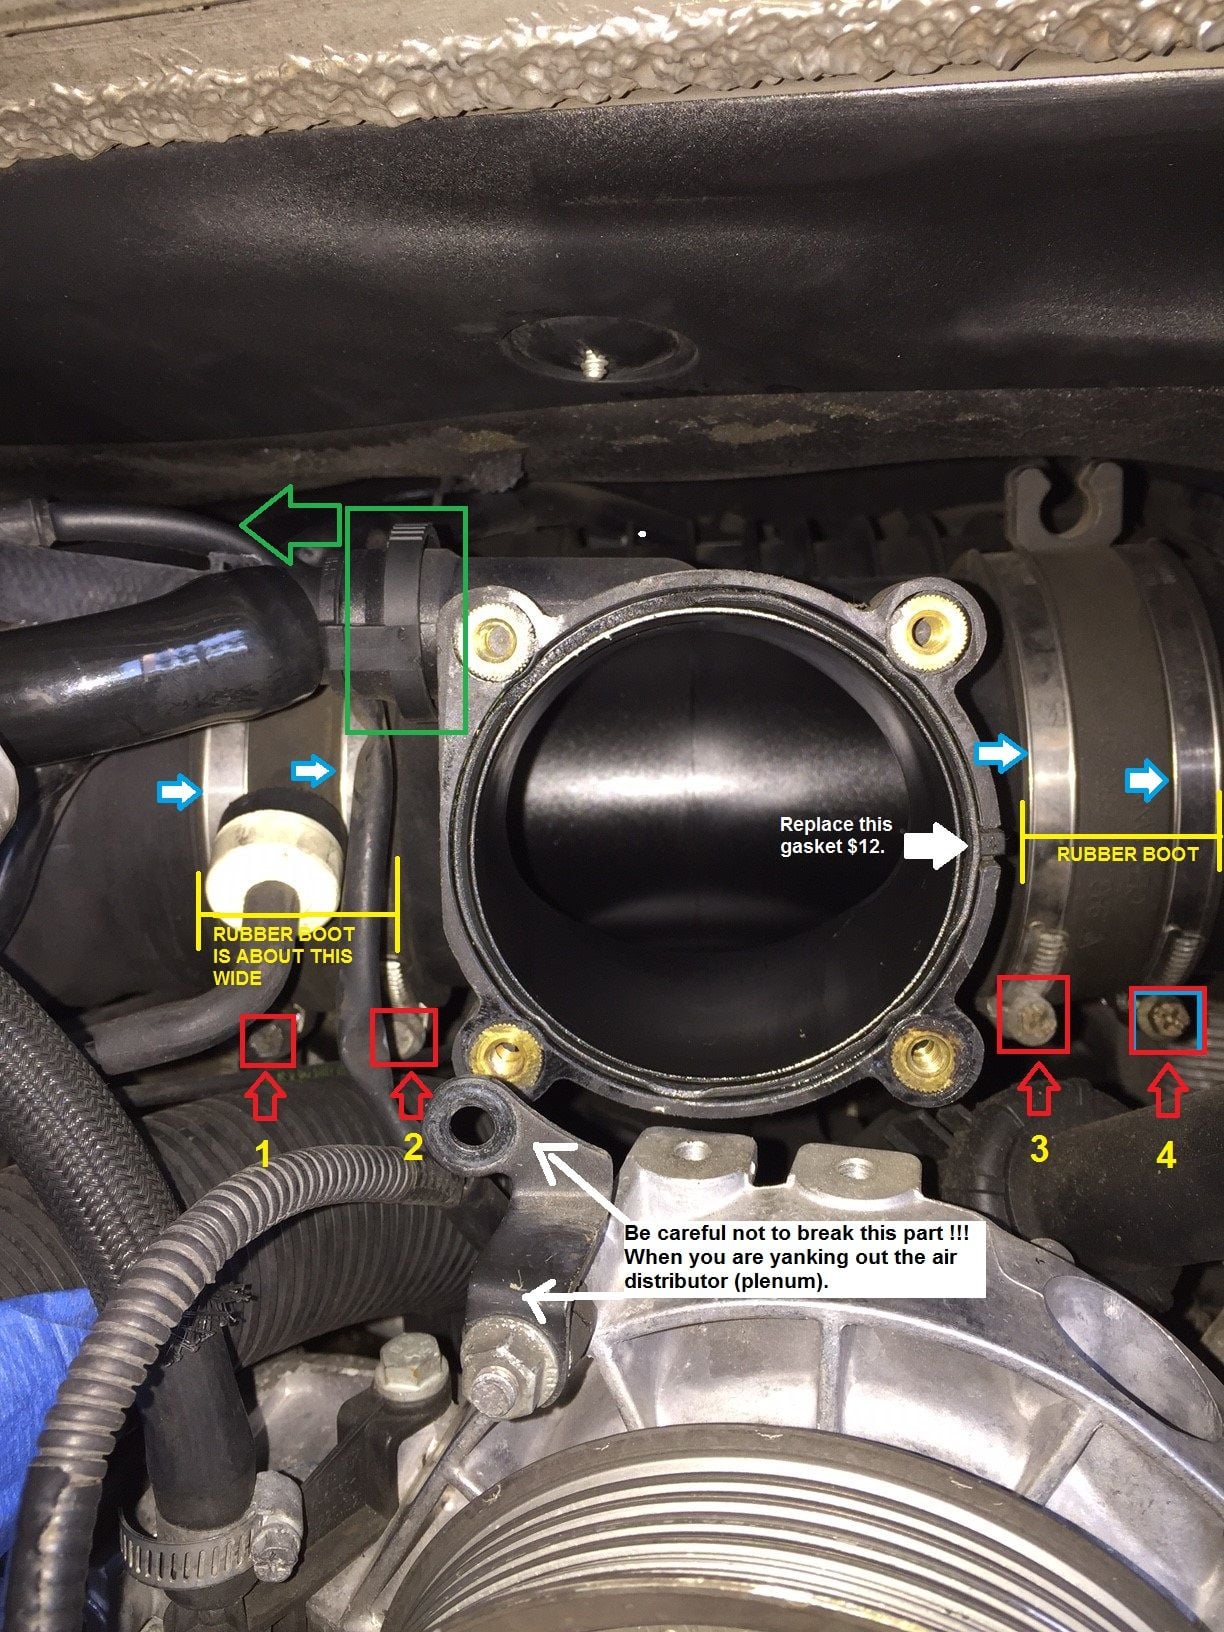
T-style Air Distributor Removal (Plenum)
Some have reported problems removing and installing this part and I can see why. Some force is needed when you pull the part out and again when you try and push it back in place but there are a couple of tips that might make the job easier.
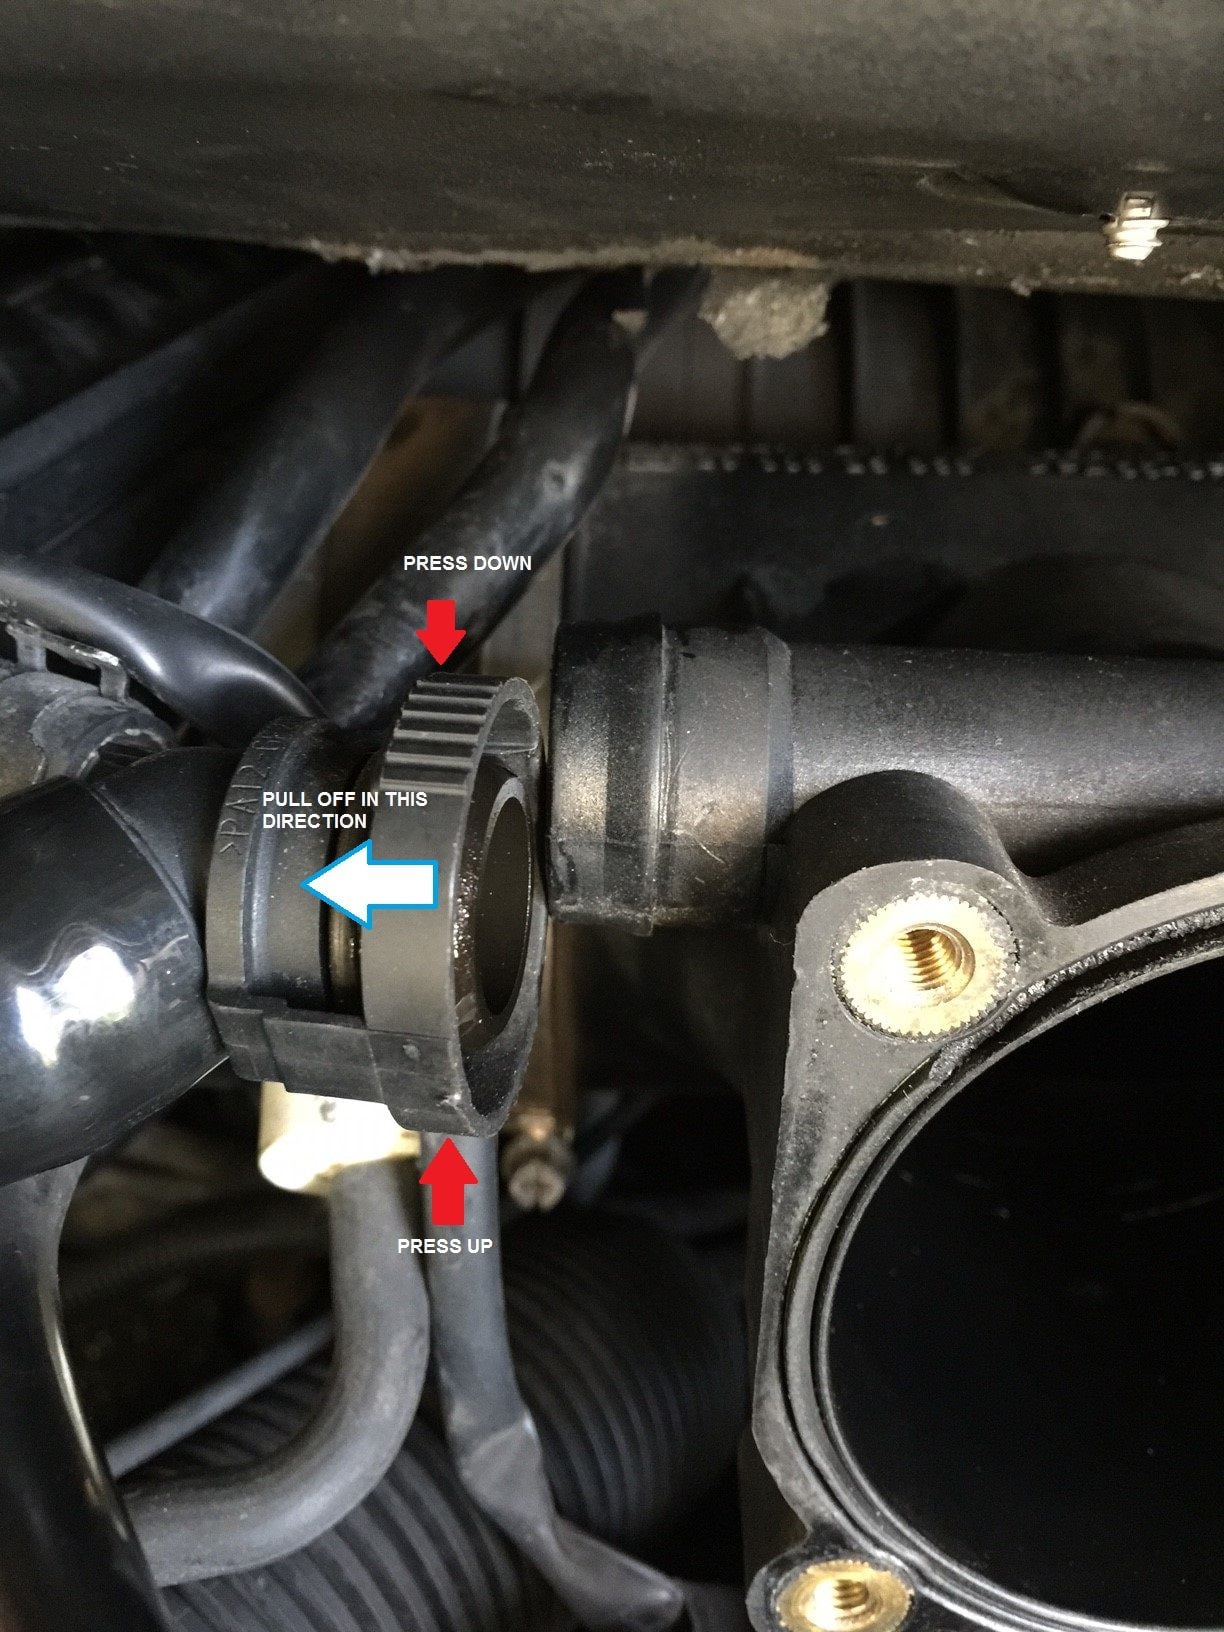
- See the green box with the green arrow? That connection to the air distributor needs to come off. Reference the second picture for a close up of what it looks like disconnected. Pretty straight forward.
- Now loosen up #2 and #3 ONLY (the inside hose clamps) try and move the Plenum up and down. The goal here is to break the seal (if there is one) between the plastic T-style air distributor and those rubber boots.
- Now loosen up #1 and #4 (the outside hose clamps) try and move the Plenum up and down (same as above) Some people tighten down #2 and #3 while working on breaking the seal of #1 and #4.
- I encountered no problem with the T-style air distributor sticking to the rubber boots.
- At this point you should be able to easily move the air distributor piece up and down in place. Mine moved very easily right away once the 4 hose clamps were loose and the connection (top left) was detached.
- Rubber Boot Hose Clamp #3 (Right Side) - loosen this one up enough so you can slide it to the LEFT onto the plastic air distributor and OFF the rubber boot. The goal is to remove the rigidity of the metal clamp out of the way so there is more "give" on the right side rubber boot when you pull the T-style air distributor out.
- Rubber Boot Clamps #1 & #2 loosen those up (do not remove) and shift / push the rubber boot itself as far to the LEFT as possible
- Now the moment of truth, YANK OUT THAT AIR DISTRIBUTOR! .... carefully of course...it WILL come out but you may need to use a little force. Try pulling out the right side first and once that gets past the rubber boot on the right, the rest should come out easy.
- CAREFUL!! not to break off that black bracket (lower left corner) just in front of the air distributor. Ask me how I know!
- Replace the rubber gasket between this piece and the metal throttle body.
Last edited by ejdoherty911; 07-11-2017 at 06:05 PM.
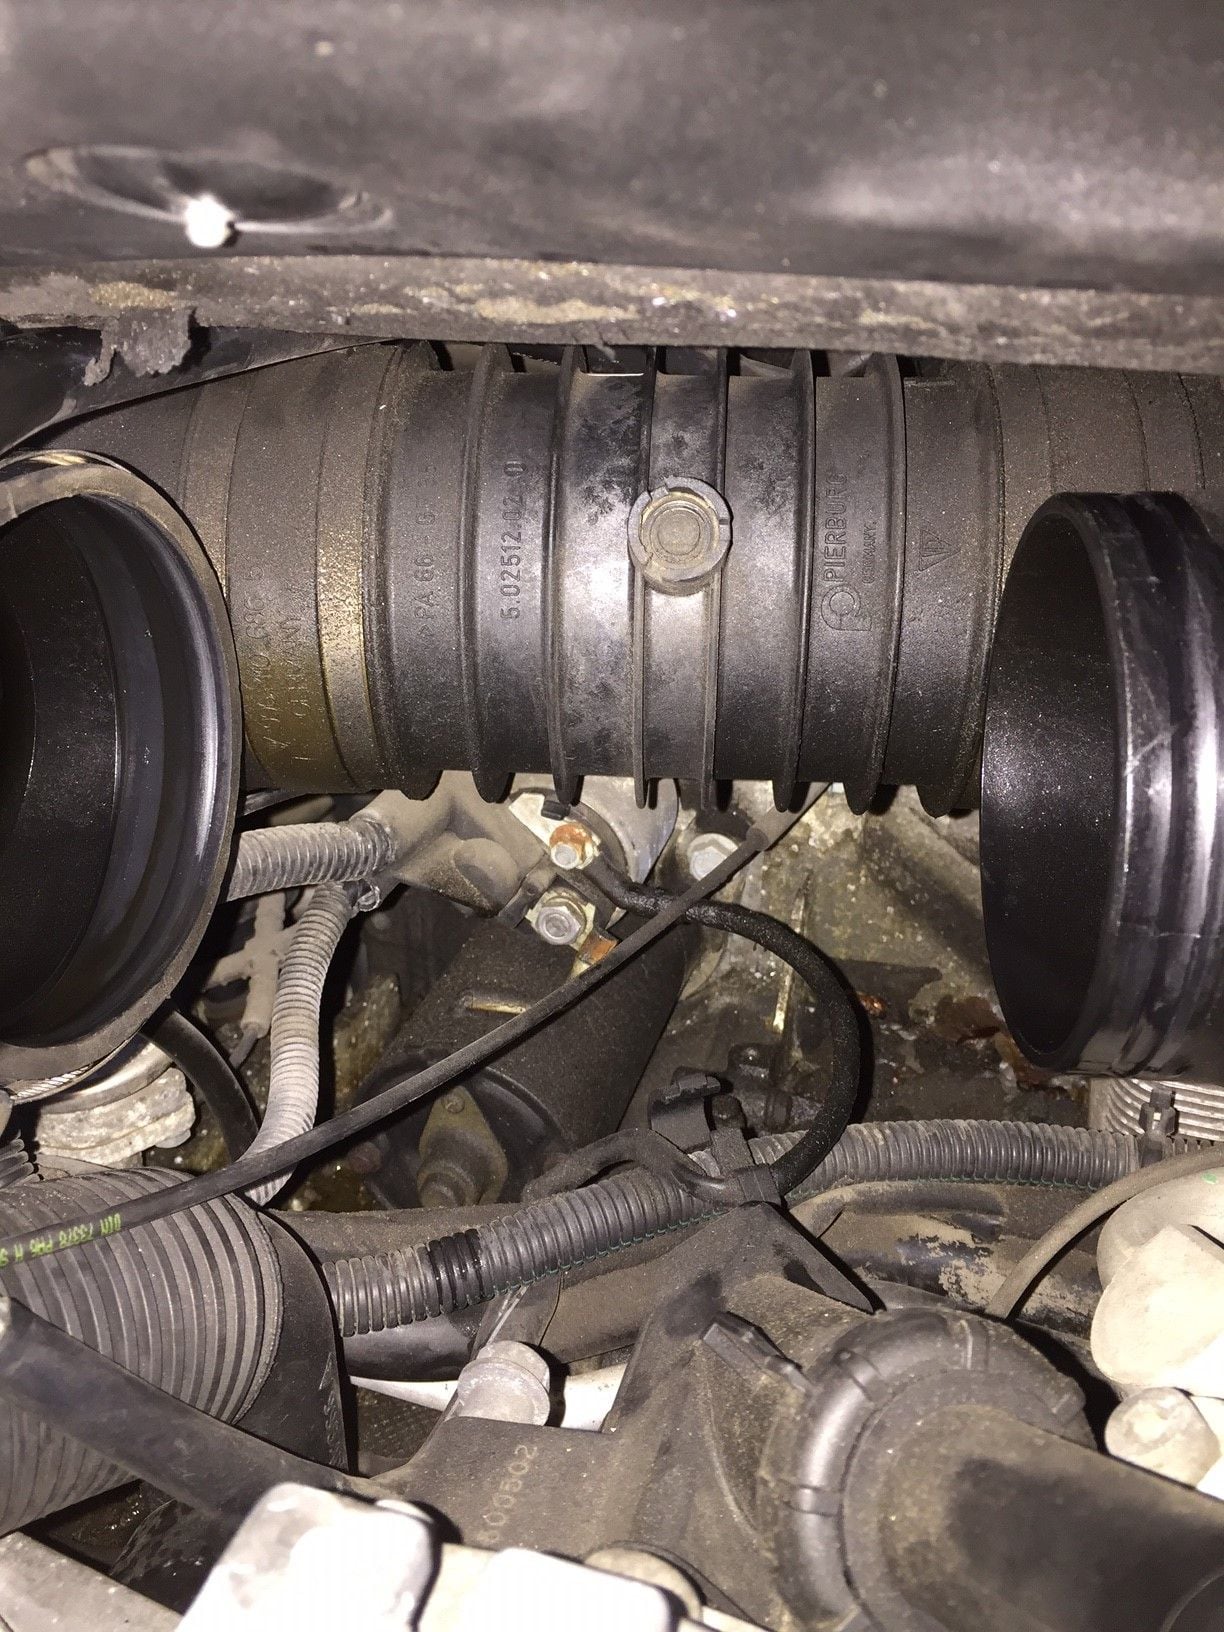
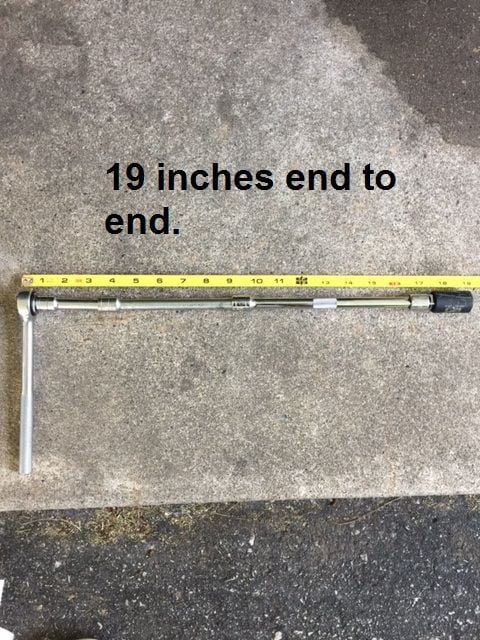
And the starter is revealed! Along with the wire harness between the alternator / starter / and positive battery terminal. Turns out the dirty dirty starter you see is actually not very old. It's the real deal Bosch made in Germany in 2014 and stamped with the Porsche part number... and it's EXACTLY like the one I purchased off Amazon for $102, exactly the same. So the starter did not need to be replaced, but I went this far so I replaced it anyway. And, as a result, I can tell you exactly how long your extension needs to be to remove the two 15mm bolts holding the starter in place. (19") pic to follow.
Where did all that oil residue come from?? Could it be from my cracked oil filler tube? (the reason I started all this) I hope so.
The Plenum removed earlier was SPOTLESS inside. But as you can see the outside of the rear air distributor (above the starter) is also pretty dirty with dirt and oil residue all over the outside. Anyway on to the starter removal....
Starter removal.
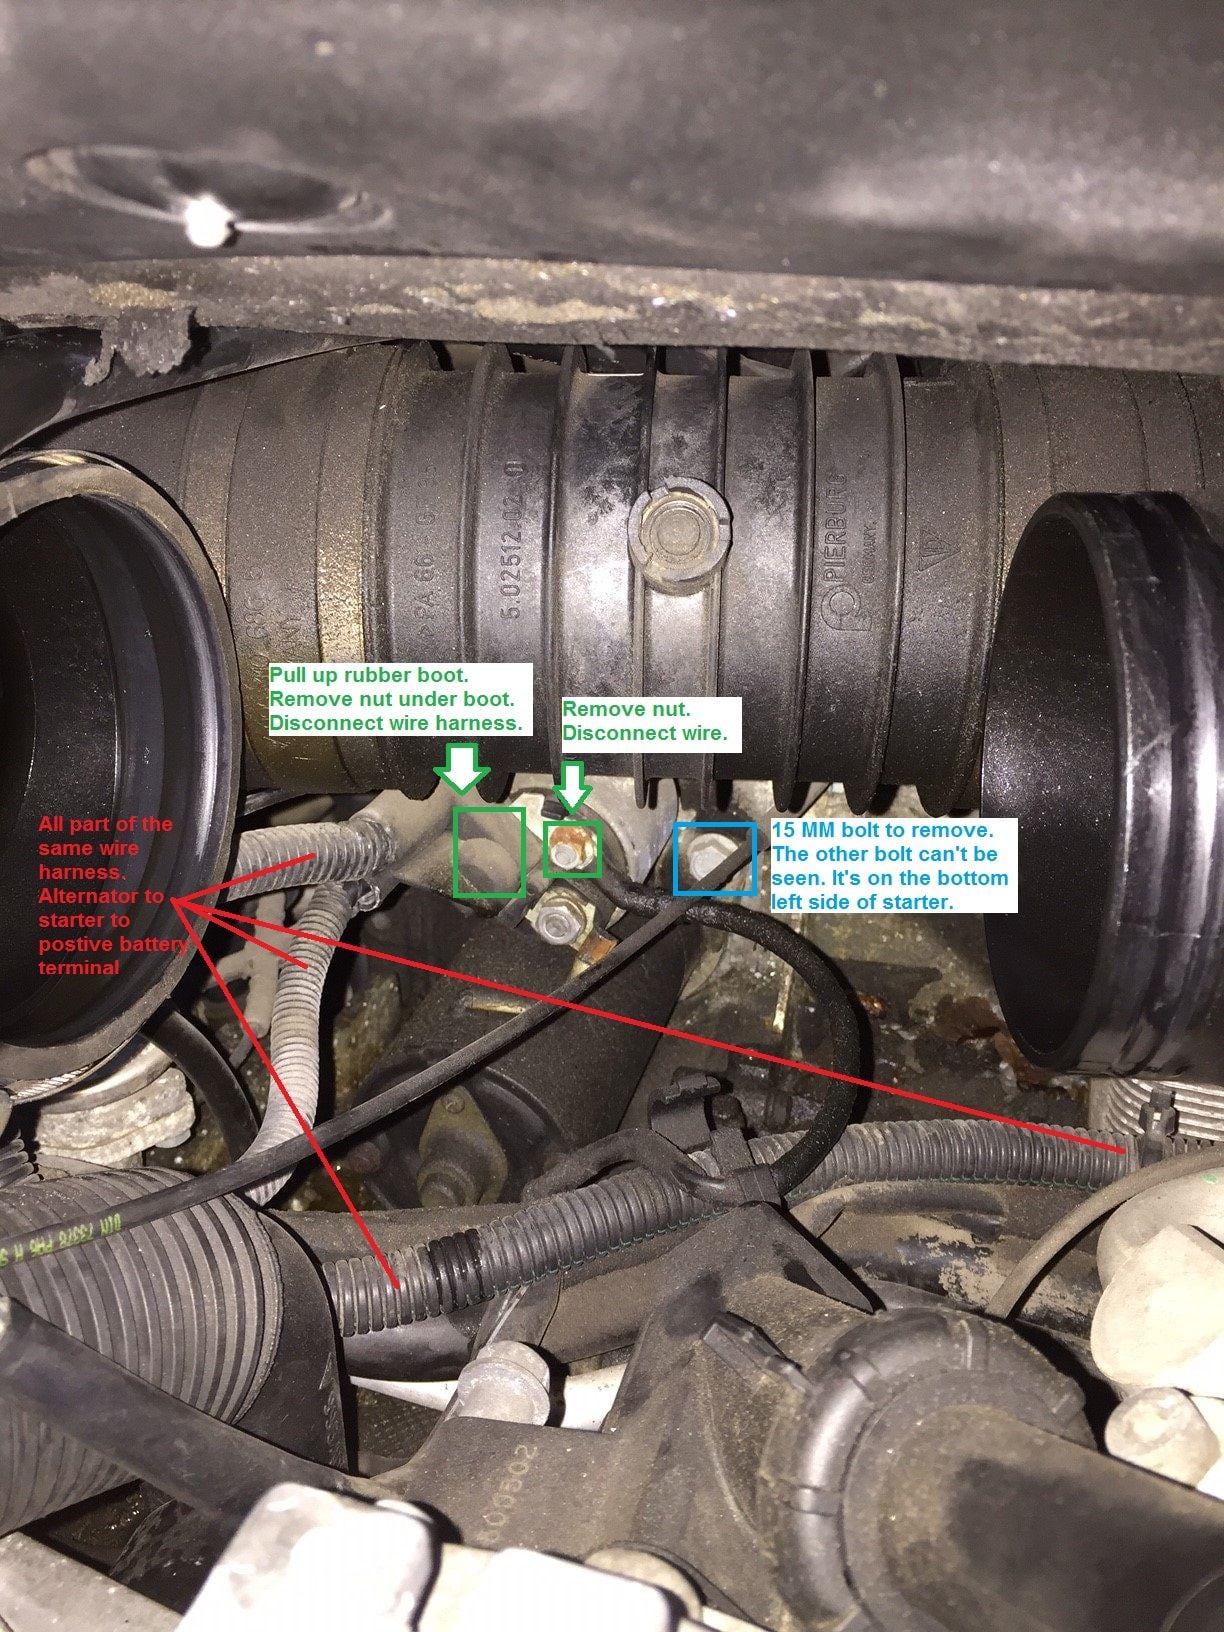
- Pull up the rubber boot (green box) note: older wire harnesses may not have this updated rubber boot. Remove the nut under the rubber boot and disconnect the wire harness from the starter.
- Remove the smaller nut to the right (green box) and disconnect that wire.
- Now you are only two 15 mm bolts away from pulling out that starter.
- Tip, if you have a small can of WD40 or 'PB bolt blaster' with a straw extension nozzle now might be a good time to spray those 15 mm bolts.
Here's the socket wrench and extension set up you will need (or something similar) to remove those two 15 mm bolts. The upper bolt (which you can see in the post above, blue box) is fairly easy to get to. The lower bolt is a little more challenging.

 07-06-2017 | 02:39 PM


 ty for that.