When you click on links to various merchants on this site and make a purchase, this can result in this site earning a commission. Affiliate programs and affiliations include, but are not limited to, the eBay Partner Network.
I had a rattle in my 2003 C4S that was caused by the front lower control arms. It was present at least as early as 20,000 miles on the odometer. The car drove fine but the noise increasing was an irritation on the city streets with cracks and potholes. It was on both sides. The curious thing was that the rattle didn’t start until the car had been driven 10 miles or so and it went away when even light braking was applied.
I replaced the control arms that you are working on and it has been fine so far for 5000 miles.
Looking at the original parts, I could see nothing that was wrong to the eye. I also could not see any movement when they were on the car.
I looked on the 996 and Boxter Rennlist posts and did not find any people commenting about this problem. I guess this is because people just accept the noise or their streets are smoother than ours. I have to believe this is a common problem.
After installing the arms, I had the car realigned. This might have been unnecessary since the before and after numbers were ok.
I had the dealership diagnose the sound which was happening at low speed, kind of a metallic clunk noise.
Either was I hope it's that!
Ive recently swapped back to 5 spoke 996 rims from 997 ones and the tyres have a little life left in them so planning to wear these out then get brand new PS2s and a full dealership alignment.
Dealership told me it takes 2 hours to do a proper alignment but whether there's any truth to that I'm not too sure but I've trusted them on everything else so ill get it done eventually.
The rears were a complete pain in the $%. Fronts were easy.
For the rears, best of luck getting the nut threaded on the top of the bolt. I had to by a long set of pliers to hold it in place and fold back the wheel liner. Hope that saves you time.
The rears were a complete pain in the $%. Fronts were easy.
For the rears, best of luck getting the nut threaded on the top of the bolt. I had to by a long set of pliers to hold it in place and fold back the wheel liner. Hope that saves you time.
Thanks going to give the rear a shot on Sunday. I did plan to remove the lining
Thanks going to give the rear a shot on Sunday. I did plan to remove the lining
For Thrust Arms:
Definitely remove the lining if you can. The space is very, very small so putting in a little more time before starting will save you in the long run.
To start:
Getting the nut off (18mm?), the bolt, the control arm bolt/nut and removing the arm wasn't difficult. It gave me false confidence this was an easy job like the fronts.
From there, you'll need to find the right angle to push the new arm in (towards the engine) to accept the bolt while aligning it with the control arm. Thats tough.
Then comes getting the nut to thread. I was able to get a single finger on the top of the nut and it took a number of tries to get it to thread, 30-40m if I remember.
Once you get the nut threaded, I used an impact hand drill with a socket on the bolt to get it going somewhat.
This becomes a two arm job now.
In one hand I had a massive torque wrench on the bottom bolt.
Simultaneously in my other hand I used a very long wrench on the top nut with the wrench arm following the thrust arm.
The nut when tightened recesses so thats when the pliers came into play because the top wrench will not fit.
You'll need to get a locking set of pliers to clamp on the top of the nut at a downward angle. Hard to explain but you'll see what I mean when you get the liner pushed back or removed.
I believe someone already put the torque specs but its well over 100lbs if I remember.
Fronts took 45 minutes.
Rears took me 3 hours and I somewhat know my way around this car. Lots of swearing and a few beers.
Unfortunately this weekend I ran out of time to get started on the rear
Although now that I've done the front I have noticed a small knock after driving around for a bit??
Drop links, springs, top bearings and dampers were all replaced by the previous owner <20k ago.
Could it be time for new inner and outer tie rod ends? Beginning to get on the "I hate diagnosing suspension faults" bandwagon...
Don't have any records of tie rods being replaced so maybe I'll start with them? Although the steering rack was reconditioned but it makes no mention of the inner tie rods. Ugh
Jack up one side and see how much play you have in the wheel. If you have a lot of play side to side and not up and down it is tie rod. Play up and down is wheel breaking.
Make sure the top hats are tight on your shocks and also the nut on the LCA ball joint is tight. I have had both of these issues on the track and they make scary noises.
Thanks slakker, if I grab the wheel at 3 and 9 and push/pull forwards and backwards I get some play. Maybe around 2-3mm it was the same on both sides. Enough to warrant replacing them?
For the front clunk im going to pull out the left side and inspect it.
Anyway as for the rear, got the car up wheel off and stalled.
I was going to take it apart but there was no one home to give me a hand and I wasnt confident in getting the proper torque to either bolts so I left it for now
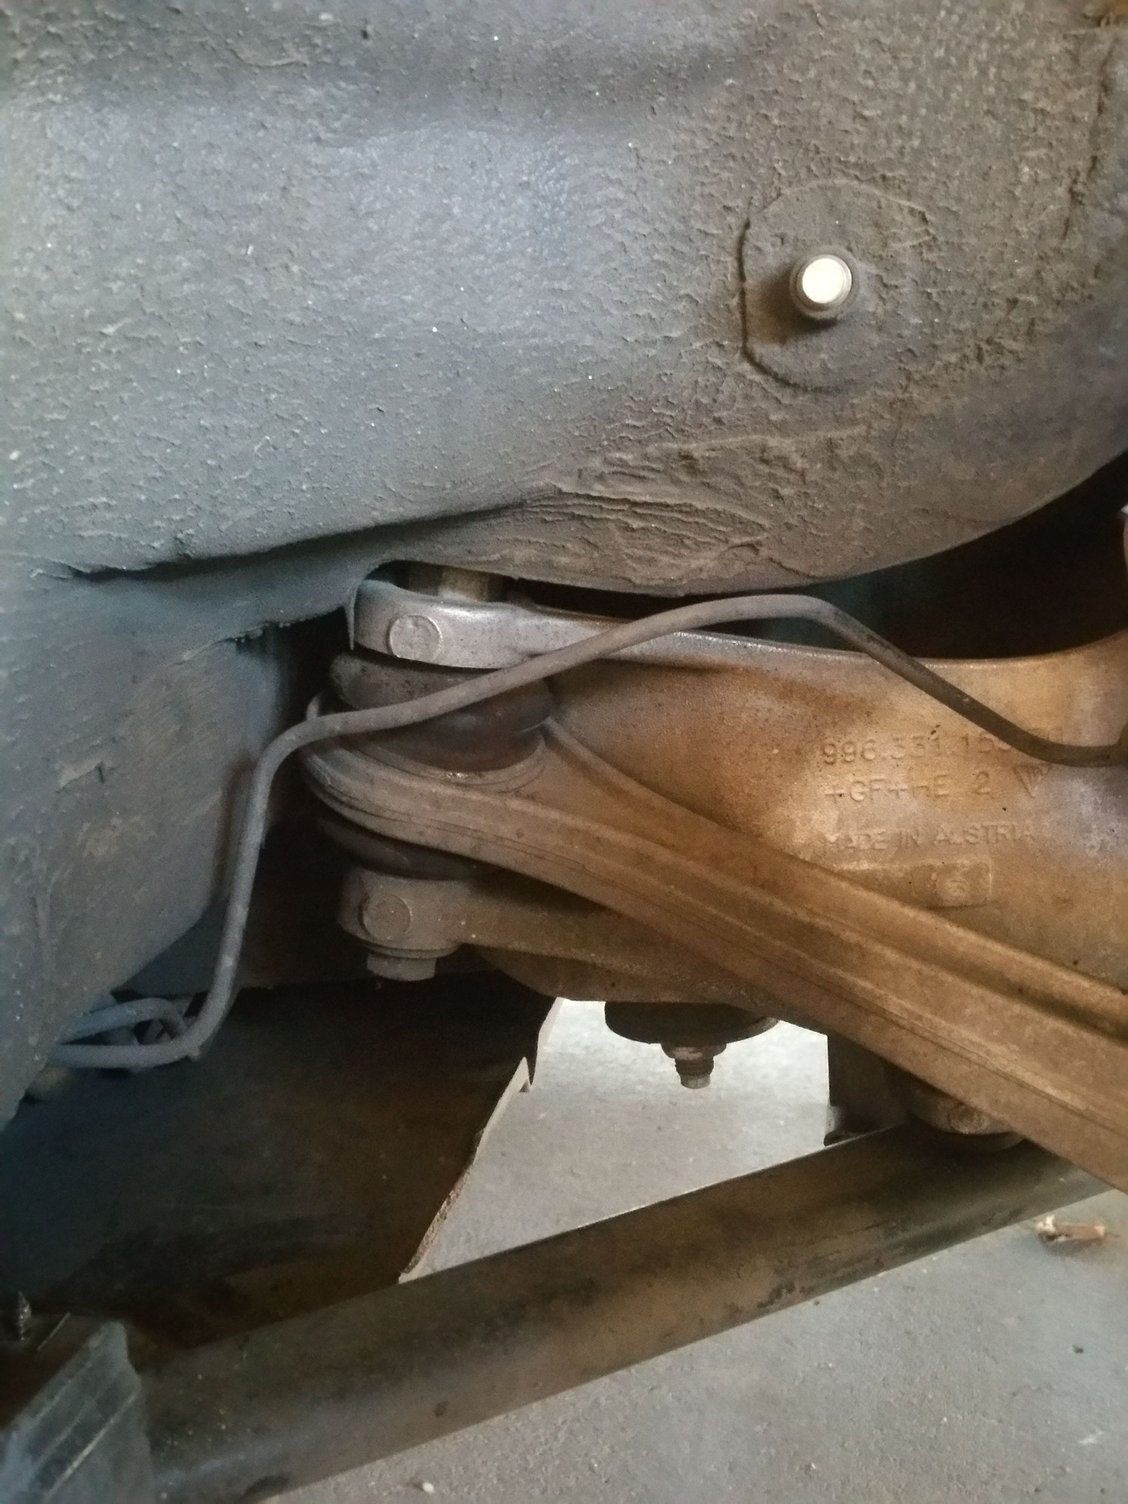
I can see why its so difficult, there is little to no room for that top nut on the body side!
For future reference, this is what I/we are dealing with:
It appears as if the ball joint is on quite an odd angle, is this how it is or is mine worn? Any issues getting the arm back in and putting it back at that angle?
 11-25-2016, 01:00 PM