willwood trailer hitch install help


 12-08-2012, 03:45 PM
#19
Rennlist Member
Thread Starter

I am still trying to find a place to get 12V power in the rest drunk area
No luck
Btw, sorry bumperette ARE rivetted , but should be possible to screw them back on when needed
No luck
Btw, sorry bumperette ARE rivetted , but should be possible to screw them back on when needed
12-09-2012, 01:44 AM
#20
Rennlist Member
Thread Starter
ok I am moving forward the hitch is installed.
I spoke with Will where I bought the hitch and he confirmed that the L shape piece is not flush to the bottom of the bumper bar. So the trick is to drill the holes in the middle of the lower part of the bumper bar, per template.
* note that in the picture the template is taped to the upper part of the bumper beam just for my own reference, that holes have to be drilled on the bottom part. I hope this doesn't confuse anybody..
I took a picture at and angle so you can see that gap under the bumper bar, between the hitch receiver angled plate.
For the screws, instead of drilling two more holes to push them in. I used a craftsman telescopic magnet and it was a breeze to push them into the bumper bar and push them into the holes.
Those screws have a little piece of metal welded on top so that you can screw the nuts without having to hold the screw head, because there is no access behind the bumper bar.
For the wiring harness I located it right by the air pump and fished the wired into the left taillight housing using the manual release cable for the frunk.
I have not connected the harness yet because I still can't put my hand on a 12V power in this area.
I think I will tap into the main taillight wire and my harness will only be functional when I activate the running lights. I just hope there is enough power for the harness, anyways I'll tempt it, we'll see.
I'll post more pics once I have the bumper cut properly.
12-09-2012, 01:47 AM
#21
Rennlist Member
Thread Starter
BTW I hope the cut I made in the head shield will not damage the bumper once it is back up.
That cut will let very hot air coming out at this precise location in the middle of the rear bumper. I just don't see how I can 'weld' the heatshield. Looks like aluminum. I can't do it.
I'd felt better if I had this sealed back, but it will have to do... I'll report later on that.
That cut will let very hot air coming out at this precise location in the middle of the rear bumper. I just don't see how I can 'weld' the heatshield. Looks like aluminum. I can't do it.
I'd felt better if I had this sealed back, but it will have to do... I'll report later on that.
 12-09-2012, 09:35 AM
#23
Rennlist Member
Thread Starter
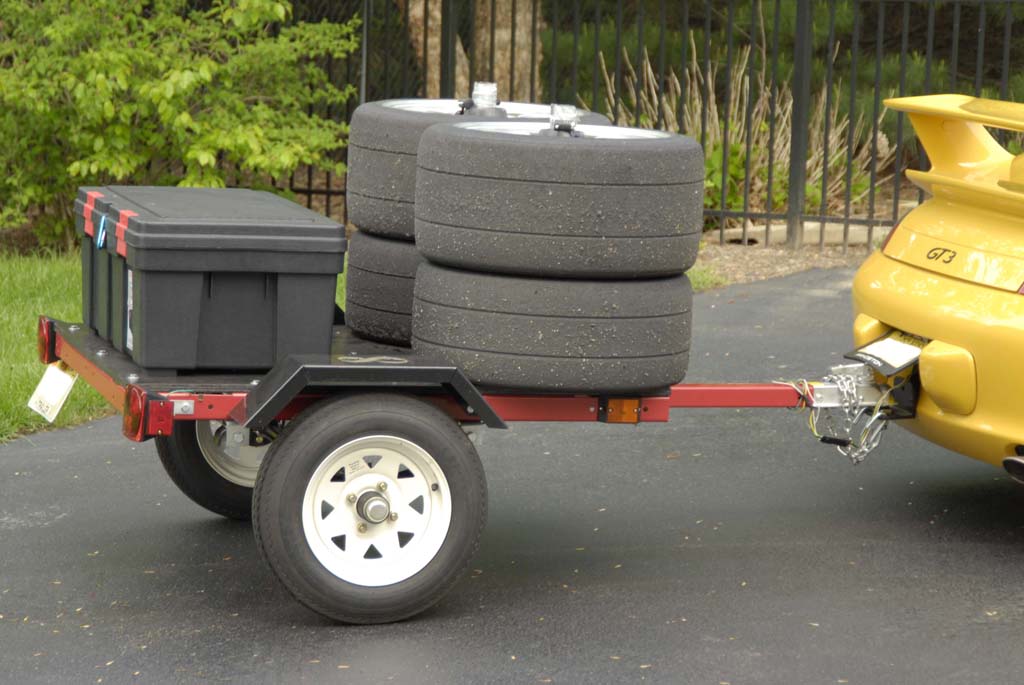
I am not planning on towing much. The weight of the trailer and the load will be like 400lbs max
150lbs for trailer and 200lbs for tires and tools, so when you think the trailer and its load rest on wheels, that is hopefully not much more than 50 to 100lbs resting on that bumper beam/tow hitch.
For those who wonder about the location of the hitch, keep in mind that the factory rear tow hook is place right on that bumper beam, so it has to be quite a strong location.
12-09-2012, 11:41 AM
#25
Race Director
I was able to put one rim in the front space on my '72 9111T and a second one on top of it. The other 2 rims would go in the back seats folded down. Those days are long gone with what Porsche has done to comply with Federal crumple zones.
If you have a short distance to go you can wedge one wheel in the front seat with a modern 911 but you have to be careful not to mar the interior. Same is true of the rear seat scenario because the rims have swollen from 15's with `185/60's to 18's with 295's on the rear.
When I go to Watkins Glen there are a TON of pickups with trailers loaded with P cars and tires. There are not too many Pcars with trailer hitches however. I see more trailer hitches at zone autocross type events.
Assuming the trailer is not overloaded you should have no problem what so ever.
The following users liked this post:
TheUnscented (01-10-2022)
12-09-2012, 12:10 PM
#27
Rennlist Member

Phil,
That is a good solution as to how to get track tires to DE!
Thanx for posting.
 12-09-2012, 01:49 PM
#28
Rennlist Member
Join Date: Nov 2008
Location: Mooresville, IN (Life Long Cheesehead)
Posts: 5,815
Likes: 0
Received 55 Likes
on
36 Posts
Great thread Phil.....I have been looking at this for sometime.
KK......there is more to Porsche ownership than humping your car's fender...
KK......there is more to Porsche ownership than humping your car's fender...
12-09-2012, 06:46 PM
#29
Rennlist Member
philooo,
Get something like this, cut it to fit the cutouts, glue it on the hitch with silicone seal, and then wrap saftey wire around it and tie it off like a bread tie.
I had to use heat shield like this on my modified 1972's center panel to keep the paint from melting off.
http://www.summitracing.com/parts/th...0/media/images
Last edited by fpb111; 12-09-2012 at 06:47 PM. Reason: works better with the url
12-09-2012, 07:01 PM
#30
Rennlist Member
Thread Starter
Thanks for all the support guys.
Thanks for the heat shield solution, I think I'll do it as I have the hi flow cars and they pump even more heat than the stock ones.
Once I have that setup I will finally be able not to waste my good tires on the roads !
That will be sumitomo hrtzIII everywhere aside if the track.
And yes Hardback, it will finally be worth it fit me to drive 3 hours to Sebring once I get the trailer
The hitch install is very easy ...
Now if only someone can help me find a cool way to get 12V power in the rear without having to drag a wire all the way to the battery, that would be awesome.