When you click on links to various merchants on this site and make a purchase, this can result in this site earning a commission. Affiliate programs and affiliations include, but are not limited to, the eBay Partner Network.
So mine cracked after moving the airbox and figured to get it done before the vacuum leak ruined something else. After searching for the replacement part, there is a later retrofit from the 997. Part No. 997.107.131.00. I got a new O-ring and Oil cap like everyone else suggested. Not really sure why a new cap is needed but I just followed the herd.
All from Pelican Parts.
Oil Cap - $14
Oil Filler Tube - $49.50
O Ring - $4.75
Air Filter - $22.50
1. Remove Airbox - Easy
2. Remove serpentine belt - Easy (Need a 24mm socket)
3. Remove the vacuum hose bracket for the Brake Boosters above the Alternator. Easy
3. Remove Alternator
3a. What can I say. Everyone else b!+ched about it and I will too. Now that i've removed it 3x it's cakewalk. On the right bolt (the long one); you remove it, take out the idler pulley, put the bolt back in without the pulley and whack it with a hammer a few times to push the pressed-in nut out a bit. This will give about 2mm slack to wiggle the alternator out. Disconnect the 2 wires behind it and it should pop right out.
4. The cracked Oil filler tube is removed and the new one is replaced. Oil the new O-ring and be patient. When the tube is put in properly, it will sit almost flush with the top of the engine. If it's not flush, then it's not properly seated. It took me about 10 minutes of twisting, turning, and shouting before it seated. Those darned new O-Rings . I see the torque for the bolts as around 7 ft-lbs. I always just finger tightened it by hand and went about a quarter turn more with the ratchet. Yes the block is aluminum so you can easily strip the threads.
5. Of course in my zest to install the alternator, it pushed a vacuum tube in and when I pulled it to align with a connector, I pulled it out completely! This was the Brake Booster hose. After pulling out the plenum tube the disconnected hose was sitting on top of the starter. I reconnected the tube but it slid out easily due to warping from time and heat. I sprayed some loctite adhesive on the male end of the tube and the tube was snug when I reconnected.
Reconnected everything and all is working. Been on for 300 miles and nary a problem. Thank you all for your input!
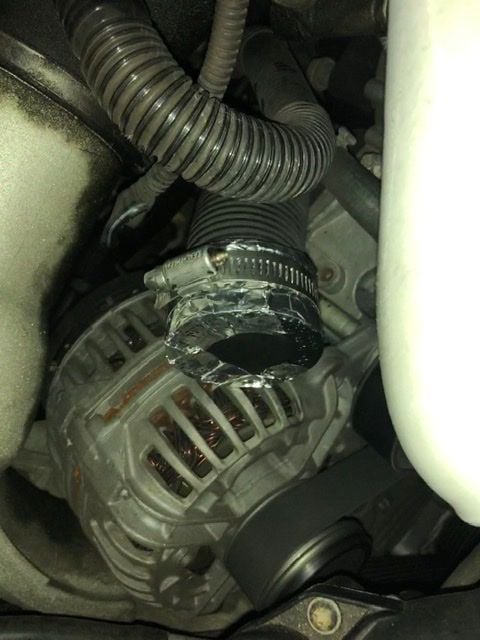
Used 1.5 inch Flexible Rubber End Cap & Aluminum Tape
I did a temporary repair job using 1.5 Inch Fernco Rubber Cap and because it was possible it would melt - I converted inside and outside in Aluminum tape rated up to 300 F
I did a temporary repair job using 1.5 Inch Fernco Rubber Cap and because it was possible it would melt - I converted inside and outside in Aluminum tape rated up to 300 F
 04-26-2016, 07:24 PM

 . I see the torque for the bolts as around 7 ft-lbs. I always just finger tightened it by hand and went about a quarter turn more with the ratchet. Yes the block is aluminum so you can easily strip the threads.