So I replaced my Air/Oil separator
 10-13-2010, 08:25 AM
#16
Nordschleife Master
I finally got around to reading the instructions. Great write up. Couple things I would mention (due to my mistakes.
Actually the first is informational, the hose clamp that fits to the plenum is like a medicine bottle where you sweeze the serated/ribbed parts and the clips perpendicular to the ribbed pieces come out and you can pull the hose off.
Mention when you plug the intake holes so that when someone disconnects the coolant hoses they don't do what I did....dump some coolant into the intake.
Take care in the plenums since the rubber bushings holding them in place have vacuum line connections that can break since they are now most likely brittle.
When reinstalling the upper coolant line make sure you don't push the hose so far that it rides up onto the gusset which will then cause a leak when you tighten the clamp.
I was able to get the last bolt in after the fact. I just made sure that all the others were loosely on to give the last one some adjustment. I also took a corner of the blue shop paper towels and pressed the bolt into the socket with the towel between them to make it "stick" as soon as it connected I puled the socket off and removed the paper towel.
The only thing you need to make sure is out when lowering the motor is the air box.
Good write up I hope this makes it easier for others.

The following users liked this post:
747winglet (01-31-2020)
10-13-2010, 02:18 PM
#17
Racer
Thread Starter
Thanks for the additional input, Ed. Hopefully, this will help others who decide they may want to tackle this job.
Also, prepare to have your left arm and hand scratched and cut beyond belief. I swear, I look like I got into a fight with a cat and lost.
Also, prepare to have your left arm and hand scratched and cut beyond belief. I swear, I look like I got into a fight with a cat and lost.
02-02-2011, 02:18 AM
#18
2nd Gear

Join Date: Nov 2010
Posts: 2
Likes: 0
Received 0 Likes
on
0 Posts
Hi, thanks for the writeup. It gave me the confidence to tackle this involved job. Car now idles perfectly, there's no vacuum at the oil filler tube now (see before after pics) and hopefully no more P1128 error and no more startup smoke. My only suggestion to provide greater access and to save your hands and arms is to remove the generator. I had no problems removing any bolts or installing them since I could get both hands all the way to the front of the motor. Also used the porsche lower bellows clamp and tool - made light work of that too - just be sure to put the clamp with tool attached on the bellows, and lube the inside of the bellows before installing the AOS to the crankcase - then it was a simple job to fit the bellows and a quik flick remove the tool.
I also took before and after AOS replacement measurements of the vacuum at oil filler tube using a modified oil filler cap and Mitivac. There is much debate in the AOS threads about whether there's a vacuum or not with a bad AOS. As you can see "before' there is a vacuum of -26kpa, and almost 0 kPa "after".
I also replaced all the vacuum lines, switches, actuators, connectors etc while there and used Mitivac to test for vacuum hold. Found that the vacuum canister had failed - developed a hairline fracture at the seam where the bottom joins the sides. See the air bubbles in the picture. Who'd have thought it. So my other suggestion check all your vacuum lines and actuators are working and the whole system pulls and holds a vacuum. Its a no-brainer while the intake is off. I think this may have been the cause of the P1128 error.
Torque specs from the factory manuals for the AOS bolts x 2; and the Intake bolts x 6 is 10nm (7.5 ftlb).
I also replaced all of the o-rings (oil vent tubes, intakes, throttle body etc) since they're cheap, easy to do and I wanted no post job air or oil leaks.
See my blog over on renntech
Last edited by aussie996; 02-05-2011 at 03:40 PM.
02-06-2011, 01:54 PM
#20
Nordschleife Master
Hey Scott,
Did you ever get my responses to your plug removal. I was having issues with my phone it it kept saying that the messages were still waiting to send . I didn't want to keep sending over and over....
Did you ever get my responses to your plug removal. I was having issues with my phone it it kept saying that the messages were still waiting to send . I didn't want to keep sending over and over....
02-17-2011, 12:15 PM
#21
Rennlist
Lifetime Member
Lifetime Member
A little trick you can use to help with the squeeze type clamp on the bellow is to open the clamp prior to install and wrap the tab with a zip tie. This way the clamp will remain open during the install, after everything is installed cut off the zip tie.
 05-24-2011, 07:09 PM
#23
Track Day

Join Date: Dec 2008
Posts: 18
Likes: 0
Received 0 Likes
on
0 Posts
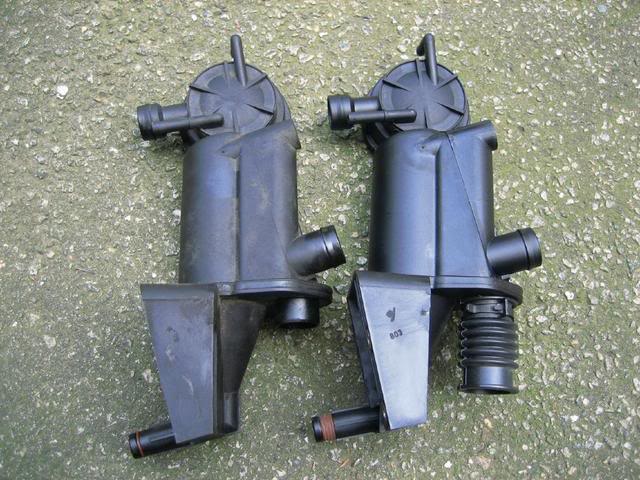
I bought AOS from the porsche dealer (so it is VIN matached, correct year etc 996.107.026.51). My car is 2003 C4S and I have correct AOS but the dealer could not find accordeon pipe that connects to the bottom of AOS (number 10 on Pet picture). In fact when oerdered what is marked as number 10 comes as a small beded pipe 1/2 in.
AOS also has a red ruber ring (see attached pic) so it is unlikekly that accordeon pipe fits it (in fact it doesnt as we tried with the dealer). I really dont want to take everything apart to find out that i need some other part.
Does anybody know what the story is with this new design of AOS and what connects to the big pipe?
05-24-2011, 07:59 PM
#24
Addict
Rennlist Member
Rennlist Member
I ordered one this afternoon and saw this tonite ! Thank you.
 08-27-2011, 09:39 AM
#28
Racer
Join Date: Jun 2004
Location: Brandon FL
Posts: 277
Likes: 0
Received 0 Likes
on
0 Posts
No there is still a bellows, it is just not in the picture. It's easiest to drop the transmission and then do some of the while I'm here other things (RMS, IMSR, clutch).
09-08-2011, 03:57 PM
#29
AutoX

Join Date: Aug 2010
Location: Scotland
Posts: 10
Likes: 0
Received 0 Likes
on
0 Posts
The 3.6 engine has a different type of AOS (the one pictured in sa321's post)
I have hunted high and low on the internet to find any info on fitting the 3.6 type AOS but to no avail.
Going to have a bash at fitting mine at the weekend, will keep you all updated on how it goes.
I have hunted high and low on the internet to find any info on fitting the 3.6 type AOS but to no avail.
Going to have a bash at fitting mine at the weekend, will keep you all updated on how it goes.
09-11-2011, 01:00 PM
#30
AutoX
Join Date: Aug 2010
Location: Scotland
Posts: 10
Likes: 0
Received 0 Likes
on
0 Posts
OK, job done! pretty much need to do the same amount of removal as you do on the 3.4 engine type, I removed the air box, dropped the engine by removing the 2 engine mounting nuts and removed the inlet manifold, did not need to remove the alternator or the coolant expansion bottle.
The AOS is held in place with two 5mm Allen key headed bolts, and these are accessed from the top, not the bottom as in the 3.4 engine.
Anyone needs to ask any more info on the removal of this type of AOS please feel free to pm me.
The AOS is held in place with two 5mm Allen key headed bolts, and these are accessed from the top, not the bottom as in the 3.4 engine.
Anyone needs to ask any more info on the removal of this type of AOS please feel free to pm me.