
Caliper stencil location question...

Thread Starter
Intermediate
Joined: Feb 2010
Posts: 43
Likes: 0
From: Austin, Texas
Well, I still haven't posted any pics of the ride - I'm waiting until it gets the way I want it.
However, I am learning so much from you guys and undertaking a few projects in order to get it where I want it to be. I've read all the 'poser' threads, color preference threads, etc., but with an arctic silver car I thought the red would look good. I'm still on the fence as to whether it was a good move, but it's done now.....
I painted the calipers this weekend (sprayed them, calipers off), and after getting them all done.... I realized I had not marked where to put the stencils in order to replicate the white Porsche. Dumb move.
So, does anybody have any measurements or advice on where to locate the stencils before I spray the script?
Any help would be much appreciated.
TIA, Hugh
2001 Carrera base, Arctic, still in progress....
Here is the result so far.....
Burning Brakes

Joined: Dec 2006
Posts: 1,211
Likes: 67
From: Pensacola, FL
Tex:
Be sure to paint the rotor hats before you're done!
As far as the stencil placement, I would just refer to some of the pics that have been posted on the subject. If I recall, Tim posted the pics of his job a few years ago. I really didn't measure mine when I did it, but I did look at the opposite wheel.
Hope that helps!


Much missed
Lifetime Rennlist
Member
Lifetime Rennlist
Member
Joined: Mar 2008
Posts: 18,020
Likes: 10
From: In my exclusive Cayenne
1) Thoroughly clean calipers with brake cleaning spray.
2) Apply caliper paint.
3) Repeat step 2 as necessary.
3) Apply decal.
4) Spray with high temp clear coat.
Thank you. I was hoping for an opportunity to showcase my smartassedness.
I think I read the real step by step on Loren's site. It took about 3 hours, mostly waiting for paint to dry between coats. After 2 years, it's still at 98%, and only needs a small touch up.
Trending Topics
Thread Starter
Intermediate
Joined: Feb 2010
Posts: 43
Likes: 0
From: Austin, Texas
Thanks to all.
I suppose I'll just eyeball it.
I was hoping for a more precise approach. If I had thought of it before blundering ahead, I'd have made a little cardboard cutout that put the script the correct distance from the circle indentations or some other reference point. As I have figured out after every step in this mod, trying to get it just right is a bit silly - it is truly hard to see once they are back on the car and hidden by the wheels.
himself, thank you for your offer. I already have the stencils on their way, so I should be OK. If I screw it up and have to go back to the blank red, then I may PM you and take you up on your offer if you still have them....
As far as a DIY, there are a ton of threads on this forum and others. I can list them all specifically, but I am not sure of the rules on that - let me know if it is OK. I referenced probably 10 posts altogether from this forum, RennTech, and a Boxster projects forum.
Thread Starter
Intermediate
Joined: Feb 2010
Posts: 43
Likes: 0
From: Austin, Texas
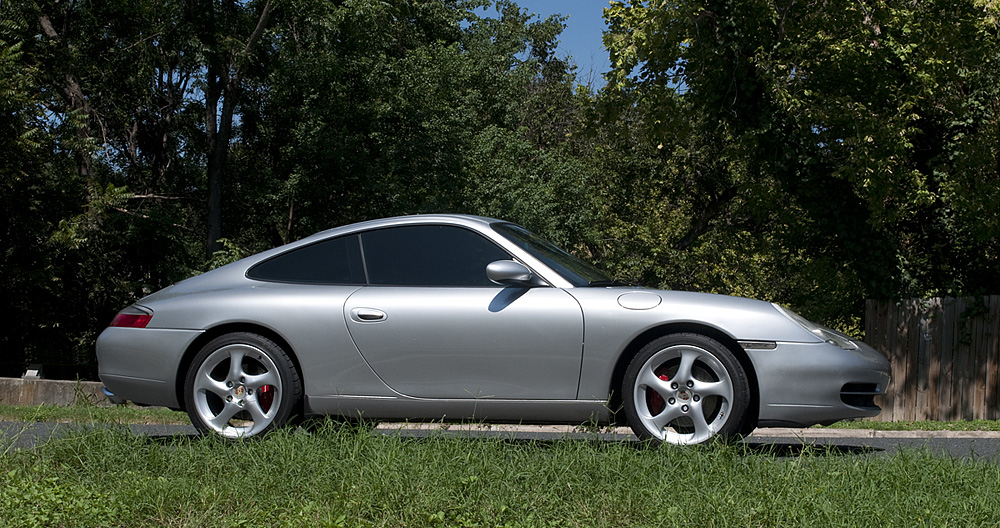
Well, I finally finished the calipers and I've attached images of how I located the 3-inch stencils. I hope I got it right, and maybe it'll help somebody in the future.
Thanks to all on the forums for their help - I used posts from so many people here for guidance and inspiration and I appreciate it all.
Down South - I chickened out on the top hats. Since I live in Texas and they don't rust, I decided I'd just have to deal with the ugly stock gray.
Thanks again to all.
-Hugh
I also finally attached a picture of the car.


Race Car

Joined: Oct 2003
Posts: 4,400
Likes: 47
From: Denver Colorado
If you can get your hands on some wheel cleaning acid that is the best. I have done so many calipers it is not funny and using the acid and the cleaner makes for the best LONG LASTING finish.
Just an FYI. If you guys have flaking clear on your calipers, pick the loose flakes off and then shoot it with high temp clear and it will look as good as new.
Just an FYI. If you guys have flaking clear on your calipers, pick the loose flakes off and then shoot it with high temp clear and it will look as good as new.

Pro
Joined: Mar 2008
Posts: 547
Likes: 9
From: Sedona, AZ
After wasting most of a day calling local auto parts stores, I went to www.jegs.com and ordered:
>Dupli-Color Caliper Cleaner (318BCP200)
>Dupli-Color Engine Paint-Clear(318DE1636)
and they arrived the next day. Good customer service from JEGS.
The DIY start-to-finish was about 2 hours as my calipers only needed to be shot with the clear coat. Now, they shine like new.
FYI-Dupli-Color is a Sherwin-Williams product.
Thread Starter
Intermediate
Joined: Feb 2010
Posts: 43
Likes: 0
From: Austin, Texas
I think I used the Rust-Oleum engine enamel high-heat clear coat, but I'm not sure (got it at AutoZone).
I think any clear coat will be fine - I hope the high heat I got will help a bit, and I hope it doesn't yellow. I did quite a few coats of it before I read numerous posts specifically on clear coat that said to use it sparingly or it will yellow and peel in relatively short order. We will see.
I'm glad yours turned out well. In retrospect, I probably should have just sanded a bit, wiped them well, and sprayed the clear over the stock black. Would have been A LOT easier. I think red looks great with the silver car, but with my wheel choice (I just think they look the best myself, although the thin 5-spokes look great too) it may look like I'm trying to be an S or Turbo. I'm not, I just like the look on my car. Oh well, I'm happy.