When you click on links to various merchants on this site and make a purchase, this can result in this site earning a commission. Affiliate programs and affiliations include, but are not limited to, the eBay Partner Network.
Before I bought the car, I noticed the handbrake lever was too high. (See Diagnosis - left image) Originally, I assumed it would be a 'free' fix via adjustment of the rear brake shoes. This was not to be the case and it turned out to be a lot bigger and a few (not a lot) of extra $$$.
I saw there are a few Boxster 986 orientated DIYs on Youtube but not much specific to 996. Even Wayne from Pelican Parts' book uses Boxster images and I did not see anybody describing the potential perils of incorrect top\bottom spring installation, the springs that hold the shoes to the wheel hub. So I decided, for the first time in my Porsche ownership, to contribute this DIY to the community which others may find informative.
Please be aware that working with brakes can be quite costly, even if a small error is made. If you are unsure about the notes shared below, please consult a qualified technician. If you are confident, proceed at your own risk. With that all said, let’s crack on!
Diagnosis.Left – Handbrake lever was too high. It was about 10 clicks (it should be 4 clicks maximum) and it couldn’t fully hold the car still. Parking in gear is a NO NO as it can cause engine timing problems and undue forces on the transmission, so we want to deal with this ASAP!
Diagnosis.Middle and Right – On both sides, the shoes had crumbled away with deep scoring from the metal-on-metal contact with the rotor.
$$$ - Order new OEM brake shoes, manufactured by Textar. (more on this shortly)
$$$ - Order 2 x OEM rear brake rotors, manufactured by Sebro.
(I also bought 1 x left & 1 x right front rotors, new pads all around, steel braided lines and oem dot 4 fluid – not addressed in this DIY)
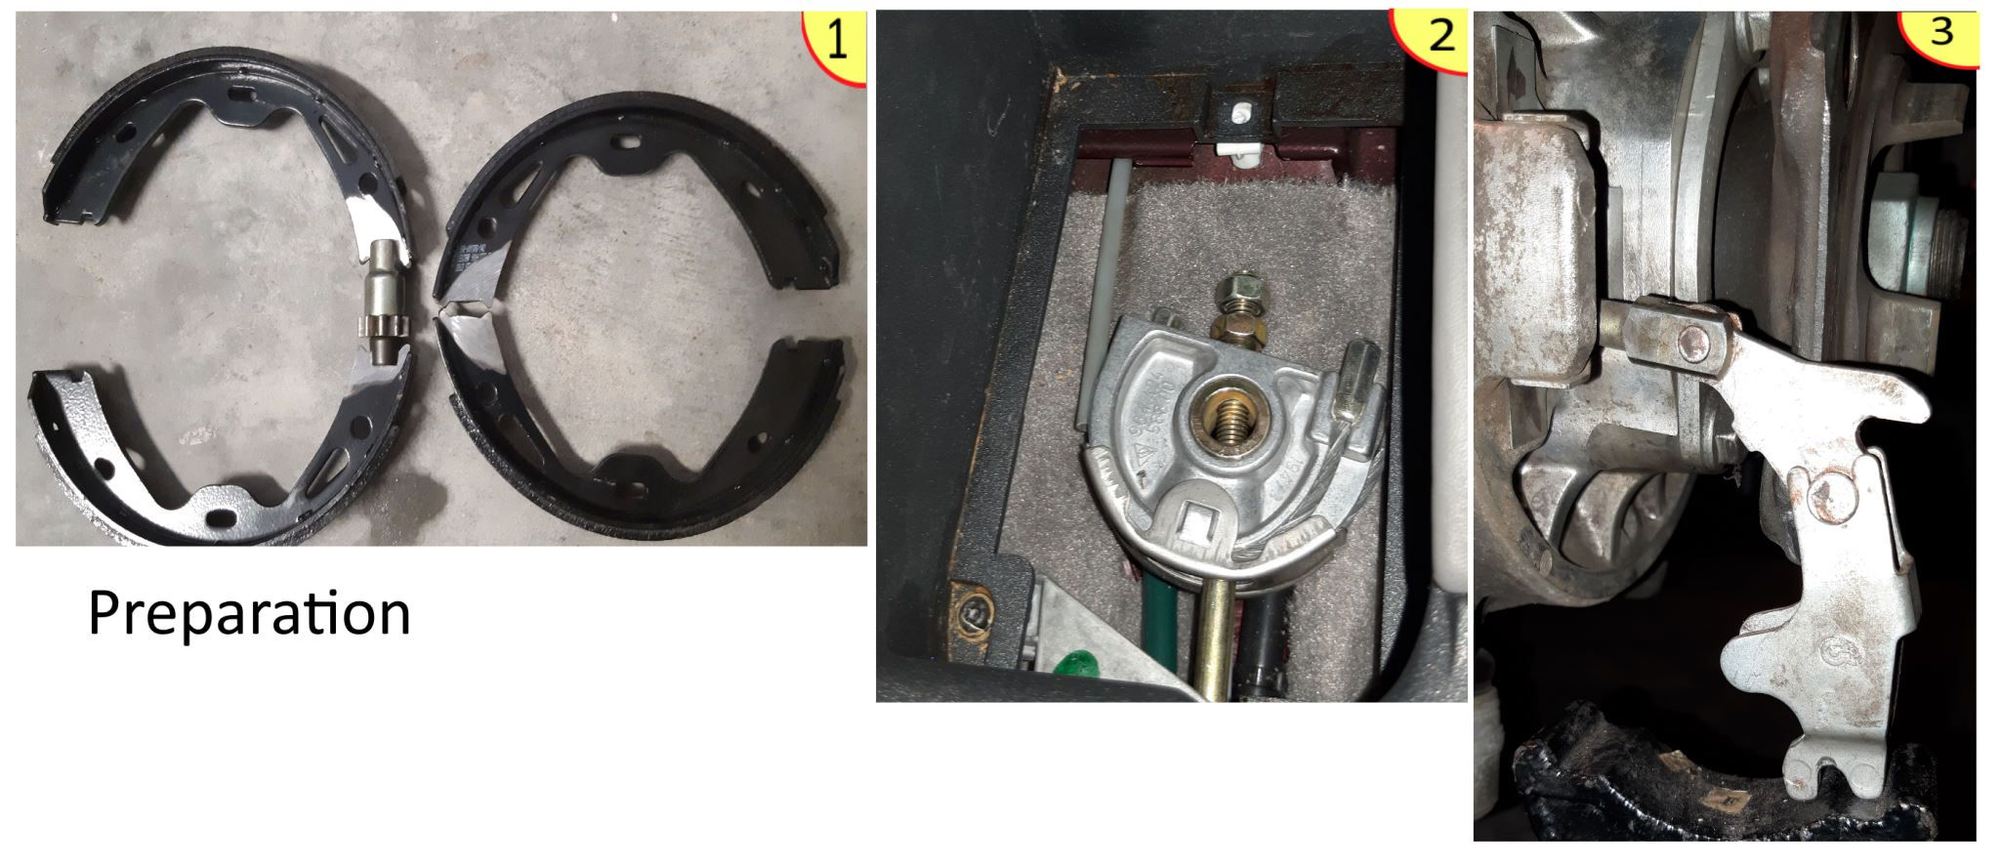
Preparation.0 - (not shown) Jack rear of the car and use axle stands. Remove the rear wheels and brake calipers. Rest the calipers in a place where there are zero stresses on the flexible and hard hydraulic lines. Remove the 2 x rotor screws. Remove the top and bottom springs holding the shoes to the hub. Remove the adjuster spring and adjuster. Slacken the handbrake cables as shown in Preparation.2.Wiggle the old shoes away from the hub. The long 'return' spring can remain attached before removal of the brake shoes.
Preparation.1 - Test fitting revealed that the adjusters won’t fit to the OEM(?!?) brake shoes. The area was slightly thicker than the original ones on the car. Looking online showed other 996 owners running into this with Textar brake shoes. Solution is to grind 1mm or so off each side. Once ground, I sprayed the metal exposed areas in high-temperature Satin Black which seemed to match the original paint nicely.
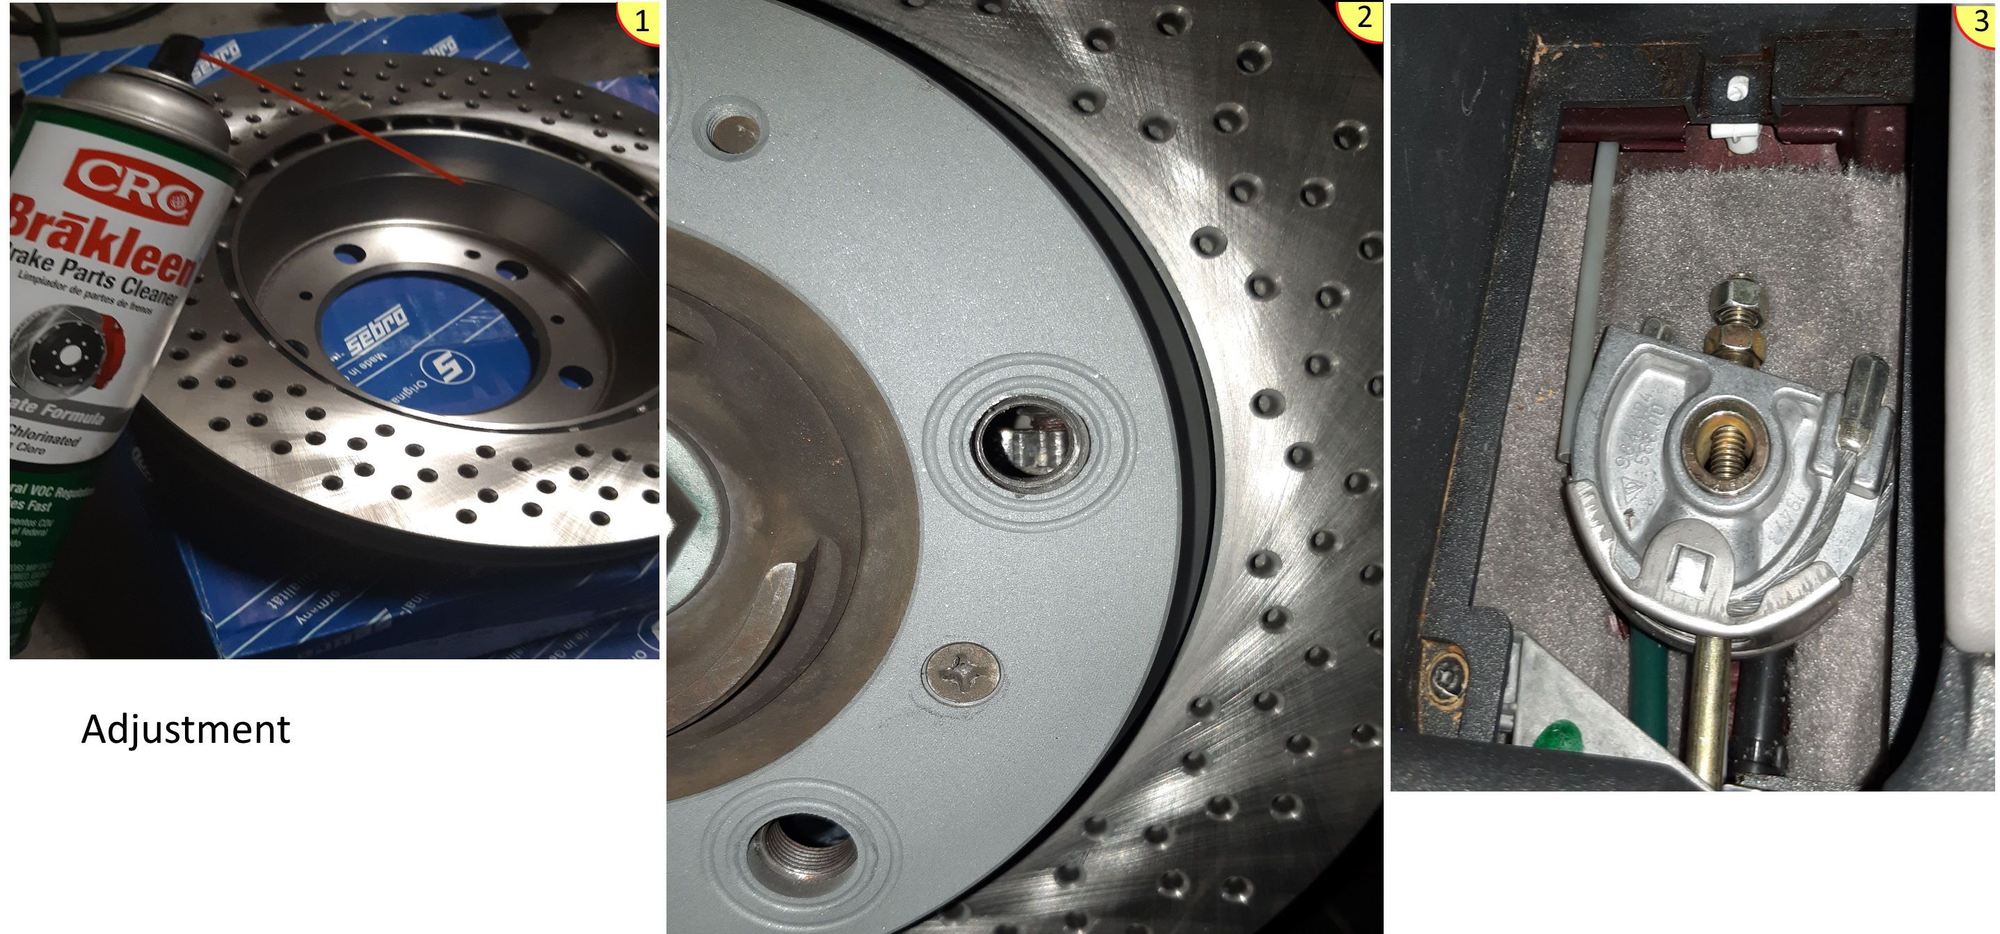
Preparation.2 – Slacken the handbrake cable inside the center console ‘glovebox’, underneath the hidden panel enabling accessibility of the cable linkage at the wheel hubs.
Preparation.3 – Notice the orientation of the cable linkage. This is the driver’s side, passenger side is a mirror image.
Preparation.4 – (not shown) Take this opportunity to unscrew the adjuster fully and apply anti-seize to the adjuster’s threads. I used copper grease. I also fully disassembled the cable linkage and applied white grease at each pivot point.
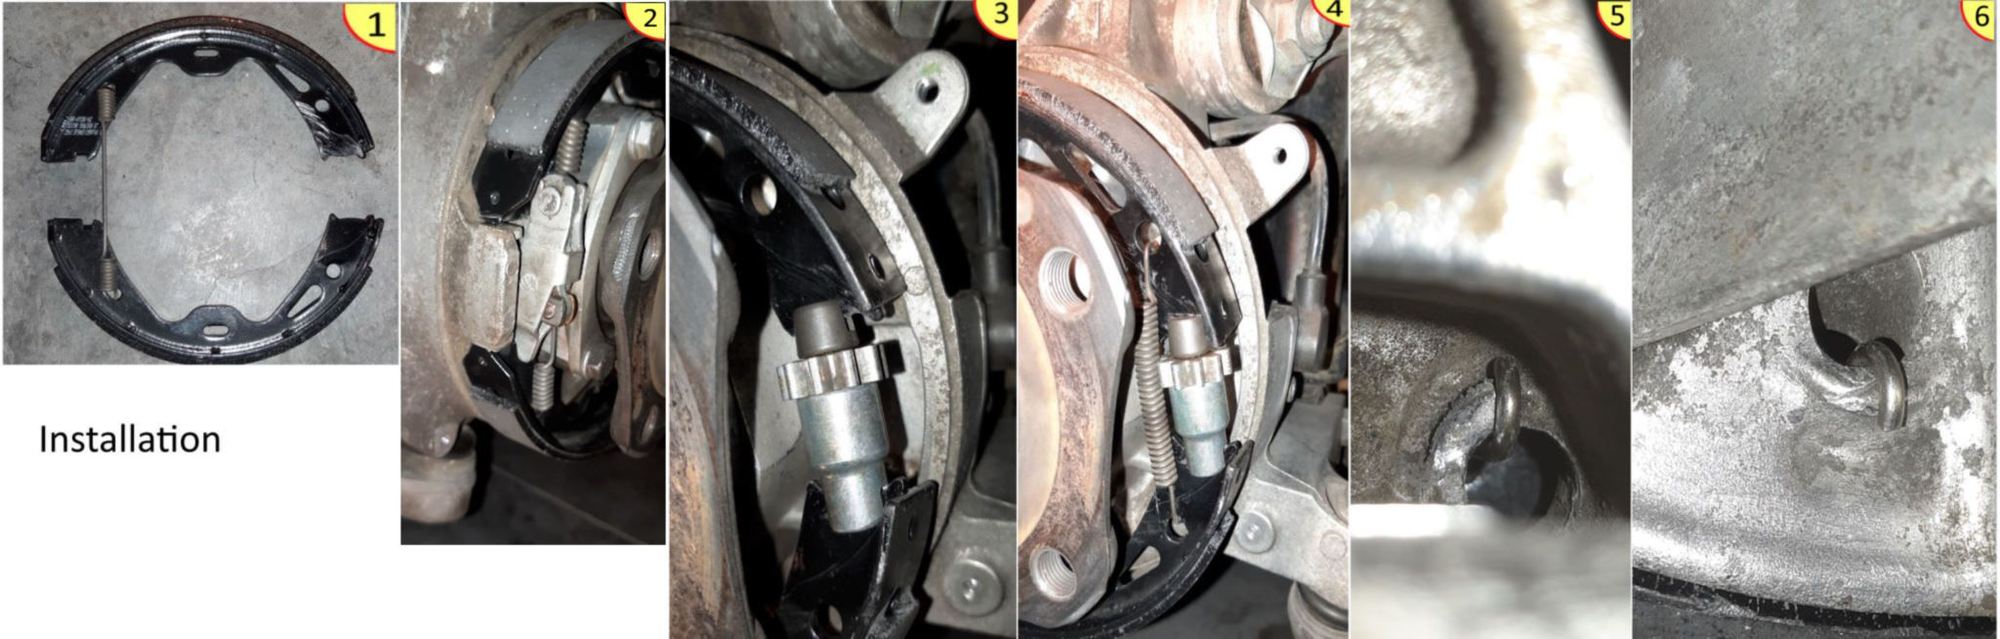
Installation.1 – Install the long ‘return’ spring as shown.
Installation.2 – Install the uncoiled section of the long spring behind the linkage and the shoes need to be placed on either sides of the aluminum post that protrudes from the hub. This step requires some finger muscle and maneuvering to get the parts seated correctly.
Installation.3 – Slide in the adjuster screw at the opposite side.
Installation.4 – Install the adjuster spring. First install the top hook and then the bottom hook using long-nosed pliers.
Installation.5 – Install the top spring. I recall, insert the spring at 3 o’clock and rotate anti-clockwise until 12’oclock.
Installation.6 – Install the bottom spring. I recall, insert the spring at 3 o’clock and rotate clockwise until 6 o’clock.
Both 5&6 – The described rotations are reversed for the passenger side. I used a cheap Amazon borescope to keep an eye on the hook seated position during installation of each spring in real-time on my phone.
Both 5&6 – Important note!!! – Ensure that these top and bottom springs sit at 12 o’clock and 6 o’clock respectively. There are reports online of them dislodging and locking rear wheels at speed!!! It is very easy to snag them on the rather poorly finished, cast aluminum hub. Therefore, double check they have seated correctly before proceeding any further!
Adjustment.1 – Install the rear brake rotors on both sides - do not forget to use brake cleaner on the rotors and on the inside surfaces where the brake shoes will make contact. Install the 2 x rotor screws, applying copper grease to the threads beforehand.
Adjustment.2 – Adjust both sides. I widened the adjuster using a large screwdriver thru one of the lug holes, clicking it until it would not turn any further. I confirmed the rotor was being firmly held by the brake shoe. I then loosened 5 clicks and found it was very lightly binding. I loosened a further 4 clicks (total 9) and the rotor was fully free. I repeated this on the passenger side.
Adjustment.3 – Sorry this is not the correct photo. I fully released the handbrake and tightened the inside nut until the handbrake could be pulled up with normal force by 2 clicks. I tried to turn both rotors and they were firmly held in place. With (a lot) more force the handbrake could be pulled another 2 clicks. (total 4 clicks) I pulled and released the handbrake a few times to ensure the shoes had fully seated. I then held the inside nut in place while I tightened the outside nut, thus locking them both together. I finally refitted the covers inside the center ‘glovebox’.
This is the end of the DIY. It makes sense to replace other wear items at the same time. Put the calipers and wheels back on and drive. (I have not done this yet! ) You might need a brake piston separator tool to push the pistons wider if you changed the brake pads and rotors. Remember to remove some brake fluid beforehand if the old rotors and pads were changed and remember to pump the brake pedal a few times to ensure you have a firm pedal prior to the test drive.

 10-26-2020, 09:27 PM

 ) You might need a brake piston separator tool to push the pistons wider if you changed the brake pads and rotors. Remember to remove some brake fluid beforehand if the old rotors and pads were changed and remember to pump the brake pedal a few times to ensure you have a firm pedal prior to the test drive.


