When you click on links to various merchants on this site and make a purchase, this can result in this site earning a commission. Affiliate programs and affiliations include, but are not limited to, the eBay Partner Network.
my shade made some strange snapping noises when closing/opening but was still operable. I was unsure if this was normal as I was not the original owner so I never felt comfortable operating the shade/roof. In 2012, fellow RL'er Marc looked over my shade and helped me disassemble and replace some of the shade components. No more snapping noises and the shade worked properly. Soon after, I installed 18" Fikse wheels on my car, (my suspension is HD Bilsteins with M030 springs). The ride felt much firmer/harsher but I think this was not so good for my shade/roof and 5 years later, my shade started making the snapping noise again. I was fortunate to have watched Marc work on my shade so I tackled the job of figuring out what if anything was wrong with my shade. After less than a day of inspecting, disassembling and reinstalling/testing, my shade is back to normal!
a quick visual can give you the first clues as to why your shade could be making funny noises....with the glass roof all the way open, stand outside of the car and visually check to see that the pull-bow (or knock out lever) are straight and not bent in any way. If the pull bow or the arms of the metal bracket attached to the pull bow are even slightly bent, then your shade operation could or will be impacted very soon.
here is a simple and very doable DIY for just reparing the shade portion of the 993 Targa. I know Mike and p-car have more indepth material about the 993 Targa's roof mechanism. I will call this a "Dummies DIY to the 993 Targa Shade"
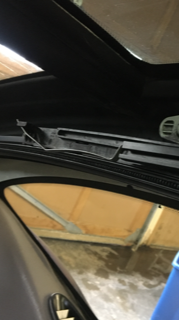
1. Open Glass Roof. The front air deflector will be standing up. Take 3mm Allen head and unscrew all four screws holding the glass. As you loosen screws the deflector will dislodge. Angle the deflector the opposite way and pull glass out towards the front of the car. Store deflector away for re-assembly later. (see pic 1)
2. Dislodge shade. While holding the metal edge of the shade, angle it from 45 to 90 degrees and it will dislodge from the metal lever support (993-562-554-00). After you do this to both sides, the shade should wrap further closed. (see pic 2)
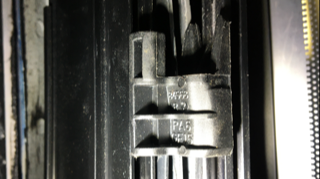
3. Take a pointed edge picking tool and from the inside of the car, gently push tab outwards of plastic bracket (993-562-541-00). You should hear a muted snap. Now gently slide metal guide track (993-562-542-00) front and back a few times so that it dislodges from the plastic bracket in front and also the spring (993-562-557-00) in the back will dislodge from the zip ties (if your car has them) (see pic 3)
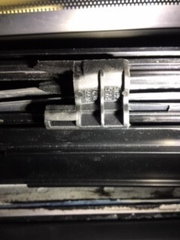
4. You will notice the little arms of the lever support which were holding the shade (993-562-554-00). These arms will tend to bend due to age (or flexing of car?). As the arms have bent, so too will the ends of the pull bow that you will replace in the next step. The arms will slide out and there are two little plastic shoes (993-562-555-00) that can be pulled out and replaced. Also, the spring attached to the rear of the metal guide can be replaced at this time. (see pic 4)
5. Dislodge pull bow or knock out lever (993-562-551-00). For this operation, you will need to close the glass roof. Make sure the pull bow is in the horizontal position on both sides of the guides. After you close the glass roof, push the button to open/close the shade and you will notice the pull bow sliding towards the front. Take front of the pull bow and angle it vertically (90 degrees). The pull bow can only be pushed upright vertically if there is an opening to the roof. So you will need to slide the glass back and forth until there is enough space for the pull bow to stand up right. Gently pull/push pull bow towards the front of the car and it will slide out. (pic 5 is of the pull bow after I reassembled. I forgot to take a pic of the pull bow after step 4 above)
6. Dislodge plastic guide track (993-562-559-00). If you glance over/inspect this part, you will notice that there are about 8 or so spots where the part "snaps" on. So to pull it out, you will need to grab the ends and gently pull on the corners. The plastic can bend a bit but it's ok as long as enough force is applied it will snap off. Don't bend too much as to break it. You will know what I mean once you attempt to dislodge it. I think this plastic guide (where the pull bow/knock out lever rides on) is highly susceptible to damage. Because the pull bow is metal, and if it has warped or bent in any way, the pull bow will not ride smoothly on the track and start "chewing away" at the plastic piece. You can see in my pic how the grooves in the plastic guides were affected and impacting my shade operation. (see pic 6).
So that is it. Reassembly is just reverse of the steps. Hope this helps the 993 Targa lovers
PS, I didn't include the steps required to detach all the interior plastic trim covers before tackling the shade. So you would need to take off the front two flip sun visors and the plastic cover that is above that, the rear deck (the large piece in the back that holds the rear speakers). Now take off the two little hangers on the B pillar of the car and unscrew the interior piece. Finally there are 4 screws (2 on each side) all the way back close to the rear glass. Unscrew these and it will allow you to slide back the long plastic covers that go along the top side interior of the car. After all the interior pieces are removed, visually check that the vinyl covers have not been unglued. Most likely, as our cars have aged, the glue has deteriorated and the vinyl coverings will need to be re-glued on.
I am new to this site but have been watching for a year or so. LUCKYJ....Thank you for the posts!! I since have removed all parts and replaced hem all and they work great. Looking at the parts under magnification and the failure points. Failure is due to the lever physics that are being introduced. I am going to measure the weight and the lever fulcrums. I imagine the 'pin' on the bow is sustaining more than 15-20 lbs and causing it to roll out. If you look at the broken pieces you have and line the guide pin in the tract you will see where it rolls out and bends the lever arm supports. I wonder what would happen if you lowered the force on the spring?? Well just wanted to say thanks!
Hi, I�m about to purchase a �97 993 Targa and the selling dealer says the top doesn�t work and listed this as what he observed. Is this correct? Will a sunshade problem prevent the glass roof from sliding back?
�So the little front vent flap works fine. The motors for the screen move and just don't appear to take the screen with them. It has limit switches so if the screen doesn't extend or work correctly it won't initiate the glass to move�So the little front vent flap works fine. The motors for the screen move and just don't appear to take the screen with them. It has limit switches so if the screen doesn't extend or work correctly it won't initiate the glass to move.little front vent flap works fine. The motors for the screen move and just don't appear to take the screen with them. It has limit switches so if the screen doesn't extend or work correctly it won't initiate the glass to move.
Excellent, thanks GAV. After reading numerous threads on typical 993 targa problems it sounds like it might be easily fixed with some tinkering if it is limited to just the sunshade having issues.
Bought the '97 Targa last Thursday and love it. On my mission to fix the top. My targa issues are not that serious after all, just need a top bow and knock out lever, but also these two parts - Researched all day with no luck. I need a plastic drivers side rail that the spring connects to as there is a chunk missing out of the existing drivers side one. I also need a rail guide like the one pictured. I have the passenger side one, but the drivers side one is missing. With all of these parts I should be good to go. I tried Googling the part numbers with absolutely no luck. Thanks!!
Thanks Grapeape! That was a huge help, I have a shopping list of everything I need now. So thankful for this page and all the help, and that these parts are still available.
You're welcome. When I did what you are doing now, replacing brittle plastics and fatigued metal parts, I used Sunset to source the parts. Don't be surprised if more than a few items are back ordered. It took about 6 to 8 weeks for me to get my list completed.
 06-14-2017, 01:17 PM