

Prep, Prime, Painting Non-OEM RS Tail
 03-14-2017, 09:45 PM
#1
Banned
Thread Starter

I purchased this RS tail last week, and thought I'd post some process pics.
https://rennlist.com/forums/parts-ma...rear-tail.html
Prep consisted of removing OEM spoiler; then scuffing/sanding the entire RS tail with 320° wet/dry paper, rinsing with water and set out to dry in 80° Socal heat...After drying, I wiped the tail clean with acetone.
Here is the tail, primed and sanded...again with 320.
More to follow as I apply aerosol canned, Touchupdirect base coat, color sand and clear...Hoping things turn out ok.
Last edited by nine9six; 03-16-2017 at 01:10 AM.
 03-15-2017, 02:23 AM
#2

I purchase this RS tail last week, and thought I'd post some process pics.
https://rennlist.com/forums/parts-ma...rear-tail.html
Prep consisted of removing OEM spoiler; then scuffing/sanding the entire RS tail with 320° wet/dry paper, rinsing with water and set out to dry in 80° Socal heat...After drying, I wiped the tail clean with acetone.
Here is the tail, primed and sanded...again with 320.
More to follow as I apply aerosol canned, Touchupdirect base coat, color sand and clear...Hoping things turn out ok.
No pinholes to fill or flashing from the molds to remove? I think you should consider yourself lucky.
03-15-2017, 09:36 AM
#5
RL Community Team
Rennlist Member
Rennlist Member
It seems that since you used a consumer paint can primer that you plan to paint it with a consumer acrylic spray paint or really any paint out of a can. Is this the case?
If so consider this I pulled from another document:
Spraycans generally do not push enough paint to produce an automotive quality finished job. Better to buy an inexpensive compressor and paint gun from Harbor freight for about $125 and source some automotive paint. Using a paint gun is easy. Adjusting it can be done on a trial basis. I adjust mine while spraying plain solvent through it before loading it with paint.
Why Paint Matters – Having your car painted is a big deal as properly applied paint will last the life of your vehicle. Here is my rundown on the subject based on both working with paint shops and having personally painted both new and used bumper covers using commercial methods and materials:
One stage paint uses a primer and one or more top coats that carry the color. Two stage paints involve a primer, color layer(s) and a clear-coat top coat that provides the gloss. Contrary to Porsche’s own marketing literature, solid color 993 are in many cases painted in single stage paint, my 96’ Speed Yellow car is. If your car is painted with single stage paint any repainting should be done the same way. This will require finding a restoration quality shop that is willing to do this as most shops will just use a two stage paint on what is now just part of your car.
Shops like to use two stage paint as all newer cars are painted this way, it is simpler to apply and when their paint system can’t produce a color match between panels they can feather the color layer of the paint when applying it to merge the dissimilar color of body panels. Once feathered they can overspray the job with clear coat. With single stage paint where the color and final finish layer are one and the same getting a good color match up front is how it is done requiring skill and the flexibility in selecting a paint system that can produce a good color match.
Most higher volume modern shops will only use their in-house paint systems as it keeps their cost down and meets EPA requirements. Usually these shops use acrylic paint or in some cases water solvent based paints. These paints and this form of application are significantly inferior to the paint that came on your car and can fail in just a few years. Smaller restoration paint shops do not maintain in-house paint systems. Due to their lower volume of work they are not required to meet the same EPA rules so they can select from multiple paint system suppliers paint that will color match very closely and not exhibit adhesion issues as it ages and gasses out.
All acrylic paints, the most commonly used, are somewhat brittle. This can cause things such as clear coat pealing around edges, failing from UV exposure or paint cracking or flaking off a bumper cover with minor flexing. The most durable and flexible paint is a two part urethane sometimes called 2K, used with a catalyst. Once it hardens it is much less susceptible to damage from chemicals, weather, or UV rays. It retains its flexibility/adhesion and if applied with a proper compatible primer will outlast the car. It is available as both one and two stage paint.
Painting a new vs used bumper cover - Bumper covers flex. For this reason using a 2K urethane paint is especially important. Also achieving good adhesion is a big deal. An odd experience I have had is that achieving good adhesion on a new replacement cover is actually more difficult than over spraying an undamaged used bumper cover. I believe this has to do with some of the plastic’s chemical
Things to consider when Buying / Servicing / Replacing / Upgrading a 993.
components migrating to the surface of the part and creating a coating that is difficult for the paint to grasp to.
Some new covers are also pre-primed, however the primer in many cases is not compatible with the paint system being used so it must be sandpaper prepped and the part re-primed. I have used adhesion enhancing sprays to assist in overcoming these issues. Even with these sprays getting the primer coat down right and achieving good even adhesion can be a challenge.
With used bumper covers where the existing paint has good adhesion resolves many of these issues as the plastic is encapsulated under the paint and therefore does not cause issues. In this case the existing finish needs to be sanded to prep it for good mechanical adhesion and the proper primer applied to ready it for painting.
Beware of reconditioned bumper covers. Many have had cracks or rips repaired in them. This is typically done by using melt gun plastic to fuse and fill the crack. I have tried these products and found that although they can produce flawless repairs from a visual standpoint the repair is not as strong as the surrounding material. For this reason using a reconditioned cover where the rip or crack extends to the edge of the part can result in a propagation point for a future failure. The take away from this is that one should only consider a used cover if you personally inspect it.
03-15-2017, 11:39 AM
#6
I rattle-canned JDM bumpers for my Galant VR-4 back in the day, and they came out decently, but it's not the kind of thing I'd put on a nice 911. I have a feeling the products and prep that nine9six is using here will give a better result, but I'm pretty interested to see the final result.
03-15-2017, 12:25 PM
#7
Seared
Rennlist Member
Rennlist Member
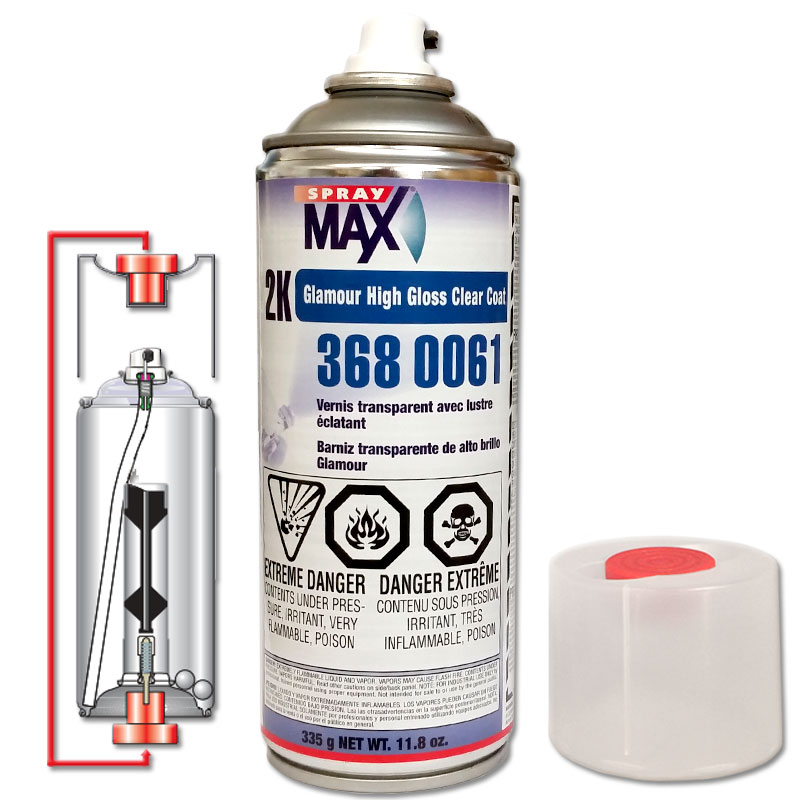
I'm not sure what you're using for clear, but I'd highly recommend SprayMax two-part catalyzed automotive clear. Made in Germany and comes in spray cans. I've gone through at least 20 cans over the years.
It has a fantastic spray pattern, lays beautifully, and gives a crystal-clear automotive finish.
Andreas
It has a fantastic spray pattern, lays beautifully, and gives a crystal-clear automotive finish.

Andreas
Trending Topics
03-15-2017, 12:45 PM
#8
Burning Brakes
Once you put some gloss on it, you're going to see all the imperfections/waves that needed to be corrected first. There's a lot more prep work that the part will need to pass visual muster, unless it's a track piece.
03-15-2017, 12:47 PM
#9
Rennlist Member
I've never used that vendor, but can't imagine they are making their own paint... I assume they are repackaging PPG or some other standard automotive paints.. If so: film thickness of the clear is critical to the longevity of the finish. Its the clear that has the UV blockers.
Just something to think about.
My first automotive painting experiment was painting my trailer fenders. I was using a professional HVLP gun, but was afraid of runs so was very stingy with the film thickness. It looked great when I was done, but after two years in the sun the finish started to noticeably degrade... Had my buddy at PPG take a look and found out where I went wrong.
03-15-2017, 12:55 PM
#10
Agent Orange
Rennlist Member
Rennlist Member
I've tried the rattle can approach in the past. Only worked on small, narrow surfaces, never on what you have planned. I've found it better to just let the pros handle this type of work. That said I would love for you to prove me wrong!
And +1 on Spraymax. It's good stuff. But it's highly toxic (wear the best respirator money can buy) and has a very short life once you mix the two chambers.
Good luck!
And +1 on Spraymax. It's good stuff. But it's highly toxic (wear the best respirator money can buy) and has a very short life once you mix the two chambers.
Good luck!
03-15-2017, 02:27 PM
#11
Banned
Thread Starter
Thanks for the tips and interest, gentlemen...
I used the touchupdirect paint on the Turbo brake ducts and they turned out nice, but I suspect ilko may be right regarding the small narrow surfaces for rattle can painting. But I'm into it now, and I'm going to see things through. If it needs to be redone by professional, well then so be it; but I am going to try. Will keep you all posted.
I used the touchupdirect paint on the Turbo brake ducts and they turned out nice, but I suspect ilko may be right regarding the small narrow surfaces for rattle can painting. But I'm into it now, and I'm going to see things through. If it needs to be redone by professional, well then so be it; but I am going to try. Will keep you all posted.
Last edited by nine9six; 03-16-2017 at 01:21 AM.
03-15-2017, 04:24 PM
#12
RL Community Team
Rennlist Member
Rennlist Member
03-15-2017, 04:55 PM
#13
RL Community Team
Rennlist Member
Rennlist Member
Intriguing...
http://usa.spraymax.com/fileadmin/do.../TMB033_US.pdf
Looks like a potential alternative to conventional acrylic where better durability is needed. Things such as plastic or fiberglass where thermal expansion and flexing may be present.
Andy
http://usa.spraymax.com/fileadmin/do.../TMB033_US.pdf
- Looks like it is a two part acrylic paint with a pot life once one begins to apply it.
- Probably significantly more durable than conventional acrylic paint
- Not as durable or flexible as two part urethane
- Need to make sure the primer and color coat is compatible with it.
Looks like a potential alternative to conventional acrylic where better durability is needed. Things such as plastic or fiberglass where thermal expansion and flexing may be present.
Andy
03-15-2017, 06:55 PM
#14
Banned
Thread Starter
...Using urethane clearcoat per Andreas, and ordered a pint of 25D, Turquois Blue Metallic, because of the tips and comments.
I ended up purchasing a paint gun from Harbor Freight tools. BTW, there were a few pinholes, and one flashing seam I had to correct.
Last edited by nine9six; 05-18-2018 at 10:12 AM.
05-17-2018, 11:57 PM
#15
Banned
Thread Starter


I'll be damned if I never posted the final result...
I learned a great deal about painting during this exercise and would not hesitate doing a bumper or other such part but it is a huge amount of prep work, in order to realize a good result.
I ended up purchasing a pint of the base and clear from touchupdirect.com.
it is water-based, low VOC, and I was happy with the paint match.
I also bought some piping to go around the RS tail for a more finished look... and although it's not perfect; it's good enough for the girls I go with!
I ended up purchasing a pint of the base and clear from touchupdirect.com.
it is water-based, low VOC, and I was happy with the paint match.
I also bought some piping to go around the RS tail for a more finished look... and although it's not perfect; it's good enough for the girls I go with!
Last edited by nine9six; 05-18-2018 at 10:07 AM.