When you click on links to various merchants on this site and make a purchase, this can result in this site earning a commission. Affiliate programs and affiliations include, but are not limited to, the eBay Partner Network.
Just replaced the frunk struts. Made a tool from a steel wire. Pounded the wire's end flat. Used it as a wedge to keep the ball joint clip open on the new rods. Placed the new rod over the ball joint and simply pulled the wire out to lock the ball in. Top was easy, held the hood open with my back as I adjusted its height to line up the strut pin. Hardest part was it was a hot day. Pulled off the old ones by wedging the ball end with a screwdriver. Now for the engine lid!
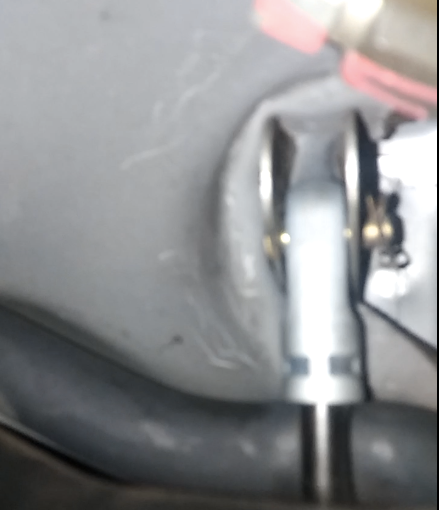
Here is a picture of the original strut I removed and the ball retaining release wire-tool I used with the replacement strut. In my case prying the old ball joint apart was probably easier due to the earlier design ball socket. If one wants to remove a newer strut design with the ball capture clip I see no reason why the tool will not work to release the clip that holds the head on the ball if the ball can't be pried off.
Andy
PS be sure to place the replacement strut in its approximate final orientation before attaching it to the ball on the bottom as the top may not clear the hood hinge frame to position it once the strut is attached at the bottom.
Thanks Andy...The tool is exactly as you described, and as my mind pivtured.
Just did the engine lid struts today.
Not a big deal, just requires patience.
They are done completely by feel.
Remove the air filter cover on the right to gain access;
Reached way forward from below the blower motor on the left one;
Again I used my head and back to move the lid up and down to align the pin holes;
The process is done basically blind so I put a large towel under the work so as I dropped the pins and clips it was easy to retrieve them;
Out of the box the URO struts had holes on the head ends that were too small for the pins.
I drilled both ends out allowing for pin play. Seeing that strut pins are under constant one way tension there is no possibility of rattle if the strut has a little play in it.
I also reamed a generous round on the edge of the pin holes at the ends of the struts. This made it much easier to align and guide the pins into position.
I bet one could order self locking pins with a button release and a D ring on the head to make the pin insertion a no-brainer in the future.
I did the hood struts not that bad...so i wanted to do the engine lid which also doesn't look hard....yeah BUT behind the inner pin there's something hard. Is that some sort of rubber?? Taking the clip is not so bad but how to handle this back pin??? Just push it or scratch it out?? Any pointers?? Other than that yeah a 15min job
I've taken mine off several times and not sure wha rubber you're referring to? The engine sound pad? You need t grab the edge of the deck lid in one hand and either force it up slightly to relieve tension on the struts. When the tension is relieved, the pins slide out completely freely. No need to force the pin itself.
While we're on this topic...
Can someone explain why there are two sets of mounting holes for the struts? I presume for different weight decklid + spoiler combos but I've yet to come across instructions around this or evidence of anyone using the alternate holes with different wings.
OK now that u mention it is the sound pad ... as it is hard to get to the inner clip& mainly by touch it felt a bit hard so thought maybe they secured somehow with some rubber behind and wanted to make sure
before continuing I'm the only owner of my C4S and lately been doing more DIY stuff than the basic brake jobs and things like that.
Originally Posted by boomboomthump
I've taken mine off several times and not sure wha rubber you're referring to? The engine sound pad? You need t grab the edge of the deck lid in one hand and either force it up slightly to relieve tension on the struts. When the tension is relieved, the pins slide out completely freely. No need to force the pin itself.
While we're on this topic...
Can someone explain why there are two sets of mounting holes for the struts? I presume for different weight decklid + spoiler combos but I've yet to come across instructions around this or evidence of anyone using the alternate holes with different wings.
I replaced mine last year and it was not very hard. Just a little patience and a long flat screwdriver will do. Here is a helpful video. This lady knows her stuff...


 08-20-2015 | 07:28 PM