
Broke 1 hood crest lug while removing. How do you hold this sucker?
 09-12-2013, 11:16 PM
#1
Rennlist Member
Thread Starter
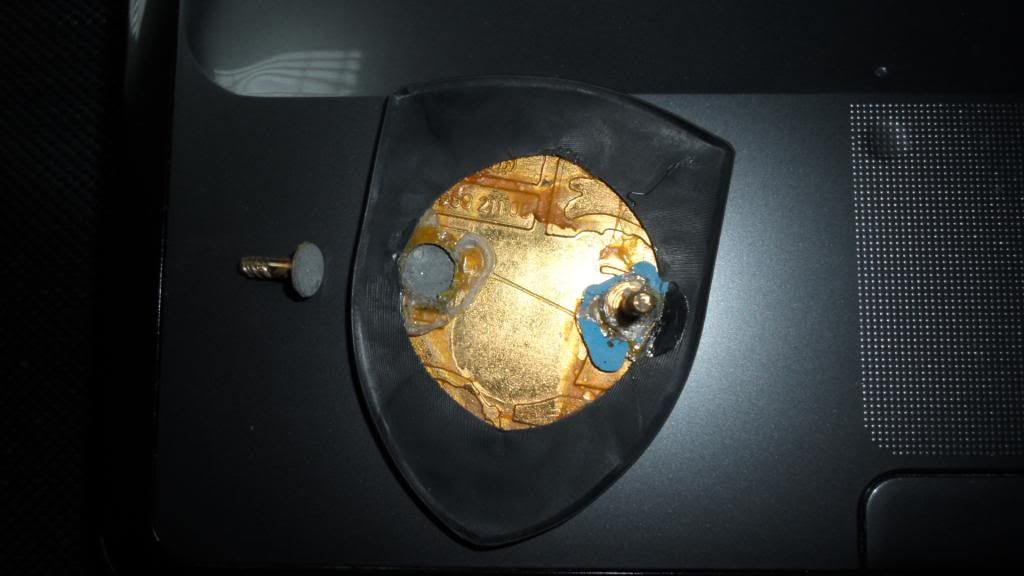
I was removing the original hood crest to replace with a new one from intrepidagent. While removing the 8mm nuts, one of the cast lugs broke off from the crest. It seems that I need to get the socket wrench on the nut, some leverage to lift the lug against the nut, and also grasp it to keep it from spinning.

Anybody else have experience with this? I can get floss under there to lift, but I cant find anything in my garage that can grasp onto it to limit spinning. The round lug part is very slippery.
TIA
Anybody else have experience with this? I can get floss under there to lift, but I cant find anything in my garage that can grasp onto it to limit spinning. The round lug part is very slippery.
TIA
 09-13-2013, 12:26 AM
#2
Drifting
IIRC, Blue tape around it on top, grasp with needle nose or flat nose pliers, then a socket (socket screwdriver works well) on back. The nut shouldn't be on there very tight, as its a thin metal nut.
I've fixed such a broken crest by wire brushing and cleaning the interface between the parts and using a little JB Weld to stick it back on. Originally they are soldered, but not sure you can get enough heat on the crest without melting the plastic colors on the front.
I've fixed such a broken crest by wire brushing and cleaning the interface between the parts and using a little JB Weld to stick it back on. Originally they are soldered, but not sure you can get enough heat on the crest without melting the plastic colors on the front.
 09-13-2013, 12:55 AM
#3
7th Gear

Join Date: Mar 2006
Location: MD
Posts: 7
Likes: 0
Received 0 Likes
on
0 Posts
It happened to me early this year. I used a dremel with a small tip. Drill at the center of the round lug from the top of hood until the it is loosen from the pin below it. Cover the entire area with masking tapes to protect the paint. This of course destroys the lug but I'd rather buy a new hood crest then trying to fix it. Good luck!
09-13-2013, 01:06 AM
#4
Rennlist Member
Thread Starter
I think I will JB weld a bolt to it tomorrow and see if that works. The "plate" that resulted from the break is just thin enough to prevent me from being able to grab it with anything securely. I didnt even think about adhering something to it. Thanks for advice.
PS I dont need to put it back on except to keep the "stock" emblem, I just want to be able to put on the new crest.
PS I dont need to put it back on except to keep the "stock" emblem, I just want to be able to put on the new crest.
09-13-2013, 03:02 AM
#5
Drifting
I think I will JB weld a bolt to it tomorrow and see if that works. The "plate" that resulted from the break is just thin enough to prevent me from being able to grab it with anything securely. I didnt even think about adhering something to it. Thanks for advice.
PS I dont need to put it back on except to keep the "stock" emblem, I just want to be able to put on the new crest.
PS I dont need to put it back on except to keep the "stock" emblem, I just want to be able to put on the new crest.

I might have even been able to get it loose just holding the top firm with a finger, as you just need to loosen a little, then you can get pliers on it.
Good luck!
09-13-2013, 03:05 AM
#6
Rennlist Member
Thread Starter
I tried my fingers, a pair of plastic pliers to save the paint, then frustrated, a pair of metal pliers. I just cant get a grip to be able to stop it from rotating and be able to pull up against the nut to get a grip on the thread. If I find a good solution I'll make sure to post. If i accidentally make a terrible error, I'll make sure to post


Trending Topics
09-13-2013, 05:36 AM
#8
Rennlist Member

If you have a dremel tool use a cutoff wheel to carefully make a short slot in center of the exposed head. Then use a small pocket clip Chraftsman flat blade screwdriver or like to hold the mount from turning and unbolt. This will save the stud and you can reattach to the crest as suggested above.
09-13-2013, 10:17 AM
#9
Seared
Rennlist Member
Rennlist Member
If you have a dremel tool use a cutoff wheel to carefully make a short slot in center of the exposed head. Then use a small pocket clip Chraftsman flat blade screwdriver or like to hold the mount from turning and unbolt. This will save the stud and you can reattach to the crest as suggested above.
Andreas
09-13-2013, 10:23 AM
#10
Rennlist Member
Thread Starter
Unfortunately I also need to lift up to get the threads to engage, else I would have tried the dremel technique sooner. I will try the side cutters if I can find a set in my tool chest thats big enough to grasp. I'll post a quick update here when I get it.
09-13-2013, 11:05 AM
#11
Rennlist Member
Mask around the head with tape, and cut a short piece of wood (dowel) to apply max downward pressure on the head - should secure it from turning as you spin the tin nut off ....
09-13-2013, 12:58 PM
#12
Banned

Join Date: Aug 2011
Location: 6feet under snow of CANADA
Posts: 3,665
Likes: 0
Received 0 Likes
on
0 Posts
this happened to me aswell, I just bought a new logo and the special nuts with a gasket.
side cutters to hold it or a quickweld / JB weld solution to hold the little post. There is a grey sticky stuff on the bottom of the nut to prevent it from rattling loose
when the new nuts arrive you will see what I mean. I hope you get it fixed without scratches. Everyones input is spot on, taping the paint is always helpful.
best of luck
09-13-2013, 02:30 PM
#13
Rennlist Member
Thread Starter
Just got the lug out this morning. Thanks for all the input guys. I installed the new badge no problem.
My process was:
1) Use a soft plastic putty knife to wedge under the lug. It still spun, but the upward pressure seemed to get the threads to engage.
2) Used a pair of side cutters to get a grip and got the nut half off
3) used regular needle nosed pliers to grab the fastener part and got everything apart.
Did not tape off anything and after cleaning, no marks were on the paint.
09-13-2013, 03:18 PM
#14
Banned
Join Date: Aug 2011
Location: 6feet under snow of CANADA
Posts: 3,665
Likes: 0
Received 0 Likes
on
0 Posts
good to hear you got it off, Post a pic of the finished product. Cant wait -->
gold logo was pn 997.559.211.02
gasket 7L5.853.611.B
nut x 2 were 999.591.423.03
gold logo was pn 997.559.211.02
gasket 7L5.853.611.B
nut x 2 were 999.591.423.03
09-13-2013, 05:45 PM
#15
Rennlist Member
Thread Starter
Here are some crappy cell phone pics after a large pollen fall (excuses for the dirtiness)


I really like the brushed nickel on the black paint. It probably doesnt provide that 200$ pop for some, but I love it. Thanks to IntrepidAgent (Jim) for an awesome refresh of the worn out original crest.
I really like the brushed nickel on the black paint. It probably doesnt provide that 200$ pop for some, but I love it. Thanks to IntrepidAgent (Jim) for an awesome refresh of the worn out original crest.