
Wheel Well Archaeology
 05-28-2011, 06:58 PM
#1
Rennlist Member
Thread Starter
Bit of a teaser since I don't have pics yet, but just needed to share... great use of a rainy day.
Every time I have the wheels off the car, I am disgusted by the 15 years of accumulated grime. Not just amber cosmoline on the suspension components, but a thick, brown, concrete-like coating.
Over the years, I've taken a few stabs at scrubbing them with a variety of products (simple green, P21S citrus degreaser) and my wheel wells just laughed at me. In German.
Today, finally got around to trying Stoner Xenit as recommended here. Wow, it works. Taking it very slow (as in chatting with Nat the resident Pit Pixie as she cleaned the E88's, drinking beer, etc.) I probably spent 2 hours total on 1 rear wheel well. I did not get perfection, but a 95% improvement over where I started.
Like a fossil dig, you get visible results with some paint showing through within a few minutes. My technique was wrong though - once you've saturated an area and scrubbed a bit, you need to rinse. The cosmoline is a very nasty, greasy, petroleum coating that will just smear once it starts to break down. The other learning experience was that when you are down to the final 10-20% of areas remaning after a number of applications, best to abandon the brush and use a sturdy terry cloth. Keep saturating, and rub the remainder off using clean portions of the towel. As with the rinsing, the key is a clean towel each swipe to avoid smearing instead of removing.
Will tackle the 3 others tomorrow, and hopefully get some pics to share.

Best,
Matt
Every time I have the wheels off the car, I am disgusted by the 15 years of accumulated grime. Not just amber cosmoline on the suspension components, but a thick, brown, concrete-like coating.
Over the years, I've taken a few stabs at scrubbing them with a variety of products (simple green, P21S citrus degreaser) and my wheel wells just laughed at me. In German.
Today, finally got around to trying Stoner Xenit as recommended here. Wow, it works. Taking it very slow (as in chatting with Nat the resident Pit Pixie as she cleaned the E88's, drinking beer, etc.) I probably spent 2 hours total on 1 rear wheel well. I did not get perfection, but a 95% improvement over where I started.
Like a fossil dig, you get visible results with some paint showing through within a few minutes. My technique was wrong though - once you've saturated an area and scrubbed a bit, you need to rinse. The cosmoline is a very nasty, greasy, petroleum coating that will just smear once it starts to break down. The other learning experience was that when you are down to the final 10-20% of areas remaning after a number of applications, best to abandon the brush and use a sturdy terry cloth. Keep saturating, and rub the remainder off using clean portions of the towel. As with the rinsing, the key is a clean towel each swipe to avoid smearing instead of removing.
Will tackle the 3 others tomorrow, and hopefully get some pics to share.
Best,
Matt
 05-29-2011, 09:10 PM
#2
Rennlist Member
Thread Starter
Interim update - tackled the right front corner this afternoon. Another big job (2hrs?) with good results.
For those thinking about doing this, a further refinememt to the technique above may be helpful. I realized that in certain areas, the coating is very thick (~1mm?). Using solvent and brush only, it would take forever. I got out an old bondo spatula (somehwat pliable plastic, but still rigid enough). After a bit of saturation, the best result was to literally scrape off the worst of the heavy accumulation. Then to proceed with repeated solvent and scrubbing on the remaining coating.
Still no pictures, but only the left side is done so I'll snap some on the second half of the job over the next week or so.
Hope this is helpful.
Best,
Matt
05-29-2011, 09:53 PM
#3
Rennlist Member
Great work Matt. I did this over the winter and the result is just spectacular. Sure, lots of work but well worth it. Now I don't even dare to drive across any standing water ;-) I used the Stoner Xenit Orange. Worked well but not great. Agreed.....spray, saturate, soak, then lots of towel work. Pics coming?
05-30-2011, 07:01 AM
#4
Yes, alot of work. And the results, as others have noted and displayed, are impressive, provideing the much needed motivation to tackle such a project. As part of my comprehensive "clean ovehaul" craziness, I did the wheel wells last, freshening-up the rotor hats and disc edges with some grey primer. After tackling the cast aluminum engine, transmission and suspension pieces it was a bit more straightforward and less busy.
Doing this first:
Made this a breeze: (black metallic helps)
Enjoy the process!
Doing this first:
Made this a breeze:
(black metallic helps)Enjoy the process!
The following users liked this post:
Paolo1 (04-18-2021)
05-30-2011, 07:29 AM
#6
Rennlist Member
Interim update - tackled the right front corner this afternoon. Another big job (2hrs?) with good results.
For those thinking about doing this, a further refinememt to the technique above may be helpful. I realized that in certain areas, the coating is very thick (~1mm?). Using solvent and brush only, it would take forever. I got out an old bondo spatula (somehwat pliable plastic, but still rigid enough). After a bit of saturation, the best result was to literally scrape off the worst of the heavy accumulation. Then to proceed with repeated solvent and scrubbing on the remaining coating.
Still no pictures, but only the left side is done so I'll snap some on the second half of the job over the next week or so.
Hope this is helpful.
Best,
Matt
For those thinking about doing this, a further refinememt to the technique above may be helpful. I realized that in certain areas, the coating is very thick (~1mm?). Using solvent and brush only, it would take forever. I got out an old bondo spatula (somehwat pliable plastic, but still rigid enough). After a bit of saturation, the best result was to literally scrape off the worst of the heavy accumulation. Then to proceed with repeated solvent and scrubbing on the remaining coating.
Still no pictures, but only the left side is done so I'll snap some on the second half of the job over the next week or so.
Hope this is helpful.
Best,
Matt
 I used your method for the first two and then I used a low power pressure washer (karcher) and connected it to my hot water sink. The temperature increase helped tremendously and was very effective in rinsing the cosmoline.
Trending Topics
 06-16-2011, 11:38 PM
#9
Rennlist Member
Thread Starter
Bit of a teaser since I don't have pics yet, but just needed to share... great use of a rainy day.
Every time I have the wheels off the car, I am disgusted by the 15 years of accumulated grime. Not just amber cosmoline on the suspension components, but a thick, brown, concrete-like coating.
Over the years, I've taken a few stabs at scrubbing them with a variety of products (simple green, P21S citrus degreaser) and my wheel wells just laughed at me. In German.
Today, finally got around to trying Stoner Xenit as recommended here. Wow, it works. Taking it very slow (as in chatting with Nat the resident Pit Pixie as she cleaned the E88's, drinking beer, etc.) I probably spent 2 hours total on 1 rear wheel well. I did not get perfection, but a 95% improvement over where I started.
Like a fossil dig, you get visible results with some paint showing through within a few minutes. My technique was wrong though - once you've saturated an area and scrubbed a bit, you need to rinse. The cosmoline is a very nasty, greasy, petroleum coating that will just smear once it starts to break down. The other learning experience was that when you are down to the final 10-20% of areas remaning after a number of applications, best to abandon the brush and use a sturdy terry cloth. Keep saturating, and rub the remainder off using clean portions of the towel. As with the rinsing, the key is a clean towel each swipe to avoid smearing instead of removing.
Will tackle the 3 others tomorrow, and hopefully get some pics to share.
Best,
Matt
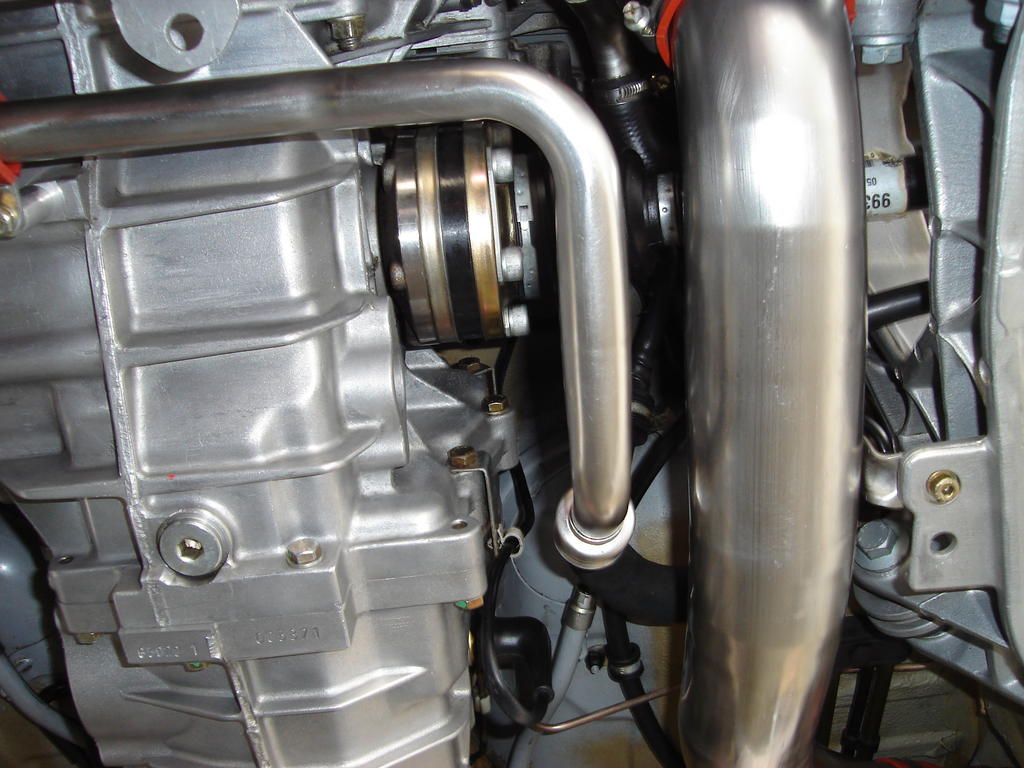
I was not looking for perfection, definitely not at the level of some of the accomplishments posted above - just a good tidy up. For those thinking about tackling this, here's an attempt at a visual how to:
1 - You get at idea of how bad these can be... and that's just 38K miles of nice weather driving.
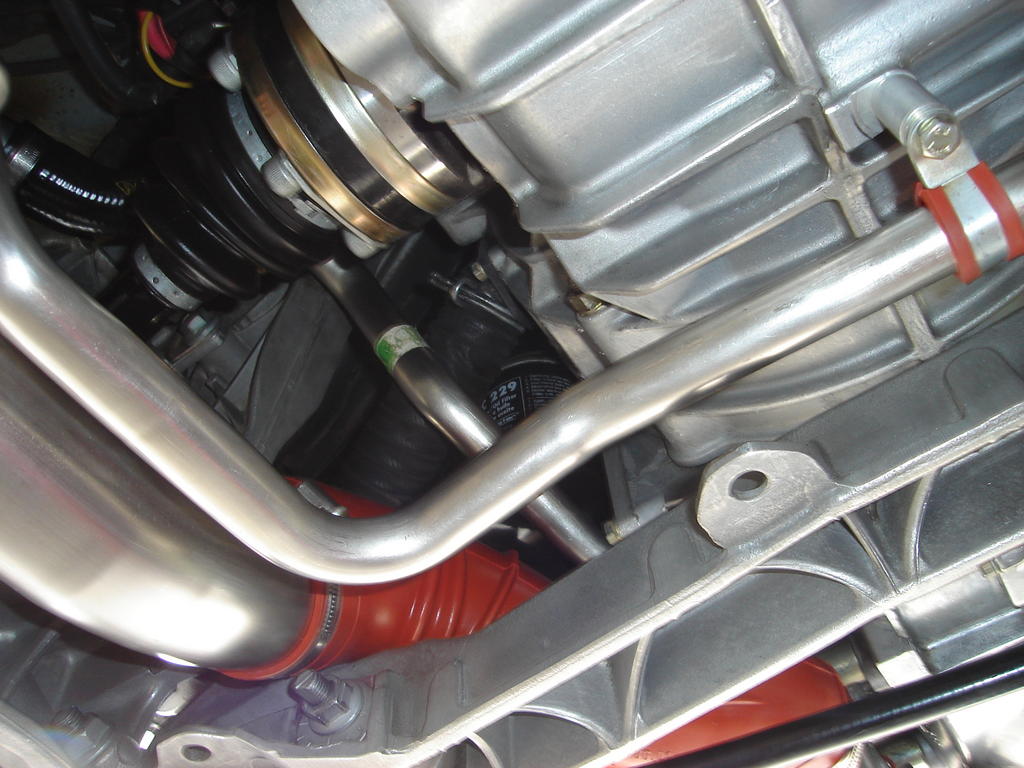
2 and 3 - This was how my technique improved since the first wheel. If you use the solvent (Xenit) alone with a brush, it will take forever to dissolve that thick coating. Key is to use a bondo scraper or similar to gently scrape off the worst of it. Lots of paper towels to dispose of most of the gunk that comes off.
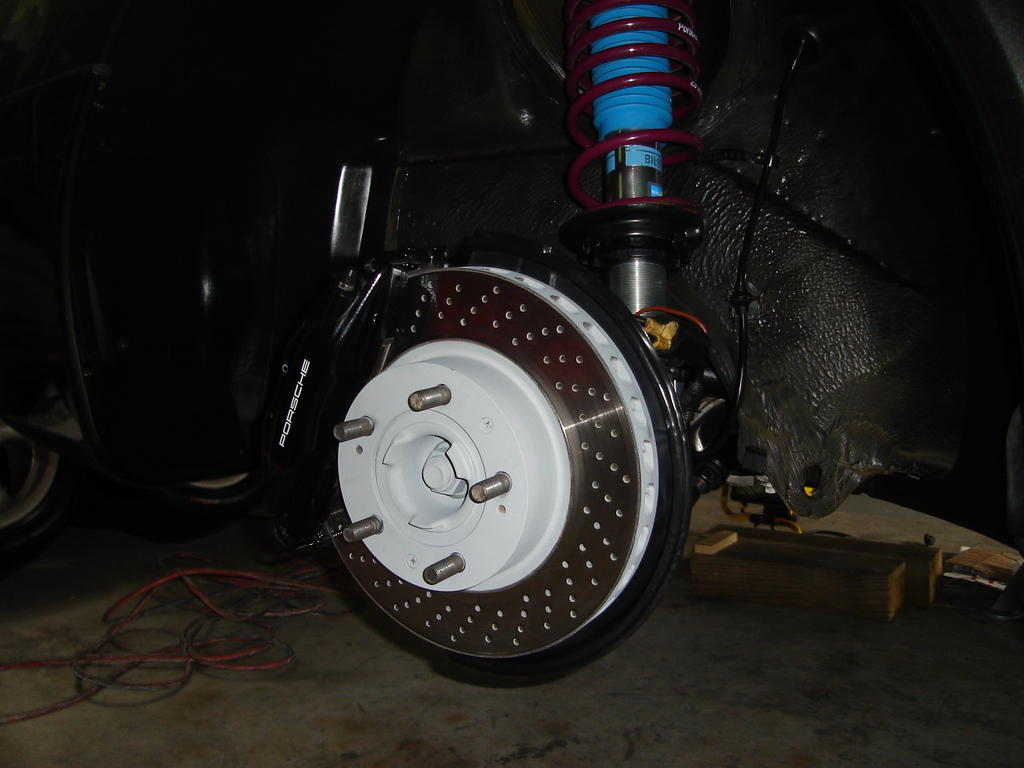
4 and 5 - A few shots of interim progress. After the worst is scraped off, best succes was found by saturating with Xenit and progressively wiping off with clean terry towels. Lot's of saturate, wipe, and repeat.
6, 7 and 8 - Results were very good, especially considering where I started. Took 2 hours total to get here, taking it easy. I am very pleased.
9 and 10 - Oh yeah, the secret weapon. Get yourself a Pit Pixie like Nat to work on the wheels while you're slaving under the car. All good - I am a lucky man.
Let me know if you have any questions. Hope this is helpful to see the steps involved.
Best,
Matt
Last edited by Matt Lane; 06-16-2011 at 11:53 PM.
06-17-2011, 03:03 AM
#10
Drifting
You clean freaks simultaneously disgust and encourage me!!!!
Now to find some time to get on this... I can see it is a long term project, not just a "I'll knock it out this weekend" sort of job.
If one PitPixie is good, what do you think about getting two of them?
Hmmm, I bet I really can't afford 2...
Lucky man indeed.
and encourage me!!!! Now to find some time to get on this... I can see it is a long term project, not just a "I'll knock it out this weekend" sort of job.
Hmmm, I bet I really can't afford 2...
Lucky man indeed.
06-17-2011, 08:27 AM
#12
Rennlist Member
Thread Starter
You clean freaks simultaneously disgust and encourage me!!!!
Now to find some time to get on this... I can see it is a long term project, not just a "I'll knock it out this weekend" sort of job.
If one PitPixie is good, what do you think about getting two of them?
Hmmm, I bet I really can't afford 2...
Lucky man indeed.
and encourage me!!!! Now to find some time to get on this... I can see it is a long term project, not just a "I'll knock it out this weekend" sort of job.
If one PitPixie is good, what do you think about getting two of them?
Hmmm, I bet I really can't afford 2...
Lucky man indeed.
You could easily do it over a weekend, but if you're like me, you'd be rushing to finish and do a crappy job. I'd say if you allow 2-3 hours for a corner each time including setup and cleanup, there's a hope of being patient enough to do that one corner well. It's also a good time to slap some Rejex on clean wheels...
Mmmm... Pit Pixies...
06-17-2011, 08:32 AM
#14
Rennlist Member
Thread Starter
Oh, and one more tip that may be helpful.
Removing the fender liners and some of the tubes that are clamped to the wheel wel would make things a lot eaiser, and you'd get a much better result.
If you leave it all buttoned up like I did, you watse fair bit of time trying to clean the edges and around clamps...
Kinda obvious, but I think 15 minutes invested up front would make the job even less painful.
Good luck.
Matt