
Apres polish!!!!
 04-23-2011, 12:01 PM
#16
Instructor
Jeff u can you post more pictures. Can you give more details on the Flex XC 3401. Any tips on how to use it. How long do you polish? How do you apply the wax and use the Flex? I spent hours doing my car, manual polishing. It came out good but not as I hoped which is the finish you have. A more detailed description will be appreciated. A detailed DIY will be great for us detailing freaks.
This is what I did:
Cleaned
Zymol HD cleaner (a light polishing compound)
Zymol Concours (hand applied)

This is what I did:
Cleaned
Zymol HD cleaner (a light polishing compound)
Zymol Concours (hand applied)
 04-23-2011, 12:15 PM
#17
Rennlist Member
Join Date: Apr 2006
Location: Rainforest (Vancouver, BC)
Posts: 7,570
Received 1,033 Likes
on
464 Posts
Or drive 1/2 a block, or.......
I love black cars....when they belong to someone else!
AMEN to that!
Car looks fantastic Ginch, now comes the tough part: driving with all that leftover winter crap on the road!
I love black cars....when they belong to someone else!
AMEN to that!
Car looks fantastic Ginch, now comes the tough part: driving with all that leftover winter crap on the road!
04-23-2011, 12:20 PM
#18
Rennlist Member
Beautiful car !!!
Learning to detail a car is a lot of fun and can become addictive.
I am new to the 993. I just recently sold my 1986 911 and picked up a 1996 C4S.
Polishing paint is not that hard to learn and the cost of paying for one professional detailing will probably cover the necessary equipment.
This is my 1986 taken about a 18 months ago. The car was my year round daily driver and had 149,000 at the time of the photo.
I did this at home:
 04-23-2011, 02:44 PM
#20
Guest
Posts: n/a
Excellent post Jeff, thank you.
I think I'll start with the Hummer first as my guinea pig before trying it on the Porsche. I would love to have that finish in your photo.
I think I'll start with the Hummer first as my guinea pig before trying it on the Porsche. I would love to have that finish in your photo.
Thanks!
Rule number one - use the least aggressive polish/product first. Only move up if that does not get the job done.
I had been a committed hand polish/wax kind of guy. But trying to get perfect paint by hand is back breaking work and I could never get it looking as good as I wanted. I was afraid of using a machine. I now wonder why I waited so long to try one.
The key is getting a "dual action" polisher. The DA is much more user friendly and idiot proof than a "rotary" machine. The most common machines I have seen are from Porter Cable, Meguiars, Flex, & Griots. I have a Flex XC 3401.
That photo was taken after the first time I detailed the car using a machine to polish. It had 24 years of built up swirls in the paint so needed a fairly aggressive polish.
That was done with these steps:
Menzerna makes some excellent polishes and I really like their Menzerna Micro Polish PO85rd.
There is a great site called "truth in detailing" where you can find lots of information. I am no great detailing expert and have only been at it for about two or three years.
There is great satisfaction in learning to do it yourself. Although there is the danger of getting addicted to having perfect paint. You will then spend countless hours chasing small marks that your family and friends will never notice, even when you attempt to point them out. They will think you are nuts.
Rule number one - use the least aggressive polish/product first. Only move up if that does not get the job done.
I had been a committed hand polish/wax kind of guy. But trying to get perfect paint by hand is back breaking work and I could never get it looking as good as I wanted. I was afraid of using a machine. I now wonder why I waited so long to try one.
The key is getting a "dual action" polisher. The DA is much more user friendly and idiot proof than a "rotary" machine. The most common machines I have seen are from Porter Cable, Meguiars, Flex, & Griots. I have a Flex XC 3401.
That photo was taken after the first time I detailed the car using a machine to polish. It had 24 years of built up swirls in the paint so needed a fairly aggressive polish.
That was done with these steps:
- Wash
- Clay bar
- First polish - Meguiars M105 on a white Lake Country foam pad
- Second polish - Mequiars M205 on a black Lake Country foam pad
- Protect/Sealant - Blackfire Wet Diamond
Menzerna makes some excellent polishes and I really like their Menzerna Micro Polish PO85rd.
There is a great site called "truth in detailing" where you can find lots of information. I am no great detailing expert and have only been at it for about two or three years.
There is great satisfaction in learning to do it yourself. Although there is the danger of getting addicted to having perfect paint. You will then spend countless hours chasing small marks that your family and friends will never notice, even when you attempt to point them out. They will think you are nuts.
04-23-2011, 04:50 PM
#21
Drifting
A DIY post describing how to polish and protect the exterior would be awesome. I would like to know what polisher, compounds and pads to use. If I knew what polisher to look for and what pads/compounds to use, I would buy the necessary equipment today. This has been something I've wanted to learn to do forever.
04-23-2011, 07:45 PM
#23
Instructor
Ginch - I hope you don't mind me jumping in your thread. Your car looks fabulous, I love BLACK cars. When they are good, they are VERY good...
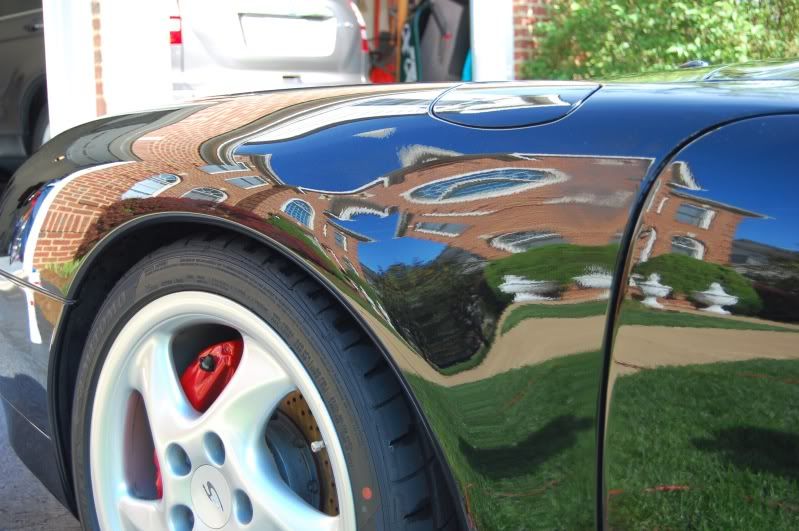
My "new" car - 1996 C4S
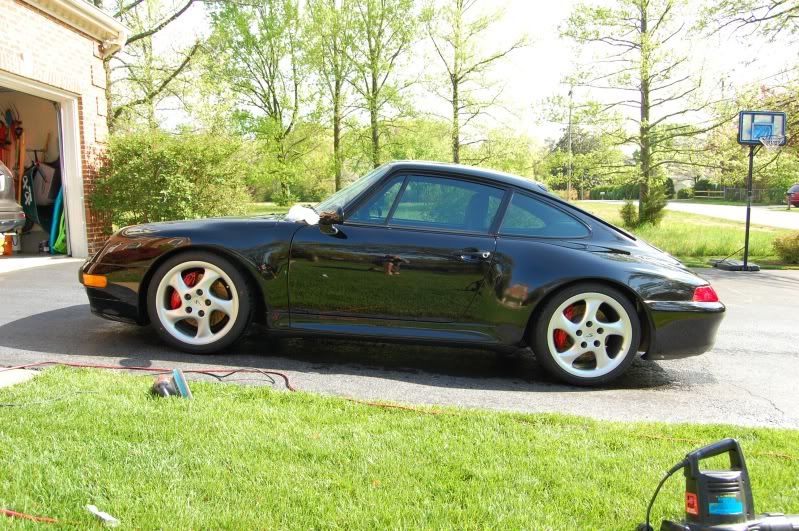
Same house - different car (this is the '96 C4S - above I posted the now gone '86 911)
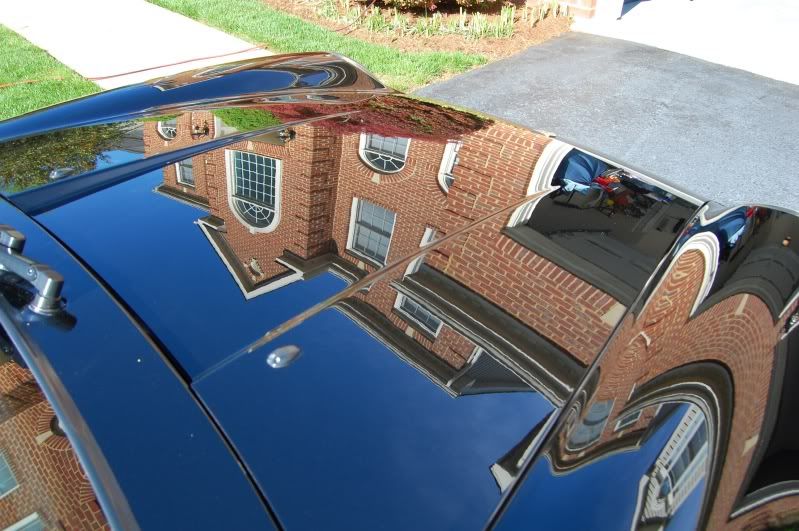
A few more:
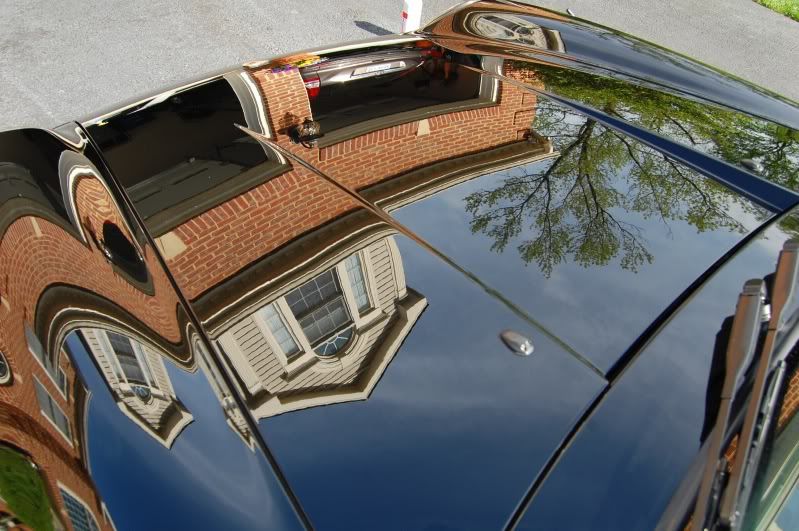
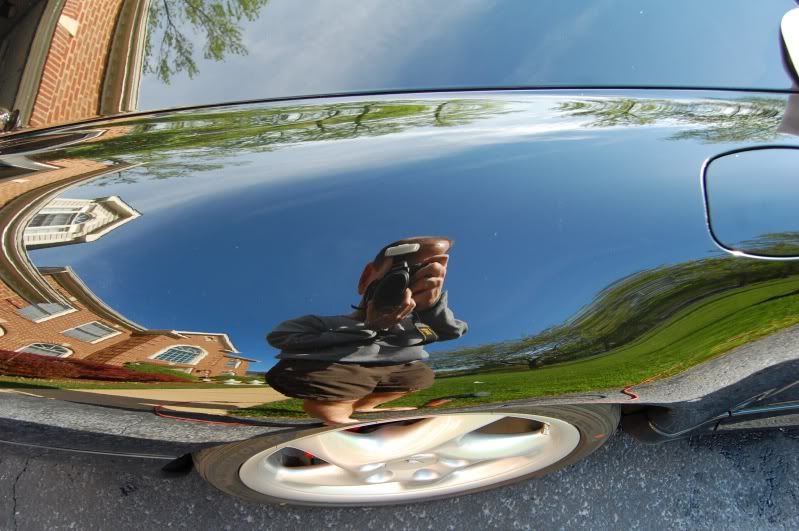
I'm not sure what happened here. I must have moved to blur the reflection.

My "new" car - 1996 C4S
Same house - different car (this is the '96 C4S - above I posted the now gone '86 911)
A few more:
I'm not sure what happened here. I must have moved to blur the reflection.
Last edited by Jeff U; 04-24-2011 at 12:25 AM.
04-23-2011, 07:49 PM
#24
Instructor
That is exactly what I did, when I got the machine I practiced on our Honda Odyssey before moving to the Porsche.
04-23-2011, 10:11 PM
#25
Rennlist Member
I have followed Jeff's path in a way. I finally got a polisher a few years ago. I learned about the importance of a thorough wash and clay. Polishing with good quality products (I now use Menzerna) in two stages with good pads and technique make the difference.
The final sealing and waxing will only reflect what you have done in previous steps...both good and bad. It is alot of WORK, but not difficult if you read and take your time to do it all right.
So gratifying when finally finish...usually about 11:34 pm on Sunday night!
The final sealing and waxing will only reflect what you have done in previous steps...both good and bad. It is alot of WORK, but not difficult if you read and take your time to do it all right.
So gratifying when finally finish...usually about 11:34 pm on Sunday night!
04-23-2011, 10:12 PM
#26
Instructor
A DIY post describing how to polish and protect the exterior would be awesome. I would like to know what polisher, compounds and pads to use. If I knew what polisher to look for and what pads/compounds to use, I would buy the necessary equipment today. This has been something I've wanted to learn to do forever.
With the caveat I am no expert but I have learned a lot by trial and error, here is what I know (or at least convinced myself that my opinion and "fact" are one and the same):
RULE NUMBER # 1 (never violate) - always start with the least aggressive polish/pad combination that you think will get the job done. Only move up if you need to.
Polishers:
Rotary - forced rotation, it spins. Speeds as high as 3000 RPM. Lots of cutting (polishing) power but can be a challenge to master. It is easy to leave holograms, visible "shadows" left by the polishing. They also have enough cutting power that it can fairly easily damage your paint. Especially, if you hit an edge. As a newbie DO NOT buy a rotary.
Random Orbital, dual action - the thing kind of shakes and moves the pad in a random pattern which pretty much eliminates the hologram problem. No forced rotation. Much less cutting power than the rotary. As a newbie look online for a Porter Cable, Griots, or Meguairs. Expect to spend $150 or so. BTW - the ones sold in most auto parts stores are junk.
Mine, the Flex XC 3401 - has a little of both. It has force rotation of the rotary but max forced rotation is only 480 RPM. Has less polishing power than a rotary but more than the Random Orbital yet is still fairly idiot proof. Expect to pay near $300.
I picked the Flex and have been happy with it. I have never used another machine so I have no comparisons to make.
Polish:Random Orbital, dual action - the thing kind of shakes and moves the pad in a random pattern which pretty much eliminates the hologram problem. No forced rotation. Much less cutting power than the rotary. As a newbie look online for a Porter Cable, Griots, or Meguairs. Expect to spend $150 or so. BTW - the ones sold in most auto parts stores are junk.
Mine, the Flex XC 3401 - has a little of both. It has force rotation of the rotary but max forced rotation is only 480 RPM. Has less polishing power than a rotary but more than the Random Orbital yet is still fairly idiot proof. Expect to pay near $300.
I picked the Flex and have been happy with it. I have never used another machine so I have no comparisons to make.
This can get mind numbing as there are lots of makers and they use the same, or similar terms, but mean lots of different things. I have only tried two makers and have one favorite.
Meguiars: You'll see a great deal about M105 & M205. These are excellent polishes but have one difference from most others, they are non-diminishing. The abrasive particles are tough and do not break down. They maintain their cutting power as long as you polish. M105 is very aggressive while M205 is a finishing polish. They are designed to use M105 to remove your defects and M205 provides the final pop. M105 has a little steeper learning curve and it produces quite a bit of dust.
Regardless of maker's polish you use, once you have removed any big defects the finishing polish will be all you need. So if you are a home DIY, don’t buy a big bottle of the more aggressive polish.
Pads:Meguiars: You'll see a great deal about M105 & M205. These are excellent polishes but have one difference from most others, they are non-diminishing. The abrasive particles are tough and do not break down. They maintain their cutting power as long as you polish. M105 is very aggressive while M205 is a finishing polish. They are designed to use M105 to remove your defects and M205 provides the final pop. M105 has a little steeper learning curve and it produces quite a bit of dust.
BTW - Mequiars has just created/introduced a new system that uses specially designed micro fiber pads, a cutting polish, D300, and a finishing polish that includes a wax, D301. Both are non-diminishing polishes. I have not tried it but the system is getting rave reviews from professional detailers as it cuts down on time.
Menzerna: I have used Intensive Polish (aggressive but not quite as much as M105) and Micro Polish PO85rd, a finishing polish. Both are diminishing polishes. Which means that as you work them the abrasives break down, the polish changes visually (becomes kind of opaque) and eventually provides no additional cut.- These two Menzerna polishes have become my personal favorites.
Regardless of maker's polish you use, once you have removed any big defects the finishing polish will be all you need. So if you are a home DIY, don’t buy a big bottle of the more aggressive polish.
Each maker color codes them to show their level of cut. Lake Country is a big maker and their colors go like this:
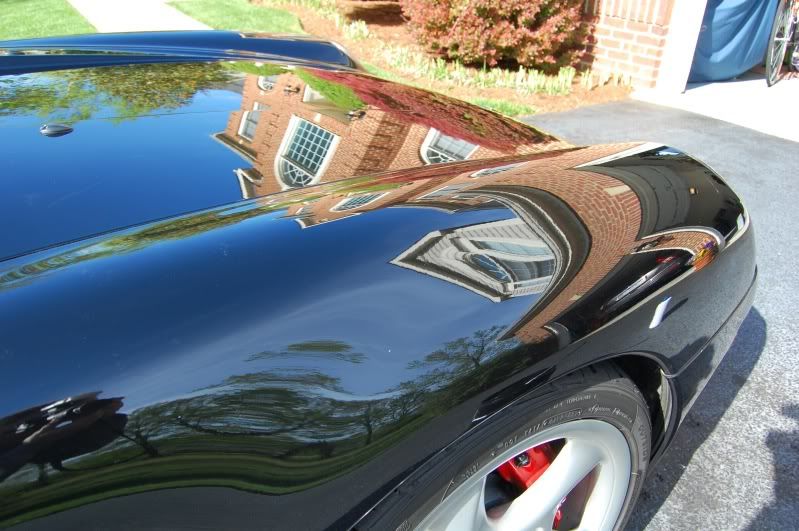
Some have dimples, some are flat, there are lots of minor differences that different users will swear by. I use black and green pads the most. The most aggressive pad I own is white. For the above photos I used Menzerna PO85rd with a black pad.
Process:- Gold - least aggressive, soft
- Red
- Black
- Green
- White
- Orange
- Yellow
- Purple - most aggressive, stiff
Some have dimples, some are flat, there are lots of minor differences that different users will swear by. I use black and green pads the most. The most aggressive pad I own is white. For the above photos I used Menzerna PO85rd with a black pad.
Wash the car. Unfortunately, this is where we all put swirls on our cars. If you are careful you can minimize the rate of swirl application. I like the two bucket method and use LOTS of water. The first bucket has your soapy water (buy a soap designed to wash cars), the second has fresh water used to rinse your mitt. I also hold the hose and flush the car with water just in front of my mitt as I gently wash the car.
There is a special place in hell for anyone that takes a 993 to a car wash…
Continue to prepare the paint by claying, if needed. You can check if you need to clay by putting your hand in a plastic bag and then gently rub the surface of the paint. If it feels rough, clay the car. If you have never done this you will not believe how smooth the paint will become. It is just super cool… Use LOTS of lubricant.
Many people will tape off window trim, joints, badges, etc… with blue painters tape. I once polished my windshield with a special glass compound and it made LOTS of dust. I wish I had taped all the joints and other openings that were anywhere near the windshield. BTW - glass is very hard and the standard paint polishes do nothing.
Polish - remember rule #1
Work small areas at a time. For example, on a 911 I do about one sixth of the hood at a time.
Here’s what I do:
Wax/Sealants:Here’s what I do:
- Put a tiny spritz of water on my pad. I mean tiny
- Apply polish to pad, four to six dots (each half size of a dime) of polish
- Gently use the polisher to spread the polish on the paint before turning it on
- Turn on polisher
- Polish until you see the polish break down (assuming Merzerna use)
- Wipe off with micro fiber cloth (clean, soft, with lots of nap)
- Check the surface
- Repeat as needed
I wish I had a dollar for every person that looks at my car and then asks me "what wax do you use?" It's polishing, not wax, that makes your paint pop. Wax or sealant just protects it from the elements, the sacrificial coating.
I have tried lots of waxes and sealants. Talk about mind numbing… Here's what I found, I like one wax and one sealant.
If you are a pure wax guy, get P21s Carnauba. Very deep shine, easy to put on, but last only a short time.
If you like sealants, try Blackfire Wet Diamond. Easy to put on, seems to last and will give you the slickest, smoothest finish you can believe.
Applying wax/sealant:I have tried lots of waxes and sealants. Talk about mind numbing… Here's what I found, I like one wax and one sealant.
If you are a pure wax guy, get P21s Carnauba. Very deep shine, easy to put on, but last only a short time.
If you like sealants, try Blackfire Wet Diamond. Easy to put on, seems to last and will give you the slickest, smoothest finish you can believe.
P21s - I do by hand
Blackfire Wet Diamond (my favorite) - I apply it with a red pad at a very slow setting on my Flex. It is some type of oil based product and a tiny amount spreads a long way. I start at one corner of the car and by the time I have applied the whole car, the first section is ready to be hand wiped off with another clean, soft, thick nap micro fiber cloth.
Other random thoughts:Blackfire Wet Diamond (my favorite) - I apply it with a red pad at a very slow setting on my Flex. It is some type of oil based product and a tiny amount spreads a long way. I start at one corner of the car and by the time I have applied the whole car, the first section is ready to be hand wiped off with another clean, soft, thick nap micro fiber cloth.
If your car is older than late 1980's it will probably have single stage paint, no clear coat. Your pad will turn the color of the paint and in a moment of terror you will be convinced you are in the process of stripping the car to bare metal. Not so and this is normal.
Cars with clear coats will generally not transfer color to the pad. However, some clear coats are tinted with the underlying paint color, not really clear clear coats. So you may get a little blush of the color on the pads.
Have a couple of each pad you plan to use so the pad stays fairly clean. I just did my C4S and used two black pads to do the car. Half way through I got out a new pad.
On a 911, tape the seal around the sunroof. Trust me on this one. It's easy to hit the seal and have the pad pull the seal loose. Did you know there is a little white plastic cord type thing under there? No, I wish I was unaware of that as well…
Blackfire Wet Diamond is just about impossible to remove from pads. It is not water based and it laughs at soap or other detergents. I have one red pad set aside that I only use with BFWD.
I buy just about everything online.
Last edited by Jeff U; 04-23-2011 at 10:33 PM. Reason: typo
04-23-2011, 10:32 PM
#27
Rennlist Member
Here you go�
With the caveat I am no expert but I have learned a lot by trial and error, here is what I know (or at least convinced myself that my opinion and "fact" are one and the same):
RULE NUMBER # 1 (never violate) - always start with the least aggressive polish/pad combination that you think will get the job done. Only move up if you need to.
Polishers:
Polish - remember rule #1
With the caveat I am no expert but I have learned a lot by trial and error, here is what I know (or at least convinced myself that my opinion and "fact" are one and the same):
RULE NUMBER # 1 (never violate) - always start with the least aggressive polish/pad combination that you think will get the job done. Only move up if you need to.
Polishers:
Rotary - forced rotation, it spins. Speeds as high as 3000 RPM. Lots of cutting (polishing) power but can be a challenge to master. It is easy to leave holograms, visible "shadows" left by the polishing. As a newbie DO NOT buy a rotary.
Random Orbital, dual action - the thing kind of shakes and moves the pad in a random pattern which pretty much eliminates the hologram problem. No forced rotation. Much less cutting power than the rotary. As a newbie look online for a Porter Cable, Griots, or Meguairs. Expect to spend $150 or so. BTW - the ones sold in most auto parts stores are junk.
Mine, the Flex XC 3401 - has a little of both. It has force rotation of the rotary but max forced rotation is only 480 RPM. Has less polishing power than a rotary but more than the Random Orbital yet is still fairly idiot proof. Expect to pay near $300.
I picked the Flex and have been happy with it. I have never used another machine so I have no comparisons to make.
Polish:Random Orbital, dual action - the thing kind of shakes and moves the pad in a random pattern which pretty much eliminates the hologram problem. No forced rotation. Much less cutting power than the rotary. As a newbie look online for a Porter Cable, Griots, or Meguairs. Expect to spend $150 or so. BTW - the ones sold in most auto parts stores are junk.
Mine, the Flex XC 3401 - has a little of both. It has force rotation of the rotary but max forced rotation is only 480 RPM. Has less polishing power than a rotary but more than the Random Orbital yet is still fairly idiot proof. Expect to pay near $300.
I picked the Flex and have been happy with it. I have never used another machine so I have no comparisons to make.
This can get mind numbing as there are lots of makers and they use the same, or similar terms, but mean lots of different things. I have only tried two makers and have one favorite.
Meguiars: You'll see a great deal about M105 & M205. These are excellent polishes but have one difference from most others, they are non-diminishing. The abrasive particles are tough and do not break down. They maintain their cutting power as long as you polish. M105 is very aggressive while M205 is a finishing polish. They are designed to use M105 to remove your defects and M205 provides the final pop. M105 has a little steeper learning curve and it produces quite a bit of dust.
Regardless of maker's polish you use, once you have removed any big defects the finishing polish will be all you need. So if you are a home DIY, don�t buy a big bottle of the more aggressive polish.
Pads:Meguiars: You'll see a great deal about M105 & M205. These are excellent polishes but have one difference from most others, they are non-diminishing. The abrasive particles are tough and do not break down. They maintain their cutting power as long as you polish. M105 is very aggressive while M205 is a finishing polish. They are designed to use M105 to remove your defects and M205 provides the final pop. M105 has a little steeper learning curve and it produces quite a bit of dust.
BTW - Mequiars has just created/introduced a new system that uses specially designed micro fiber pads, a cutting polish, D300, and a finishing polish that includes a wax, D301. Both are non-diminishing polishes. I have not tried it but the system is getting rave reviews from professional detailers as it cuts down on time.
Menzerna: I have used Intensive Polish (aggressive but not quite as much as M105) and Micro Polish PO85rd, a finishing polish. Both are diminishing polishes. Which means that as you work them the abrasives break down, the polish changes visually (becomes kind of opaque) and eventually provides no additional cut.- These two Menzerna polishes have become my personal favorites.
Regardless of maker's polish you use, once you have removed any big defects the finishing polish will be all you need. So if you are a home DIY, don�t buy a big bottle of the more aggressive polish.
Each maker color codes them to show their level of cut. Lake Country is a big maker and their colors go like this:
Some have dimples, some are flat, there are lots of minor differences that different users will swear by. I use black and green pads the most. The most aggressive pad I own is white. For the above photos I used Menzerna PO85rd with a black pad.
Process:- Gold - least aggressive, soft
- Red
- Black
- Green
- White
- Orange
- Yellow
- Purple - most aggressive, stiff
Some have dimples, some are flat, there are lots of minor differences that different users will swear by. I use black and green pads the most. The most aggressive pad I own is white. For the above photos I used Menzerna PO85rd with a black pad.
Wash the car. Unfortunately, this is where we all put swirls on our cars. If you are careful you can minimize the rate of swirl application. I like the two bucket method and use LOTS of water. The first bucket has you soapy water (buy a soap designed to wash cars), the second has fresh water used to rinse your mitt. I also hold the hose and flush the car with water just in front of my mitt as I gently wash the car.
There is a special place in hell for anyone that takes a 993 to a car wash�
Continue to prepare the paint by claying, if needed. You can check if you need to clay by putting your hand in a plastic bag and then gently rub the surface of the paint. If it feels rough, clay the car. If you have never done this you will not believe how smooth the paint will become. It is just super cool� Use LOTS of lubricant.
Many people will tape off window trim, joints, badges, etc� with blue painters tape. I once polished my windshield with a special glass compound and it made LOTS of dust. I wish I had taped all the joints and other openings that were anywhere near the windshield. BTW - glass is very hard and the standard paint polishes do nothing.
Polish - remember rule #1
Work small areas at a time. For example, on a 911 I do about one sixth of the hood at a time.
Here�s what I do:
Wax/Sealants:Here�s what I do:
- Put a tiny spritz of water on my pad. I mean tiny
- Apply polish to pad, four to six dots (each half size of a dime) of polish
- Gently use the polisher to spread the polish on the paint before turning it on
- Turn on polisher
- Polish until you see the polish break down (assuming Merzerna use)
- Wipe off with micro fiber cloth (clean, soft, with lots of nap)
- Check the surface
- Repeat as needed
I wish I had a dollar for every person that looks at my car and then asks me "what wax do you use?" It's polishing, not wax, that makes your paint pop. Wax or sealant just protects it from the elements, the sacrificial coating.
I have tried lots of waxes and sealants. Talk about mind numbing� Here's what I found, I like one wax and one sealant.
If you are a pure wax guy, get P21s Carnauba. Very deep shine, easy to put on, but last only a short time.
If you like sealants, try Blackfire Wet Diamond. Easy to put on, seems to last and will give you the slickest, smoothest finish you can believe.
Applying wax/sealant:I have tried lots of waxes and sealants. Talk about mind numbing� Here's what I found, I like one wax and one sealant.
If you are a pure wax guy, get P21s Carnauba. Very deep shine, easy to put on, but last only a short time.
If you like sealants, try Blackfire Wet Diamond. Easy to put on, seems to last and will give you the slickest, smoothest finish you can believe.
P21s - I do by hand
Blackfire Wet Diamond (my favorite) - I apply it with a red pad at a very slow setting on my Flex. It is some type of oil based product and a tiny amount spreads a long way. I start at one corner of the car and by the time I have applied the whole car, the first section is ready to be hand wiped off with another clean, soft, thick nap micro fiber cloth.
Other random thoughts:Blackfire Wet Diamond (my favorite) - I apply it with a red pad at a very slow setting on my Flex. It is some type of oil based product and a tiny amount spreads a long way. I start at one corner of the car and by the time I have applied the whole car, the first section is ready to be hand wiped off with another clean, soft, thick nap micro fiber cloth.
If your car is older than late 1980's it will probably have single stage paint, no clear coat. Your pad will turn the color of the paint and in a moment of terror you will be convinced you are in the process of stripping the car to bare metal. Not so and this is normal.
Cars with clear coats will generally not transfer color to the pad. However, some clear coats are tinted with the underlying paint color, not really clear clear coats. So you may get a little blush of the color on the pads.
Have a couple of each pad you plan to use so the pad stays fairly clean. I just did my C4S and used two black pads to do the car. Half way through I got out a new pad.
On a 911, tape the seal around the sunroof. Trust me on this one. It's easy to hit the seal and have the pad pull the seal loose. Did you know there is a little white plastic cord type thing under there? No, I wish I was unaware of that as well�
Blackfire Wet Diamond is just about impossible to remove from pads. It is not water based and it laughs at soap or other detergents. I have one red pad set aside that I only use with BFWD.
I buy just about everything online.
One thing that drove me NUTS on my last detailing...the fuzzy seal that shows on the outside with the roof closed. It stays wet long after washing. Anything you do with polish or wax while it is wet will smear and make you go mad. Best to have your 993 really DRY before polishing. Will remove alot of frustration.
 04-24-2011, 10:03 PM
#29
Guest
Posts: n/a
Jeff, you are the man. Talking about joining the forum and adding instant value. Jeez!
I feel like I have a much better understanding of the process and I think I will order the Porter Cable 7424XP unless you have feedback against?
I saw you recommended it and I am as rookie as you can get.
Thanks again
I feel like I have a much better understanding of the process and I think I will order the Porter Cable 7424XP unless you have feedback against?
I saw you recommended it and I am as rookie as you can get.
Thanks again