

SAI flush, no CEL.
 03-08-2006, 05:24 AM
#1
Advanced
Thread Starter
Join Date: Feb 2006
Location: Orange County, CA
Posts: 81
Likes: 0
Received 0 Likes
on
0 Posts
First of all, I wanted to thank everyone on Rennlist who contributed information and advice regarding the SAI system and Robin for making Robert Kwate’s DIY available on P-car.com. I simply want to give something back, so I compiled the following notes, observations, tips, and lessons learned I gleamed from my first SAI flush.
My car is a 1996 C2 (993) with 75,800 miles on it. There was no CEL, but since I’ve only had the car a few months (I’m the 3rd owner as of Oct 2005) and have no history on the car’s SAI system, I had no idea if the check valve was ever replaced, the system ever flushed, the top end ever rebuilt (unlikely), etc.
Turns out, I found a crush washer on the SAI check valve once I got it out, so it must have been replaced at some point. Not sure when, but I suspect at the 60,000 mile mark since paperwork reveals a major service then.
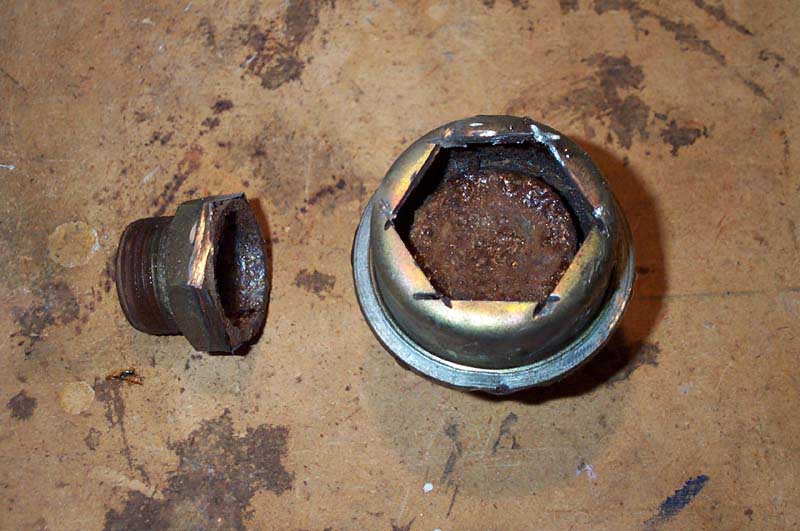
After I got the air box off, I prepared to do battle with the SAI valve, which I understood could be a bear to get out at times. I hadn’t made the special tool yet, but I figured I would use the modified wrench to install the new valve, not remove the old one. After trying and failing to unscrew the old valve with a pair of vise-grips, I ground a notch into the valve’s rim with my Dremel tool and struck it slightly off-center with a cold chisel. After a few wacks, I noticed the valve had rotated!!! Yee-haw. I grabbed it again with the vice-grips and removed the little bugger. Whew!!!
Once I got the check valve out, I noticed the crush washer, so this must have been done before. There was also some rust on the threads, but the valve still worked only one-way. I cleaned out the valve seat with my Dremel tool and a wire wheel.
Underneath the car, I only removed the heater hoses at two points rather than the three Robert recommends, the large black supply hose on top of the heat exchanger and the orange hose just above the sway bar. Yes, I removed the heat control box along with the exchangers. IMPORTANT NOTE: Make sure you are supporting the heat exchanger before you remove that last nut… ouch!!! BTW, the forward most nut on the driver’s side is tricky to get at because the sway bar is in the way (what’s not in something else’s way on this car???)
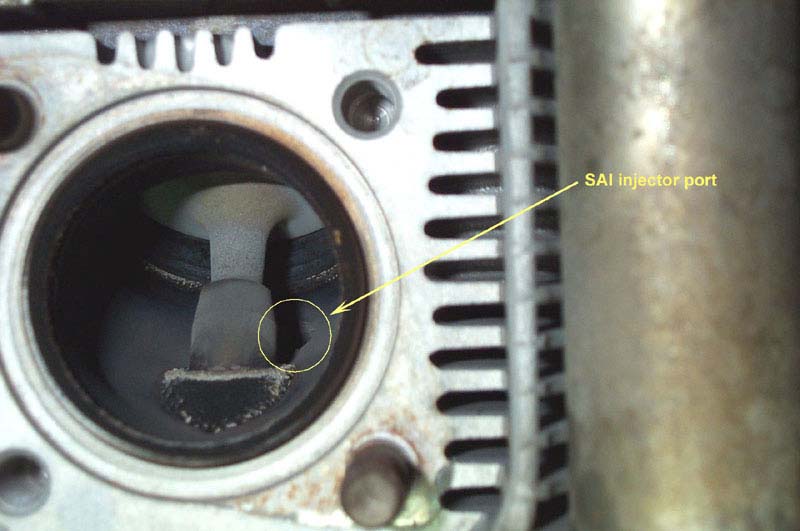
After the first heat exchanger was off, I couldn’t wait to crawl up under there and catch my first peek at my exhaust ports and the infamous SAI injector. They looked pretty darn clean based on my limited experience.
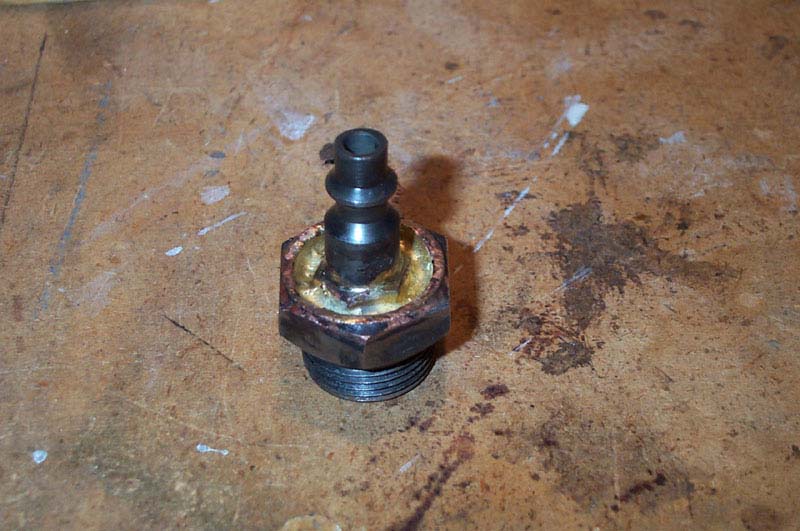
Thanks to all the great advice here, I cut open the old check valve and brazed an air fitting into it and made a slick connector for my air compressor hose.
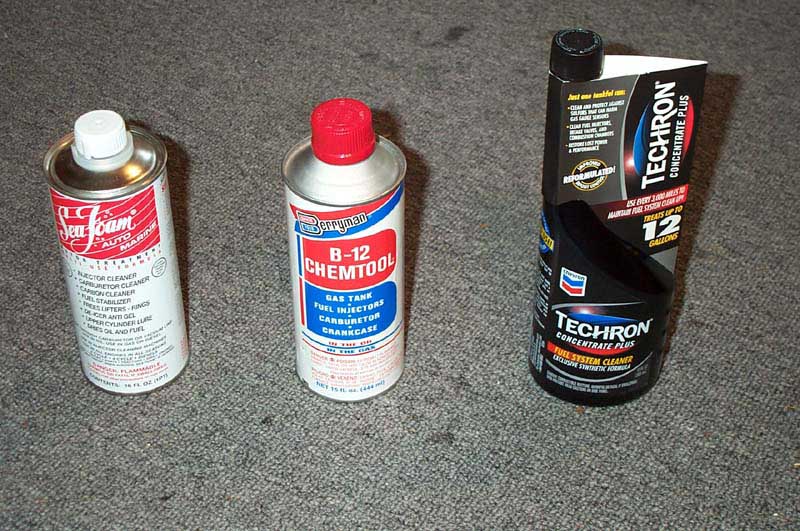
I purchased 3 cleaning fluids to start, but ended up only using the Techron and Berryman’s B-12 (later on, I used Berryman’s Carb Cleaner in a spray can). Here is a pic so newbies, like me, can find them easier at the auto parts store.
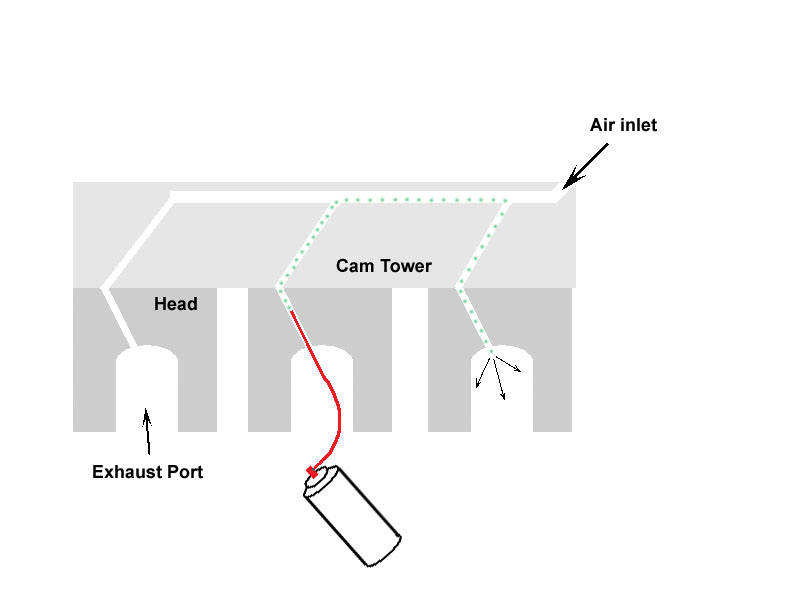
Next is a port with a pipe cleaner shoved up. The first 2 inches were easy to snake through, but after that is was much tougher getting the cleaner further up. I believe this is where the head to cam tower interface meets. My system appeared fairly clean (perhaps because the old check valve was still doing its job).
Before calling it a night, I sprayed an entire can of Berryman’s into each port using an extra long straw I fashioned out of two. To my surprise, and delight, as I was spraying the fluid deep into one port, the adjacent port started to drip. Mike can correct me here if I’m wrong, but that must mean the pathway is clear all the way up through the cam tower where the SAI passages tree off.
I let the car sit over night to “air out”. Just before hitting the sack, I cleaned the exhaust studs and all the mating surfaces with a wire wheel to knock off rust and corrosion.
The next morning, I began putting my precious car back together. I started on top, coating the threads of the new check valve with anti-seize compound. At this point, I made my special wrench and tightened the valve about 1/8 of a turn past finger tight. I don’t see any reason this thing has to be super-torqued.
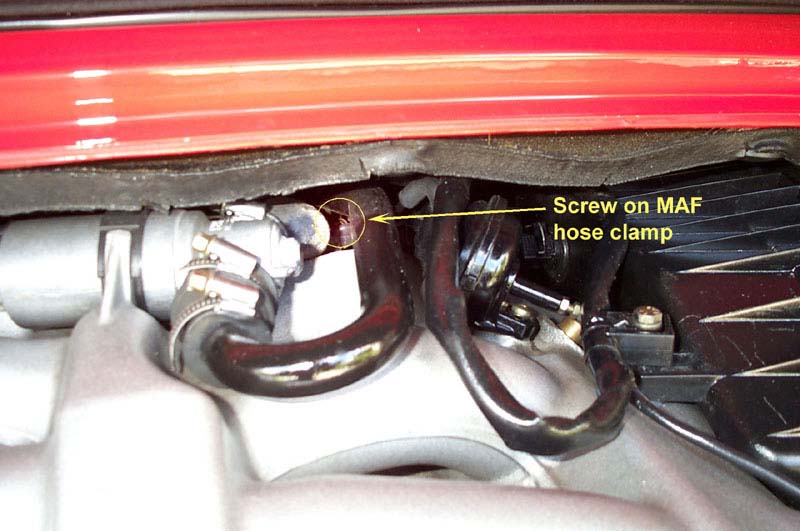
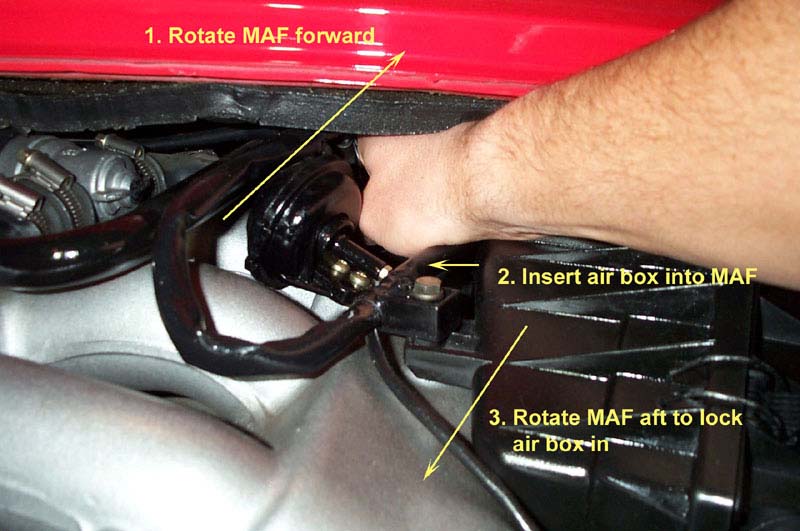
Thanks to more great advice from Rennlisters, I loosened the MAF hose clamp before wrestling the air box back into place. You will need a long-shafted screwdriver to reach the screw. After it’s loose, the entire MAF can be rotated. Reference the following pictures, because this worked like a charm. Fortunately, I have small girlie hands and can reach between the intake manifold and the compartment’s overhead. First, rotate the top of the MAF forward (towards the front of the car). Next, insert the air box intake port into the MAF. Finally, rotate the MAF aft locking it onto the air box. Geee, what a PITA… thanks Stuttgart!!!
After the top was all buttoned up, it was time to put the exhaust system back together. I put four little dabs of anti-seize compound on the sealing rings to “glue” them into place onto the head until I could bolt the heat exchangers on. I also purchased brand new stainless steel hardware for the flanges connecting the exchangers up to the catalytic converter. Don’t forget to reconnect ALL the heater hoses (I almost forgot one).")
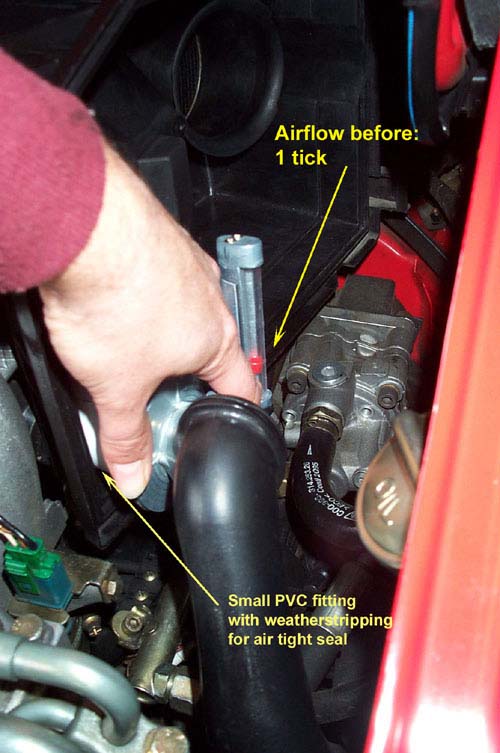
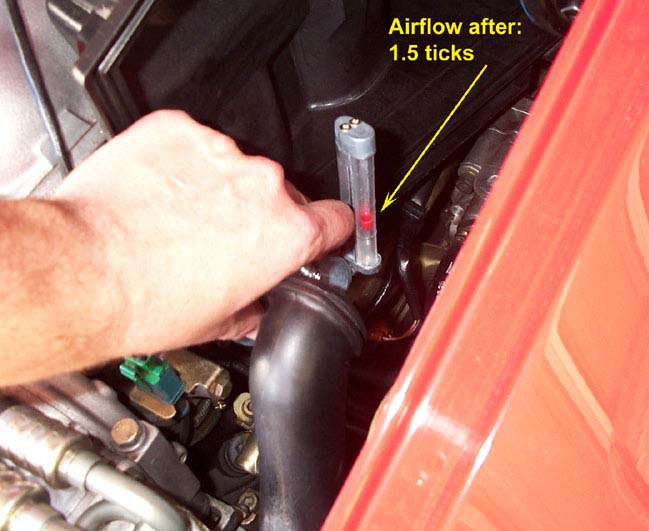
Because I had no idea what the status of my ports were, I was very interested in trying to discover what the level of blockage was, if any. Unless air gets out some other way (pressure relief valve?), I figured the airflow into the air pump must equal the airflow through the ports. So using a Unisyn synchronizer and a small PVC adapter, I measured the airflow into the air pump’s intake hose before and after the flushing. My results were fairly inconclusive, i.e., I had pretty clear ports and good airflow at the start, and so it was difficult to see much improvement afterwards.
I believe a much better method would be to measure the outputs of the oxygen sensors. The leaner the exhaust, the clearer the ports must be and vice-versa. That will be a little project for a later date.
What would I do different for the next flushing??? The problem with the current procedure is we are mostly blowing air and just a little fluid through the lines. That’s because the distribution manifold (where the check valve sits) only holds a few ounces of solvent at a time. When we connect the air, we push that small slug of fluid into the system, but it quickly dissipates, coating the walls of the passages, and very little of it reaches the end of the system. What should be done is a fluid flush, not an air flush. I will try and construct a reservoir that will hold an entire quart of more of Techron or Berryman’s, and then force ALL that fluid through the system giving it a good cleaning. I’m thinking something like this.
Anyways, thanks for everything. I hope all this info helps at least one person a little bit. And change that check valve regularly!!!


My car is a 1996 C2 (993) with 75,800 miles on it. There was no CEL, but since I’ve only had the car a few months (I’m the 3rd owner as of Oct 2005) and have no history on the car’s SAI system, I had no idea if the check valve was ever replaced, the system ever flushed, the top end ever rebuilt (unlikely), etc.
Turns out, I found a crush washer on the SAI check valve once I got it out, so it must have been replaced at some point. Not sure when, but I suspect at the 60,000 mile mark since paperwork reveals a major service then.
After I got the air box off, I prepared to do battle with the SAI valve, which I understood could be a bear to get out at times. I hadn’t made the special tool yet, but I figured I would use the modified wrench to install the new valve, not remove the old one. After trying and failing to unscrew the old valve with a pair of vise-grips, I ground a notch into the valve’s rim with my Dremel tool and struck it slightly off-center with a cold chisel. After a few wacks, I noticed the valve had rotated!!! Yee-haw. I grabbed it again with the vice-grips and removed the little bugger. Whew!!!
Once I got the check valve out, I noticed the crush washer, so this must have been done before. There was also some rust on the threads, but the valve still worked only one-way. I cleaned out the valve seat with my Dremel tool and a wire wheel.
Underneath the car, I only removed the heater hoses at two points rather than the three Robert recommends, the large black supply hose on top of the heat exchanger and the orange hose just above the sway bar. Yes, I removed the heat control box along with the exchangers. IMPORTANT NOTE: Make sure you are supporting the heat exchanger before you remove that last nut… ouch!!! BTW, the forward most nut on the driver’s side is tricky to get at because the sway bar is in the way (what’s not in something else’s way on this car???)
After the first heat exchanger was off, I couldn’t wait to crawl up under there and catch my first peek at my exhaust ports and the infamous SAI injector. They looked pretty darn clean based on my limited experience.
Thanks to all the great advice here, I cut open the old check valve and brazed an air fitting into it and made a slick connector for my air compressor hose.
I purchased 3 cleaning fluids to start, but ended up only using the Techron and Berryman’s B-12 (later on, I used Berryman’s Carb Cleaner in a spray can). Here is a pic so newbies, like me, can find them easier at the auto parts store.
Next is a port with a pipe cleaner shoved up. The first 2 inches were easy to snake through, but after that is was much tougher getting the cleaner further up. I believe this is where the head to cam tower interface meets. My system appeared fairly clean (perhaps because the old check valve was still doing its job).
Before calling it a night, I sprayed an entire can of Berryman’s into each port using an extra long straw I fashioned out of two. To my surprise, and delight, as I was spraying the fluid deep into one port, the adjacent port started to drip. Mike can correct me here if I’m wrong, but that must mean the pathway is clear all the way up through the cam tower where the SAI passages tree off.
I let the car sit over night to “air out”. Just before hitting the sack, I cleaned the exhaust studs and all the mating surfaces with a wire wheel to knock off rust and corrosion.
The next morning, I began putting my precious car back together. I started on top, coating the threads of the new check valve with anti-seize compound. At this point, I made my special wrench and tightened the valve about 1/8 of a turn past finger tight. I don’t see any reason this thing has to be super-torqued.
Thanks to more great advice from Rennlisters, I loosened the MAF hose clamp before wrestling the air box back into place. You will need a long-shafted screwdriver to reach the screw. After it’s loose, the entire MAF can be rotated. Reference the following pictures, because this worked like a charm. Fortunately, I have small girlie hands and can reach between the intake manifold and the compartment’s overhead. First, rotate the top of the MAF forward (towards the front of the car). Next, insert the air box intake port into the MAF. Finally, rotate the MAF aft locking it onto the air box. Geee, what a PITA… thanks Stuttgart!!!
After the top was all buttoned up, it was time to put the exhaust system back together. I put four little dabs of anti-seize compound on the sealing rings to “glue” them into place onto the head until I could bolt the heat exchangers on. I also purchased brand new stainless steel hardware for the flanges connecting the exchangers up to the catalytic converter. Don’t forget to reconnect ALL the heater hoses (I almost forgot one).
Because I had no idea what the status of my ports were, I was very interested in trying to discover what the level of blockage was, if any. Unless air gets out some other way (pressure relief valve?), I figured the airflow into the air pump must equal the airflow through the ports. So using a Unisyn synchronizer and a small PVC adapter, I measured the airflow into the air pump’s intake hose before and after the flushing. My results were fairly inconclusive, i.e., I had pretty clear ports and good airflow at the start, and so it was difficult to see much improvement afterwards.
I believe a much better method would be to measure the outputs of the oxygen sensors. The leaner the exhaust, the clearer the ports must be and vice-versa. That will be a little project for a later date.
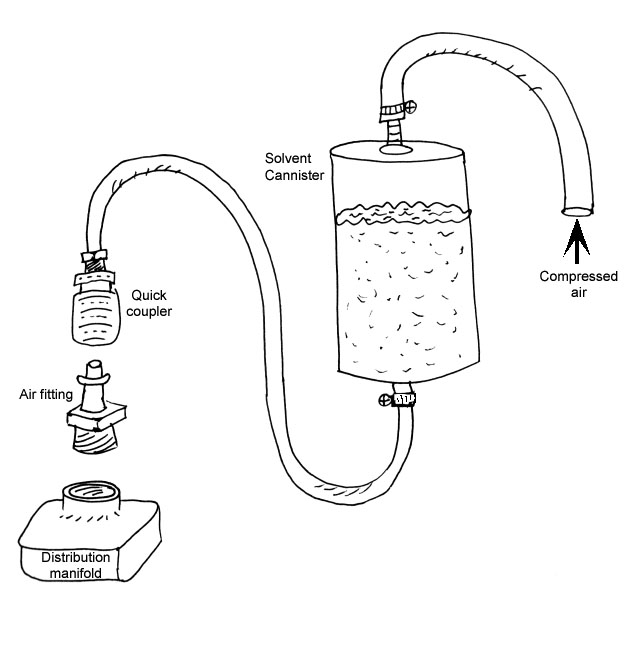
What would I do different for the next flushing??? The problem with the current procedure is we are mostly blowing air and just a little fluid through the lines. That’s because the distribution manifold (where the check valve sits) only holds a few ounces of solvent at a time. When we connect the air, we push that small slug of fluid into the system, but it quickly dissipates, coating the walls of the passages, and very little of it reaches the end of the system. What should be done is a fluid flush, not an air flush. I will try and construct a reservoir that will hold an entire quart of more of Techron or Berryman’s, and then force ALL that fluid through the system giving it a good cleaning. I’m thinking something like this.
Anyways, thanks for everything. I hope all this info helps at least one person a little bit. And change that check valve regularly!!!
Last edited by planeguy67; 03-10-2006 at 03:22 AM. Reason: Trying to fix inline images.

 03-08-2006, 09:57 AM
#7
Instructor

Join Date: Oct 2005
Location: Chapel Hill, NC
Posts: 134
Likes: 0
Received 0 Likes
on
0 Posts
Great work. Can't wait for the pictures.
Since you just went through it, do you still have the numbers for the required parts. The p-car writeup shows them all lined up but I have not found a part number list yet.
Getting ready for it myself. Wish me good luck...
Since you just went through it, do you still have the numbers for the required parts. The p-car writeup shows them all lined up but I have not found a part number list yet.
Getting ready for it myself. Wish me good luck...
Trending Topics
 03-08-2006, 03:15 PM
#11
Advanced
Thread Starter
Join Date: Feb 2006
Location: Orange County, CA
Posts: 81
Likes: 0
Received 0 Likes
on
0 Posts
Originally Posted by mbpa
Since you just went through it, do you still have the numbers for the required parts.
(1) SAI Check Valve: 993-113-250-03
(12) Lock Nuts: 999-084-052-02
(6) Sealing Rings: 993-111-195-00
(2) Gasket (Gillet): 928-111-127-02 --OR--
(2) Gasket (Bischoff): 930-111-192-06
03-08-2006, 03:19 PM
#12
Advanced
Thread Starter
Join Date: Feb 2006
Location: Orange County, CA
Posts: 81
Likes: 0
Received 0 Likes
on
0 Posts
Originally Posted by tam993
when I flushed the system on my car I fashioned an attachment using an A/C flush kit.
You can put a quart of that cleaner through the ports if you want.
You can put a quart of that cleaner through the ports if you want.

