
Fog Light R&R - Part II: Lens Repair
 01-21-2006, 10:09 PM
#1
Rennlist Member
Thread Starter
Join Date: Aug 2005
Location: Huntington Beach, CA
Posts: 1,353
Likes: 0
Received 2 Likes
on
2 Posts
This is a followup to my recent post for Fog Lights Yellowing?. This R&R was to fix the pitting and sandblasting of the lens. I found this windshield repair kit from Permatex, so I thought I'd give it a try. It’s available from the local auto parts store for about $10. There’s enough repair liquid in the kit to easily do both lenses.

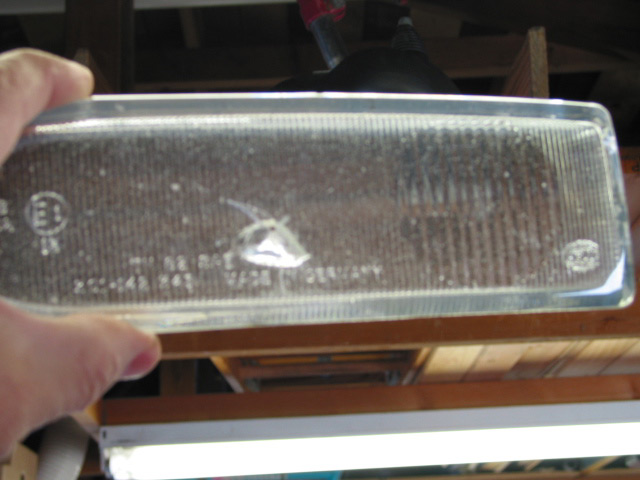
I used the damaged lens from the fog light assembly that Kelly Kim provided. Here’s what the lens looked like before:
The process is pretty straightforward: Clean the lens with the alcohol swab. Apply the repair liquid. Spread a light zig-zag coat across the lens. Apply the thin plastic sheets. Swirl these sheets on the lens to spread and flatten the repair liquid. Then, place the lens in the sun for 1-2 hours to cure.
Here’s the result on one half of the lens:

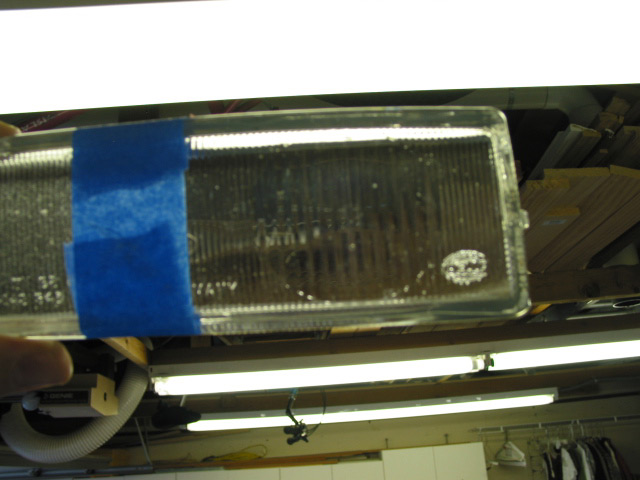
Overall, a lot of the pitting has been fixed and the sandblasting has been virtually eliminated. I think results could have been a little better as I probably initially applied too much repair liquid. In fact, those two large dings in the center are actually bubbles in the repair liquid. So, use the liquid sparingly and apply multiple layers as necessary.
Even though it’s not 100% perfect, it’s a considerable improvement. Once mounted, any remaining imperfections will be almost undetectable. And, it’s certainly cheaper than $500+ for replacement fog lights.
I used the damaged lens from the fog light assembly that Kelly Kim provided. Here’s what the lens looked like before:
The process is pretty straightforward: Clean the lens with the alcohol swab. Apply the repair liquid. Spread a light zig-zag coat across the lens. Apply the thin plastic sheets. Swirl these sheets on the lens to spread and flatten the repair liquid. Then, place the lens in the sun for 1-2 hours to cure.
Here’s the result on one half of the lens:
Overall, a lot of the pitting has been fixed and the sandblasting has been virtually eliminated. I think results could have been a little better as I probably initially applied too much repair liquid. In fact, those two large dings in the center are actually bubbles in the repair liquid. So, use the liquid sparingly and apply multiple layers as necessary.
Even though it’s not 100% perfect, it’s a considerable improvement. Once mounted, any remaining imperfections will be almost undetectable. And, it’s certainly cheaper than $500+ for replacement fog lights.
 01-22-2006, 02:28 AM
#2
Addict
Rennlist Member
Rennlist Member

Eric,
That does look a lot better... why didn't I think of this?
Kudos to you for finding low buck fixes for common problems all 993s seem to be afflicted with .
I'd love to see your 993 in person someday.
That does look a lot better... why didn't I think of this?
Kudos to you for finding low buck fixes for common problems all 993s seem to be afflicted with .
I'd love to see your 993 in person someday.
01-22-2006, 11:40 AM
#3
Rennlist Member
Thread Starter
Join Date: Aug 2005
Location: Huntington Beach, CA
Posts: 1,353
Likes: 0
Received 2 Likes
on
2 Posts
Thanks Kelly. I really didn't think it would turn out so well. Having a prototype really helped! Probably the best thing to do after this R&R would be applying a stone guard to keep them looking new(er) for the long term.
Anytime you're in So Cal, you're always welcome around here. If I can figure out how to attach pontoons to my car, I'll pay you a visit!
Anytime you're in So Cal, you're always welcome around here. If I can figure out how to attach pontoons to my car, I'll pay you a visit!