When you click on links to various merchants on this site and make a purchase, this can result in this site earning a commission. Affiliate programs and affiliations include, but are not limited to, the eBay Partner Network.
Super! Thanks Boom. No pics anywhere on internet on disassembly of the box.
Forgot to comment that I stood down on this after the next few posts, where it was confirmed that you can indeed separate the halves to get at the layers of the buss.
If you do end up opening yours up, please post pics because I'm really curious to see it too after @barracuda68 description, as I assumed it was a PCB in there but guess not!
If you're referring to all the harness connectors that go on the underside, yes, they are all labeled with a capital letter
The relay sockets on the perimeter are not embossed but should have a letter written in marker on them. At least that's how mine were (also in photo you posted at top).
I feel like were all in high school egging Jay on to do a dumb thing and he's going "Hmmm I dunno about this" and were all like "Oh yeah, Sure you got this...easy!" haha.
BTW Jay, all bottom connectors are keyed also as everything is crammed in that little wiring box its hard for the harnesses connectors to get out of position.
I'm at work and looking to see if I got those photos, going to look in Icloud next.
I feel like were all in high school egging Jay on to do a dumb thing and he's going "Hmmm I dunno about this" and were all like "Oh yeah, Sure you got this...easy!" haha.Sean
Nah... After your description I just have to open that box!
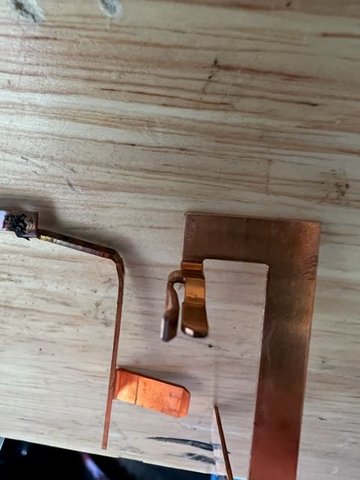
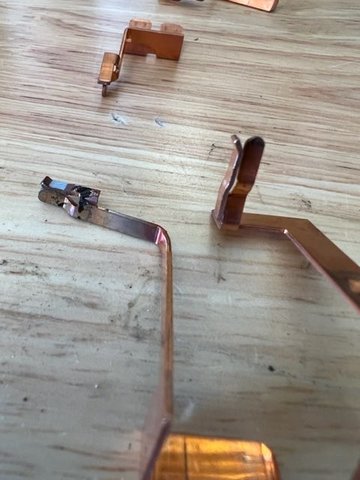
Good news on Pandoras box. So I couldn't find my original photos but I actually found some traces that I kept for some unknown reason for everyone's review. As you can see they are copper / brass traces that have different terminal heights to pass through multiple layers of plastic insulating plates. You will also see a discolored one, that was supplying my fuel pump, and its discolored from heat generated at the socket. I knew there as a problem when I pulled the fuse and saw bubbling in the plastic from getting overheated. I tried to use a pick to bend it back but the terminal lost its tension so I ordered a new fuse box.
Jay you can have them if you want (PM me your address). Perhaps if your fuse terminal end is damaged you can somehow cut the buss and solder in a section?
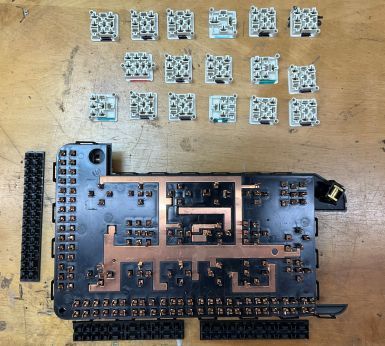
Holy crap! Assembly nightmare! Gotta be over 200 pieces in there! So the female contacts are NOT replaceable, but looks like once opened up it'll be easy to do a thorough cleaning job - better than could be done from above. I'll be tackling this next week and will post more pics. Thanks for the update.
Yep there a ton of unique little busses in there that are all different. It will definitely be one of those things where you are going to need to remove every layer and set it aside. If you (your kids, your cat or your dog) jumps up on your worktable and mixes up this massive jig saw puzzle of buss bars just know you can always whip out Mr. Visa and buy another one.
I was surprised how complex it is and the amount of money that must of been spent to design such a thing and dies needed to punch out all of those individual buss bars. Crazy. But some German or Eastern European assembled it so we can too... or maybe not. lol
So servicing the relay terminals was nowhere near as hard as I thought it would be,
mainly because all I had to do was remove the top. There are 21 plastic
latches around the perimeter that have to be freed up pretty much simultaneously. Toothpicks did the trick:
(Careful - they break easily).
Each of the white plastic spacers precisely aligns the terminals to the slots in the lid (the
corner posts pick up receivers in the lid). When I took the top off, half of them fell out
onto the bench but fortunately, it was easy to figure out which goes where. (The lid won't go
back on if anything is out of place - thanks Porsche).
There are 5 different type spacers so I color coded them just in case. The black strips
at the bottom and left side align the fuses to the lid.
The whole assembly is a sandwich of plastic and copper layers - like a PCB (it weighs a ton).
No further disassembly required to service the terminals.
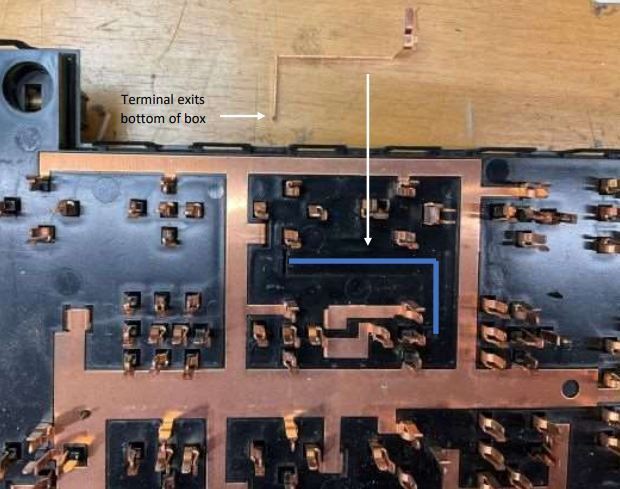
Here's one of the copper contact/terminal pieces removed. The section on the left goes thru all the layers below it,
exiting the bottom where the wiring harness plugs in. Only some on each layer can be pulled out like this.
Others require removing more layers of plastic. Fortunately, not much can go wrong on inner layers.
Reassembly was easy - a little jiggling to get the spacers aligned and it snapped back in.
It's an impressive piece of engineering, but not something I'd want go any deeper in.
Last edited by jay@EZimmoblock.com; Dec 20, 2022 at 10:23 AM.