
Remote door lock/unlock installation into '95 993
 03-24-2004, 07:23 PM
#1
Addict
Rennlist Member
Rennlist Member
Thread Starter
Well, having been a part of several debates on whether or not it's possible to install an aftermarket remote door lock/unlock switch, I now have a definitive answer. And the answer is YES.
Preliminaries:
The following is for a 1994 and 1995 built 993s with no immobilizer installed and no factory remote. I do not know anything about immobilizer and its functionality when it comes to controlling the door locking.
The procedure is very simple, it could be done in 30-40 minutes total.
You will need:
Some sort of remote door opener. I used a $30 JC Whitney unit that I already had, but there are dozens of them on the market.
6mm hex (allen) wrench
10mm socket
Small flat blade screwdriver
Wire cutting tool
Wire crimping tool or some other method of attaching wires
Voltmeter (optional)
Procedure:
1. Take out the passenger seat. In order to do that you'll need to undo the 6 hex head bolts (6mm) that hold the rails to the floor. Raise both the front and the rear of the seat to the highest position to give yourself more room. Disconnet (pull off by hand) the connector under the front portion of the seat before removing the seat from the car.
2. Once the seat is out you will see this:
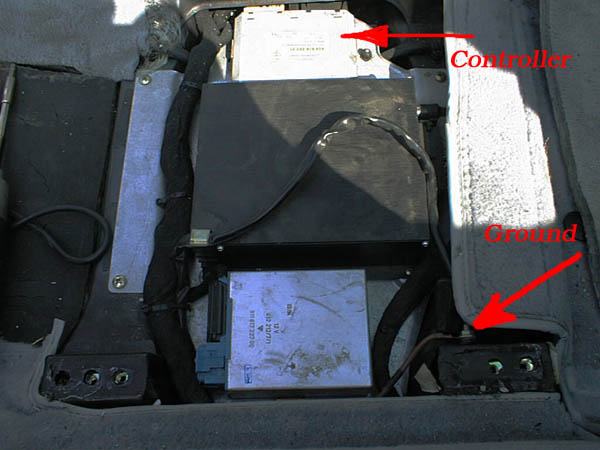
Red arrow indicates the Porsche "Control unit/Central Locking".
3. Unscrew the 10 mm nut on the side and carefully pull out the control unit. The thick black wire is held by a metal connector that is fairly easy to break, but since the wires are not moving, that's not a big deal.
4. Detach the yellow connector as seen below. In order to do that, pry up the black plastic slider in the middle with a small flat blade screwdriver. Once it's up, you can just pull on it with your fingers or a larger screwdriver. Below is what you'll see: arrow 1 is the connector, arrow 2 is the control unit. Black connector is also disconnected, but you can leave it connected.
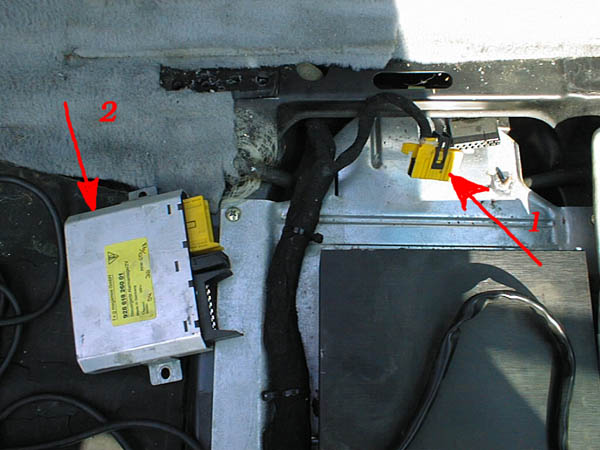
5. There are two wires going to yellow connector that you will need. One is Brown/Blue and the other is Brown/Green. Brown/Blue is "Lock", Brown/Green is "Unlock".
6. Connect the "Lock" and "Unlock" wires from your remote control unit to the two above wires. You can do it in several ways. I did it a about 4" above the yellow connector. Unwind or cut the gooey black insulation tape first. Don't cut the wires too close to the connector. Once the connections are made, re-tape with electric tape.
7. Remote units differ, but most universal ones have a polarity wire (often white). It can either be connected to Ground or +12V. In case of 993 you connect it to Ground. So, attach the polarity wire and ground wire together to the convenient Ground connection that can be seen on the first picture (brown wire with a lug is connected there).
8. Connect you fused +12V (usually red) wire to a convenient +12V non-switched power source. You want to make sure that +12V is present with ignition off, as that's how you are going to use the remote. Most power leads on universal remote controllers are already fused, but make sure it is.
9. Connect the yellow connector back into the controller, screw the controller back in. Get outside, close the door, push the buttons, make sure the car locks and unlocks, drink a beer. Or don't.
10. You can attach the remote unit to the top of the factory door controller if it's slim enough not to interfere with the seat. Put the seat back in, connect the power connector under the seat, bolt the seat down, drink another beer. Or don't.
Optionally you can connect the lead to have the car blink the parking lights when locking or unlocking the doors, but I never did that in any of my cars, so that's where my instructions stop.
The entire procedure can be done in 30-40 minutes.
The original discussion revolved around the ability to arm the alarm while remotely locking the car. Mine seems to be fine, the red LEDs in the doors are blinking as they do when door is locked with the key.
If you have any questions, don't hesitate to contact me. If this is to be put into a DIY collection on Robin's site, I'd like somebody else to try it to make sure all the steps are described well enough.
Preliminaries:
The following is for a 1994 and 1995 built 993s with no immobilizer installed and no factory remote. I do not know anything about immobilizer and its functionality when it comes to controlling the door locking.
The procedure is very simple, it could be done in 30-40 minutes total.
You will need:
Some sort of remote door opener. I used a $30 JC Whitney unit that I already had, but there are dozens of them on the market.
6mm hex (allen) wrench
10mm socket
Small flat blade screwdriver
Wire cutting tool
Wire crimping tool or some other method of attaching wires
Voltmeter (optional)
Procedure:
1. Take out the passenger seat. In order to do that you'll need to undo the 6 hex head bolts (6mm) that hold the rails to the floor. Raise both the front and the rear of the seat to the highest position to give yourself more room. Disconnet (pull off by hand) the connector under the front portion of the seat before removing the seat from the car.
2. Once the seat is out you will see this:
Red arrow indicates the Porsche "Control unit/Central Locking".
3. Unscrew the 10 mm nut on the side and carefully pull out the control unit. The thick black wire is held by a metal connector that is fairly easy to break, but since the wires are not moving, that's not a big deal.
4. Detach the yellow connector as seen below. In order to do that, pry up the black plastic slider in the middle with a small flat blade screwdriver. Once it's up, you can just pull on it with your fingers or a larger screwdriver. Below is what you'll see: arrow 1 is the connector, arrow 2 is the control unit. Black connector is also disconnected, but you can leave it connected.
5. There are two wires going to yellow connector that you will need. One is Brown/Blue and the other is Brown/Green. Brown/Blue is "Lock", Brown/Green is "Unlock".
6. Connect the "Lock" and "Unlock" wires from your remote control unit to the two above wires. You can do it in several ways. I did it a about 4" above the yellow connector. Unwind or cut the gooey black insulation tape first. Don't cut the wires too close to the connector. Once the connections are made, re-tape with electric tape.
7. Remote units differ, but most universal ones have a polarity wire (often white). It can either be connected to Ground or +12V. In case of 993 you connect it to Ground. So, attach the polarity wire and ground wire together to the convenient Ground connection that can be seen on the first picture (brown wire with a lug is connected there).
8. Connect you fused +12V (usually red) wire to a convenient +12V non-switched power source. You want to make sure that +12V is present with ignition off, as that's how you are going to use the remote. Most power leads on universal remote controllers are already fused, but make sure it is.
9. Connect the yellow connector back into the controller, screw the controller back in. Get outside, close the door, push the buttons, make sure the car locks and unlocks, drink a beer. Or don't.
10. You can attach the remote unit to the top of the factory door controller if it's slim enough not to interfere with the seat. Put the seat back in, connect the power connector under the seat, bolt the seat down, drink another beer. Or don't.
Optionally you can connect the lead to have the car blink the parking lights when locking or unlocking the doors, but I never did that in any of my cars, so that's where my instructions stop.
The entire procedure can be done in 30-40 minutes.
The original discussion revolved around the ability to arm the alarm while remotely locking the car. Mine seems to be fine, the red LEDs in the doors are blinking as they do when door is locked with the key.
If you have any questions, don't hesitate to contact me. If this is to be put into a DIY collection on Robin's site, I'd like somebody else to try it to make sure all the steps are described well enough.
Last edited by nile13; 03-25-2004 at 12:38 AM.
 03-24-2004, 07:34 PM
#2
Advanced

Join Date: Feb 2004
Location: wilton ct
Posts: 91
Likes: 0
Received 0 Likes
on
0 Posts
can you imagine i went to the dealership in fairfield CT three weeks ago to see if it could be installed and they said yes but it would cost approx.
$ 1,600.00
and i said that i could have installed a top of the line security system
with remote start and satellite tracking for half that price.......
$ 1,600.00
and i said that i could have installed a top of the line security system
with remote start and satellite tracking for half that price.......

 03-24-2004, 09:18 PM
#7
Addict
Rennlist Member
Rennlist Member
Thread Starter
Kelly, it's just a function of weather  And the fact that i just got the real printed '95 schematics book helped a lot.
JPS, there are several +12V leads. Power seat, amplifier, the black connector of the Control/Locking unit itself. Pretty much any large red wire is uninterrupted +12 V, but check with a voltmeter first.
And the fact that i just got the real printed '95 schematics book helped a lot.JPS, there are several +12V leads. Power seat, amplifier, the black connector of the Control/Locking unit itself. Pretty much any large red wire is uninterrupted +12 V, but check with a voltmeter first.
Trending Topics
03-24-2004, 09:23 PM
#8
Addict
Rennlist Member
Rennlist Member
Thread Starter
Boris, if you do try this, I suggest not cutting wires at first. Get a very thin metal pin (regular paper clip is too thick) and stick it into pin 1 (Lock) and pin 2 (Unlock) of the yellow connector. Connect +12V, Ground, and polarity wires as needed and then aligator-clip the Lock and Unlock lead to these thin pins (a needle comes to mind). That was you can test everything before the surgery.
I was also thinking that it might be easier to install the unit inside the door. The wire colors remain the same - Brown/Blue for lock and Brown/Green for unlock inside each door.
Let me know if it worked and if any changes to the procedure are needed.
I was also thinking that it might be easier to install the unit inside the door. The wire colors remain the same - Brown/Blue for lock and Brown/Green for unlock inside each door.
Let me know if it worked and if any changes to the procedure are needed.
03-24-2004, 10:15 PM
#9
Addict
Rennlist Member
Rennlist Member
You... are... the... man! I knew on these non-immobiliser cars it had to be something less than rocket science. So those leads must be what is triggered inside the lock cylinder on either door when turning the key. You can hear the motor kick in and pull the locks before the key really does the work anyway. I will definitely give this a try this spring and let you know. Thanks so much for paving the way here.
03-25-2004, 12:25 AM
#12
Addict
Rennlist Member
Rennlist Member
Thread Starter
No problem, guys, glad to help.
Boris, to try and answer your question... The contacts are normally floating (in electrical sense). By turning the key you do a momentary pull to ground. By going with remote box, you have a choice of how you wire it. You have a polarity wire that you connect to either ground or +12V. A hit on remote key simply closes the relay inside the remote box that passes the polarity wire voltage to the lock or unlock wire that you connect to the Porsche controller. In case of our cars the polarity wire must go to ground (I think it's true on most German cars).
Sorry if this sounds confusing to everyone, don't worry about it, it's irrelevant to all but us electrical engineers
Now, I didn't want to confuse anybody, but I observed an interesting thing. When connected as described, either of two remote buttons can lock and unlock the car. In other words, one hit on either button will lock the car. Next hit on either button will unlock the car. I know that my BMW behaved the exact same way when this unit was installed there. I remember definitely modifying one remote years ago to do this, but I don't recall doing the second one, now they both behave the same. So I'll be very interested to hear how other remotes behave. To me this is a big plus - I don't need to remember which remote button is lock and which is unlock.
Also, all the above is for my C2 cab. I'm sure that coupes will work the same way, but would like to hear from others after the install. So, any and all info is very welcome.
03-25-2004, 01:34 AM
#13
Addict
Lifetime Rennlist
Member
Lifetime Rennlist
Member
Join Date: Jun 2001
Location: SF Bay Area
Posts: 1,955
Likes: 0
Received 0 Likes
on
0 Posts
mike,
well i just got done hooking everything up aside from the lock/unlock. i was missing a wire tap (which is what i prefer to use) - that way it can be removed back to stock. so i'll get some wire taps and will report back tomorrow.
so far everything seems the same except i have a different alarm. mine has a green sticker and the part # ends in 02
cheers,
boris
03-25-2004, 01:55 AM
#14
Addict
Rennlist Member
Rennlist Member
Thread Starter
Boris, what type of wire taps do you use? And what sort of remote? Are the wire colors on your remote box about the same as mine (white for polarity, green for unlock, yellow for lock, red and black for power)?
I'd love to hear that yours worked the same way as mine tomorrow.
I'd love to hear that yours worked the same way as mine tomorrow.
03-25-2004, 03:25 AM
#15
Addict
Lifetime Rennlist
Member
Lifetime Rennlist
Member
Join Date: Jun 2001
Location: SF Bay Area
Posts: 1,955
Likes: 0
Received 0 Likes
on
0 Posts
mike,
the wire taps i like just create a little slice in two parallel wire with a tap.
i'll try to post a pic tomorrow. the nice thing is you just unsnap them and the only artificat is a little slit in the factory wire. this is important to me as i like the idea of returning to stock. i even have the same mesh sticky electrical tape....
cheers,
boris