
~DIY Seat Back Swap - w/pics
 01-08-2007, 01:26 PM
#1
Rennlist Member
Thread Starter
I searched and searched, found a few posts, including Leland Pate's search for the same answers but no info was available on swapping the seat backs on 8 way power seats. So, I dove in yesterday to get it figured out. I thought I'd share the process as it is really not as bad as it first seemed and I want to save you the trouble of taking more apart than necessary (as I did at first).
I am not sure what differences there are between the 8 way and others but I think it is the wires to the seat back and the pivot pins.
Why swap seat backs?
The bolster on the driver's side wears out first. If you swap the backs, you are putting the inside passenger bolster on the driver's side (and visa versa) lengthening the life of your seats.
LEVEL OF DIFFICULTY borrowed from Jeff (InTheAir):
(Scale: 1�changing a tire; 10�engine rebuild)
I'm calling this a 2 if you remove the seats first. Otherwise a 2.5
I chose to leave the seats in.
TIME REQUIRED:
2 hours if you are meticulous
TOOLS USED:
15mm Socket and ratchet
2.5mm allen wrench
Needle nose pliers
Phillips head screw driver
Flat head screw driver
Wire cutters
Work light of some sort
OTHER MATERIALS:
Loctite Blue
4 small wire ties

INSTRUCTIONS:
Optional: Remove both seats. 6 Allen head bolts per seat, see other DIYs for this if you choose this route. Not too hard to to and it will make the job easier. I saw it as a trade off and chose to leave them in. Getting under the seats to unplug the seat back motor connection is a bit of a squeeze. If you cannot "wire tie" one-handed, remove the seats
NOTE:
You will need to move the seat around a bit if you leave the seats in the car. Raise the rear all of the way and slide it in the full forward position for best access on most of the job.
~Remove the plastic covers (x4) - Small washer alert! Each of these screws has a small washer that may stick in the cover or may fall onto your black carpet and hide from you.
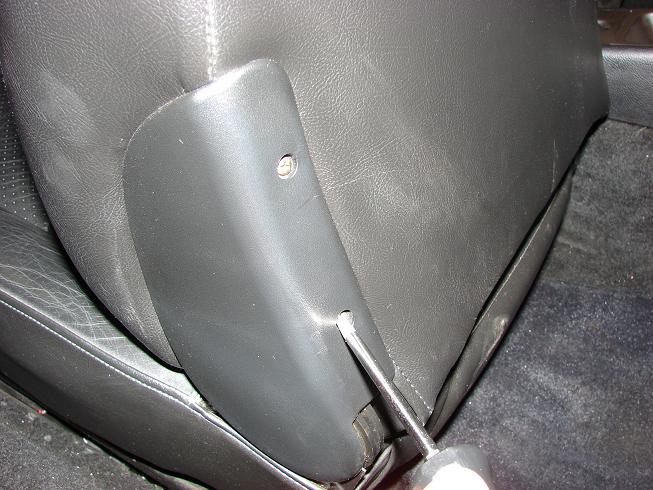
~Remove E-clips from shaft of seat back release (x4) - Be careful and don't let this little clip fly away.
~Slide cable arm off of splined shaft and remove cable end from arm. Place the arm back on the shaft in the same position it came off (x4). - Note the position of this arm. At first I marked the position but it is not really necessary. It is easy to put these in the right spot when installing. More later.
~Use a screwdriver to pry open the metal bracket that holds the cable sheathing in place - This will make it much easier to remove/reinstall the seat backs.
~Move seat all of the way forward and raise the rear all of the way. Put seat back in an upright position but NOT all of the way forward. You do not want tension on the pivot point as this will make removing the pivot pin diffuicult or impossible - Of course, this is only needed if you leave the seats in the car. Look under the seat from the back and yuo will find a pair of plastic covered wires that run from the RH side of the seat back then under the seat. This plugs into a connector deep under the seat.
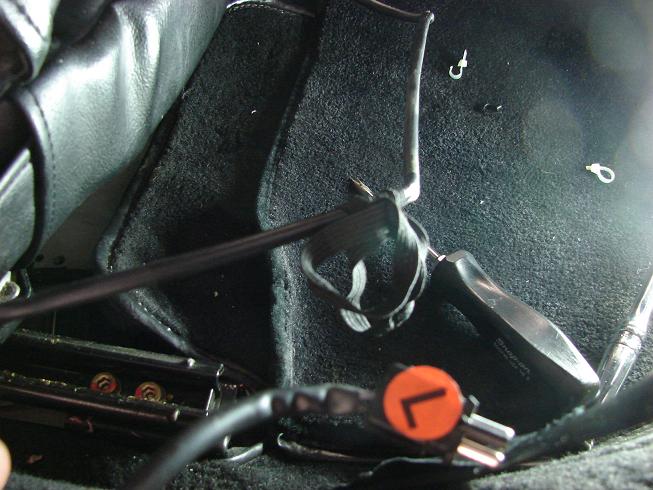
~Carefully cut the 2 wires ties that hold this wire to the seat springs. The blue arrow points to the wire in this (pathetic) pic of the underbelly of the seat
~Pop the plug/connector out of the metal plate that they are mounted in. It was hard to get good pics of this, my apologies. See red circle in the pic for the area this is in. The connector is on top of that metal plate.

~Disconnect this plug - This is a bit tricky with the seats in. You need to squeeze the sides of the connector while pulling the plug out.
~Slide "bungee cord" off of seat spring - This is only slipped onto the seat springs to keep tension on the slack wire. No need to remove it from wire!
~Wire should now be free. Slide it though seat bottom and out. - See "bungee" thing in pic below.
~Do this on the other seat
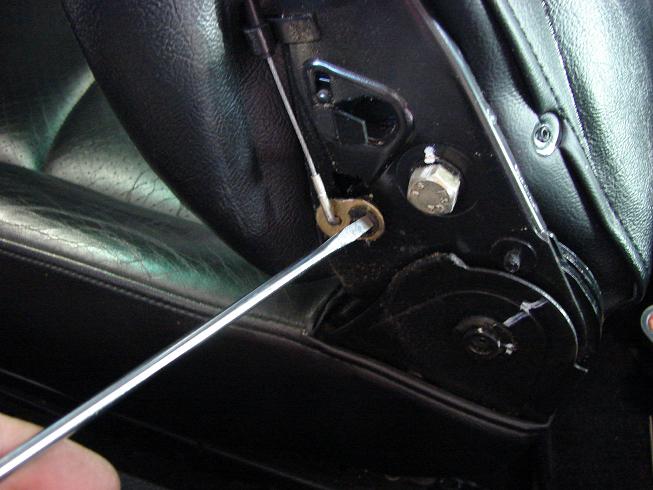
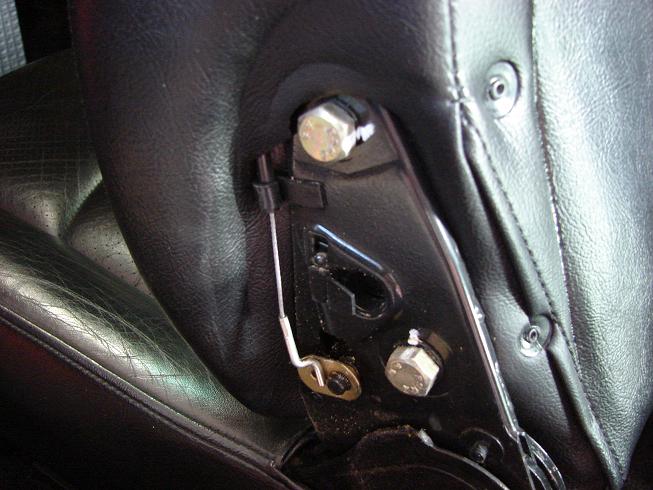
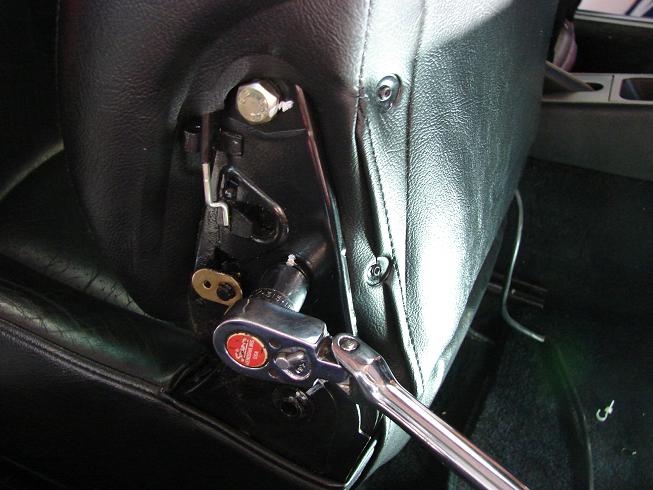
~Loosen small 2.5mm Allen screw at seat back pivot point (x4) - You will need the rear of the seat bottom all of the way up to access the pins closest to the center console. (see next pic)
IMPORTANT NOTE: I listed this step AFTER removing the wires controlling the seat back motor so you don't make the mistake I did. If you remove one of these pivot points then adjust the seat back you may get them out of phase. The seat back moves in an elliptical fashion and the pivot pins are square. If the left/right are out of phase the seat back motor will not operate smoothly!
~Slide needle nose pliers in the gap between the seat back and the metal hinge assembly. You can then grab the pivot pin and use the pliers to slide it outward. - If there is tension on this pin it will be hard to slide it out. Be sure the seat back was not in the full forward position. Wiggling the seat back can also help slide the pin out. You can also remove the little Allen screw and use a small pick to remove the rubber washer that is at it's base. That may help if yours is sticky. Mine wasn't a problem. Another method would be to get a longer screw the same thread as the samll Allen screw and use this as a puller to pull the pin out.
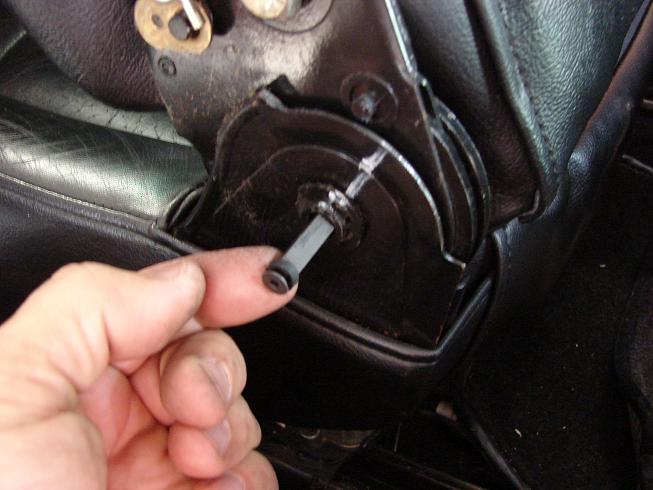
~Pull pivot pin out, set aside
~Loosen and remove the 15mm bolt holding the seay back to their hinges - The seat back is now set free. You may want to use a flat blade screwdriver to break the seal between the hinges and the seat back.
~When lifting the seat back out take care to not damage the seat back release cables, they may get caught
Assembly Notes:
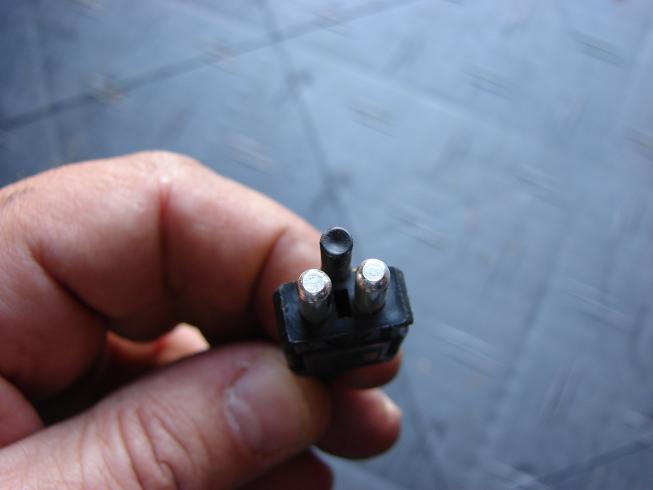
~Modify seat back motor plugs - The plugs for the seat back motors are labelled L and R, for Left and Right. I could not see why this would be... and had a bit of a laugh... until I plugged this first one in. The seat back controls were reversed. Ooops. The easiest way around this was to modify the plug a bit. I simply cut off the 3rd plastic prong (see pic) and plugged it in just the opposite of how Porsche intended. Be sure to cut it completely flush with the connector body. Swap the L/R stickers on the plugs if you are obsessive compulsive.
~Use Loctite Blue on 15mm seat back bolts
~Recrimp the metal bracket/loop that holds the seat back release cable
~When reinserting the seat back release cable, pull down on the release **** to put the proper tension on the cable - Test it!
~When reinstalling the pivot pin you can use your needle nose pliers to hold the pin in position (in the same gap between hinge and seat back mentioned earier) while tightening the 2.5mm Allen screw. This little screw just puts pressure on the rubber washer, squeezing it out to hold the pin in it's place. As long as the screw head isn't sticking out past the pushing you are OK.
Other than that, the rest goes back in just the opposite as it came apart.
If anyone has any additions or corrections to this DIY, fire away!
If you have trouble or questions I'd be happy to help.
I am not sure what differences there are between the 8 way and others but I think it is the wires to the seat back and the pivot pins.
Why swap seat backs?
The bolster on the driver's side wears out first. If you swap the backs, you are putting the inside passenger bolster on the driver's side (and visa versa) lengthening the life of your seats.
LEVEL OF DIFFICULTY borrowed from Jeff (InTheAir):
(Scale: 1�changing a tire; 10�engine rebuild)
I'm calling this a 2 if you remove the seats first. Otherwise a 2.5
I chose to leave the seats in.
TIME REQUIRED:
2 hours if you are meticulous
TOOLS USED:
15mm Socket and ratchet
2.5mm allen wrench
Needle nose pliers
Phillips head screw driver
Flat head screw driver
Wire cutters
Work light of some sort
OTHER MATERIALS:
Loctite Blue
4 small wire ties
INSTRUCTIONS:
Optional: Remove both seats. 6 Allen head bolts per seat, see other DIYs for this if you choose this route. Not too hard to to and it will make the job easier. I saw it as a trade off and chose to leave them in. Getting under the seats to unplug the seat back motor connection is a bit of a squeeze. If you cannot "wire tie" one-handed, remove the seats
NOTE:
You will need to move the seat around a bit if you leave the seats in the car. Raise the rear all of the way and slide it in the full forward position for best access on most of the job.
~Remove the plastic covers (x4) - Small washer alert! Each of these screws has a small washer that may stick in the cover or may fall onto your black carpet and hide from you.
~Remove E-clips from shaft of seat back release (x4) - Be careful and don't let this little clip fly away.
~Slide cable arm off of splined shaft and remove cable end from arm. Place the arm back on the shaft in the same position it came off (x4). - Note the position of this arm. At first I marked the position but it is not really necessary. It is easy to put these in the right spot when installing. More later.
~Use a screwdriver to pry open the metal bracket that holds the cable sheathing in place - This will make it much easier to remove/reinstall the seat backs.
~Move seat all of the way forward and raise the rear all of the way. Put seat back in an upright position but NOT all of the way forward. You do not want tension on the pivot point as this will make removing the pivot pin diffuicult or impossible - Of course, this is only needed if you leave the seats in the car. Look under the seat from the back and yuo will find a pair of plastic covered wires that run from the RH side of the seat back then under the seat. This plugs into a connector deep under the seat.
~Carefully cut the 2 wires ties that hold this wire to the seat springs. The blue arrow points to the wire in this (pathetic) pic of the underbelly of the seat
~Pop the plug/connector out of the metal plate that they are mounted in. It was hard to get good pics of this, my apologies. See red circle in the pic for the area this is in. The connector is on top of that metal plate.
~Disconnect this plug - This is a bit tricky with the seats in. You need to squeeze the sides of the connector while pulling the plug out.
~Slide "bungee cord" off of seat spring - This is only slipped onto the seat springs to keep tension on the slack wire. No need to remove it from wire!
~Wire should now be free. Slide it though seat bottom and out. - See "bungee" thing in pic below.
~Do this on the other seat
~Loosen small 2.5mm Allen screw at seat back pivot point (x4) - You will need the rear of the seat bottom all of the way up to access the pins closest to the center console. (see next pic)
IMPORTANT NOTE: I listed this step AFTER removing the wires controlling the seat back motor so you don't make the mistake I did. If you remove one of these pivot points then adjust the seat back you may get them out of phase. The seat back moves in an elliptical fashion and the pivot pins are square. If the left/right are out of phase the seat back motor will not operate smoothly!
~Slide needle nose pliers in the gap between the seat back and the metal hinge assembly. You can then grab the pivot pin and use the pliers to slide it outward. - If there is tension on this pin it will be hard to slide it out. Be sure the seat back was not in the full forward position. Wiggling the seat back can also help slide the pin out. You can also remove the little Allen screw and use a small pick to remove the rubber washer that is at it's base. That may help if yours is sticky. Mine wasn't a problem. Another method would be to get a longer screw the same thread as the samll Allen screw and use this as a puller to pull the pin out.
~Pull pivot pin out, set aside
~Loosen and remove the 15mm bolt holding the seay back to their hinges - The seat back is now set free. You may want to use a flat blade screwdriver to break the seal between the hinges and the seat back.
~When lifting the seat back out take care to not damage the seat back release cables, they may get caught
Assembly Notes:
~Modify seat back motor plugs - The plugs for the seat back motors are labelled L and R, for Left and Right. I could not see why this would be... and had a bit of a laugh... until I plugged this first one in. The seat back controls were reversed. Ooops. The easiest way around this was to modify the plug a bit. I simply cut off the 3rd plastic prong (see pic) and plugged it in just the opposite of how Porsche intended. Be sure to cut it completely flush with the connector body. Swap the L/R stickers on the plugs if you are obsessive compulsive.
~Use Loctite Blue on 15mm seat back bolts
~Recrimp the metal bracket/loop that holds the seat back release cable
~When reinserting the seat back release cable, pull down on the release **** to put the proper tension on the cable - Test it!
~When reinstalling the pivot pin you can use your needle nose pliers to hold the pin in position (in the same gap between hinge and seat back mentioned earier) while tightening the 2.5mm Allen screw. This little screw just puts pressure on the rubber washer, squeezing it out to hold the pin in it's place. As long as the screw head isn't sticking out past the pushing you are OK.
Other than that, the rest goes back in just the opposite as it came apart.
If anyone has any additions or corrections to this DIY, fire away!
If you have trouble or questions I'd be happy to help.

 01-08-2007, 04:25 PM
#5
Rennlist Member
Thread Starter
Originally Posted by InTheAir
Hey, I like the "structure" of the DIY writeup. 
Nicely done.
Nicely done.
Jeff, I stole most if it from you
When I reflected on well formatted DIYs I thought of your susp. install.
How do I get the pics within the text? Do I need to host them somewhere else abnd use those links to do that?
01-08-2007, 06:06 PM
#6
Nordschleife Master
Join Date: Jun 2005
Location: Neither Here Nor There
Posts: 5,351
Likes: 0
Received 7 Likes
on
5 Posts
Originally Posted by MarkD
How do I get the pics within the text? Do I need to host them somewhere else abnd use those links to do that?
In your case, you have uploaded to the forum. The "good" is that it is easy to upload. The "bad" is that the uploaded forum images are occassionally purged from the servers. You have a photo upload feature being a Rennlist Member (upper right corner of the screen) where you can upload your picture and link to them here--that way you're insured they won't be purged later on, thus rendering your DIY worthless.
Nice job again, Mark.
Trending Topics


 01-08-2007, 07:36 PM
#9
Rennlist Member
Thread Starter
Thanks Toeny and Scottoe
Ah, I see Jeff. Got it. Will upload to RL and re-insert them into the post.
Thanks!
Edit: Done! Easy enough... thanks again for the assist.
Ah, I see Jeff. Got it. Will upload to RL and re-insert them into the post.
Thanks!
Edit: Done! Easy enough... thanks again for the assist.
01-08-2007, 09:08 PM
#11
Rennlist Member
Thread Starter
Originally Posted by InTheAir
Glad it worked out easily.
BTW, you might as well submit a link to this thread in the DIY forum (993 specific). That way others can easily find it.
BTW, you might as well submit a link to this thread in the DIY forum (993 specific). That way others can easily find it.

I searched, can't see how I do this. I am sure it is simple. I cannot post a new thread in the DIY forum.
01-08-2007, 09:11 PM
#12
Nordschleife Master
Join Date: Jun 2005
Location: Neither Here Nor There
Posts: 5,351
Likes: 0
Received 7 Likes
on
5 Posts
Mark -
At the main forum listing here at Rennlist (where you can see all of the forums), the grouping at the bottom is the DIY forums. In those forums, there is a DIY submission forum where you submit either your full DIY post or, in my case, a link to your DIY thread. John D. or one of the moderators will then put it into the correct model specific DIY forum.
Here is the main grouping:
https://rennlist.com/forums/marketplace-archive-127/
01-08-2007, 09:15 PM
#13
Rennlist Member
Thread Starter
OK, I haven't seen that view of the forums for a year. I've been using the other one... Thanks.
Now let's just delete these last few posts and pretend this never happened
Now let's just delete these last few posts and pretend this never happened
01-08-2007, 09:35 PM
#14
Race Car
Awesome writeup. Good thing you did this because I have been thinking of doing this same thing for the past 2 months and I didn't know what I was against.
Now I can just follow your writeup and there'll be no surprises. Thanks!!!
Now I can just follow your writeup and there'll be no surprises. Thanks!!!