When you click on links to various merchants on this site and make a purchase, this can result in this site earning a commission. Affiliate programs and affiliations include, but are not limited to, the eBay Partner Network.
I was wondering if anyone has done this on their own before. I looked and it appears that there are only three bolts holding the lower panel to the dor, but before I started ripping things apart, I thought I would ask. If I can get a little guidance I will document this for the forum for any future installations by other members.
OK thank you all for the tips and the link. I prefer a little more detail so I have added it all in here. I have the blessing of a car lift so you will see mine is up off the ground. This is not a requirement, but if you have the room, it was by far the number two investment I have ever made (first was my kids college).
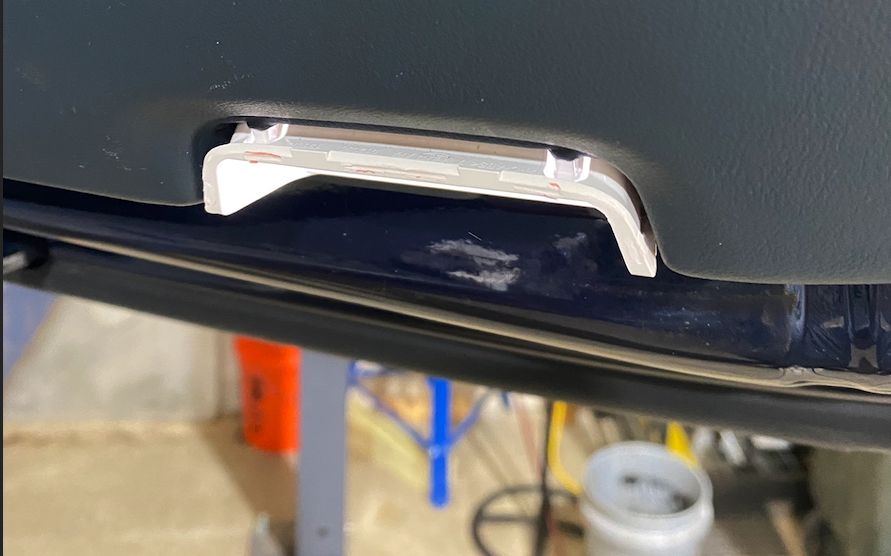
1. Open the door and review the way the light is attached the best you can. You will recognize that there are what appear to be little tabs at the top, the portion facing the seat bottom. You can see the tabs in this photo clearly.
2. I had the most luck prying (gently) from the corners to release the top tabs. You will see that I did not have any fancy trim tools and so I old schooled with a little painters tape on the end of a flathead screwdriver. See photo below:
3. After you loosen one of the upper corners, then switch to the other side to loosen the other upper corner. Once both of the upper corners are loose, it will look like this:
4.Next, you just gently pull up and the bottom will come out. This will expose the electrical connection. The connection has two tabs that must simultaneously be squeezed before pulling the connection from the old fixture. Use caution here as I am sure the Stealership would stick you for a couple hours to replace these....see photo below of electrical connection:
5. Once you have disconnected the electrics, whip out your trusty Suncoast replacement and plug it right in. Exact same connection, this you cannot screw up. I found that the easiest way to reinsert the new lights was to insert and seat the top edge securely where it goes. Top edge is indicated in the following photo and is identified as the area at the end of the screwdriver below:
6. So once you get the top edge seated well, this is where one might have some apprehension....you need to be a little bit forceful on this step. The top will go in easily, the bottom needs some elbow grease. So, once the top is seated in the correct position, I took the heel of my hand and pushed directly upwards until the bottom two clips fall into place. DO NOT HIT IT, constant gentle pressure, but with some force. Once they clip in you will know it.
That's it, you're done. Now go tell your wife that the Porsche is already saving you money as you are learning to make improvements all on your own without breaking anything.
The poster of this tutorial has no liability for the actions you take on your own vehicle.
Taking the old lights off is easy, just pry them off.
installing the new lights in the old one�s place, without removing the door panel, is very difficult; the 4 plastic tabs on the new lights are longer and thus can�t be jammed in there even with brute force.
I did what someone else recommended, which is to trim/cut off a little of the tabs with a cutter tool and then they fit in relatively easy, with no need to remove door panel.
Last edited by reddsektor; Jan 19, 2022 at 12:29 PM.
Taking the old lights off is easy, just pry them off.
installing the new lights in the old one�s place, without removing the door panel, is very difficult; the 4 plastic tabs on the new lights are longer and thus can�t be jammed in there even with brute force.
I did what someone else recommended, which is to trim/cut off a little of the tabs with a cutter tool and then they fit in relatively easy, with no need to remove door panel.
Interesting. Maybe something changed in the design. I didn't have that problem installing mine that I bought in early 2020. Just need to be aware of how the tabs should be inserted.
OK thank you all for the tips and the link. I prefer a little more detail so I have added it all in here. I have the blessing of a car lift so you will see mine is up off the ground. This is not a requirement, but if you have the room, it was by far the number two investment I have ever made (first was my kids college).
1. Open the door and review the way the light is attached the best you can. You will recognize that there are what appear to be little tabs at the top, the portion facing the seat bottom. You can see the tabs in this photo clearly.
2. I had the most luck prying (gently) from the corners to release the top tabs. You will see that I did not have any fancy trim tools and so I old schooled with a little painters tape on the end of a flathead screwdriver. See photo below:
3. After you loosen one of the upper corners, then switch to the other side to loosen the other upper corner. Once both of the upper corners are loose, it will look like this:
4.Next, you just gently pull up and the bottom will come out. This will expose the electrical connection. The connection has two tabs that must simultaneously be squeezed before pulling the connection from the old fixture. Use caution here as I am sure the Stealership would stick you for a couple hours to replace these....see photo below of electrical connection:
5. Once you have disconnected the electrics, whip out your trusty Suncoast replacement and plug it right in. Exact same connection, this you cannot screw up. I found that the easiest way to reinsert the new lights was to insert and seat the top edge securely where it goes. Top edge is indicated in the following photo and is identified as the area at the end of the screwdriver below:
6. So once you get the top edge seated well, this is where one might have some apprehension....you need to be a little bit forceful on this step. The top will go in easily, the bottom needs some elbow grease. So, once the top is seated in the correct position, I took the heel of my hand and pushed directly upwards until the bottom two clips fall into place. DO NOT HIT IT, constant gentle pressure, but with some force. Once they clip in you will know it.
That's it, you're done. Now go tell your wife that the Porsche is already saving you money as you are learning to make improvements all on your own without breaking anything.
The poster of this tutorial has no liability for the actions you take on your own vehicle.
yes it is...thank you...one thing that I would add...when pushing up the back side, seat one tab at a time...the two tabs are rather brutal if you do both at once..Instead of using heal of my hand (didn't work for me), I used a rubber end of wrench and used my knee to push it up.
You have to take the whole door panel off, which is easy to do. There are only 4 screws to remove. There are directions on here in a post about upgrading the speakers.
OK thank you all for the tips and the link. I prefer a little more detail so I have added it all in here. I have the blessing of a car lift so you will see mine is up off the ground. This is not a requirement, but if you have the room, it was by far the number two investment I have ever made (first was my kids college).
1. Open the door and review the way the light is attached the best you can. You will recognize that there are what appear to be little tabs at the top, the portion facing the seat bottom. You can see the tabs in this photo clearly.
2. I had the most luck prying (gently) from the corners to release the top tabs. You will see that I did not have any fancy trim tools and so I old schooled with a little painters tape on the end of a flathead screwdriver. See photo below:
3. After you loosen one of the upper corners, then switch to the other side to loosen the other upper corner. Once both of the upper corners are loose, it will look like this:
4.Next, you just gently pull up and the bottom will come out. This will expose the electrical connection. The connection has two tabs that must simultaneously be squeezed before pulling the connection from the old fixture. Use caution here as I am sure the Stealership would stick you for a couple hours to replace these....see photo below of electrical connection:
5. Once you have disconnected the electrics, whip out your trusty Suncoast replacement and plug it right in. Exact same connection, this you cannot screw up. I found that the easiest way to reinsert the new lights was to insert and seat the top edge securely where it goes. Top edge is indicated in the following photo and is identified as the area at the end of the screwdriver below:
6. So once you get the top edge seated well, this is where one might have some apprehension....you need to be a little bit forceful on this step. The top will go in easily, the bottom needs some elbow grease. So, once the top is seated in the correct position, I took the heel of my hand and pushed directly upwards until the bottom two clips fall into place. DO NOT HIT IT, constant gentle pressure, but with some force. Once they clip in you will know it.
That's it, you're done. Now go tell your wife that the Porsche is already saving you money as you are learning to make improvements all on your own without breaking anything.
The poster of this tutorial has no liability for the actions you take on your own vehicle.
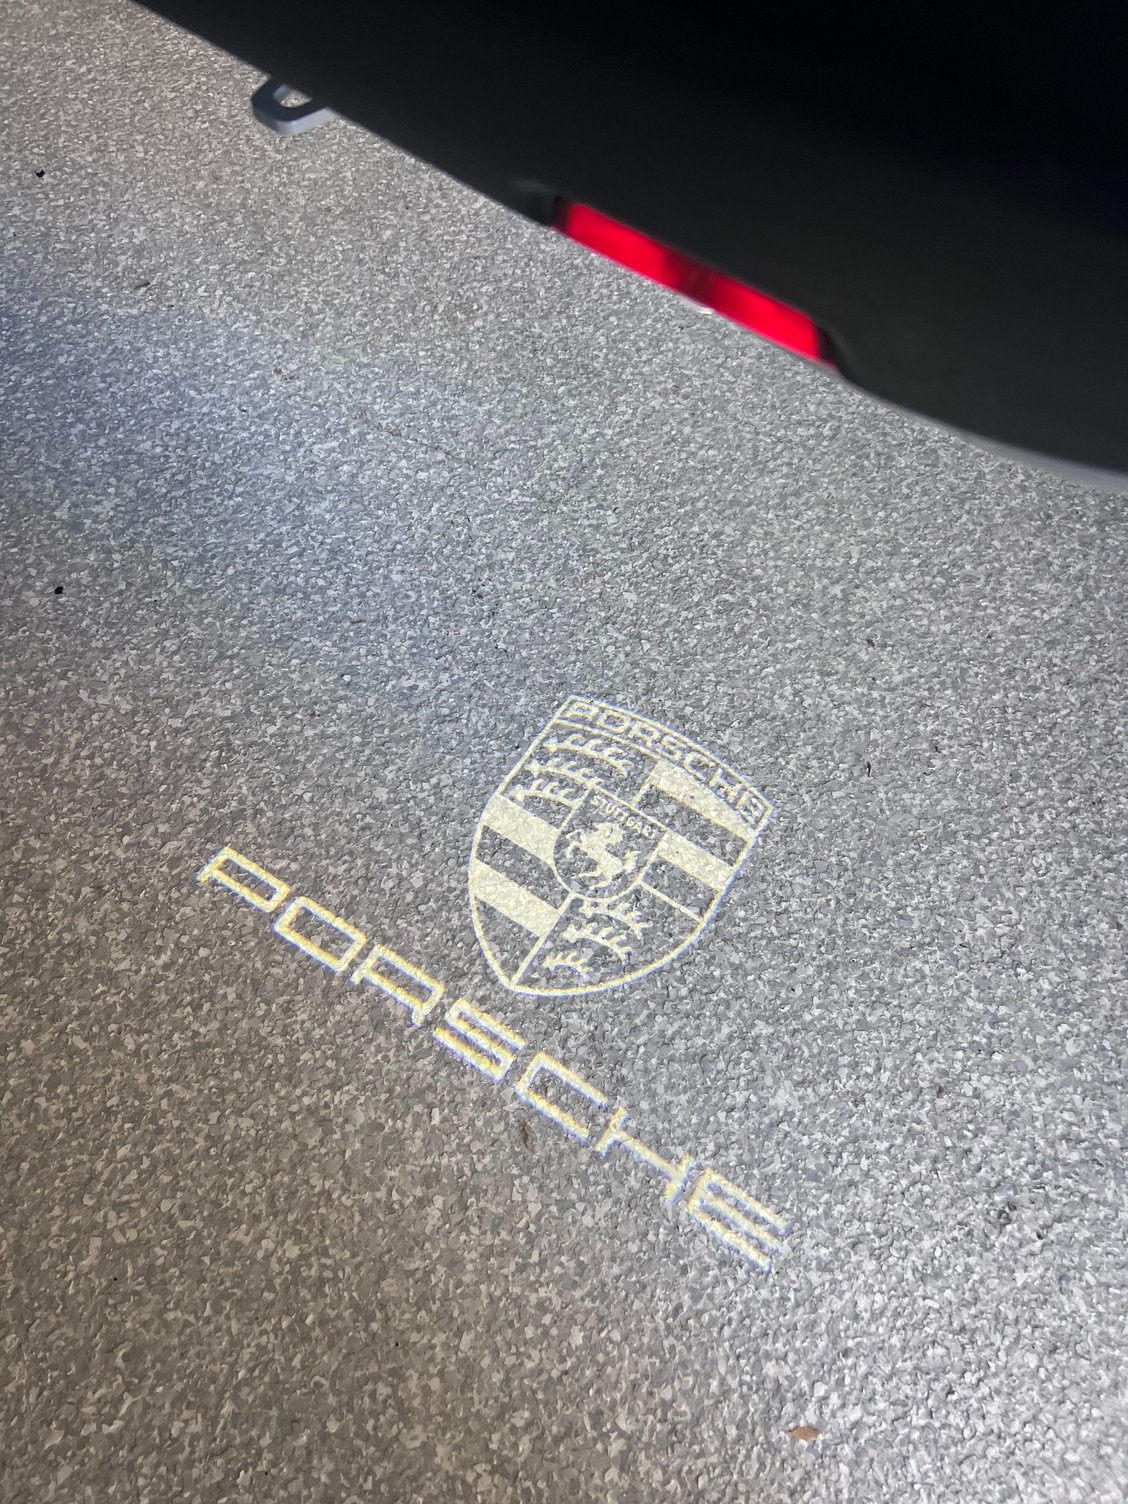
I followed these instructions with one variation and it took 5 minutes to pull out and put back. My one change was, when re-installing, I put bottom in first and then gently pressed on top and they just snapped in. The top seem to be a bit easier to engage. I figured if they came easiest by prying the top, then that would be the easiest to snap in last. It worked and now I have custom puddle lights.
One of those jobs that seems easy after the fact, not during :-). Not one I'd like to repeat.
When taking the old ones off, with plastic pry tools, the lenses fell off but could be replaced undamaged.
I fitted the new Porsche ones, bottom edge first (as impossible to do with top edge) applying brute force one clip end at a time.
Replacements don�t clip in. Might try this next later.
Originally Posted by reddsektor
Taking the old lights off is easy, just pry them off.
installing the new lights in the old one�s place, without removing the door panel, is very difficult; the 4 plastic tabs on the new lights are longer and thus can�t be jammed in there even with brute force.
I did what someone else recommended, which is to trim/cut off a little of the tabs with a cutter tool and then they fit in relatively easy, with no need to remove door panel.
This is what I found. The originals have sprung plastic clips, the replacements are not sprung � impossible even with plastic tools.
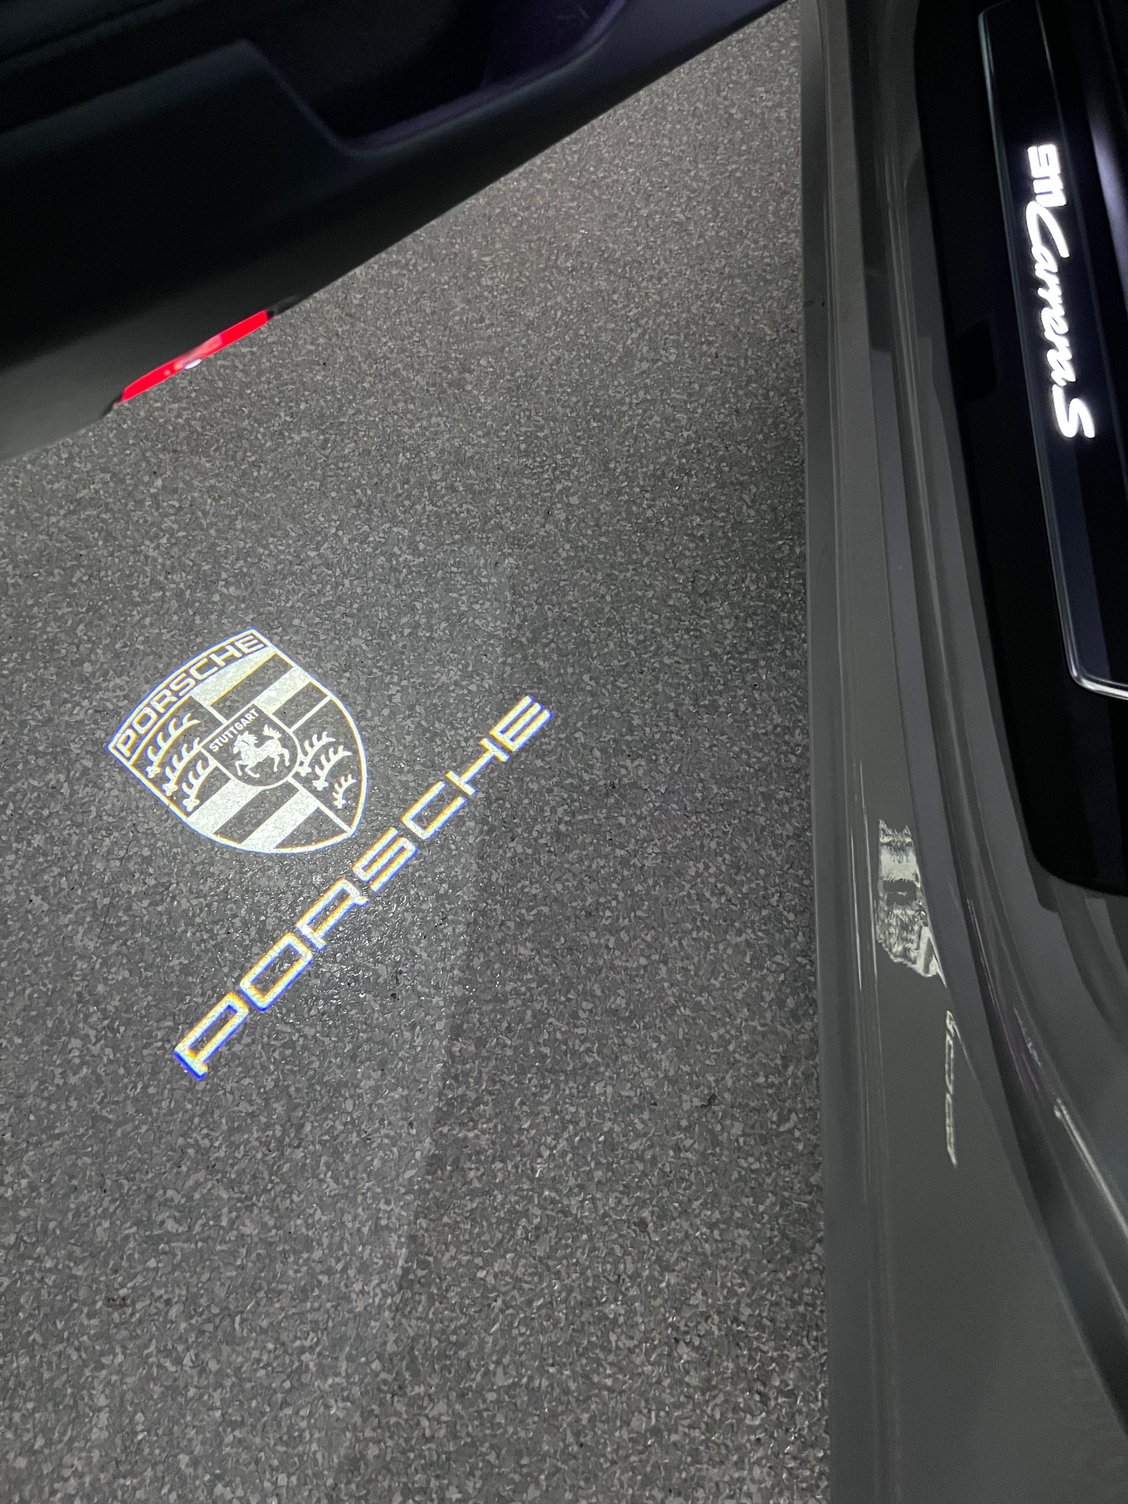
Thanks to others describing the process above it took about 2min per side (3min first side 1 min second side) to remove original ones and install Custom Puddle Lights.
The key was to make the bottom tabs seat well, gently pushing you hear or feel a little pop when the bottom is in place.
After bottom tabs were seated, top tabs popped in quickly using pressure with thumb only. Use one arm to counterhold the door from swinging open, the other to press the puddle light in place.
This method eliminated need for tab modification or wrestling.
I must've gotten lucky because when I changed mine a month ago, I was able to jam it in there and they both went in. Yes. I had to put all my might into it, but they both managed to click into place.