When you click on links to various merchants on this site and make a purchase, this can result in this site earning a commission. Affiliate programs and affiliations include, but are not limited to, the eBay Partner Network.
I'm not sure why everyone is going through this convolution. Why not attach the charger to the battery posts directly? I know it's a pain removing the huge plastic shroud... but, I'm assuming you need to leave the window open to run the power connection, so whether it's that or the frunk being open (I just place a clean sheet to protect it from dust etc. what's the difference? I must be missing something obviously
siberian
Just a few points:
The Porsche owner manual says you should connect to the battery "+" and to the car mass for the "-". So some people prefer connecting viat the accessory outlet in the passenger footwell, which avoids removing the "plastic shroud".
However, with LiFePO4 batteris, it is safe to connect directly to the battery"-" (official Porsche statement). So your suggestion is valid, just have to pass the cable through the "vents" in the plastic shroud.
When connecting via the accessory outlet in the passenger footwell, you do not need to leave anything open. You just close the passenger door on/over the charger cable.
As far as I am concerned, I use one method or the other, indifferently; I have connected a CTEK Comfort Connect Indicator Eyelet (M8) cable directly to the battery, passed it through the vents in the plastic shroud and, when I use it, the charger cable goes to the connector via the top of the frunk (where the wipers are); no need to keep the frunk open.
Hola Joan, and thank you for your comment. In actual fact there is a decal on the battery that shows not to connect to the negative terminal - a good practice for any type of battery whether wet,, AGM or LiFeP04. I just didn't understand why folks were going through all this. Chau
I have both chargers and tried both methods to charge using the 12V accessory outlet in the passenger footwell.
To charge successfully with the Porsche Charge-O-Mat Pro, you must lock the car.
To charge successfully with the CTEK Lithium XS charger, you must not lock the car.
Please note that the CTEK "cigarette lighter" adapter for the charger (CONNECT - Cig Plug) has a label that says explicitely "DOES NOT WORK WITH CAN BUS".
CONNECT� Cig PlugConnect � Cig Plug is an easy to fit adapter that allows charging from a CTEK compatible charger through the 12V cigarette lighter or accessory socket. 400mm cable length.
Compatible with all CTEK chargers up to 7A.
Connect � Cig Plug is a universal model that fits both 12 mm and 21 mm sockets.Part no. 56-263 Note: Socket must be powered even when ignition is in "off" position
I use the Porsche Charger for my lithium battery. I�ve tried all the suggested procedures. Connecting with the ignition set to accessory and giving it a minute or so before turning the ignition off works about 80% of the time, whatever the order of wall, ignition and 12V connection might be. The only foolproof has been to connect to the 12V and wall (either order) with the car running. The added benefit is it works with or without locking the car.
Direct to battery and separate negative post is the way to go. Don’t worry about sequence or whether doors locked. There are plenty of areas where the wire will fit through the shroud/cover(plug too bulky, but pass wire before connecting). You never have to remove the shroud to plug in! There’s a separate connection for negative, away from the battery. DO use a cloth if wire might rub against your car (suggestion I got from McLaren dealer when I thought McLaren was the GOAT. Didn’t use on wife’s Macan and it has micro scratches).
Last edited by markjeansonne; 04-25-2021 at 04:01 PM.
Yes (good catch! sharp eye!)
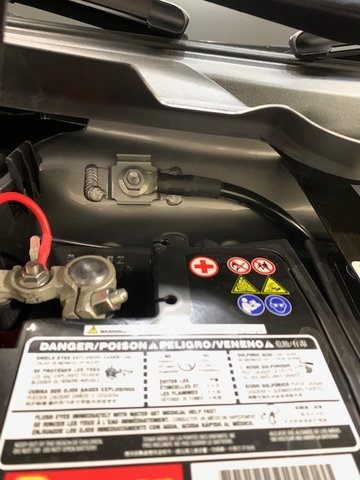
There is a fixed bolt coming out of the vehicle that was larger than the eyelet.Didn't want to loosen the bolt fixed to the body of the Porsche; and didn't want to splice the wiring to my tender connector, so cut the eyelet and then it fit perfect.
Last edited by markjeansonne; 04-25-2021 at 09:30 PM.
There is a fixed bolt coming out of the vehicle that was larger than the eyelet.Didn't want to loosen the bolt fixed to the body of the Porsche; and didn't want to splice the wiring to my tender connector, so cut the eyelet and then it fit perfect.
How do you ensure a snug connection between the cut eyelet and the bolt? Did you use plyers to close the open eyelet over the bolt? IS the contact good (durably good)??
Also, have you tried to unscrew the bolt, place a non cut eyelet below and then screw the bolt back? This is possible on BMWs, apparently.
Difficult to explain, but you see one bolt in the pic. That screws into the fixed bolt (for lack of a better word). So I should have explained that a bolt screws back over a fixed bolt.
Anyway, the bolt you see is larger than the eyelet. Hard to see from the pic, but the bolt that screws down has a sleeve, and that sleeve has to press the eyelet down unto the fixed bolt. The eyelet wrapped around the bolt good and everything was screwed back tight. Let me know if you want detailed pics of the bolts unscrewed; or check it out on your 992.
Last edited by markjeansonne; 04-26-2021 at 10:30 AM.
Difficult to explain, but you see one bolt in the pic. That screws into the fixed bolt (for lack of a better word). So I should have explained that a bolt screws back over a fixed bolt.
Anyway, the bolt you see is larger than the eyelet. Hard to see from the pic, but the bolt that screws down has a sleeve, and that sleeve has to press the eyelet down unto the fixed bolt. The eyelet wrapped around the bolt good and everything was screwed back tight. Let me know if you want detailed pics of the bolts unscrewed; or check it out on your 992.
OK, and many thanks,
If I understand you correctly, the "bolt" has two parts:
A "removable sleeve" with a hex ending at the top;
A "fixed part" of the bolt.
I suppose you can slip an eyelet over the "fixed part" of the bolt if the diameter of the eyelet opening is sufficient. I assume an 8mm diameter is insufficient but maybe a 10mm diameter would fit.
Then you can reattach the "sleeve" over the "fixed" part of the bolt and screw tight to secure the eyelet.
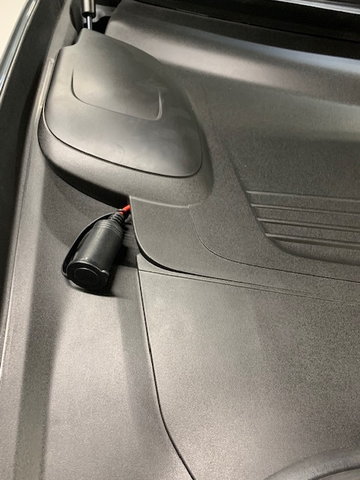
This is how I put the 12v charger coming out of the Frunk.
I can see per the battery instructions Porsche does not recommend putting the negative on the negative terminal on the battery but rather than put it on the designated bolt, do you think its is possible to put it on this bolt (see the picture). It is the bolt that is bolted to the frame.
If you follow the cable, it connects back to the negative but that cable has what looks to be a fuse or regulator so it doesn't look like it would damage the battery. Thoughts?
Direct to battery and separate negative post is the way to go. Don�t worry about sequence or whether doors locked. There are plenty of areas where the wire will fit through the shroud/cover(plug too bulky, but pass wire before connecting). You never have to remove the shroud to plug in! There�s a separate connection for negative, away from the battery. DO use a cloth if wire might rub against your car (suggestion I got from McLaren dealer when I thought McLaren was the GOAT. Didn�t use on wife�s Macan and it has micro scratches).
Is that coming out of your frunk/hood all the time, with a cap maybe? so that you don't have to pop the frunk to use it?
If so, doesn't it rattle in there. And did you feed it through a hole or make that hole for the cabling?
3dpedal, yes coming out of frunk, near windshield, do NOT have to pop the frunk.
No rattle. Yes has cap for when disconnected and driving in weather. I fed the wire end through a small pre-existing hole,
see pics again.
1. Plug into the footwell socket
2. Turn on the ignition accessories, without starting engine. Left it on for 1 min. or so and then do step 3
3. Plug the charge-o-mat pro to wall socket
4. Green light should be on
5. Select mode and choose li-ion (or car icon -Agm)
6. The charger will briefly cycle thru the battery charge level capacity. Wait for 1 min. or so and then do step 7
7. Turn off the ignition accessories.
8. Lock the car. (*)
(*) the very first time when I was doing it, I did NOT lock the car at all and after 30+ mins, the charger was shut off automatically as the light was blinking green.
Therefore, this was my own experience on how I got this maintainer working. I�m aware this thread has others said the unlocked of doors will also work as well, so do try both ways to see which one will ultimately work for you .
Last edited by bobblehead; 05-02-2021 at 06:00 PM.


 04-25-2021 | 12:24 PM