When you click on links to various merchants on this site and make a purchase, this can result in this site earning a commission. Affiliate programs and affiliations include, but are not limited to, the eBay Partner Network.
I'm looking to replace my side mirror shells (the painted part), and I was wondering if anyone has step by step instructions or a guide on how best to do this.
This is for 991.1/981.1 - non-sport design mirrors
My best guess is to somehow pop out the mirror pane, unscrew the screws holding the motor to the shell, and then remove the tabs and housing upwards.
I've found a video of a 991 owner removing the entire mirror assembly from the door, but that still keeps the whole thing attached to the black plastic base. I'm looking to replace just the painted part. I've searched on this forum and any other Porsche related forums.
Any thoughts?
(Thanks in advance)
there are a couple of youtube videos on disassembly of mirrors on other Porsche models. Otherwise closest i found was below, but no photos
Sequence for removing the mirror housing or "clamshell":
1. Remove mirror
2. Remove adjusting motor
3. Remove entire housing from door
There are a few screws that you'll have to remove first (once you have the mirror and motor out), then use a nylon wedge tool to separate the cover from the rest of the assembly. Should pop right off.
This is for 991.1/981.1 - non-sport design mirrors
My best guess is to somehow pop out the mirror pane, unscrew the screws holding the motor to the shell, and then remove the tabs and housing upwards.
That's basically it.... The mirror can be pulled from the housing easily (push inwards on the outside or pointed edge of mirror while pulling outwards gently on the "inside" or closest-to-door window edge of mirror, then unclip wire connectors - I think there are two of them...). There are three screws holding the motor in place... and one pull-off plug.
LexVan, I did come across that page but it wasn't apparent how STG disassembled the sport design mirrors...and it didn't occur to me to reach out to him to ask how the disassembly process works--thank you! He could be a great resource.
For or the rest of the replies, your advice and links are along the same lines as what I've researched so far, so it's reassuring. I'll take my best stab at it and report back when I've discovered more. of there's anything else that comes to mind, please let me know.
Thank you to all the recommendations here. RoWa, you’ll be glad to hear that the process is very straightforward and quite simple, exactly as described from the posts above. On a scale of 1–10, I would put this at a 2-3 with the help of a second person (depending on your lighting situation).
I will post the process and hopefully a couple of pictures shortly.
I finally found some time to write out the detailed process and attach a few step by step images to make things easier for those who might want to do the same thing I did.
Overview:
Removing the upper (painted) portion of the side mirrors from the 991/981 models. This is NOT for the sport design mirrors, but the standard mirrors.
It�s super straightforward. I�d say about 2-3 difficulty on a scale of 1-10. The instructions walk through the process for one side...repeat for the other mirror.
What�s required:
Torx T10
Optional: Bubble wrap/cloth and tape, and a second person to help
Step 1:
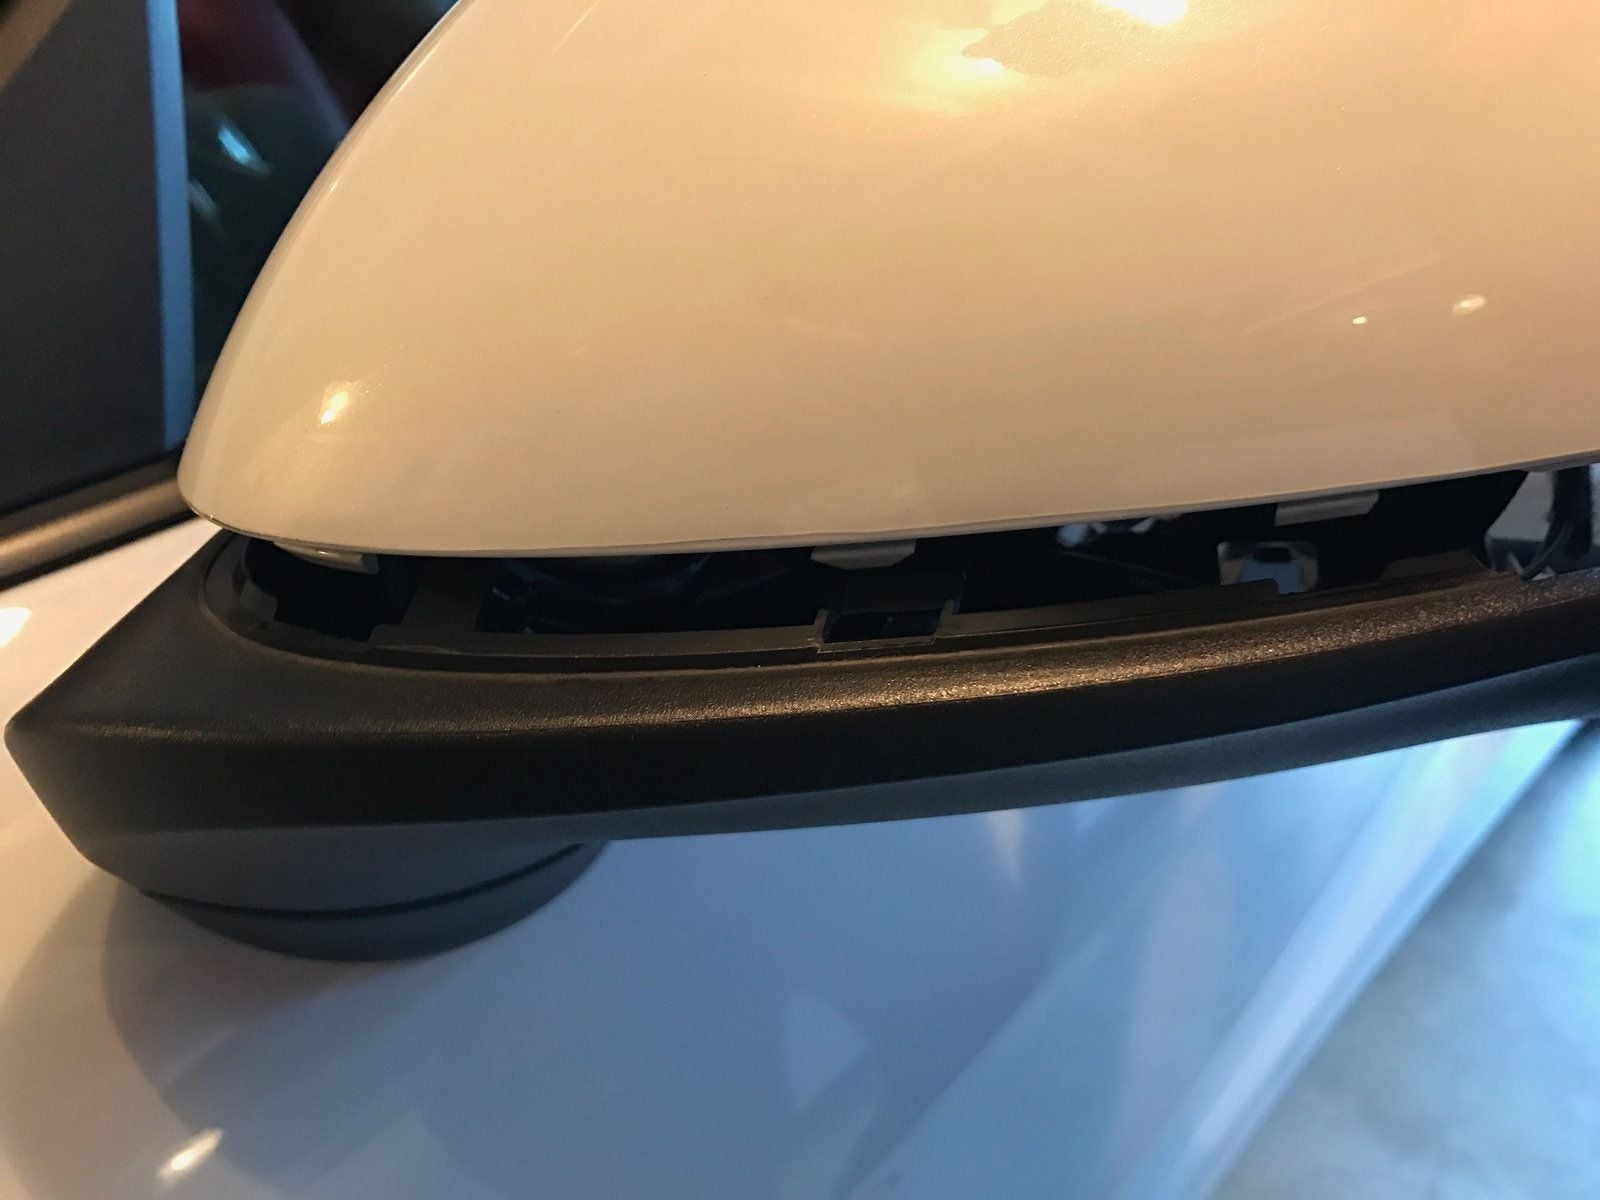
With the power turned on, turn the mirror glass outwards, so that the mirrors point as far as possible AWAY from the car. Then use your finger, or a plastic trim removal tool and gently pry the mirror away from the housing. Don�t be afraid to put a little force into it. If done correctly you should hear a little pop (that�s the mirror coming free from the motor) and the angle even more extreme than it was before.
Step 2:
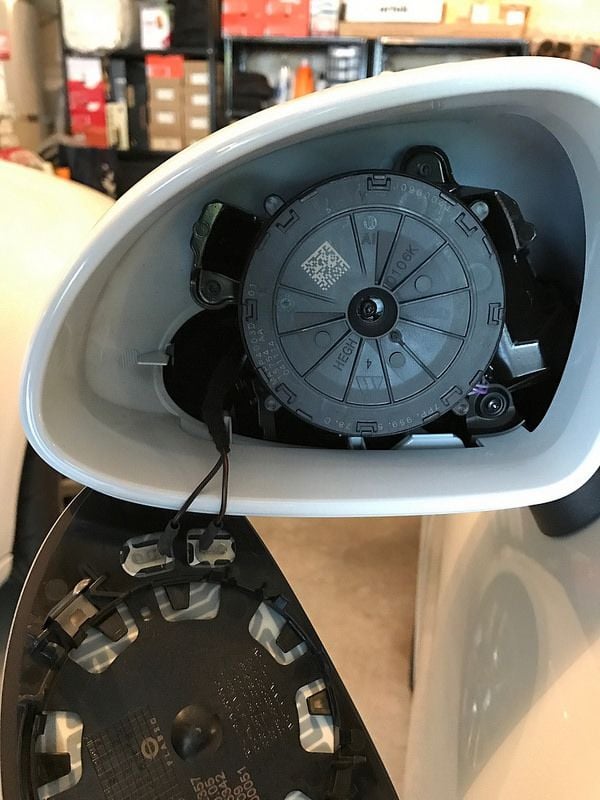
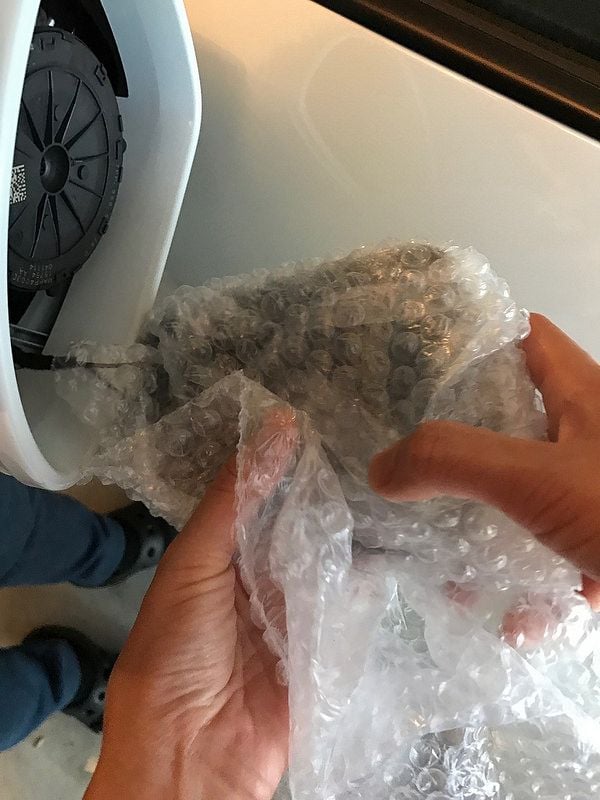
Some instructions have you removing the wire connectors from the mirror. I couldn�t figure out how to remove them without ruining it, so I just let the mirror dangle and continue with the disassembly. I still had full access to everything I needed, so just to be safe, I bubble wrapped the mirror so it wouldn�t scratch or hit anything. From this point, you can see the motor sitting inside the mirror housing.
Step 3:
I placed a microfiber towel on the roof as a work surface, and a place to store the torx screws. In the above photo, you should be able to make out 4 screws in total. There is one in the center of the motor (a long one) holding the motor to the housing, and three around the perimeter that connect the painted mirror piece to the motor housing. Remove all four. Keep track of the long motor screw as well as the screw that�s closest to the mirror arm. Once all screws are removed, take out the plastic piece that was held in by the screw closest to the arm. You�ll reuse it upon reassembly. Also note that the screw for this piece has different threads in comparison to the others. Just keep this screw and the black plastic piece together as a pair.
Step 4:
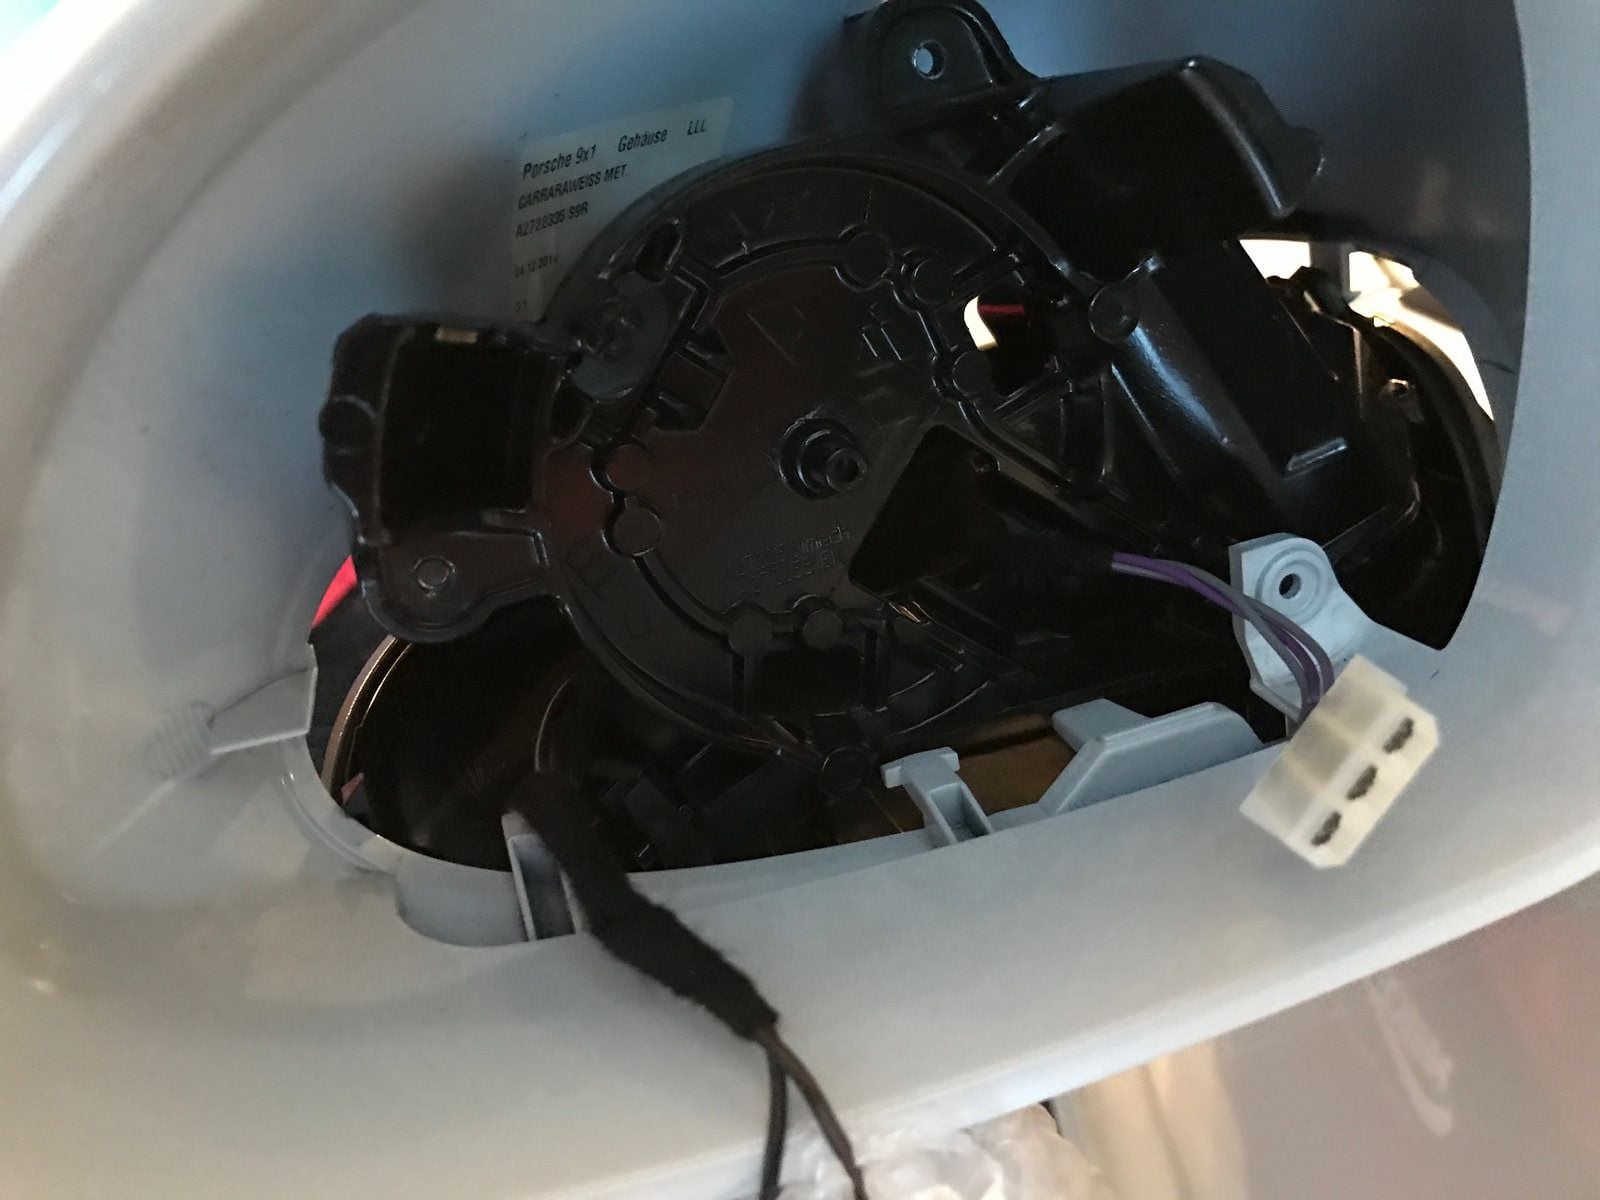
Once you have the motor released from the housing, unplug the wiring harness from the behind the motor. Place the motor in a safe place. You�ll notice a couple tabs that are �holding in� the painted mirror housing. Gently pry these tabs outward to allow for the release of the painted housing. Don�t pry too much or they will break. Once the motor is out and the tabs are �freed� then pull the housing upwards. It should come free relatively easily without too much force. Don�t be intimidated by the number of tabs on the mirror housing...you won�t need to pry every one. The whole thing should come upwards quite easily.
Step 5:
That should be it! When removing the housing, just pull upwards and work the hanging mirror lens through the housing. The last picture shows what it looks like when everything is disassembled. To put things back together just go in reverse order. The motor should self center when reinstalled and the mirror will pop in quite easily�just try to match the original angle that it was removed from. NOTE: Don�t forget to put the little black plastic piece on the screw hole (closest to the mirror arm) before putting the last screw in!
I had my wife as a helper with a flashlight and to hold things in place as I was unscrewing the torx screws. Having a second person is not necessary if you�re careful and taking things slowly as not to scratch or drop anything.
Total time is about 15-20 min per side going slowly.
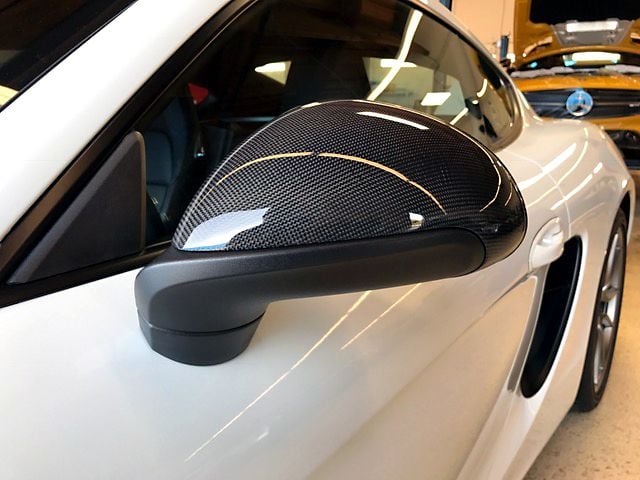
I replaced the white painted bit with a CF piece. I wanted a bit more contrast on the entirely white car, so I swapped my wing and mirror housings for CF.
I replaced the white painted bit with a CF piece. I wanted a bit more contrast on the entirely white car, so I swapped my wing and mirror housings for CF.
Did you also replace the black plastic lower part of the mirror housing with CF? That's the piece that I need to swap out as previous owner scratched it up pretty bad (how idk)
RoWa, I did not replace the black plastic lower part. I didn’t have to as I was just replacing the painted upper housing. For a step by step guide to removing the whole mirror arm, here’s a video of how to remove the entire mirror arm from the door:

 10-07-2016, 11:43 PM


 )
)