

991 DIY: Rear Bumper Debadging
 03-12-2014, 04:32 PM
#1
Rennlist Member
Thread Starter
Thought I would take snaps of the process. I'm not innovating...got the technique from here and on YouTube.
This is the Heat Gun, Fishing Line and 3M Adhesive Remover Technique.
What you will need:

Clean off the area with your cleaner and towel (unless you just washed it like me)
Using the heat gun on LOW, and keeping it at least 4" away from the surface, heat up a letter at a time. Wave the gun back and forth over the letter - I believe this should prevent the letter or paint from getting to hot in one area, possibly then bubbling.

After about 2 minutes check for wiggle. The letter should move a bit if you try and twist it within the plane of the bumper surface. If it doesn't wiggle heat some more until it does.

Once it wiggles take your fishing line and you will slowly "floss" it off of the surface. Pull the line up and away from the paint.
NOTE: Avoid letting the letter cantilever an edge over into the paint as you pull the line across. The edges of the letters are sharp and will dig into your clearcoat and paint leaving a mark.
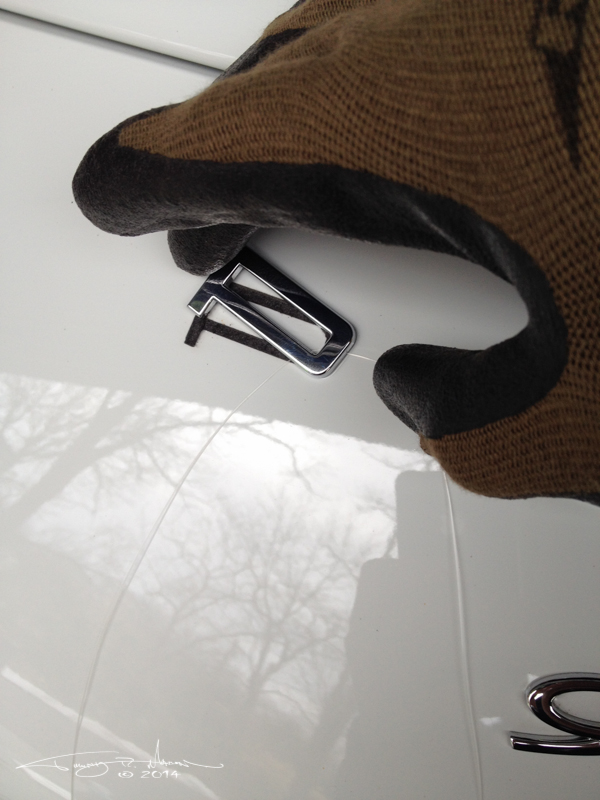
If the letter comes off easily you're doing it correctly. If it takes a lot of force to move the line underneath the letter, get it warmer with the gun.
When you get to the "Carrera" badge take it slowly. I had to heat up about 1/2 of it, drag the line through, stop, heat up the remainder and then pull the line fully through.
CAUTION: Do not pull up on the Carrera badge...it will bend if it's warm!

Instead of going right to the 3M cleaner for removing the rest you can pull up the adhesive. Heat it up with the heat gun and gently pull up.


All gone...

Now clean off the residual with the towel and the 3M adhesive cleaner. And then apply and remove your favorite wax.


Before...

After...

This is the Heat Gun, Fishing Line and 3M Adhesive Remover Technique.
What you will need:
- 3M Adhesive Remover
- Fishing Line (works better than dental floss)
- Heat Gun (preferably with Low and High settings)
- Microfiber Towel
- Liquid Cleaner (I used clay bar lubricant just to wipe up dirt)
- 3M Nameplate Repair Tape (if you plan to re-badge some portion)
- Your favorite Wax of choice
Clean off the area with your cleaner and towel (unless you just washed it like me)
Using the heat gun on LOW, and keeping it at least 4" away from the surface, heat up a letter at a time. Wave the gun back and forth over the letter - I believe this should prevent the letter or paint from getting to hot in one area, possibly then bubbling.
After about 2 minutes check for wiggle. The letter should move a bit if you try and twist it within the plane of the bumper surface. If it doesn't wiggle heat some more until it does.
Once it wiggles take your fishing line and you will slowly "floss" it off of the surface. Pull the line up and away from the paint.
NOTE: Avoid letting the letter cantilever an edge over into the paint as you pull the line across. The edges of the letters are sharp and will dig into your clearcoat and paint leaving a mark.
If the letter comes off easily you're doing it correctly. If it takes a lot of force to move the line underneath the letter, get it warmer with the gun.
When you get to the "Carrera" badge take it slowly. I had to heat up about 1/2 of it, drag the line through, stop, heat up the remainder and then pull the line fully through.
CAUTION: Do not pull up on the Carrera badge...it will bend if it's warm!
Instead of going right to the 3M cleaner for removing the rest you can pull up the adhesive. Heat it up with the heat gun and gently pull up.
All gone...
Now clean off the residual with the towel and the 3M adhesive cleaner. And then apply and remove your favorite wax.
Before...
After...

The following users liked this post:
dak911 (06-06-2023)
03-13-2014, 10:02 AM
#2
Banned

Join Date: Jan 2013
Location: Chicagoland Area
Posts: 26,141
Likes: 0
Received 5,414 Likes
on
2,517 Posts
Great work & write-up. This will help a lot of enthusiast going forward.
 03-13-2014, 12:13 PM
#4
Rennlist Member
Join Date: Dec 2013
Location: canada
Posts: 674
Likes: 0
Received 0 Likes
on
0 Posts
03-13-2014, 12:30 PM
#5
Burning Brakes
great DIY and especially well put together visually for us. Thanks. I'd do this also, but I still love the contrast with the plasti-dip emblem against the anthracite brown. Your post makes me want to try naked though, hehe. Cheers!
03-13-2014, 12:43 PM
#6
Banned
Join Date: Jan 2013
Location: Chicagoland Area
Posts: 26,141
Likes: 0
Received 5,414 Likes
on
2,517 Posts
03-13-2014, 01:18 PM
#7

Great job! I ended up leaving just the P O R S C H E emblem on my car.
Your method is a lot better than mine. I used dental floss which just kept breaking apart, hot water from my water heater (don't have a heat gun), and a little bit of WD-40 to remove the sticky residue.
Your method is a lot better than mine. I used dental floss which just kept breaking apart, hot water from my water heater (don't have a heat gun), and a little bit of WD-40 to remove the sticky residue.
Trending Topics
03-14-2014, 01:57 PM
#10
Rennlist Member
Thread Starter
and....I re-badged....was thinking it was just a little too naked back there.
What you will need:

Using the adhesive remover, coat the backs of the badge thoroughly and let stand for a few minutes so it soaks into the foam. Then with your fingernail and the scrub pad remove the remaining foam and adhesive.

Clean off the badges with soap and water and dry them.
Using the graph paper lay out your badges to be re-applied. I tried a few different orientations.


Once you get a layout you like take a long piece of cello tape and tack it down on the front face of the badges in their proper orientation.
Then turn it over.
Now cut the 3M Logo adhesive tape to fit across the backside of the badges. NOTE: There is a warning on the package telling you to not touch the sticky part of the 3M tape during the process. The badging is so small this is nearly impossible. So just make sure your hands are very clean and oil free. Or wear some silicon gloves.

Once you have it all in position press down firmly to ensure the tape is attached well to the backs of the badges.
Peel off the red liner material ry scraping up an edge with your fingernail or use a pair of tweezers.
Then "eyeball" the orientation on the car and tack it down. Press firmly to get the adhesive to adhere, then pull off the cello tape.
Viola!

What you will need:
- 3M Adhesive Remover
- A good strong fingernail
- Scrubby Dish Pad
- 3M Logo Tape
- Scissors (very sharp) or Exacto Blade
- Cellophane Tape
- Piece of Graph Paper
- Paper Towels
- Tweezers
Using the adhesive remover, coat the backs of the badge thoroughly and let stand for a few minutes so it soaks into the foam. Then with your fingernail and the scrub pad remove the remaining foam and adhesive.
Clean off the badges with soap and water and dry them.
Using the graph paper lay out your badges to be re-applied. I tried a few different orientations.
Once you get a layout you like take a long piece of cello tape and tack it down on the front face of the badges in their proper orientation.
Then turn it over.
Now cut the 3M Logo adhesive tape to fit across the backside of the badges. NOTE: There is a warning on the package telling you to not touch the sticky part of the 3M tape during the process. The badging is so small this is nearly impossible. So just make sure your hands are very clean and oil free. Or wear some silicon gloves.
Once you have it all in position press down firmly to ensure the tape is attached well to the backs of the badges.
Peel off the red liner material ry scraping up an edge with your fingernail or use a pair of tweezers.
Then "eyeball" the orientation on the car and tack it down. Press firmly to get the adhesive to adhere, then pull off the cello tape.
Viola!
03-14-2014, 03:17 PM
#12
Burning Brakes

I think the rear end looks way too naked (in an awkward way) with nothing on it. Yet I understand why some folks don't want 2 lines of buzy script.
The 911 S is awesome and very classy. I'd even think about a red S next to a stock 911 chrome.
The 911 S is awesome and very classy. I'd even think about a red S next to a stock 911 chrome.
05-21-2018, 08:32 PM
#13

[QUOTE=StudGarden;11212278]I think the rear end looks way too naked (in an awkward way) with nothing on it. Yet I understand why some folks don't want 2 lines of buzy script.
Thanks to all the contributors to this thread. You inspired me to change my lettering.
I just removed the 911 Carrera S script from my newly aquired car.
It has always seemed too busy and probably a non negotiable decision made by someone wanting to leave their mark on the series.
A couple of things I learned I hope will make things easier for others considering the change.
I was told a number of years ago by a sage mentor to always start with the least aggressive approach.
Sometimes things need to be relearned.
I went and bought a 2 level heat gun, 750 watts being the low. Got fishing line cut and started the change.
Being a type A personality, I rushed the heating of the letters by a bit. The fishing line did a fine job of taking them off.
After finishing and stepping back I noticed that there was a slight yellowing where I had worked.
Being a Carrara White car, I persume that the yellowing was much more evident due to the color than other posters with darker paint and more patience had experienced.
After kicking myself I went to the forums to find a solution.
The suggested use of Meguiers 105 seemed a good solution.
With the " use the least aggressive approach" fresh in my mind I chose Mirror Glaze 2 which is half the cutting power of 105 according to the container.
While it took several passes it did buff off the yellowing.
My original intent was after removing the "911 Carrera S" was to simply put back "911S" under the "PORSCHE".
But the cleanliness of only the "PORSCHE" has made me rethink.
Just be very careful, especially with light colored cars, to not overheat the letters.
In retrospect I would try a hair dryer 1st then move to a lower than 750 watt heat gun.
Last edited by AHnNC; 05-22-2018 at 07:01 AM.
05-22-2018, 01:29 PM
#14
My experience is slightly different. I've found it works better without applying heat. By better I mean the adhesive stays attached the lettering, and there is almost zero cleanup of residue. YMMV.