When you click on links to various merchants on this site and make a purchase, this can result in this site earning a commission. Affiliate programs and affiliations include, but are not limited to, the eBay Partner Network.
Looks really good! I'm a little biased though because I did the same thing on my dot 1...minus the exposed carbon. I was planning on just leaving the edge of the spoiler carbon but I ended up just painting the whole thing. I am digging you're exposed carbon edge though! Nice job!
Thats a solid plan. After you get up and running, could you temp the left and center and right radiators if you have an IR temp gun. Would be interesting to see where things are at. What year is your car?
Thanks. I don�t have an ir temp gun but if I pick one up I will be sure to get some temps for you. The car is a 2018 carerra t. My thought is that the main point of the vacuum fill valve tool is to keep air out of a sealed/bled system when refilling. Once the system has air in it (when the lines get connected) then it�s too late at that point to fill using the valve as the system will still need to be bled regardless.
Thanks. I don�t have an ir temp gun but if I pick one up I will be sure to get some temps for you. The car is a 2018 carerra t. My thought is that the main point of the vacuum fill valve tool is to keep air out of a sealed/bled system when refilling. Once the system has air in it (when the lines get connected) then it�s too late at that point to fill using the valve as the system will still need to be bled regardless.
Do you know if there is an old school manual bleed valve/lever that needs to be manually opened? In previous generations, this was right next to the coolant cap. I have not seen one on the 991.2.
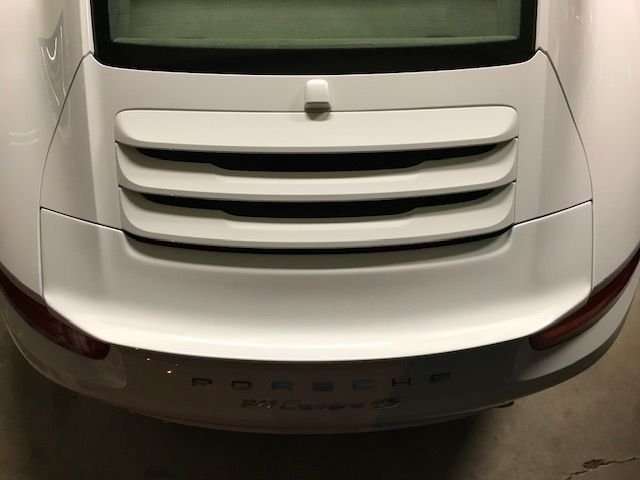
Nice job @polobai and @eroc0808 great idea to leave the rear end of the CF exposed - very nice touch.
For both, what did you do to fill the area where the spoiler lip meets engine lid to make it look as one piece. Assuming you used body filler, sanded, and then painted. Approximate cost to get it done?
Thanks. I don�t have an ir temp gun but if I pick one up I will be sure to get some temps for you. The car is a 2018 carerra t. My thought is that the main point of the vacuum fill valve tool is to keep air out of a sealed/bled system when refilling. Once the system has air in it (when the lines get connected) then it�s too late at that point to fill using the valve as the system will still need to be bled regardless.
You can get by without vac filling the coolant but it is a pain. You are going to introduce air and lose more coolant than you think when you do the connections. Prefill the radiator so you know exactly how much it takes and capture any that comes out of the car so you know exactly what was lost. To get the air out you have to open the bleeder valve near reservoir and warm car up to temperature watching the gauge closely as when you hit an air pocket the temp will climb rapidly to overheat. Once it comes to temp shut off and let cool completely (a few hours). Open fill tank and top up coolant and repeat warm up again until you can't add any more coolant and you added exactly the amount needed for new radiator and what was lost. When warming the car up you will have to drive it around so you bounce and disturb any trapped air. This method worked for me but took about 5 or 6 warm up drive cycles before it was perfect. However, I did drain a lot more coolant than you because I had to change the thermostat so I'm sure yours should bleed out quicker. Good luck!
You can get by without vac filling the coolant but it is a pain. You are going to introduce air and lose more coolant than you think when you do the connections. Prefill the radiator so you know exactly how much it takes and capture any that comes out of the car so you know exactly what was lost. To get the air out you have to open the bleeder valve near reservoir and warm car up to temperature watching the gauge closely as when you hit an air pocket the temp will climb rapidly to overheat. Once it comes to temp shut off and let cool completely (a few hours). Open fill tank and top up coolant and repeat warm up again until you can't add any more coolant and you added exactly the amount needed for new radiator and what was lost. When warming the car up you will have to drive it around so you bounce and disturb any trapped air. This method worked for me but took about 5 or 6 warm up drive cycles before it was perfect. However, I did drain a lot more coolant than you because I had to change the thermostat so I'm sure yours should bleed out quicker. Good luck!
What year do you have? Where is the coolant bleeder valve? Thanks
I have a 2013. I think its the same on all years though, but not certain. You have to remove the fan shroud and look in under the panel where the oil fill cap is located. The bleeder is in the coolant pipe coming from the reserve tank. Its just a small metal tab clip that you lift up.
Nice job @polobai and @eroc0808 great idea to leave the rear end of the CF exposed - very nice touch.
For both, what did you do to fill the area where the spoiler lip meets engine lid to make it look as one piece. Assuming you used body filler, sanded, and then painted. Approximate cost to get it done?
Thanks.
For mine, my body guy used a two part epoxy to �bond� the pieces together, sanded smooth and then finished off with filler, sanded and paint. All in, the spoiler was $300 on eBay and the bodywork/paint ran about $500. All in about $800. Prices for the bodywork/paint will vary depending on the shop and type of paint used.
For mine, my body guy used a two part epoxy to �bond� the pieces together, sanded smooth and then finished off with filler, sanded and paint. All in, the spoiler was $300 on eBay and the bodywork/paint ran about $500. All in about $800. Prices for the bodywork/paint will vary depending on the shop and type of paint used.
Pretty much the same here accept I used �Norton structural urethane� adhesive to bond it. I bought a used beat spoiler off eBay for $80 to use as the base so I can go back to stock at anytime with my original spoiler untouched. I wish I bought the cheap spoiler to mould in but I wasn�t planning to mould it originally so it�s an expensive vorsteiner that�s buried in there. Lol.

 07-05-2019, 11:43 PM