When you click on links to various merchants on this site and make a purchase, this can result in this site earning a commission. Affiliate programs and affiliations include, but are not limited to, the eBay Partner Network.
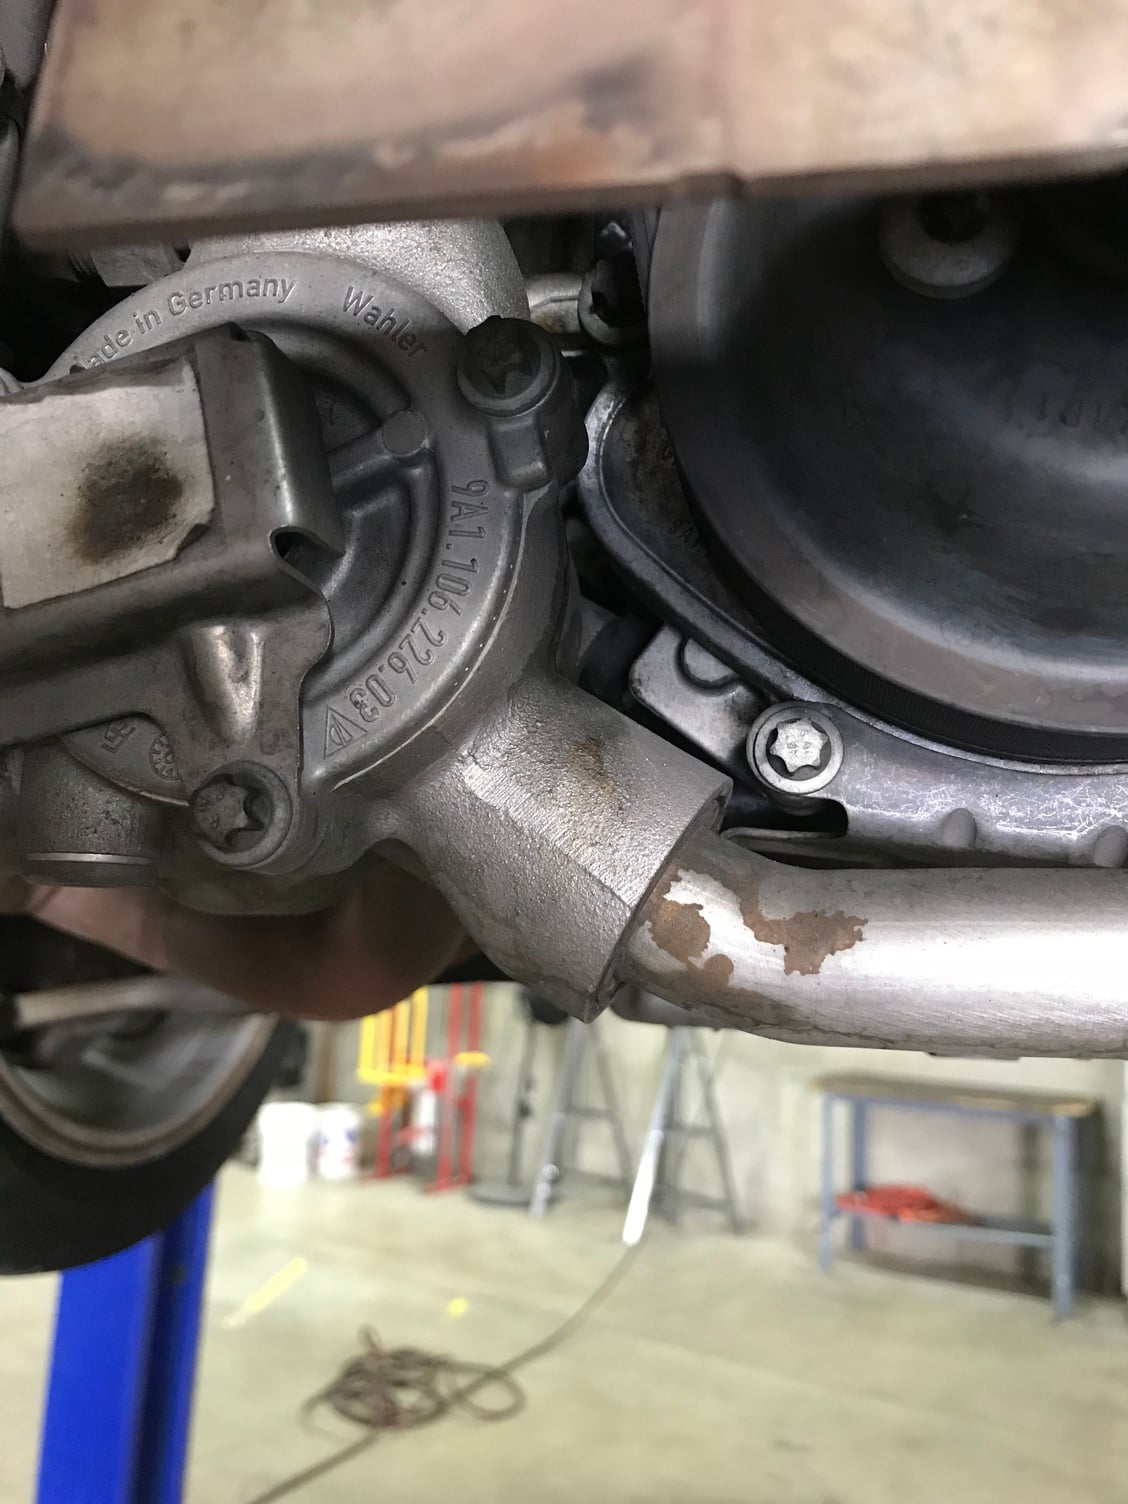
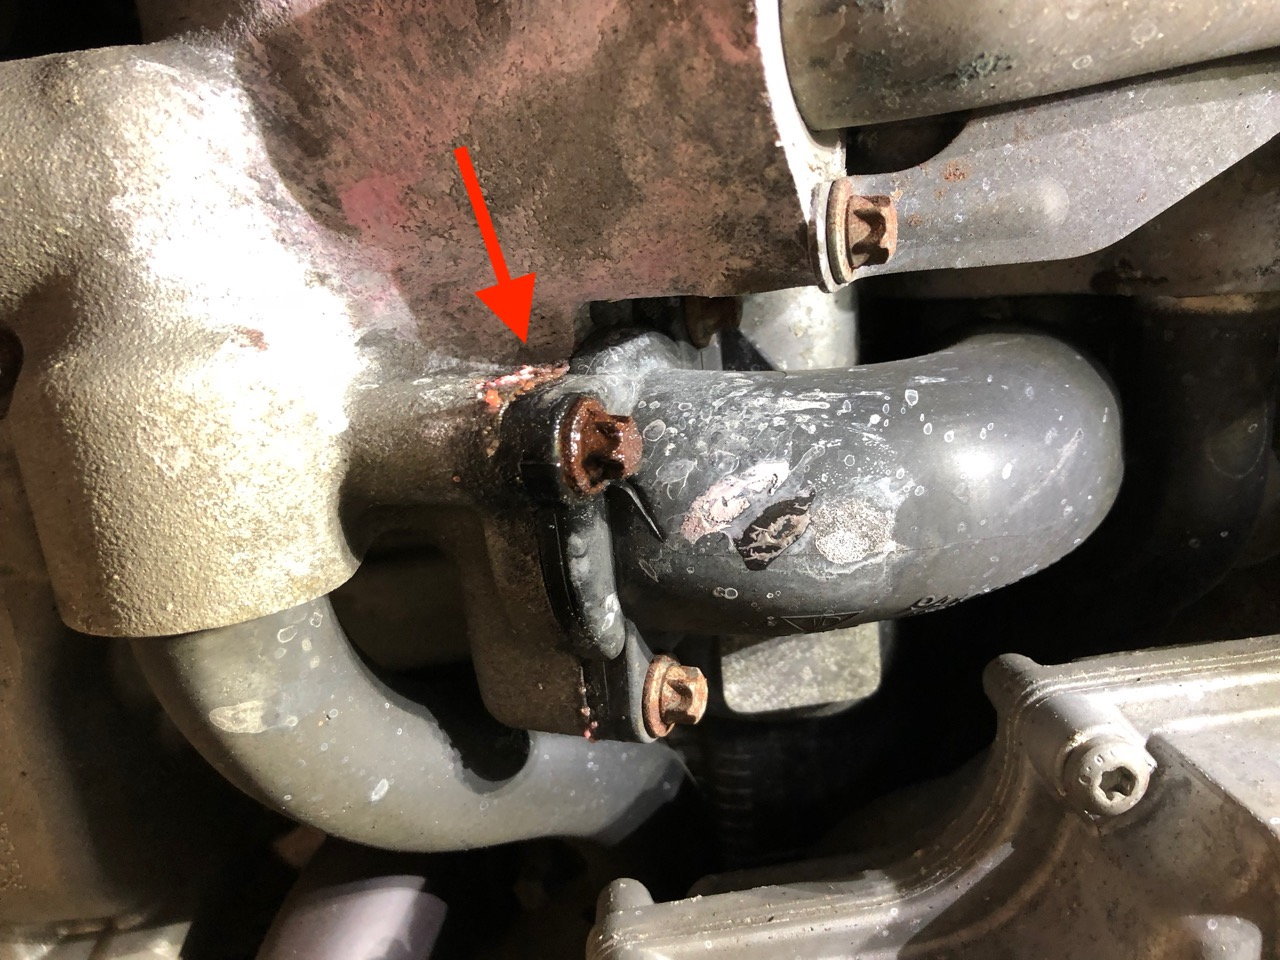
2013 Cabrio S. Just found a small puddle of coolant behind the rear driver wheel after being parked for a few hours. Looks like it's coming from the junction of a plastic pipe into the thermostat housing. Coolant level is still at max.
From a quick search looks like this might be a common problem? Anyone know a fix or seen this issue?
I'm about to try and tackle the 4 yr maintenance myself so I'd also like to address this at the same time.
Just had exactly the same problem - 4 year maintenance as well. It's straightforward to fix, though you need to follow the workshop manual to get all the pipes out in the right order and to use the correct torque settings. You'll need to replace a neoprene seal inside the black plastic pipe and I also replaced some other O-rings as recommended in the service manual.
The big problem is bleeding the air out the system afterwards! It took me about 4 days to do this properly - drive around a bit, top up, wait for it to cool down overnight. Repeat until the coolant level is correct. Porsche recommend using a vacuum filler to avoid this problem. From my experience, it would be a good thing to have. It certainly would save a lot of time (and coolant all over the floor - you really do have to wait for the engine to cool. Ask me how I know ...
Yes I've gone through the workshop manual and it does seem like draining the coolant on this car is a pain! Good to know someone has done it successfully.
I'm starting to get worried because In the manual it specifies that you need the Porsche PIWIS computer to bleed the cooling system after a flush. Even after using a vacuum filler.
Did you not find this necessary? Did the periodic top-ups accomplish the same thing? I was thinking I could do everything else and then bring it to a dealer to do the computer bleed?
You don't need PWIS - I think that just makes things easier and faster for the dealer.
I got the parts from a Porsche dealer. The main bit you need is #12 (p/n 9A1 106 215 00) in Water Pump & Thermostat housing
It's the only bit you really need. I did get some O-rings as well, but in hindsight I'm not sure I would bother again.
The problem is that to get at this gasket you have to get the water tube (#19) out and the only way to do that is to pull off the three tubes that connect to it and the thermostat. When you get it off, you might find it a good idea to clean the surface that mates with the black plastic bit (#11). The seal is a straight parallel compression type thing and it looked to me that to get the seal to work correctly the two surfaces have to be absolutely flat, clean and parallel. Due to the coolant leak, there will be a layer of dried on gunk on the aluminium tube mating surface - you need to carefully clean this off. I used a 400/1000 grit flat diamond plate which I use for sharpening wood chisels for this but any 400 grit paper will do it, I think. At first I was so uncertain about how good the seal would be that I bought some gasket sealant in as well. However, I didn't need this and just replacing the gasket worked fine. Clean the black plastic bit as well - but don't use any grit; a paper wipe ok. But I did spend a little time clearing out the gasket groove with some cotton wool buds, just to be sure.
It's a good idea to do this at the same time as the major maintenance as you have to take a lot of bits off to do both. I only noticed the leak *after* I'd done the maintenance - so the rear apron, etc, etc had to come off again!
A couple of other points �
1) I re-used most of the drained coolant (about 10l out of a possible 28l, I think). But it's a good idea to clean off as much dust and junk from under there as you can - otherwise you will get it into the coolant and you'll end up having to filter it (I did). Just draining the coolant from the drain plug doesn't actually drain that much, it seemed to me.
2) I ended up using 4l of diluted coolant (2l concentrate) due to getting about 3l all over the floor in my attempts to bleed the system. I used genuine Porsche coolant - a complete waste of money. It's exactly the same stuff as generic pink coolant you can get from an auto store at half the price. Just make sure it says ok for 911 (2011-) on it. I only found this out when I went to the auto store for some de-ionised water to dilute the concentrate.
3) I looked all over the place for instructions for how to bleed a 991. The best I could find was for a Boxter which in the event wasn't very much like what I actually needed to do. From what I remember, the instructions said 'watch the bubbles gently come up through the coolant tank and continue to fill up as the level drops'. Nope! The coolant came up all right - driven by the air behind it forcing it out all over the floor . The trick is to fill the coolant tank to the max; close the cap; start the engine and bring the water temperature up to 90C (or whatever that is in F) either by idling it or running it at 2500 rpm; the thermostat will open; leave it running for a few minutes like that then turn it off and leave it until it is cold - do *not* open the cap when the engine is hot! You will get coolant all over the floor. Repeat until the coolant level no longer drops. You should also open the air bleed valve which is near the expansion tank. Not sure what that does - it didn't seem to bleed much air to me. Also you might want to turn the heating on full to get any air out of the heating circuits.
This all worked for me - there might be a better way to do it and I'd certainly be interested in finding out about it!
Great write-up, thanks! I will give it a try and report back.
By the looks of the corrosion on the bolts, I'm guessing this was slowly leaking for a while and I didn't notice it. Will be good to get this sealed up for good.
[QUOTE=mikebernardo;15036982]2013 Cabrio S. Just found a small puddle of coolant behind the rear driver wheel after being parked for a few hours. Looks like it's coming from the junction of a plastic pipe into the thermostat housing. Coolant level is still at max.
From a quick search looks like this might be a common problem? Anyone know a fix or seen this issue?
I'm about to try and tackle the 4 yr maintenance myself so I'd also like to address this at the same time.
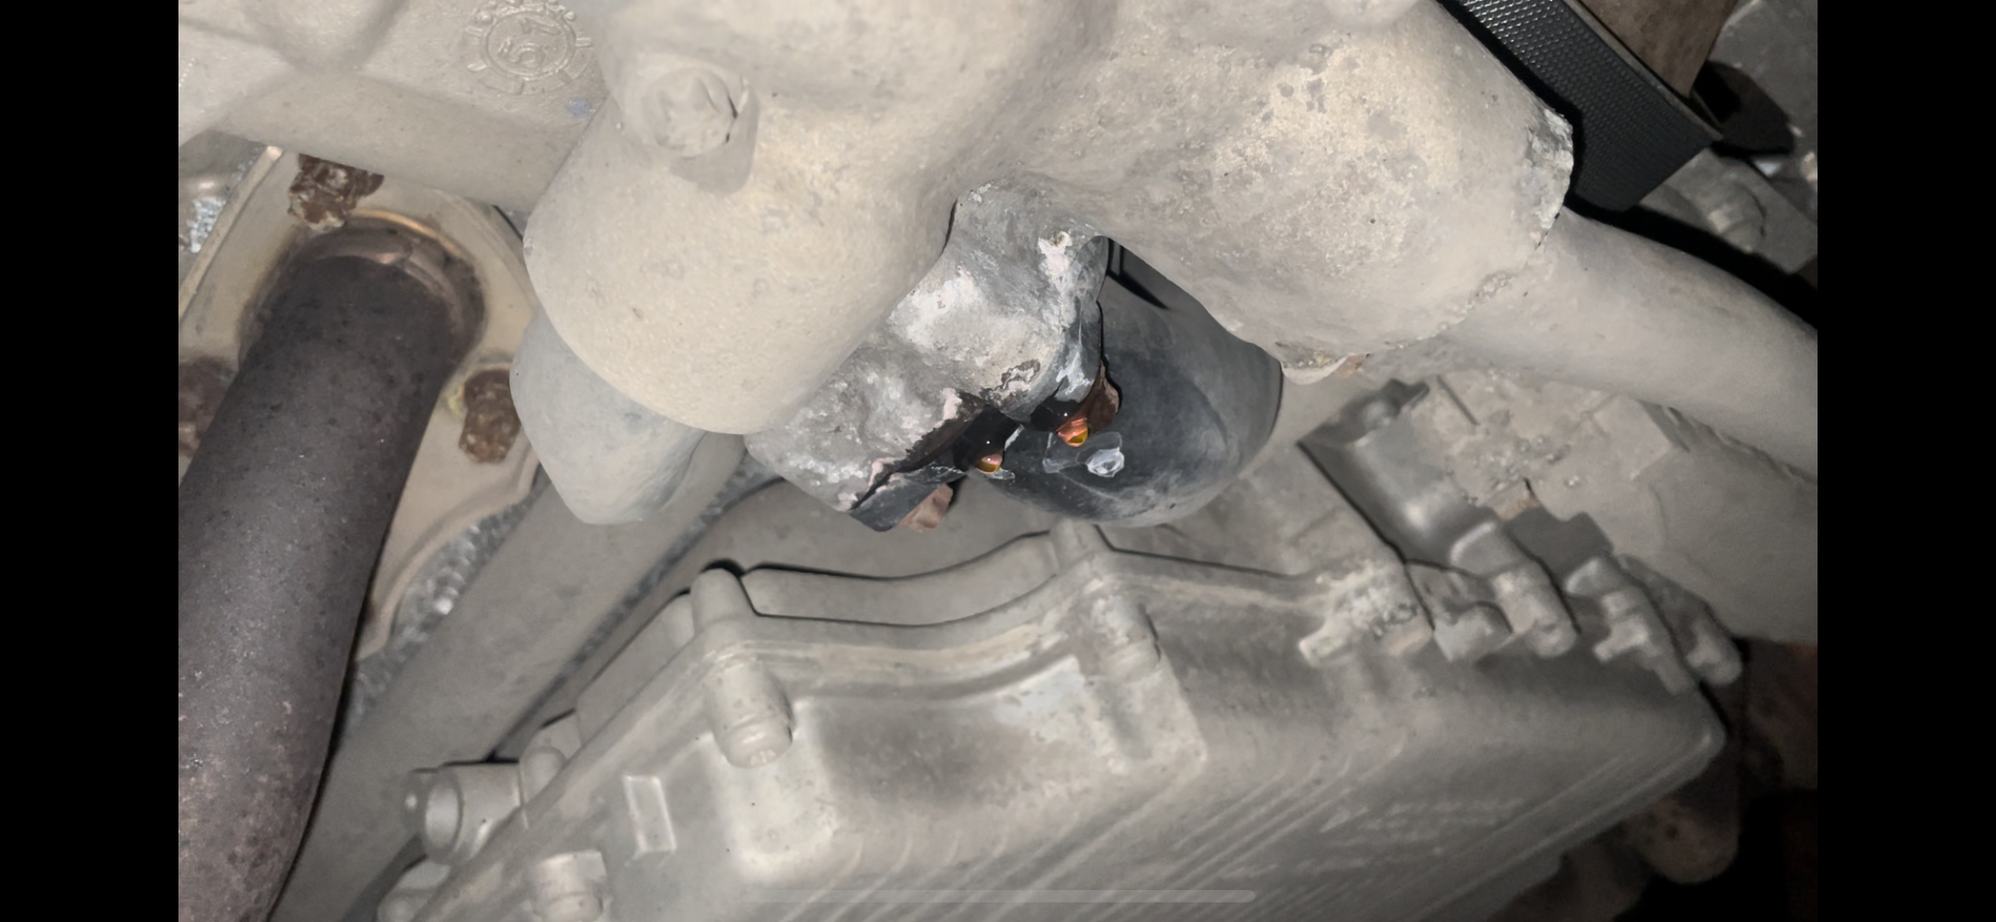
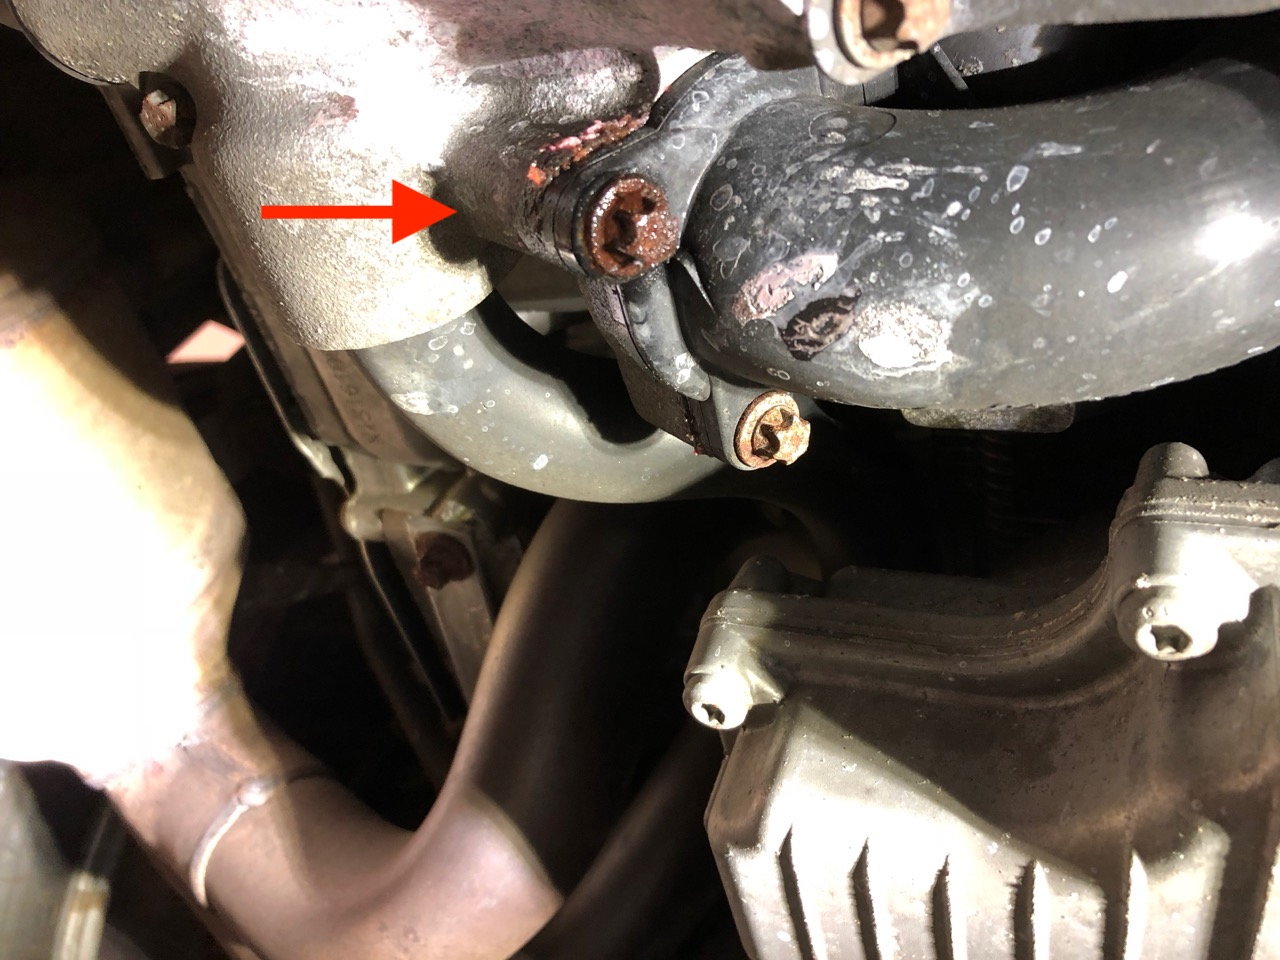
Sorry, not to thread jack here, but at the top of the picture above, I have the same signs of a leak on the pipe (yours shows green), mine was more orange. Please see below. Is that an indication of a leak as well?
Happy to report that I replaced the gasket mentioned above and no more leaks. Like Forrester mentioned, it's a bit of a pain to get to.
I sanded down the surface of the aluminum side of the joint. Quite a lot of calcified deposits on there, so no surprise this leaked.
I saved as much coolant as possible when draining. Used a common vacuum filler tool you can get on Amazon for $50 and re-filled the coolant with a little top-off from a gallon jug of the Porsche pink stuff from a local dealer. Drove the car a bit, turned on heaters. Had to top it off a couple of times. Maybe another cup total.
I seem to have the same leak on my 991.1 C2S �12. It starts to drip after driving it. And stops a few hours later after parked.
Can anyone point me in the right direction as to what page in the workshop manual helps with instructions to get this seal replaced?
Im struggling to understand why all the extra pipes have to come off to get this pipe off. Also if those extra pipes are coming off, should I replace their seals before putting them back on too?
The fix is real simple. I just replaced the O-ring in that joint and all the associated O-rings back in June of 2021 at 4251 miles and it has been fine ever since. I even bought the updated coolant pipe should I ever need it, but replacing it is more of a job and it can wait. And in the manner in which I did the job, I did not need to vacuum fill the coolant.
The fix is real simple. I just replaced the O-ring in that joint and all the associated O-rings back in June of 2021 at 4251 miles and it has been fine ever since. I even bought the updated coolant pipe should I ever need it, but replacing it is more of a job and it can wait. And in the manner in which I did the job, I did not need to vacuum fill the coolant.
Thanks, the bit that I couldn�t see, are the part numbers for any other seals for the other couple of pipes you removed. Would you have more info on that?
My car is at 70k miles so my trouble will be seized bolts :/
Thanks, the bit that I couldn’t see, are the part numbers for any other seals for the other couple of pipes you removed. Would you have more info on that?
My car is at 70k miles so my trouble will be seized bolts :/
Part number are the latest I had when I made my parts purchase.
1 x 9A1 106 215 00 now OPB 121 437 - Rectangular Section Seal.
2 x 900 123 104 30 - Aluminum Sealing Ring 14 x 18.
2 x 999 707 658 40 now PAF 008 282 - O-ring 23 x 3.
4 x 999 707 657 40 now 9A7 008 281 00 - O-ring 31 x 3.
And get a set of E-Torx sockets and maybe some new E-Torx bolts. And you'll need some Valvoline ZEREX G40 and some distilled water....2 jugs of each.
Yes, replace all seals and clean the groves they fit in properly.
My 2014 CS with 45K miles does not yet leak but I bought these parts to proactively and hopefully deter a leak. I will install it soon when I am doing my spring maintenance. This appears to address the coolant leak and may help if you have a newly developed leak but probably not with older leaks that have developed corrosion???
Jim
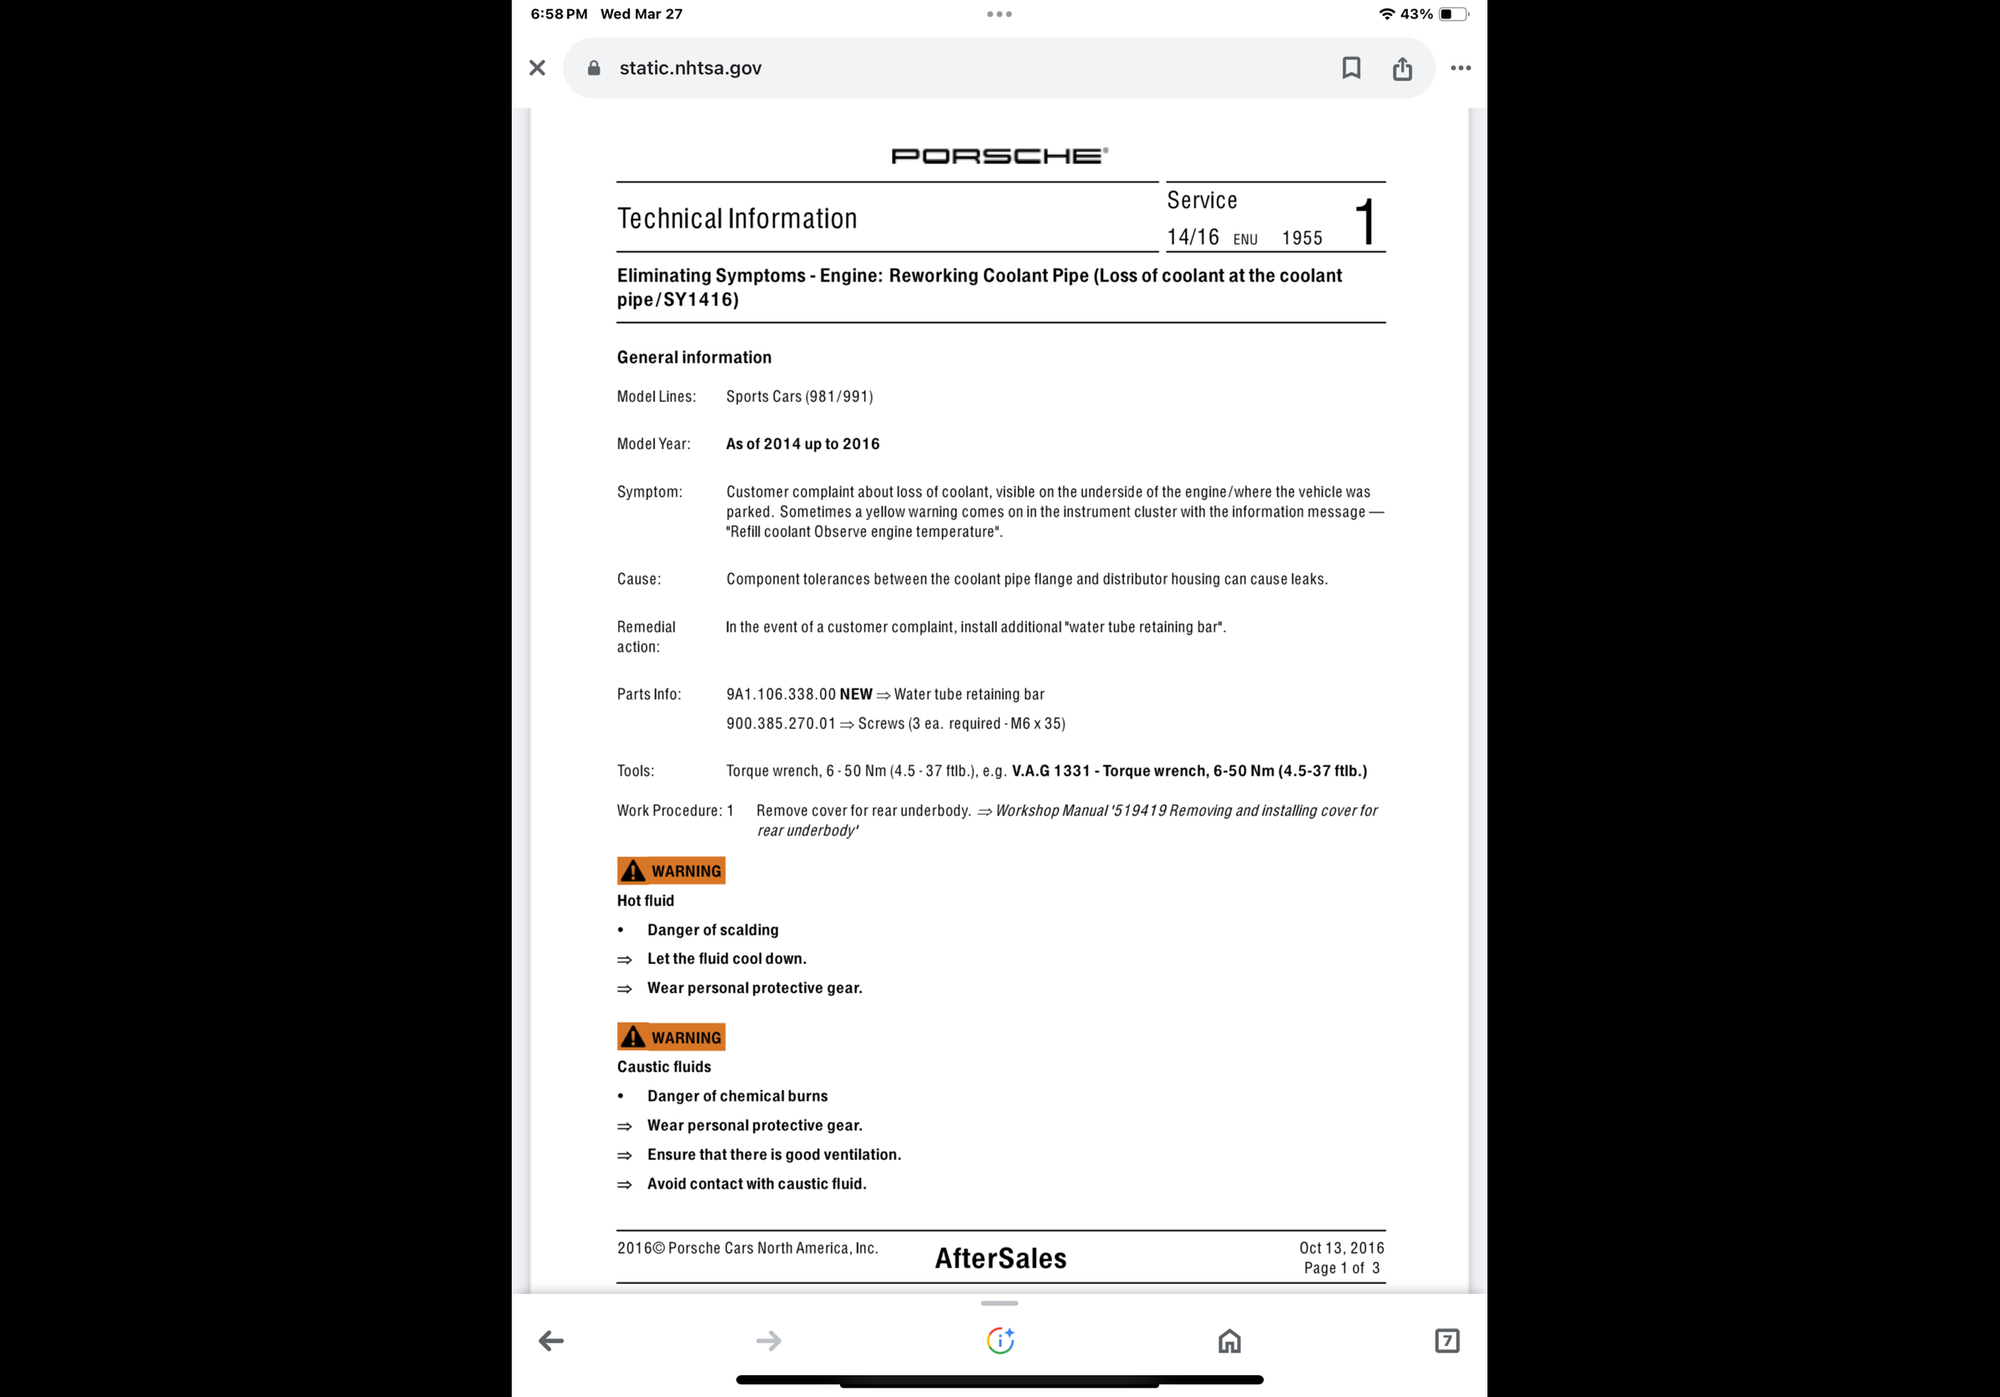
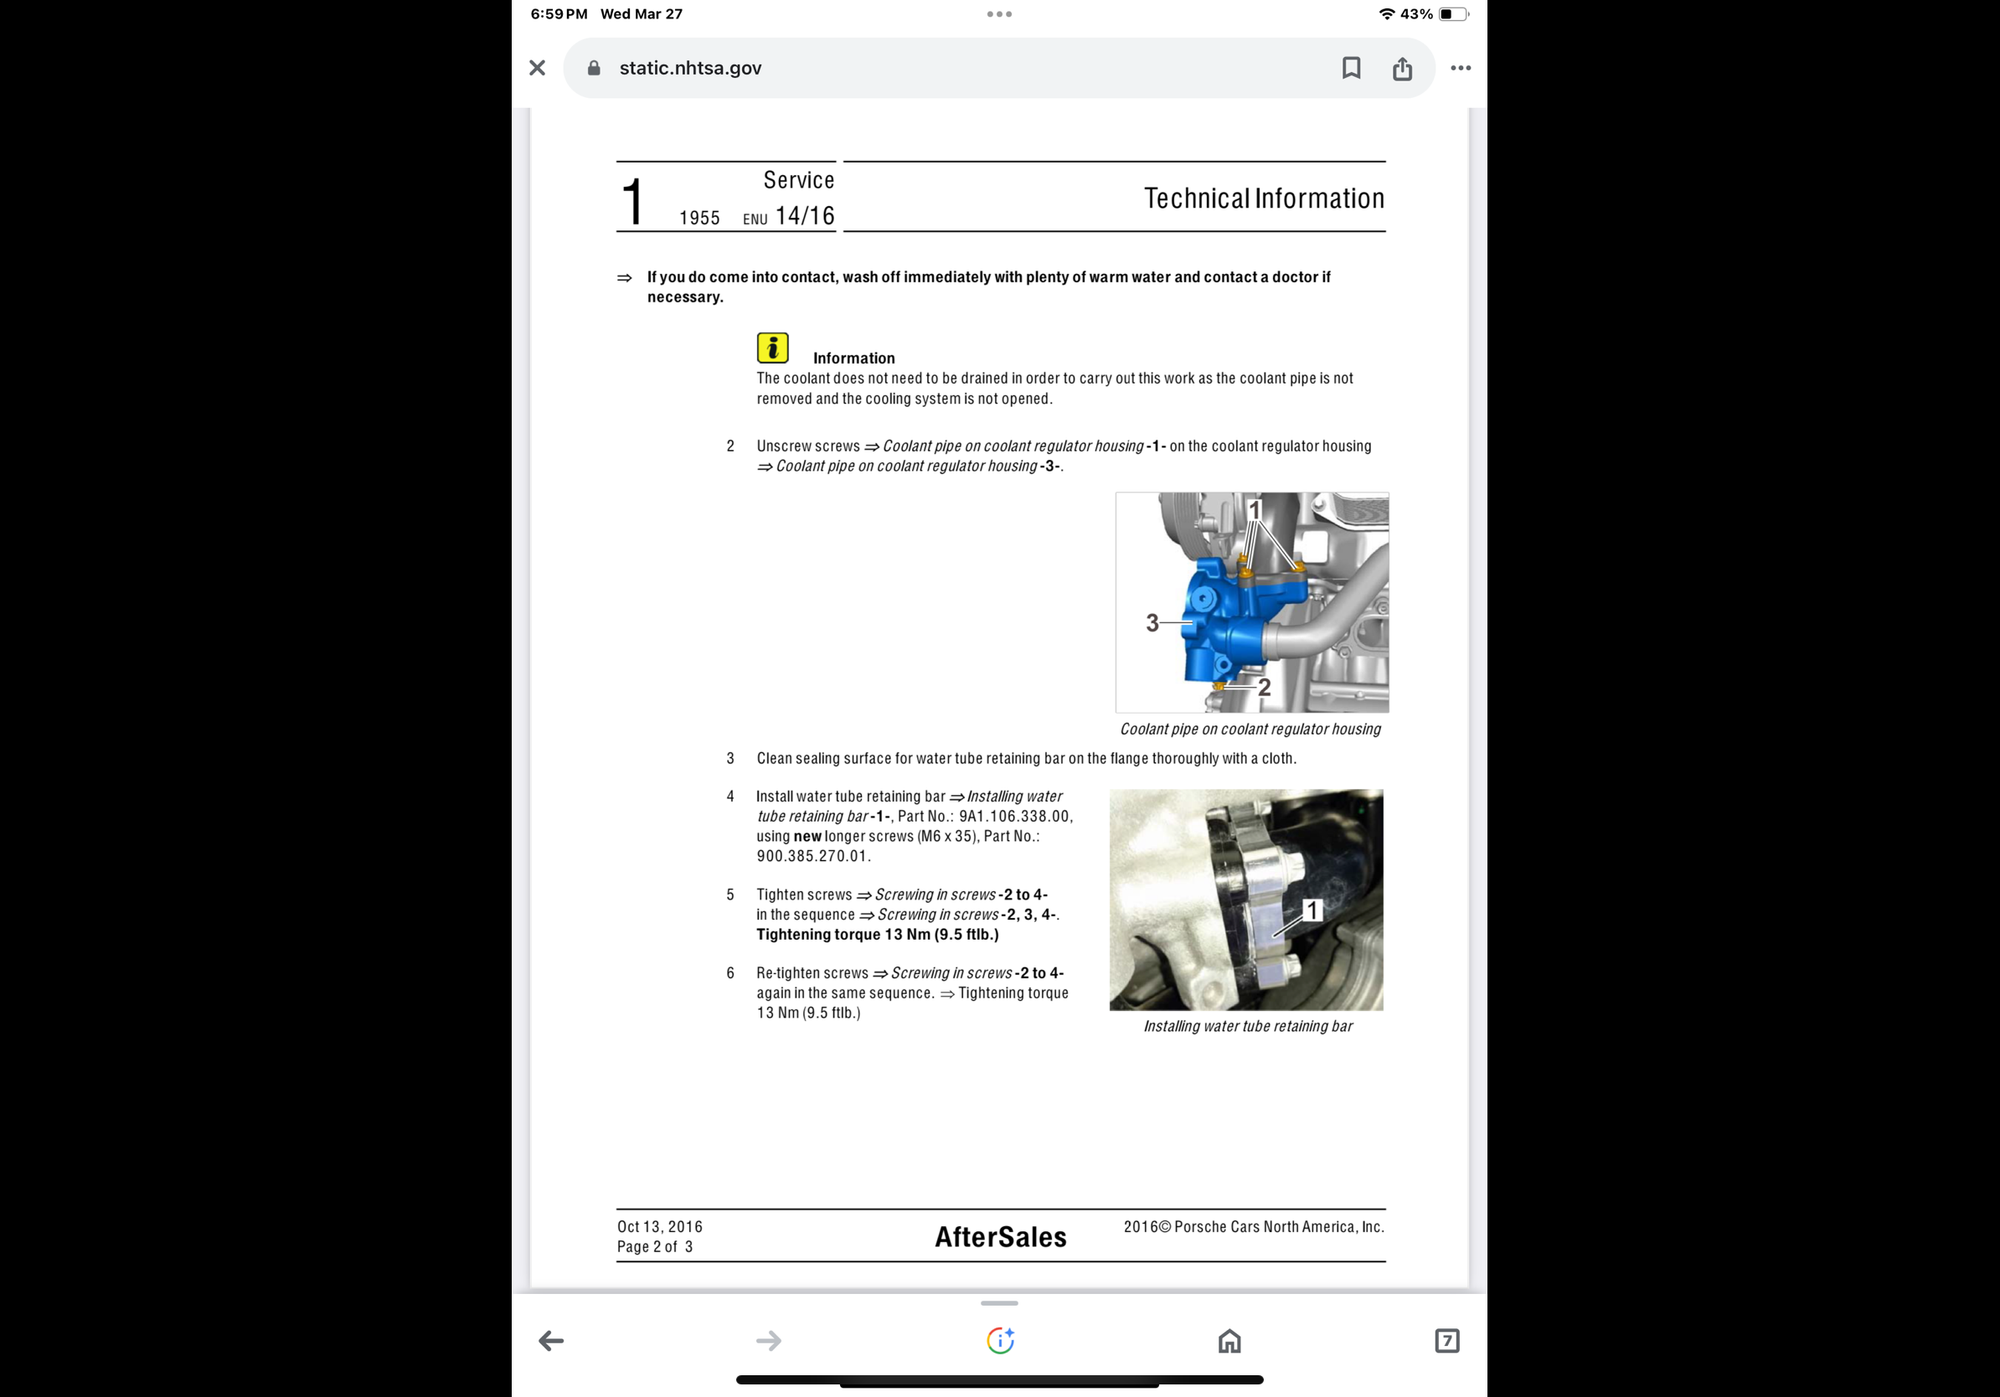
^ I often wondered about that "Water Tube Retaining Bar" I have seen in various pics on the web, but never found any information on it. I see that Pelican Parts has it and I would assume your local dealer.
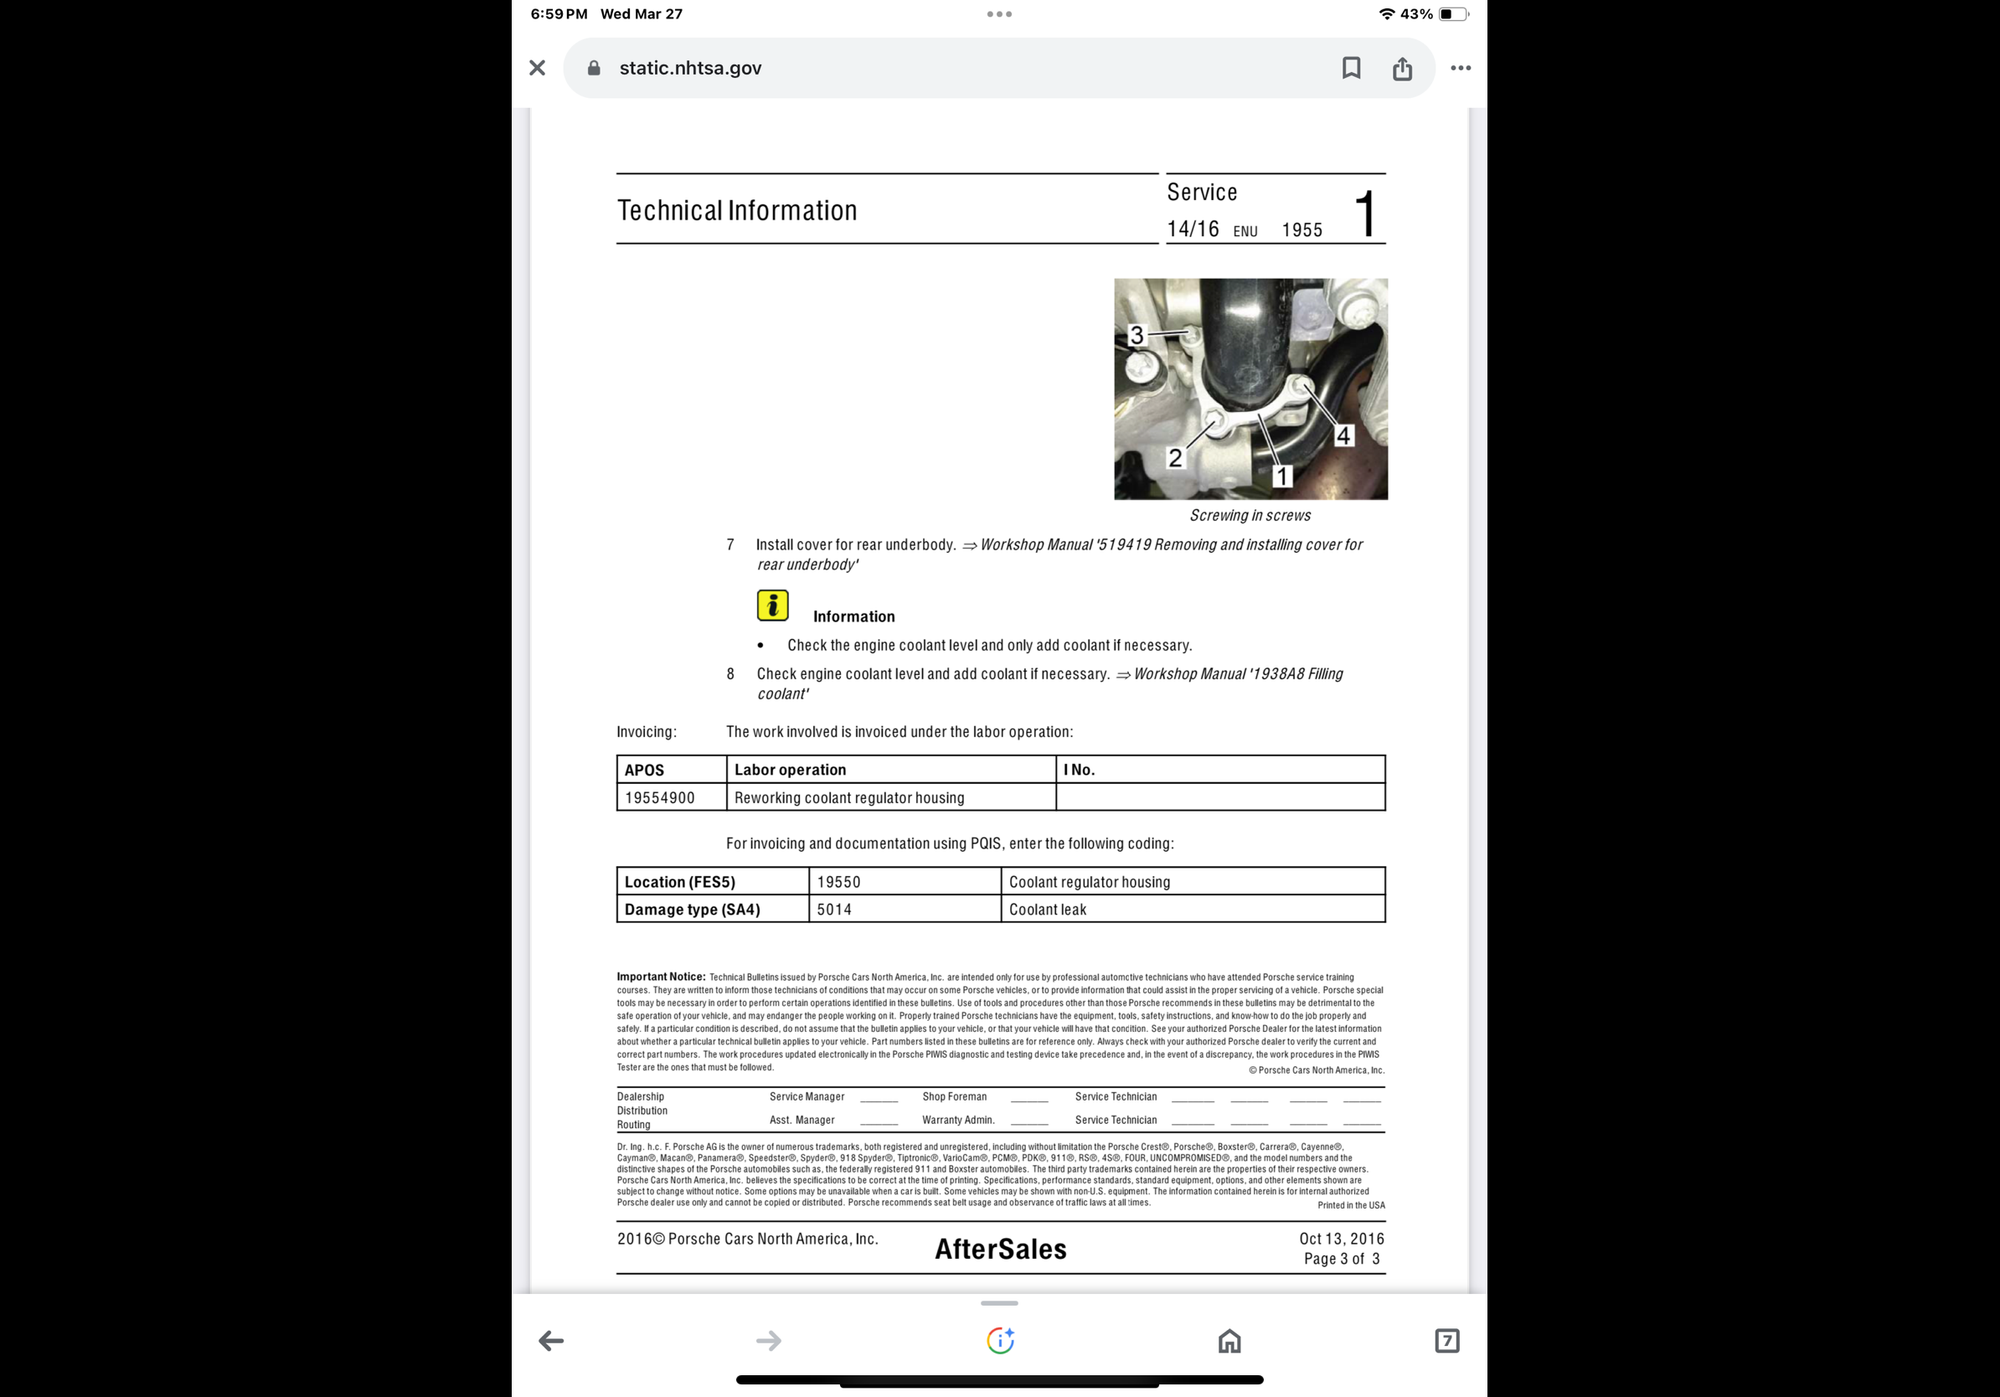
Thanks for posting that and here is a PDF of the document that you listed should someone want to print it.

 05-27-2018, 01:27 AM


 . The trick is to fill the coolant tank to the max; close the cap; start the engine and bring the water temperature up to 90C (or whatever that is in F) either by idling it or running it at 2500 rpm; the thermostat will open; leave it running for a few minutes like that then turn it off and leave it until it is cold - do *not* open the cap when the engine is hot! You will get coolant all over the floor. Repeat until the coolant level no longer drops. You should also open the air bleed valve which is near the expansion tank. Not sure what that does - it didn't seem to bleed much air to me. Also you might want to turn the heating on full to get any air out of the heating circuits.