When you click on links to various merchants on this site and make a purchase, this can result in this site earning a commission. Affiliate programs and affiliations include, but are not limited to, the eBay Partner Network.
Guide on replacing the front coolant pipe on a 987.1
I searched quite a bit on front coolant pipe replacement and didn't find much info. I looked for vids as well and none described how to remove the front pipe other than "after much effort and xyz I removed the pipe". So I thought I'd add some more detail for future reference.
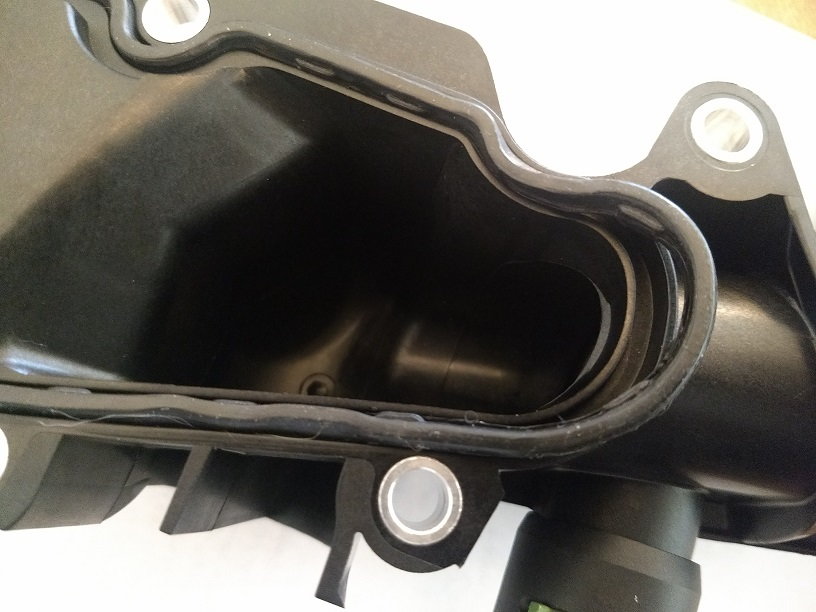
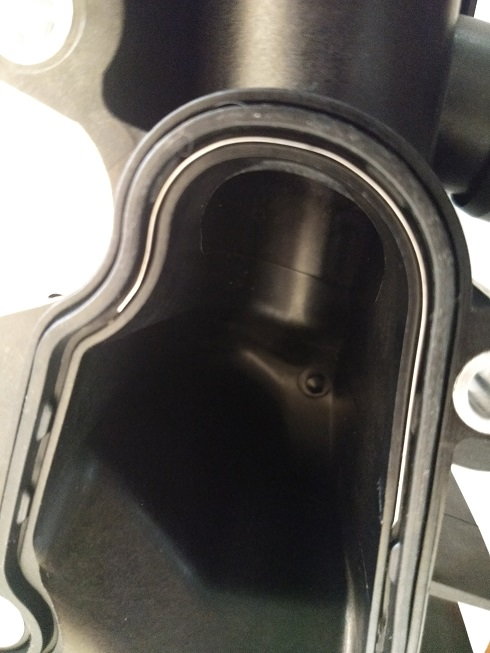
There is something, though, that all 987.1 owners should know before getting to the DIY. The reason that the front pipe starts to leak appears to be related to swelling of the rubber gasket over time which pushes on the walls of the channel that holds the gasket to the point of breaking the plastic. I would seriously suggest changing out the top and bottom gaskets every 10 years or so - maybe make it part of a coolant change maintenance since draining of the coolant is necessary. I'd also like to note that the coolant leak in my car developed after a track day where the engine died (due to back fire which caused intake pipes to pop off intake manifolds, no damage to internals) and the car was stopped with the engine off after about 10 hot laps with no cool down. I think this caused extra pressure in the cooling system and heat not usually experienced which probably weakened the plastic on the front pipe - that combined with the swelling rubber gasket broke the inner wall of the channel in which the gasket sits. The leak was not very big, perhaps requiring a quart of coolant per 200 miles. The first pic shows the broken inner wall (that little missing piece of plastic is prob in one of the radiators...) and the second pic shows how the old swollen gasket fits in the new coolant pipe. The new gasket fits perfectly, yet the old gasket would need to be jammed into the channel.
OK, so now on to the DIY. This is a serious PITA.
1) remove the rear most plastic undercover
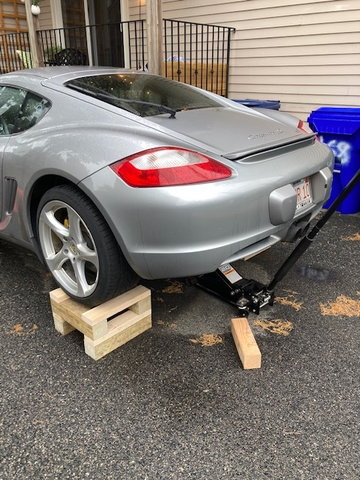
2) you'll need to support the engine before removing the engine mount - I personally made a rectangle the size of the oil plan out of 1x2 wood and then placed 4x8 2' long block of wood underneath using a few other bits of wood to raise the wooden rectangle up to the oil pan. Then I used a jack on the rear jacking point to raise the body up and down: body up, engine drops down. You can do a jack under the oil pan, but personally I did not want to have the jack with the weight of the engine overnight (would have been for many nights).
3) remove the engine mount, refer to this post with lots of useful info, especially what to do with the infamous "5th torx bolt" - read down to the 6+ post if you don't want to cut the torx bolt https://rennlist.com/forums/987-foru...tor-mount.html
4) at this point, drain the coolant by removing the lower coolant hose from the front pipe - there is well over 2 gallons, so have a really large container ready - 5 gal bucket suggested. I think that due to overnight heating and cooling, additional coolant would dribble out each day, so keep a container under the pipe or reconnect it overnight (if needed).
5) remove firewall access panel and loosen serpentine belt to get it out of the way since the serpentine belt runs across the top part of the coolant pipe.
6) unscrew all 9 of the T30 bolts holding the front pipe onto the engine block and note some are longer than others. 2" long 1/4" extension came in handy. Some bolts are really hard to reach, have a telescoping magnet retriever tool ready for duty. Finally, disconnect the temperature sensor.
At this point you'll note that you can wiggle the pipe, but it is really constrained to move in all directions. At the top, it is constrained from moving up by the AC compressor, can't move forward due to the fire wall and the safety cable that runs along the fire wall. The lower part can't move side to side due to the engine mount posts on the oil pump (seriously, who designs the engine mount as part of the oil pump?) And the lower pipe that screws into the engine block can't move forward because of the oil pressure relief valve bolt (purple). You might be like: But there is a way forward.
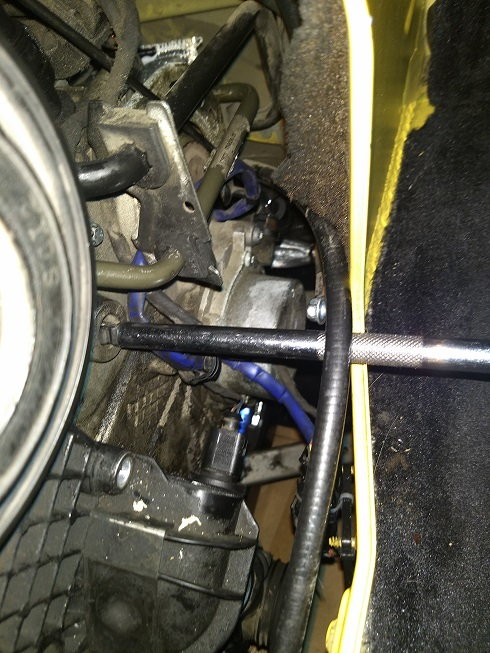
7) the secret (and it took me many days to figure this out) is to remove the safety cable from the driver's side plastic bracket that holds the cable in place. From the engine access panel, you'll be able to use a screw driver to push down on the latch to the cable bracket. I tried removing the center block that anchors the cable in the middle of the firewall, but I really could not get it to budge. But with the cable out of the bracket, you can move the cable up and give the front pipe room to move forward. The pic below taken from inside the car looking down through the access panel shows how a long 3/8" extension was used to hold the cable up. ...if you do this, be mindful of the cable when lowering the engine - ensure the cable does not snag on anything.
8) remove the oil pressure relief valve bolt (circled purple a couple pics above) which will come out with a spring and piston - Note the order in which everything comes out (useful post on it: https://rennlist.com/forums/993-foru...ief-valve.html) - and be prepared to catch 3-4 quarts of oil. It would be really useful to have a plug that sits flush to replace the pressure relief valve bolt, because even once most of the oil is out, it still comes out in a dribble for a *long* time. I used a paper towel while pulling out the old pipe and installing the new one, but this was not ideal. Why an oil pressure relief valve bolt should need to be removed in order to replace a coolant pipe is beyond me.
9) Removing the old pipe (finally ): Get that new pipe with new seals ready and close by. So now the engine might need to be lowered a bit, this allows the pipe to move forward towards the fire wall, and underneath the safety cable. Now from underneath the car, maneuver the pipe forward, it will take some effort to clear the oil pressure relief housing even with the bolt removed. Keep maneuvering it forward to clear the motor mount points on the oil pump (really, motor mount points on the oil pump? silly porsche engs!) and then maneuver it down, and after much jiggling and getting around the various pinch points it should come out. Note how you make this maneuver, because - however the pipe comes out, is exactly the same sequence to put the new one back in!
10) put the new pipe back, exactly in the reverse order that you got the old one out. The actual removal and placement of the pipe does not take long, but there sure is a lot of prep work to get to that point...
And now, make your way backwards through the items above to put everything back together.
There's lots of posts on how to fill the car back up with coolant - a vacuum based coolant fill is highly recommended.
...and one last thought... At some point I was about to give up on taking the old pipe out and instead doing a repair, but once I saw the plastic channel was cracked more than 1cm I gave up on it. Nevertheless, I did measure the channel depth: 4.85mm. As it turns out, exhaust wrap stainless steel ties such as these:
would fit perfectly since the measured width is 4.48mm and it is strong, flexible and can, with patience, be shaped fairly easily. The idea would be to place the stainless steel piece to bridge the gap in the inside wall of the channel. ...but I think this works for only small breaks in the wall, and with a new gasket would probably last a while, but not once the gasket started swelling over time. Any how, here's a pic of what that patch might look like:
...and this is what it looks like with the new gasket in place... ...again, this was not actually installed, but just test fitted...
I did this procedure in my driveway this morning with the help of this guide and I thought I would add a few more pointers. Prior to starting, I made a set of wooden wheel cradles. It made this job 100% more doable in my driveway, especially since I only have one jack and I'm always afraid of jack stands. I made mine 16x16x10" tall. I would have gone taller, but my jack ran out of lift height.
Removing all of the underbody trays, particularly the middle one, made things much more accessible
There is a plastic bracket that holds the O2 sensor connectors behind the driver's seat area in the serpentine belt access panel. This is really inconveniently located because it makes accessing some of the bolts on the coolant pipe very difficult, and I found it made it impossible to remove the pipe without removing this part. There are two threaded studs welded to the fire wall that hold this bracket in place (just a press fit; no fasteners). A big flat head screw driver did the job to pry this off.
To make things a little easier, I removed the engine mount to chassis carrier piece first. This alleviated all concerns about the "infamous 5th Torx bolt" because with the engine mount to chassis brace removed, that bolt is very easily accessible. I also removed the water pump hose to get access to the engine mount to chassis carrier nuts. Since I was going to be adding a lot of coolant back anyway, I figured the extra space was a worthwhile tradeoff for a little more lost coolant.
Get some long extensions (like >24" long). This made it much easier to access all of the engine mount bolts, especially the ones holding the engine mount to the chassis carrier.
I was able to gather a bunch of torque specs from all over the internet, so I will consolidate them here. I will note, however, that getting a torque wrench into most of these places was impossible.
Oil pressure relief value bolt (the only one I could actually get a torque wrench on): 18ft-lbs
M6 Torx bolts holding the coolant pipe to the engine: 7.5ft-lbs
Engine mount bolts all came from here. The picture at that link makes it obvious what each torque corresponds to but, again, I was only able to get a torque wrench on the bolts marked (1)
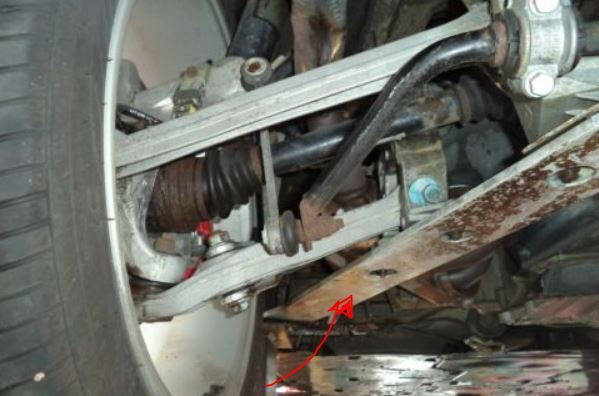
I was surprised by how little I was able to lower the engine before something made contact. The catalytic converters touch this component on the rear suspension pretty quickly, but it was still sufficient space to do the job (although more would have been welcomed)
I did not need to do anything with the parking brake cable (step 7, above). With the engine mount out of the way, the oil pressure relief valve bolt removed, and the plastic O2 sensor clip I noted above popped off, I was able to snake the coolant pipe out of the way without much issue.
Be careful to note which screws came from where on the coolant pipe. There are two different lengths.
All in, I spent about 4.5 hours to do this, including re-adding coolant (get a vacuum bleeder; it is one of those things I wished I bought years ago; it made refilling the coolant a breeze), getting the car up to temperature, and cleaning up. My coolant pipe failed a bit differently than OPs. Where the coolant hose enters the pipe on the bottom, the plastic part began to separate. In looking at the new part, this seems to be an ultrasonically welded plastic part, so with enough heat cycles, I think it just gave out.
I did this procedure in my driveway this morning with the help of this guide and I thought I would add a few more pointers.
Thank you, great pointers and addition to this topic. Yes, I neglected to mention your point #2 - my bracket was quite brittle and broke, so I could not put it back on - leading to "innovative" use of zip ties .
...less than 5hr? Jealous beyond words! Well done!
I searched quite a bit on front coolant pipe replacement and didn't find much info. I looked for vids as well and none described how to remove the front pipe other than "after much effort and xyz I removed the pipe". So I thought I'd add some more detail for future reference.
There is something, though, that all 987.1 owners should know before getting to the DIY. The reason that the front pipe starts to leak appears to be related to swelling of the rubber gasket over time which pushes on the walls of the channel that holds the gasket to the point of breaking the plastic. I would seriously suggest changing out the top and bottom gaskets every 10 years or so - maybe make it part of a coolant change maintenance since draining of the coolant is necessary. I'd also like to note that the coolant leak in my car developed after a track day where the engine died (due to back fire which caused intake pipes to pop off intake manifolds, no damage to internals) and the car was stopped with the engine off after about 10 hot laps with no cool down. I think this caused extra pressure in the cooling system and heat not usually experienced which probably weakened the plastic on the front pipe - that combined with the swelling rubber gasket broke the inner wall of the channel in which the gasket sits. The leak was not very big, perhaps requiring a quart of coolant per 200 miles. The first pic shows the broken inner wall (that little missing piece of plastic is prob in one of the radiators...) and the second pic shows how the old swollen gasket fits in the new coolant pipe. The new gasket fits perfectly, yet the old gasket would need to be jammed into the channel.
OK, so now on to the DIY. This is a serious PITA.
1) remove the rear most plastic undercover
2) you'll need to support the engine before removing the engine mount - I personally made a rectangle the size of the oil plan out of 1x2 wood and then placed 4x8 2' long block of wood underneath using a few other bits of wood to raise the wooden rectangle up to the oil pan. Then I used a jack on the rear jacking point to raise the body up and down: body up, engine drops down. You can do a jack under the oil pan, but personally I did not want to have the jack with the weight of the engine overnight (would have been for many nights).
3) remove the engine mount, refer to this post with lots of useful info, especially what to do with the infamous "5th torx bolt" - read down to the 6+ post if you don't want to cut the torx bolt https://rennlist.com/forums/987-foru...tor-mount.html
4) at this point, drain the coolant by removing the lower coolant hose from the front pipe - there is well over 2 gallons, so have a really large container ready - 5 gal bucket suggested. I think that due to overnight heating and cooling, additional coolant would dribble out each day, so keep a container under the pipe or reconnect it overnight (if needed).
5) remove firewall access panel and loosen serpentine belt to get it out of the way since the serpentine belt runs across the top part of the coolant pipe.
6) unscrew all 9 of the T30 bolts holding the front pipe onto the engine block and note some are longer than others. 2" long 1/4" extension came in handy. Some bolts are really hard to reach, have a telescoping magnet retriever tool ready for duty. Finally, disconnect the temperature sensor.
At this point you'll note that you can wiggle the pipe, but it is really constrained to move in all directions. At the top, it is constrained from moving up by the AC compressor, can't move forward due to the fire wall and the safety cable that runs along the fire wall. The lower part can't move side to side due to the engine mount posts on the oil pump (seriously, who designs the engine mount as part of the oil pump?) And the lower pipe that screws into the engine block can't move forward because of the oil pressure relief valve bolt (purple). You might be like: But there is a way forward.
7) the secret (and it took me many days to figure this out) is to remove the safety cable from the driver's side plastic bracket that holds the cable in place. From the engine access panel, you'll be able to use a screw driver to push down on the latch to the cable bracket. I tried removing the center block that anchors the cable in the middle of the firewall, but I really could not get it to budge. But with the cable out of the bracket, you can move the cable up and give the front pipe room to move forward. The pic below taken from inside the car looking down through the access panel shows how a long 3/8" extension was used to hold the cable up. ...if you do this, be mindful of the cable when lowering the engine - ensure the cable does not snag on anything.
8) remove the oil pressure relief valve bolt (circled purple a couple pics above) which will come out with a spring and piston - Note the order in which everything comes out (useful post on it: https://rennlist.com/forums/993-foru...ief-valve.html) - and be prepared to catch 3-4 quarts of oil. It would be really useful to have a plug that sits flush to replace the pressure relief valve bolt, because even once most of the oil is out, it still comes out in a dribble for a *long* time. I used a paper towel while pulling out the old pipe and installing the new one, but this was not ideal. Why an oil pressure relief valve bolt should need to be removed in order to replace a coolant pipe is beyond me.
9) Removing the old pipe (finally ): Get that new pipe with new seals ready and close by. So now the engine might need to be lowered a bit, this allows the pipe to move forward towards the fire wall, and underneath the safety cable. Now from underneath the car, maneuver the pipe forward, it will take some effort to clear the oil pressure relief housing even with the bolt removed. Keep maneuvering it forward to clear the motor mount points on the oil pump (really, motor mount points on the oil pump? silly porsche engs!) and then maneuver it down, and after much jiggling and getting around the various pinch points it should come out. Note how you make this maneuver, because - however the pipe comes out, is exactly the same sequence to put the new one back in!
10) put the new pipe back, exactly in the reverse order that you got the old one out. The actual removal and placement of the pipe does not take long, but there sure is a lot of prep work to get to that point...
And now, make your way backwards through the items above to put everything back together.
There's lots of posts on how to fill the car back up with coolant - a vacuum based coolant fill is highly recommended.
...and one last thought... At some point I was about to give up on taking the old pipe out and instead doing a repair, but once I saw the plastic channel was cracked more than 1cm I gave up on it. Nevertheless, I did measure the channel depth: 4.85mm. As it turns out, exhaust wrap stainless steel ties such as these: https://www.amazon.com/gp/product/B07ZNQ8R7S would fit perfectly since the measured width is 4.48mm and it is strong, flexible and can, with patience, be shaped fairly easily. The idea would be to place the stainless steel piece to bridge the gap in the inside wall of the channel. ...but I think this works for only small breaks in the wall, and with a new gasket would probably last a while, but not once the gasket started swelling over time. Any how, here's a pic of what that patch might look like:
...and this is what it looks like with the new gasket in place... ...again, this was not actually installed, but just test fitted...
Thanks for the great write up! I�m experiencing a sizeable leak from the top gasket, but no damage to the pipe. I know that you had to replace the whole pipe, but would it be possible to replace just the gaskets (top and bottom) without having to remove the engine mount?
Thanks for the great write up! I�m experiencing a sizeable leak from the top gasket, but no damage to the pipe. I know that you had to replace the whole pipe, but would it be possible to replace just the gaskets (top and bottom) without having to remove the engine mount?
I think it would be pretty difficult to replace just the gasket on the top without removing the whole pipe. There is a section at the top that bulges out (goes into the head) that would require you to pull this part out ~1" just to overcome that bulge, and you definitely don't have clearance to pull this whole part out that much with the engine carrier and oil pump pressure relief valve bolt in the way, and it's not flexible enough to bend just the top part out to squeeze in a new gasket.
Given how brittle these can become though (2 pieces of ultrasonically welded plastic), I would probably just replace the entire part, even if I could just replace the upper gasket, because lowering the engine and removing the mount was not the hardest part of doing this job anyway. It's also a great opportunity to replace the engine mount
This is a great thread and clearly a needed resource as these cars get older, thanks to the OP and everyone that contributed. Would make a great addition to the DIY section, if a moderator can place it there.

 03-25-2022, 03:23 AM


 But there is a way forward.
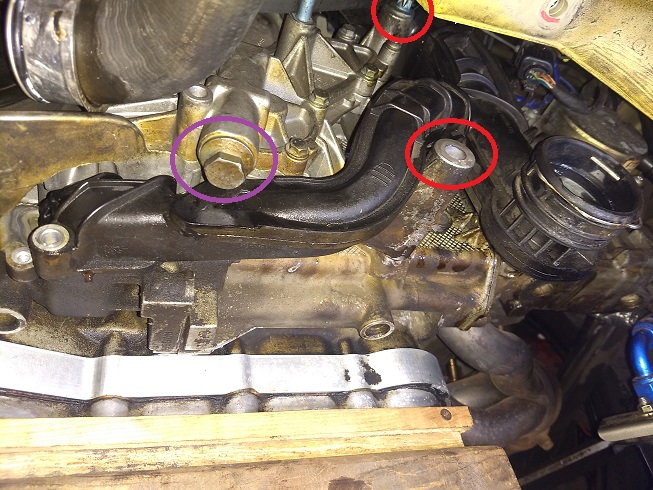
 ): Get that new pipe with new seals ready and close by. So now the engine might need to be lowered a bit, this allows the pipe to move forward towards the fire wall, and underneath the safety cable. Now from underneath the car, maneuver the pipe forward, it will take some effort to clear the oil pressure relief housing even with the bolt removed. Keep maneuvering it forward to clear the motor mount points on the oil pump (really, motor mount points on the oil pump? silly porsche engs!) and then maneuver it down, and after much jiggling and getting around the various pinch points it should come out. Note how you make this maneuver, because - however the pipe comes out, is exactly the same sequence to put the new one back in!
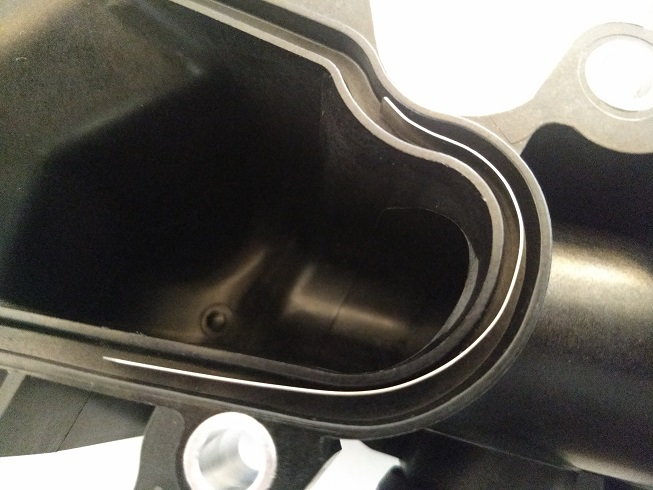


") .
. Well done!


