Odometer Repair - DIY
 09-16-2013, 10:40 PM
#1
Racer
Thread Starter
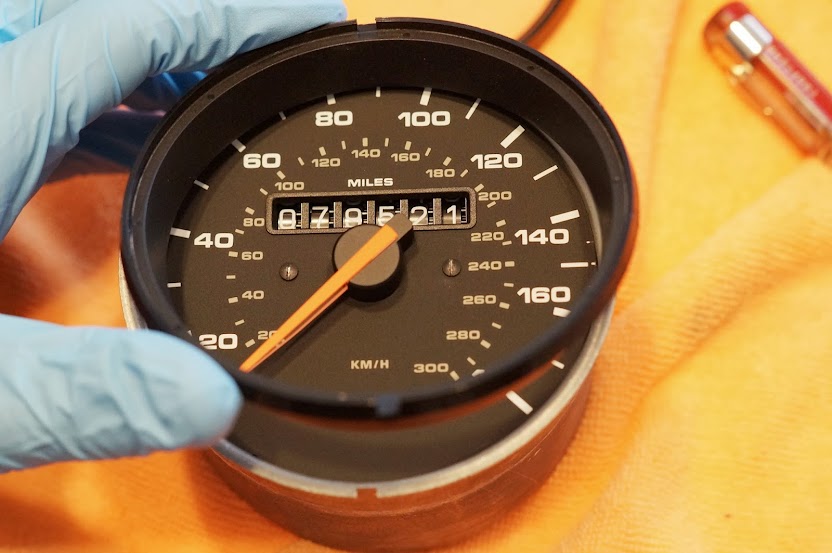
My odometer quit working a few days ago. The speedometer worked. The trip meter was working. So, I assumed it must be the odometer gear. The cost to have a shop repair it is about $135 (plus shipping). I was able to purchase the replacement odometer gear for $25 from Pelican Parts. They outsource to odometergears.com, but the same price at either site. Here�s the process to replace it:
1. Gently remove the speedometer by prying it out. The rubber surround comes out too, so insert a small screwdriver behind the surround. Use soft cloths to prevent damaging the dash.

2. Remove the cable. I had to use screwdrivers to release the clips

3. Remove the rubber surround. I damaged mine while removing the speedometer. $14 for an OEM replacement at Gaudin Porsche

4. Gently pry away the bezel. It took quite a bit of prying and a lot of patience. Try not to scratch it, but keep in mind the rubber seal will hide some of the scratches.

5. Remove the bezel, glass and plastic seat.

6. Flip over the speedometer. Keep it on a soft cloth and try not to damage the face/needle. Now remove the 4 screws and 3 light bulbs (orange plastic bits).


7. Once the screws/light bulbs are removed, the case should come off.

8. Set aside the black piece of plastic.

9. The circuit board is not attached, so rotate it out of the way.

10. Remove the 4 screws holding the bracket.

11. Flip over the speedometer again and remove the 2 small black screws on the faceplate. Do NOT remove the speedometer needle, otherwise you�ll have to recalibrate it.

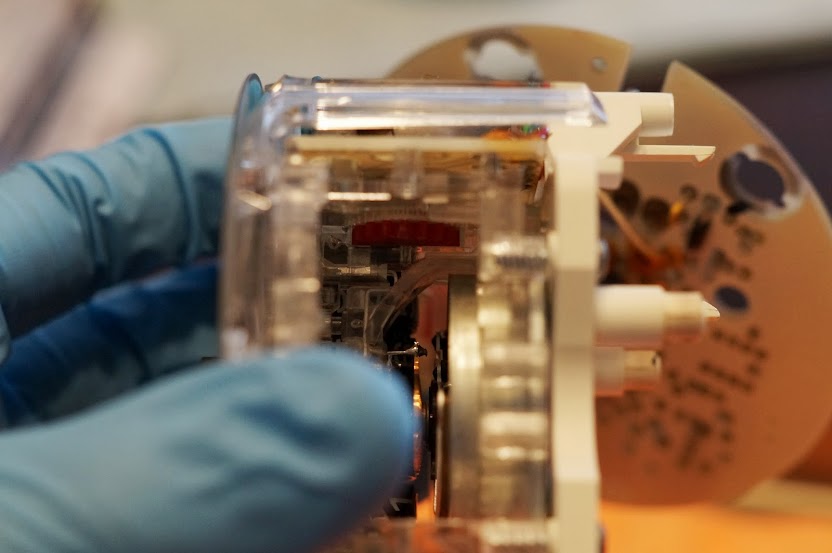
12. Now remove the 2 screws on the side that hold the motor in place.

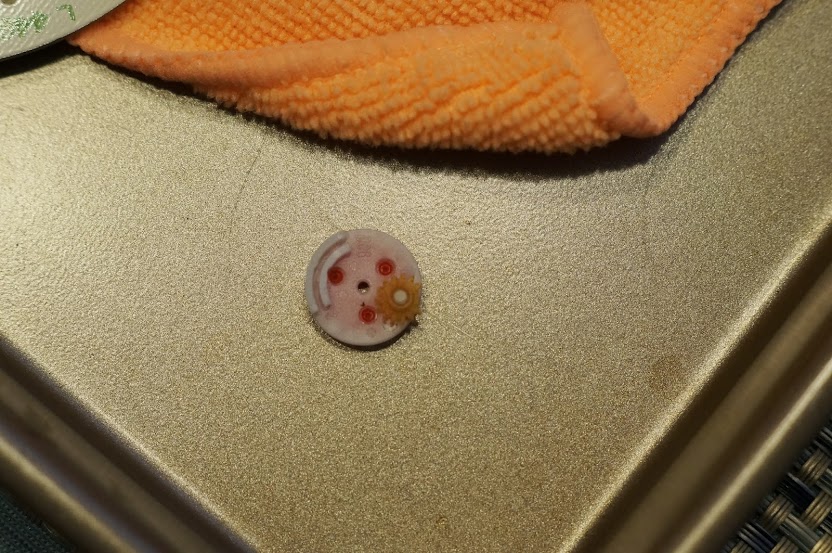
13. This will reveal the odometer gear and pod (they�re on the backside of the motor).

14. The Pod is the larger gear. On the back is a post for the odometer gear (which is really small!)
15. Here�s the old odometer gear with 2 missing teeth next to the new one ($25, but made in America!).
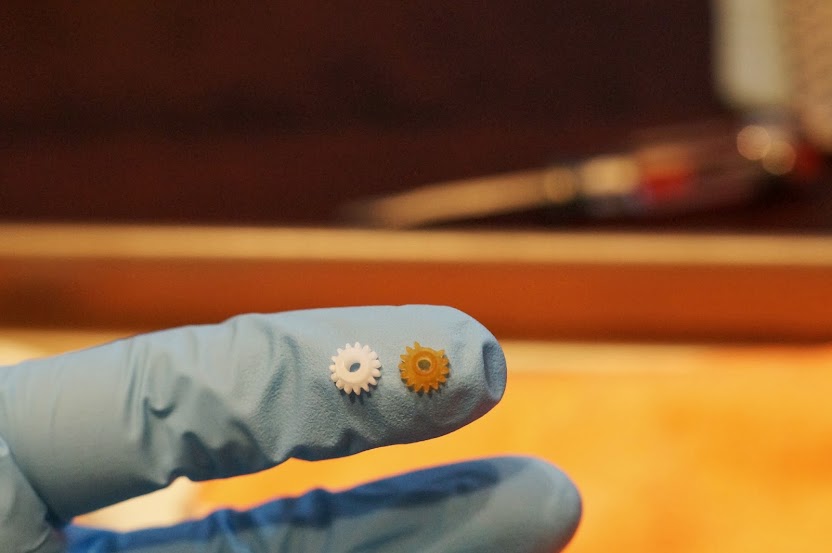
16. Swap out the odometer gear. No lubrication required.

17. Put it back together the way it came apart. Note: You may have to roll the odometer forward slightly in order to get the gears to mesh correctly. It should look like the picture.
1. Gently remove the speedometer by prying it out. The rubber surround comes out too, so insert a small screwdriver behind the surround. Use soft cloths to prevent damaging the dash.
2. Remove the cable. I had to use screwdrivers to release the clips
3. Remove the rubber surround. I damaged mine while removing the speedometer. $14 for an OEM replacement at Gaudin Porsche
4. Gently pry away the bezel. It took quite a bit of prying and a lot of patience. Try not to scratch it, but keep in mind the rubber seal will hide some of the scratches.
5. Remove the bezel, glass and plastic seat.
6. Flip over the speedometer. Keep it on a soft cloth and try not to damage the face/needle. Now remove the 4 screws and 3 light bulbs (orange plastic bits).
7. Once the screws/light bulbs are removed, the case should come off.
8. Set aside the black piece of plastic.
9. The circuit board is not attached, so rotate it out of the way.
10. Remove the 4 screws holding the bracket.
11. Flip over the speedometer again and remove the 2 small black screws on the faceplate. Do NOT remove the speedometer needle, otherwise you�ll have to recalibrate it.
12. Now remove the 2 screws on the side that hold the motor in place.
13. This will reveal the odometer gear and pod (they�re on the backside of the motor).
14. The Pod is the larger gear. On the back is a post for the odometer gear (which is really small!)
15. Here�s the old odometer gear with 2 missing teeth next to the new one ($25, but made in America!).
16. Swap out the odometer gear. No lubrication required.
17. Put it back together the way it came apart. Note: You may have to roll the odometer forward slightly in order to get the gears to mesh correctly. It should look like the picture.

The following 2 users liked this post by mapolus:
Jim Profit (03-19-2021),
Pardonmypov (05-09-2022)

The following users liked this post:
heliolps2 (03-23-2021)
 09-17-2013, 03:13 PM
#5
Racer
Thread Starter
Flachbau,
I'm not sure I quite understand. Do your bezels have a vinyl cover? Mine are just painted metal. I simply used a screwdriver to bend the bezel back around the gauge body (essentially the opposite of the removal step).
I'm pretty sure I'm not understanding your question correctly, so please let me know!!
Thanks,
Matt
09-17-2013, 04:08 PM
#6
Burning Brakes
Yes that was what I was asking. Mine are covered in leather so questioning how to secure without damage. But if no damage to paint may be ok on leather? I don't have any issues now but for future reference that's good to know.
Flachbau,
I'm not sure I quite understand. Do your bezels have a vinyl cover? Mine are just painted metal. I simply used a screwdriver to bend the bezel back around the gauge body (essentially the opposite of the removal step).
I'm pretty sure I'm not understanding your question correctly, so please let me know!!
Thanks,
Matt
I'm not sure I quite understand. Do your bezels have a vinyl cover? Mine are just painted metal. I simply used a screwdriver to bend the bezel back around the gauge body (essentially the opposite of the removal step).
I'm pretty sure I'm not understanding your question correctly, so please let me know!!
Thanks,
Matt
09-17-2013, 06:31 PM
#7
Racer
Thread Starter
Oh okay...I'm guessing it would actually work better having a vinyl or leather covering. Mine showed every minor dent/bend after I pried it open (took a while to work them out after re-assembly). I did learn that VDO doesn't offer replacement bezels to the public, so be careful if you have to do this!!
Trending Topics
09-17-2013, 07:43 PM
#8

excellent write up. Thanks in particular for fotos which are the usual 1000 words!! Better you than me. I would have spent the 25 for the gear and then screwed it and spent 135 getting it fixed
The descriptions people provide in making various repairs or changes is what makes this forum great. Thanks again.
The descriptions people provide in making various repairs or changes is what makes this forum great. Thanks again.
09-17-2013, 08:16 PM
#9
Basic Sponsor
Rennlist
Site Sponsor
Rennlist
Site Sponsor
Nice job Matt!
Mark/Pelican Parts
Mark/Pelican Parts
__________________
Your Trusted Source For DIY and Parts
FREE SHIPPING over $99 click here
Porsche Parts | DIY Tech Articles | Facebook | Twitter | Instagram | YouTube | Promos
888.280.7799 | 6am - 5pm PST

FREE SHIPPING over $99 click here
Porsche Parts | DIY Tech Articles | Facebook | Twitter | Instagram | YouTube | Promos
888.280.7799 | 6am - 5pm PST
09-18-2013, 07:43 AM
#10
Thanks a lot for sharing!

 09-18-2013, 07:27 PM
#13
Racer
Thread Starter
Thanks guys. Had I looked up the part number before I started, I probably would've paid the $135 for someone else to fix it!
Part Number 96464153700
Part Name SPEEDOMETER
MSRP $2,243.69 (<--- That's how much my first car cost!!)
Core $0.00
Part Number 96464153700
Part Name SPEEDOMETER
MSRP $2,243.69 (<--- That's how much my first car cost!!)
Core $0.00
09-19-2013, 06:47 AM
#14
Spare pieces prices are getting outrageous ... I have been asked 700.00 Euros by Porsche Italia for a headlamp with pneumatic set up ... a three fold increase in a couple of years time! I found it much cheaper elsewhere but I think they're really exaggerating, considering that much of this stuff has been around for decades already!
06-29-2019, 12:26 PM
#15
Rennlist Member

Join Date: Nov 2012
Posts: 6
Likes: 0
Received 0 Likes
on
0 Posts
I'm about to order to the odometer gear but thinking there may be some other stuff I should replace while i'm in there. Anyone have some experience to share? Maybe the pod? light bulbs?