

Clutch replacement - lessons learned
 03-23-2008, 03:31 PM
#1
Instructor
Thread Starter
I spent the winter replacing the clutch and assorted other 'while it's out' jobs. I had scoured RL for various ideas before starting and noticed varying opinions on some things. I thought I would compile what worked for me. Lastly, a few pics of the process since everyone loves pics, plus I can show off my extensive cleaning!
My work list included:
Replace clutch/PP/TOB
Replace all CV boots and clean/re-grease
Replace rear wheel bearings
Replace rear calipers with 993 C2 4 pots and new pads
Replace engine bay blanket
Adjust valves
Replace clutch slave hose, clean/flush slave cylinder
Replace rear wheel studs with 5mm longer (using Cup IIs with 5mm spacers)
Replace M1 trans fluid (Autozone stuff) with Delvac
Assorted maintenance stuff - various o-rings and seals (PS, RMS, dist, sender units), fan/alt/AC belts, flush PS fluid
Repaint tins, valve covers, rotors, brake shields
Clean EVERYTHING!
Jacking the car
I didn't want to hassle with removing the rear bumper and left it on. I was able to get it high enough on jackstands. I used a $59 ATV jack from Harbor Freight that I feel is a must. It only jacks about 14", so the process of removing the engine/trans is a sequence of lowering the engine/trans on the ATV jack, then raising the body using a floor jack and a 4x4 spanning the trans mounting points. I did have to remove the AFM to get everything to slide out under the bumper.
Removing engine
I removed the engine/trans together. I know some have suggested removing trans only, but I can't imagine that being easier. When I was mating the trans to the engine I was thinking this would be impossible with the engine in the car. Removing/installing the assorted hoses, connections and two rear mount bolts adds maybe 1 hour to the job. Plus it gives you the opportunity to clean the engine bay spotless and replace that crappy looking engine blanket.
Disconnecting the throttle cable is another area of debate and I found it much easier to disconnect at the engine end. BTW, I also disconnected the pedal end so I could remove the cable and repair a break in the plastic sleeving with some heat shrink.
Clutch alignment tool
I didn't use one this time, and tried Garrett's idea of leaving the PP bolts loose then torque through the starter hole after mated. It worked great except you have to snug down the PP bolts a little after it's partially mated otherwise the protruding PP bolt heads will hit on the bell housing and prevent you from rotating the flywheel to finish torquing the PP bolts.
Clutch life
My car has 64k miles and it had a previous clutch replacement by a PO as it had the updated guide tube and TOB. So that means at least 2 clutches in 64k miles.
Repainting tins, valve covers, rotors
Like many others I had grand plans to powder coat these and the fan. Once I got everything apart I opted to clean and repaint using high temperature paint. Some may cringe, but I used BBQ paint (silver for the valve covers, rotors, brake shields and black for the tins. We'll see how it holds up. I simply cleaned and polished the fan after removing it, and it looks great. Not to mention it retains the original look.
Replacing bolts, seals, miscellaneous
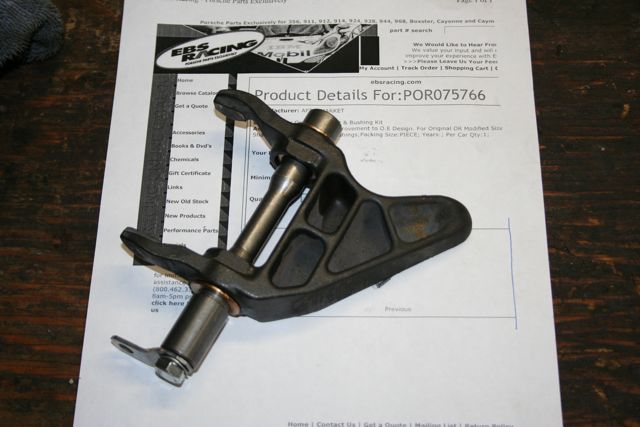
I replaced all of the major bolts including flywheel, PP, CV flange. I see it as cheap insurance. I replaced the rear main seal, pilot bearing and guide tube. I replaced the clutch release fork workings with the EBS Racing bronze bushing setup. When you price new stock needle bearings and seals it's only a few bucks more to go with the much improved EBS setup.
A note on the rear main seal - I seated mine all the way into the crankcase. My original was flush with the outside of the crankcase making it easier to remove at the notch. After I seated it, it was about 0.1" in from the outer crankcase face. I couldn't find anything in the workshop manual about where to seat it, but I did find one Rennlister who seems to know what he is doing say that it will leak if not fully seated. BTW, my old one (not fully seated), was leaking. No leaks from mine thus far, fully seated!
Lightweight flywheel
Man, did I debate this one in my head! I opted to stick with my DMF as it was in excellent condition per the workshop manual and TSB. I also haven't seen on RL a definitive answer to the stalling and I did not want to deal with that, or listen to my wife asking me "are you sure you know what you are doing because the car stalls all the time now?"
Cleaning fluid
I saw a lot of debate on this one. I opted for Purple Power. It worked well on the cosmoline in conjunction with scrapers, wire brushes and elbow grease. There is some concern with the chem film finishes on aluminum, so I thouroughly pressure washed everything with warm water after cleaning to rinse off residue.
All cleaned and ready to go back in. Notice I masked off the original white stenciled part numbers on the tins when painting to keep the 'original look'. Now is the time to put in the Delvac 75W-90.
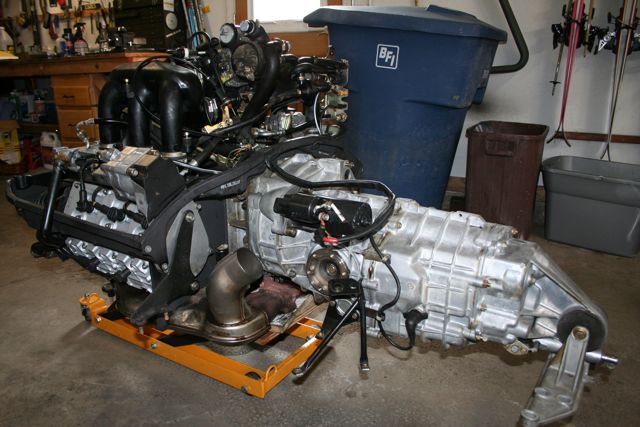
The bulk of my hours were spent cleaning and removing that damn cosmoline. My wife thinks I'm insane.
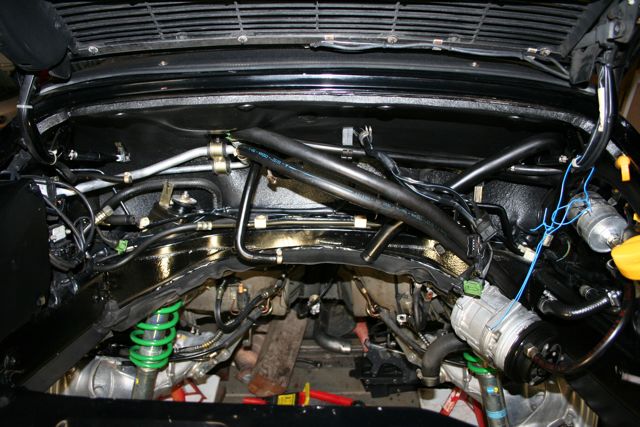
I used 3M Super trim adhesive (08090) to bond the engine blanket rather than Wurth which I couldn't find locally. Seems to work fine. Time and heat will tell. Again - clean,clean,clean.
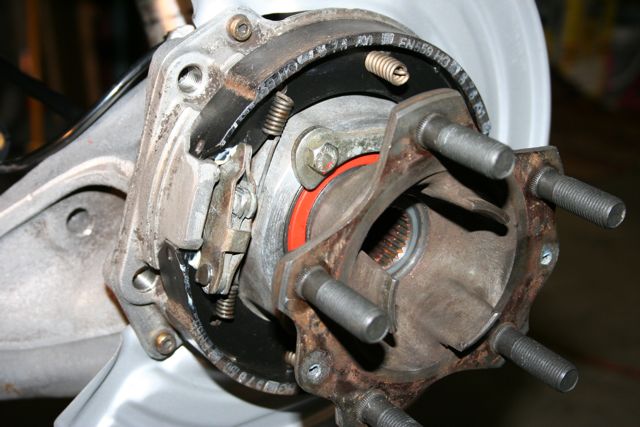
Cleaned, repainted brake shield, and new bearings installed.
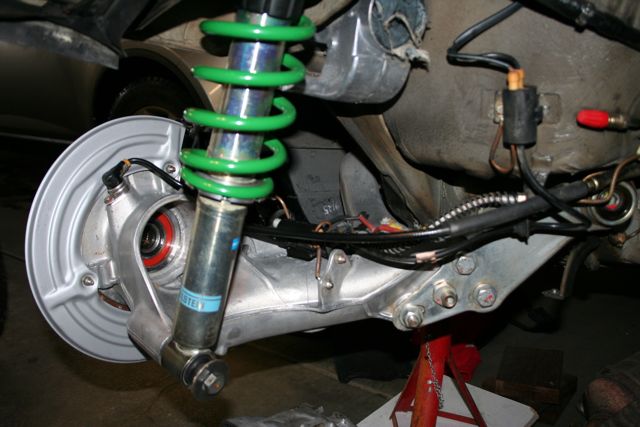
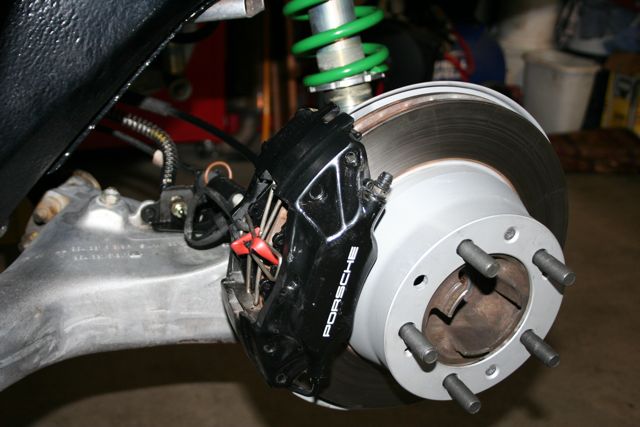
Replaced with 993 C2 4-piston calipers. I kept my stock 45 bar P/V. Replaced wheel studs with 52mm to work with my 9x17 ET55 Cup IIs, 5mm spacers and steel lug nuts. Studs ends are flush with the lugs when installed.
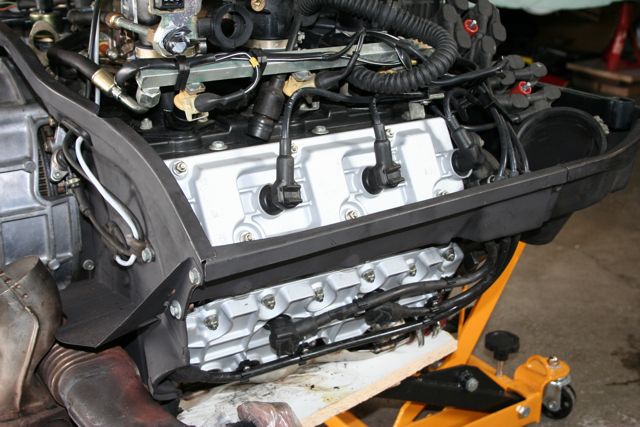
Painted the valve covers using silver high temp BBQ paint from Home Depot. We'll see how it holds up. Side note - I had replaced the valve cover gaskets last year while adjusting the valves and debated whether to buy new gaskets. I decided to experiment with re-using the gaskets since they were 'new'. No leaks re-using the old gaskets! It was also comforting to see that my valve adjustments from last year (4k miles ago), were still spot-on.
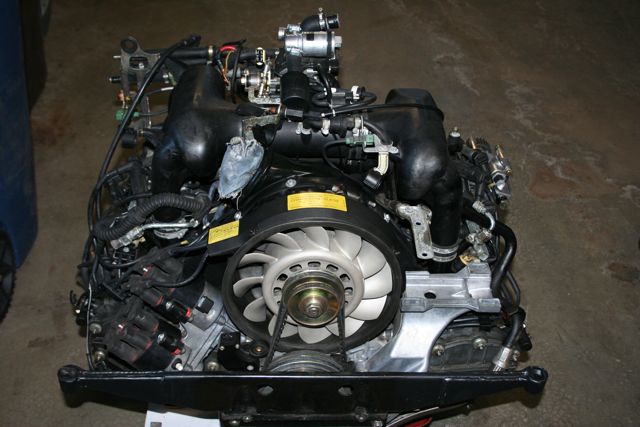
I removed the fan and cleaned everything. No painting required. Replaced the fan hub studs/nuts with 993 bolts, 900-119-026-02-M100.
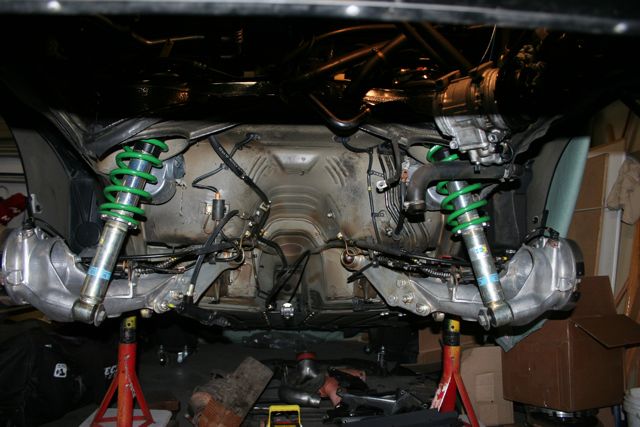
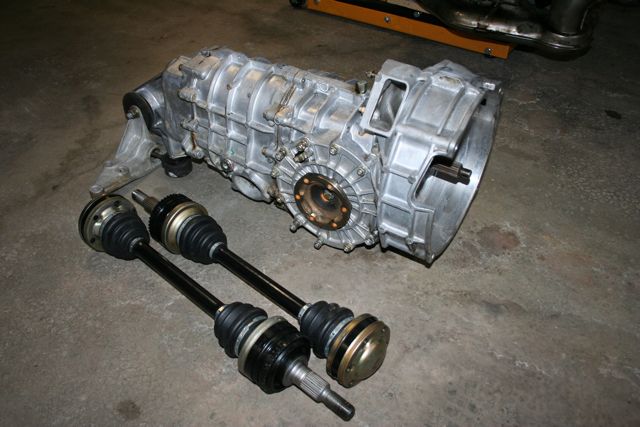
Can't beat cleaned and re-greased CVs with new boots. Much easier out of the car.
Might as well disassemble, clean and re-lube the parking brake 'while you're there'.
The EBS Racing release fork shaft is the way to go.
My work list included:
Replace clutch/PP/TOB
Replace all CV boots and clean/re-grease
Replace rear wheel bearings
Replace rear calipers with 993 C2 4 pots and new pads
Replace engine bay blanket
Adjust valves
Replace clutch slave hose, clean/flush slave cylinder
Replace rear wheel studs with 5mm longer (using Cup IIs with 5mm spacers)
Replace M1 trans fluid (Autozone stuff) with Delvac
Assorted maintenance stuff - various o-rings and seals (PS, RMS, dist, sender units), fan/alt/AC belts, flush PS fluid
Repaint tins, valve covers, rotors, brake shields
Clean EVERYTHING!
Jacking the car
I didn't want to hassle with removing the rear bumper and left it on. I was able to get it high enough on jackstands. I used a $59 ATV jack from Harbor Freight that I feel is a must. It only jacks about 14", so the process of removing the engine/trans is a sequence of lowering the engine/trans on the ATV jack, then raising the body using a floor jack and a 4x4 spanning the trans mounting points. I did have to remove the AFM to get everything to slide out under the bumper.
Removing engine
I removed the engine/trans together. I know some have suggested removing trans only, but I can't imagine that being easier. When I was mating the trans to the engine I was thinking this would be impossible with the engine in the car. Removing/installing the assorted hoses, connections and two rear mount bolts adds maybe 1 hour to the job. Plus it gives you the opportunity to clean the engine bay spotless and replace that crappy looking engine blanket.
Disconnecting the throttle cable is another area of debate and I found it much easier to disconnect at the engine end. BTW, I also disconnected the pedal end so I could remove the cable and repair a break in the plastic sleeving with some heat shrink.
Clutch alignment tool
I didn't use one this time, and tried Garrett's idea of leaving the PP bolts loose then torque through the starter hole after mated. It worked great except you have to snug down the PP bolts a little after it's partially mated otherwise the protruding PP bolt heads will hit on the bell housing and prevent you from rotating the flywheel to finish torquing the PP bolts.
Clutch life
My car has 64k miles and it had a previous clutch replacement by a PO as it had the updated guide tube and TOB. So that means at least 2 clutches in 64k miles.
Repainting tins, valve covers, rotors
Like many others I had grand plans to powder coat these and the fan. Once I got everything apart I opted to clean and repaint using high temperature paint. Some may cringe, but I used BBQ paint (silver for the valve covers, rotors, brake shields and black for the tins. We'll see how it holds up. I simply cleaned and polished the fan after removing it, and it looks great. Not to mention it retains the original look.
Replacing bolts, seals, miscellaneous
I replaced all of the major bolts including flywheel, PP, CV flange. I see it as cheap insurance. I replaced the rear main seal, pilot bearing and guide tube. I replaced the clutch release fork workings with the EBS Racing bronze bushing setup. When you price new stock needle bearings and seals it's only a few bucks more to go with the much improved EBS setup.
A note on the rear main seal - I seated mine all the way into the crankcase. My original was flush with the outside of the crankcase making it easier to remove at the notch. After I seated it, it was about 0.1" in from the outer crankcase face. I couldn't find anything in the workshop manual about where to seat it, but I did find one Rennlister who seems to know what he is doing say that it will leak if not fully seated. BTW, my old one (not fully seated), was leaking. No leaks from mine thus far, fully seated!
Lightweight flywheel
Man, did I debate this one in my head! I opted to stick with my DMF as it was in excellent condition per the workshop manual and TSB. I also haven't seen on RL a definitive answer to the stalling and I did not want to deal with that, or listen to my wife asking me "are you sure you know what you are doing because the car stalls all the time now?"
Cleaning fluid
I saw a lot of debate on this one. I opted for Purple Power. It worked well on the cosmoline in conjunction with scrapers, wire brushes and elbow grease. There is some concern with the chem film finishes on aluminum, so I thouroughly pressure washed everything with warm water after cleaning to rinse off residue.
All cleaned and ready to go back in. Notice I masked off the original white stenciled part numbers on the tins when painting to keep the 'original look'. Now is the time to put in the Delvac 75W-90.
The bulk of my hours were spent cleaning and removing that damn cosmoline. My wife thinks I'm insane.
I used 3M Super trim adhesive (08090) to bond the engine blanket rather than Wurth which I couldn't find locally. Seems to work fine. Time and heat will tell. Again - clean,clean,clean.
Cleaned, repainted brake shield, and new bearings installed.
Replaced with 993 C2 4-piston calipers. I kept my stock 45 bar P/V. Replaced wheel studs with 52mm to work with my 9x17 ET55 Cup IIs, 5mm spacers and steel lug nuts. Studs ends are flush with the lugs when installed.
Painted the valve covers using silver high temp BBQ paint from Home Depot. We'll see how it holds up. Side note - I had replaced the valve cover gaskets last year while adjusting the valves and debated whether to buy new gaskets. I decided to experiment with re-using the gaskets since they were 'new'. No leaks re-using the old gaskets! It was also comforting to see that my valve adjustments from last year (4k miles ago), were still spot-on.
I removed the fan and cleaned everything. No painting required. Replaced the fan hub studs/nuts with 993 bolts, 900-119-026-02-M100.
Can't beat cleaned and re-greased CVs with new boots. Much easier out of the car.
Might as well disassemble, clean and re-lube the parking brake 'while you're there'.
The EBS Racing release fork shaft is the way to go.
Last edited by ddubois; 05-01-2008 at 02:31 PM. Reason: Added throttle cable disconnect

The following users liked this post:
AB-Oz2 (05-21-2024)

