When you click on links to various merchants on this site and make a purchase, this can result in this site earning a commission. Affiliate programs and affiliations include, but are not limited to, the eBay Partner Network.
Dear Pesty & All,
I got my 12-point triple tool and followed the instructions here and viola! ........... 2 days later I have a re-furbed alternator in place and it is kicking out 13.9V at the battery at idle!
Why 2 days later? Well, a few trips to Autozone for tools that I did not have. Extracting the fan was a bit more than trying to tap it off the alternator shaft with all the gunk collected over the years. Just as well Autozone carry a 3-pronged extractor tool........
All is well with the electricals ........ what shall I do next........
Hey Pesty
Why didn't you tell me to stuff a rag all around the pulleys so that when I dropped a little wrench it would not hide and get jammed in the most inaccessible spot imaginable ? Took me a good 20 minutes to get that dang thing out .
Can anybody in the UK recommend where to get the 12 point tool? I have a socket attachment that fits - but it's too long, so I can't fit anything to it to hold it in place. Unfortunately, my socket bit has the hex shaft embedded into the chrome surround, so I can't even use a spanner on the star bit itself.
I've just been to Halfords (which is where my bits originally came from) and it looks like they now have some where the hex shaft stands proud so although I think they're still too long for the proper socket handle to attach, I should be able to use a spanner on the shaft.
Is this what others have done - or is there something better (i.e. a shorter socket attachment) - assuming you didn't buy the official Porsche tool of course?
I used a triple square similar to this one with a spanner (closed end box wrench) to hold it still. It barely fits but works well. It feels more solid over the tool from the emergency kit. It feels more solid
First of all a big thank you to Pesty for the DIY. Some items to add to the original post.
Step 1)Remove fan and alternator belt
- removing fan is in the owner's manual but refer to this thread https://rennlist.com/forums/964-foru...placement.html
- I had to use some small pipe adders on both tools to get the torque I needed, my tiny muscles were not up the to task. Big nut goes CCW.
Step3) Remove the belt break sensor. That is a 5mm socket head screw. Hard to see without a mirror.
I went to Autozone and bought a remanufactured alternator as that was the cheapest solution I could find as I did not think the Porsche Bosch Alternator is anything special. Other low cost options include taking the original alternator to a local rebuilder and they should be able to bring it back to life for $100 or so.
Carefully compare the the one you pull out of the car to the new one you have. Some pieces form the original alternator may need to transfer. See the photos below. I used calipers and confirmed the main shaft diameter on my new alternator matched the original one exactly (17mm).
Good catch, I just went to the garage and that thread is messed up. The nut threads on but "twisted" and doesn't seat properly. So looks like I am just going to get this original rebuilt. Man, I love you guys. Lesson learned about Autozone "quality"
I am doing this same exercise now. A few additional notes thus far:
The factory tool in my tool kit did not fit the shaft fitting. I used a 9mm triple-square socket, which worked perfectly. It's been cited as a 10mm by others, but that did not work for me.
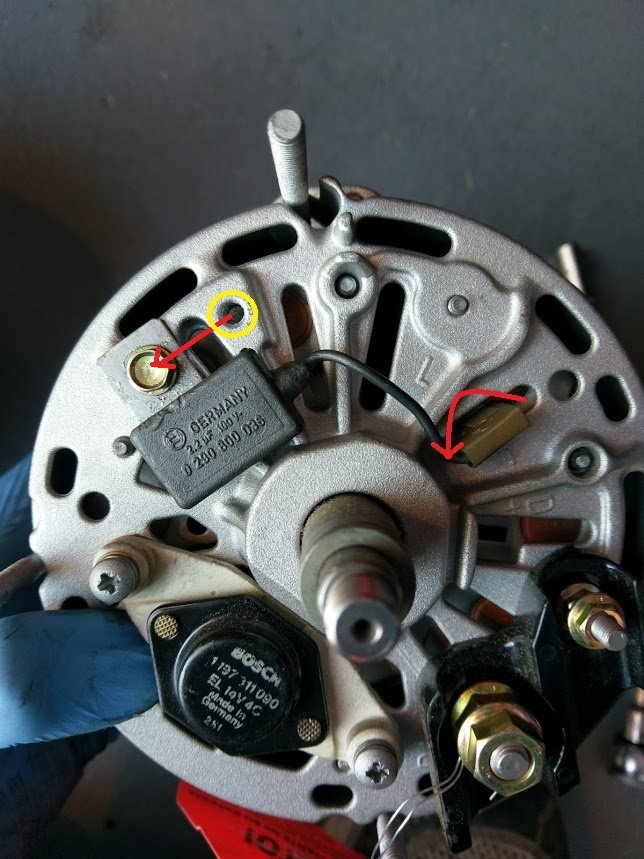
The capacitor on the back of the alternator was not properly configured on the Bosch reman unit I received.
It was like this, out of the box. The blade connector was upside down, and the capacitor was mounted to a hole that will be used to connect the wiring on that side later. It needs to be move to where the red arrow indicates:
Here is the proper arrangement. The blade connector is flipped, and the capacitor mount is move to the proper hole. The yellow circled hole will be occupied by a screw holding down one of the three connections to the alternator
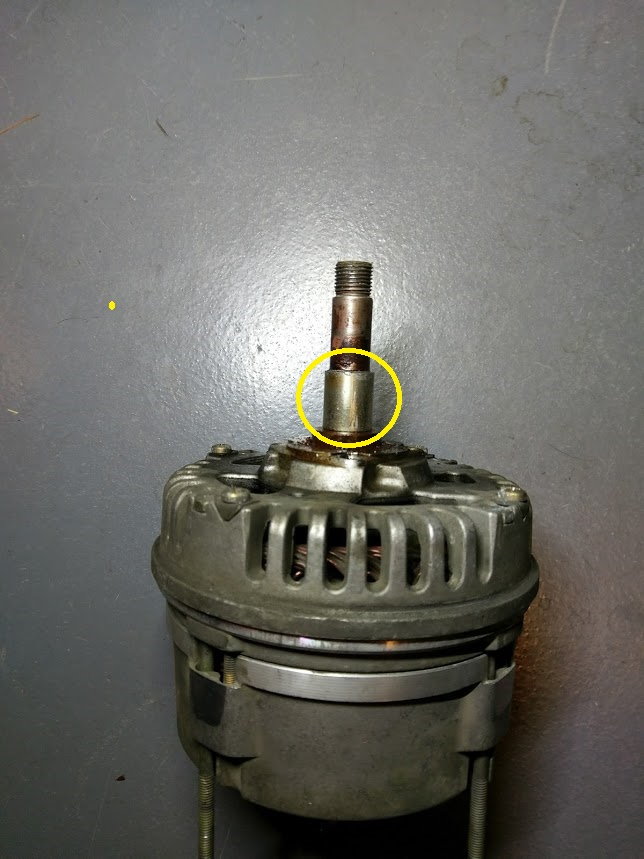
Also, the spacer on the front of the alternator shaft that Ricardo points out above, was on my old alternator very snugly. I soaked it in Kroil (use your favorite penetrating oil), put a pair of vise-grips on it, and used the triple square fitting on the shaft to turn the shaft while walking the spacer off. Took a bit of work.
Circled here:
Still working on some other bits while I have this apart. Will post any other items that I find noteworthy.


 10-02-2006, 10:34 PM