When you click on links to various merchants on this site and make a purchase, this can result in this site earning a commission. Affiliate programs and affiliations include, but are not limited to, the eBay Partner Network.
Ahh I think that would work even better, perhaps.
I initially tried four small neodymium magnets (smaller than dime diameter, 1/8th inch thick) on the button-side of the switch, hoping they would magnetize the springs enough through the plastic to hold the bearings in place. It did work, but not well enough to hold them firmly enough. I could tilt the assembly about 45 degrees before the magnets fell off... if I didn't jiggle them. would need something about quarter-sized to work well.
The way you do it is with dielectric grease-or even a spot of synthetic grease. Works every time.
My switches failed due to a crack in the white plastic rocker arm (see section on the right) that would keep the electrical contacts from completing the circuit.
Hi all. I just wanted to add a little bit to this thread, as it helped me. On my car, it turned out that the contacts were fine. What had happened was the power and ground wires had pulled apart in one of the plugs mounted underneath the seat. Also, make sure none of the spade connectors at the motors have not been accidentally pulled off.
Minor trick for what is already perfect instructions
Originally Posted by garrett376
I used my little screwdriver the scrape off the burn marks on the two contacts in the switch enclosure, and the two contact points on the rocker arm. Then I just placed the arm back into the right spot and bent back the retaining tab. The trick to getting the switch back together is to keep the rocker part of the switch aiming upwards so the little ***** remain on the top of the springs. Then slide it together gently and it will pop together with the switch base. Put it all back together, and now I've got complete operation in all directions! And I save $100!
This is another example of how the 964 is such a wonderful car with its simple, non-sealed electronics that can be repaired in most cases. Excellent!
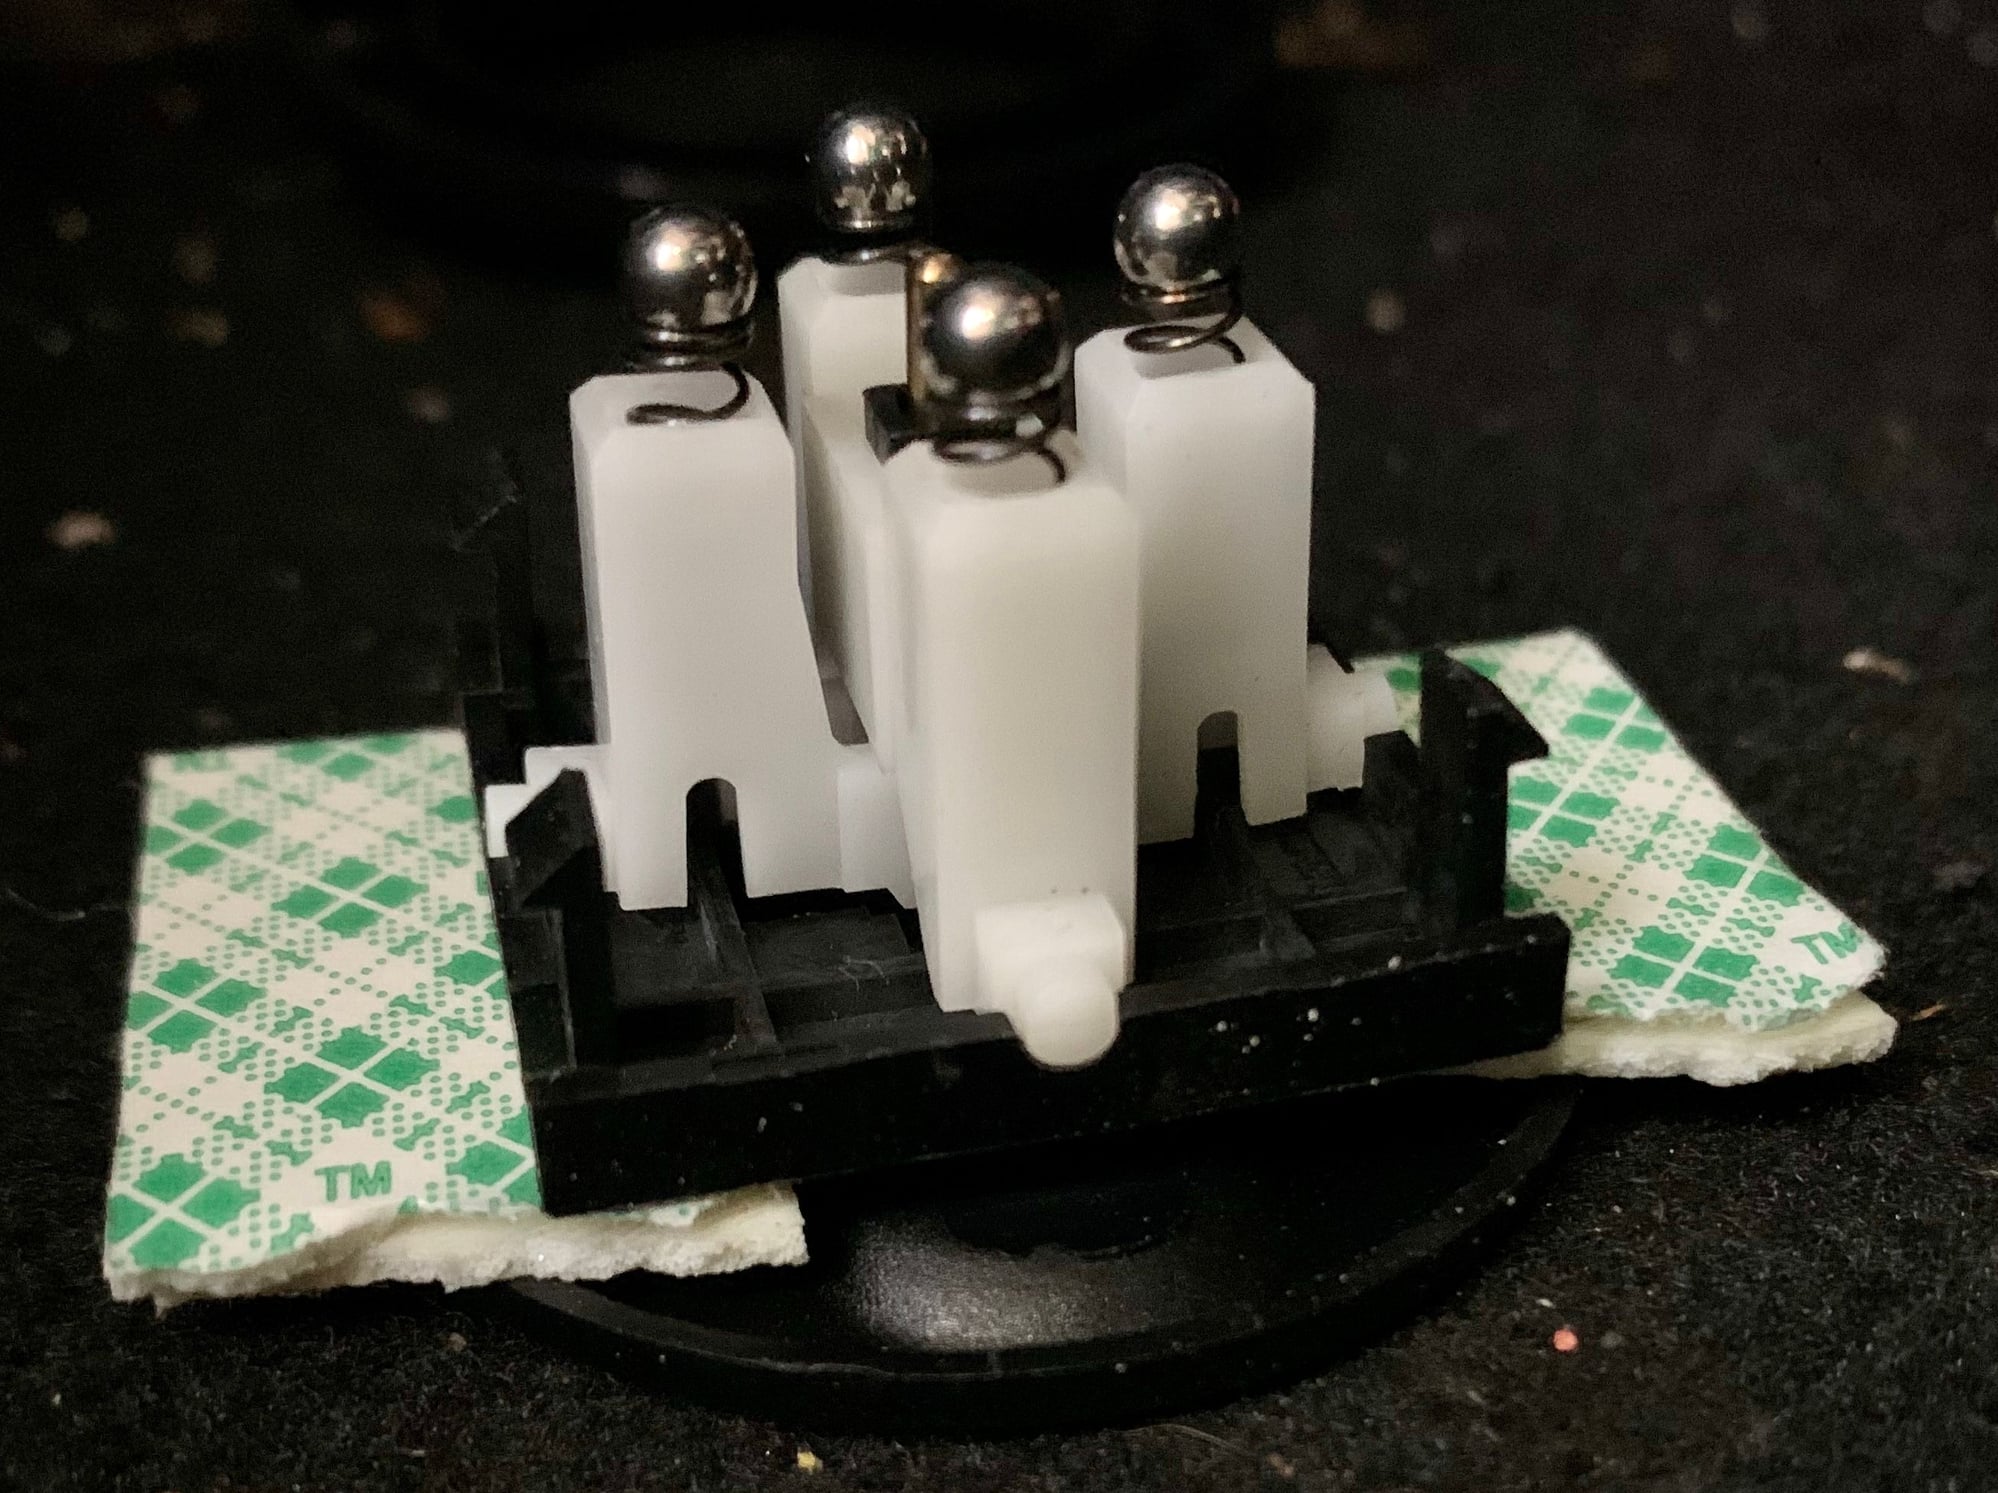
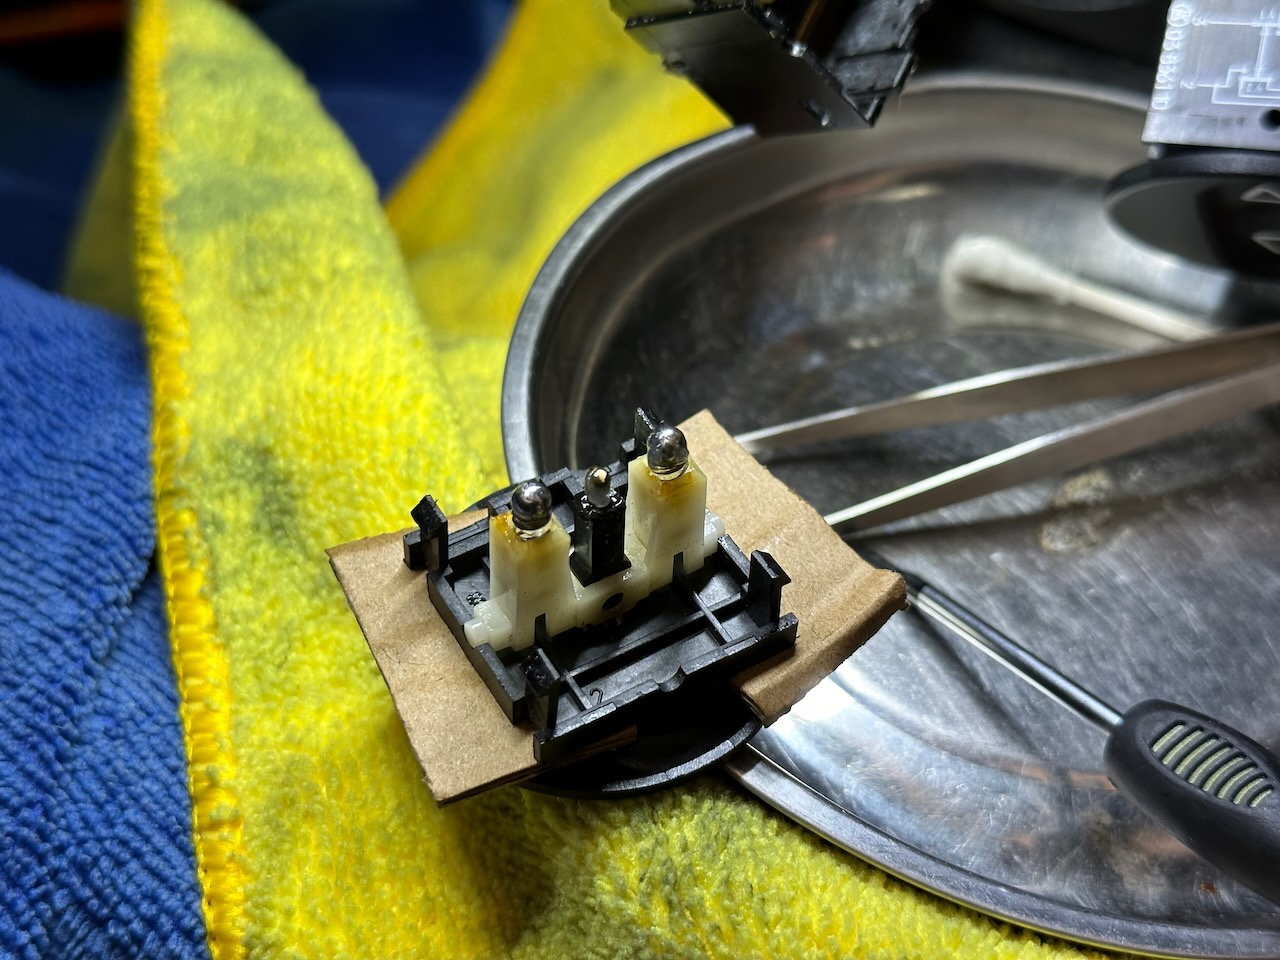
@garrett376 - You deserve a "Renny Award" (Emmy?) for your instructions! I did this fix without removing the seat (because bolts are stripped). One tip I would add to your instructions: wedge something between the outer facing switch face and the housing. This will help when trying to slide the outer square housing back on top of the switch with the bearings balanced on tops of the springs. (After the 10th time of at least one ball bearing falling off when trying to marry the two parts together, I figured there had to be a better way.) I just happen to have some double-backed foam tape I folded over and stuck a piece between the switch and housing on each side so that the white rocker towers stayed stable. You could use anything really, like a piece of cardboard or folded paper. They just have to be even on each side. I was able to get it back together on the first try after adding these wedges. Thanks again, garrett376!
@garrett376 - You deserve a "Renny Award" (Emmy?) for your instructions! I did this fix without removing the seat (because bolts are stripped). One tip I would add to your instructions: wedge something between the outer facing switch face and the housing. This will help when trying to slide the outer square housing back on top of the switch with the bearings balanced on tops of the springs. (After the 10th time of at least one ball bearing falling off when trying to marry the two parts together, I figured there had to be a better way.) I just happen to have some double-backed foam tape I folded over and stuck a piece between the switch and housing on each side so that the white rocker towers stayed stable. You could use anything really, like a piece of cardboard or folded paper. They just have to be even on each side. I was able to get it back together on the first try after adding these wedges. Thanks again, garrett376!
Sometimes others can explain what you meant A LOT better than yourself. Thanks Darius, since my own writing did not make sense, even to me, anymore.
Now I need to redo this... as they stopped working properly again.
14+ years later this is still a great post. Fixed the seat switch in my �92 964 Turbo. Had to remove the seat like some others and reinstall the switch with the seat on a work bench door side down.
To those just trying this - watch out for the ball bearings, the brass pin and the springs. If you have a cloth or a moving blanket it�s a great idea to spread it out under your work area since these fall out easily during removal and attempts at installation. Another suggestion - have a drink close by because it is frustrating 😂 but wow is it nice to have switches that work!
This is a great thread and I've made use of it too.
I find that the only switch that consistently needs attention on my car is the passenger seat because it doesn't get used all that often. I make it a point to exercise the switch about once a week. I haven't had any further issues since doing this routine.
A tiny amount of super glue on the end of the springs will hold the bearing on the spring.
Tiny amount.
Worked like a charm, and can be assembled without being upside-down.
Don't put too much, or it'll work its way down the spring and bind up in the hole.
This tip worked great for me! Recently I had to clean the contacts again and the glue still held the ball on the spring a year later!
Just rebuilt my seat switch and it works great. Before disassembly, I could get it working by spraying it liberally with contact cleaner, but that only worked for a few minutes then stopped working.
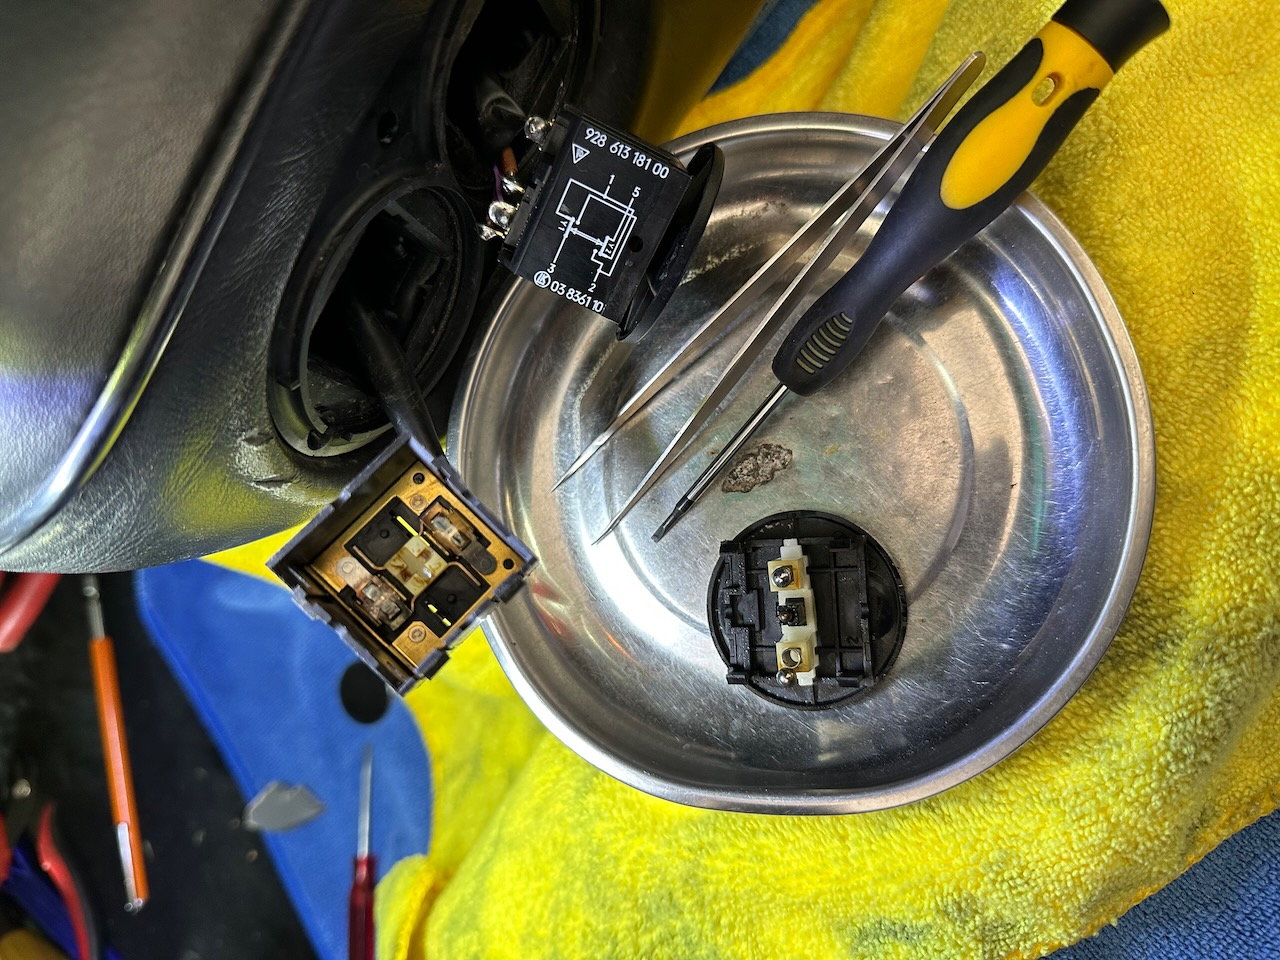
Did the surgery in car. Clipped the wire tie, used some microfiber towels and a magnetic tray to catch any wayward ***** or springs, dissassembled, cleaned contacts with some super fine sandpaper wrapped over the tip of a very small screwdriver, gave it all another shot of contact cleaner, used dielectric grease to hold the ***** in place, some cardboard to firm up the switch while assembling, and bob's your uncle!
Please let us know how long it lasts? I have done several and some don't last long once taken apart. i don't think I did anything wrong more the spring and contacts are just old and worn. The mirror switch is another that can be fixed but I found had a short life after the repair.
Please let us know how long it lasts? I have done several and some don't last long once taken apart. i don't think I did anything wrong more the spring and contacts are just old and worn. The mirror switch is another that can be fixed but I found had a short life after the repair.
Originally Posted by 993FJ80
BrandonH Full on MacGyver! It may not find favor with some of the legends on this site, but the kid and me loves your solution.
When my ball bearings rolled away to parts unknown and I resorted to using the heads of pop rivet stems o was hoping for 2-3 years. When I sold the car last year they were still working great so� 10 years and counting. Never did find any of those ball bearings.
To the purists I stand by my initial reaction: this is a dumb design!
Please let us know how long it lasts? I have done several and some don't last long once taken apart. i don't think I did anything wrong more the spring and contacts are just old and worn. The mirror switch is another that can be fixed but I found had a short life after the repair.
It's been almost exactly a year since I bumped this post doing the repair on my 930... But if the plastics are not cracked and you do a reasonable job cleaning, de-oxidizing and lubricating the assembly, I see no reason why it won't last another 40 years.


 05-12-2019, 07:48 PM