

valve adjustment question
 06-01-2005, 10:56 AM
#1
Rennlist Member
Thread Starter
The photos in Adrian's book, Factory Manual, 101 Projects...., all show pictures of the feeler gauge sitting in the gap without being held onto. From the descriptions of what the clearance should feel like, it seems like this would be too tight if the gauge were able to sit in place like that unassisted. Am I correct?
thanks,
c
thanks,
c
 06-01-2005, 11:10 AM
#2
Addict
Rennlist Member
Rennlist Member
I have cross-checked feeler gage setting with a dial indicator, which is not subjective.
There should be just a little friction on the blade when the adjustment is correct. If the blade slips out, there is clearance and the gap is too wide. It takes a little practice to get the correct "feel". The feeler should move easily, but there must be some friction drag.
There should be just a little friction on the blade when the adjustment is correct. If the blade slips out, there is clearance and the gap is too wide. It takes a little practice to get the correct "feel". The feeler should move easily, but there must be some friction drag.
06-01-2005, 11:30 AM
#3

When I had it "right", I was able to leave the gauge sitting in the gap but it was not so tight that it was actually grabbing the blade. It's a VERY subtle difference with only monor adjustments to the screw.
06-01-2005, 01:20 PM
#4
RL Community Team
Rennlist Member
Rennlist Member

You'll get the hang of it - it's actually tighter than you think - leave it too loose (gauge slips around really easily) and you'll have a noisy engine. I like to feel the drag on it - I'll tighten it so it grabs it snug where I can't move it, then back it off slightly. It is better to be on the loose side if you're going to be off, than to be on the tight side, though...
I love doing the valves... it's relaxing
I love doing the valves... it's relaxing
06-01-2005, 01:25 PM
#5
Professor of Pending Projects
Rennlist Member
Rennlist Member
Originally Posted by garrett376
...I love doing the valves... it's relaxing


and yes... what they all said!
and get a few extra blades... you will need them...
06-01-2005, 02:30 PM
#6
It is pretty tight. much tighter than you think. I tighen mine down until I can barely slip the blade out. There should be quite a bit of drag...not just a slight one. Afterward, I also double check by rocking the rocker up and down. There should be a tiny bit of movement felt (not seen). If I don't feel a tiny bit of movement, the contact is solid, then I tightened way too far.
But just adjusting to a slight friction drag on the blade usually leave my engine with lots of clacking noises.
I think everyone adjust theirs too loose the first time.
---
anthony
But just adjusting to a slight friction drag on the blade usually leave my engine with lots of clacking noises.
I think everyone adjust theirs too loose the first time.
---
anthony
06-01-2005, 03:53 PM
#7
Technical Guru
Rennlist Member
Rennlist Member
ChrisM,
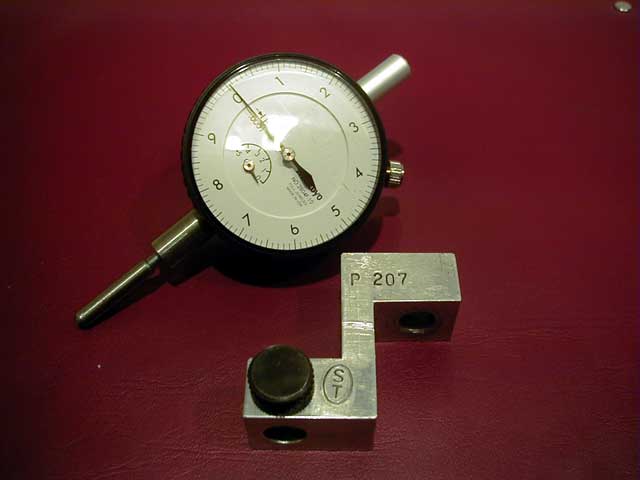
The first few times I adjusted my valves I found it really helpful to check my work with a dial-gauge indicator. If you are only going to do this a couple times you don't need to spend a fortune on Mitutoyo (see photo below) or Starrett ($100-400) and can get by with something cheaper from ENCO. For a holder you can use the Z-block ($34) that's normally used for cam-timing but something like VW387 or a (cheaper) generic 3-way adjustable holder would work fine (VW387 was designed for checking valve clearance but costs $100) and is probably better.
The first few times I adjusted my valves I found it really helpful to check my work with a dial-gauge indicator. If you are only going to do this a couple times you don't need to spend a fortune on Mitutoyo (see photo below) or Starrett ($100-400) and can get by with something cheaper from ENCO. For a holder you can use the Z-block ($34) that's normally used for cam-timing but something like VW387 or a (cheaper) generic 3-way adjustable holder would work fine (VW387 was designed for checking valve clearance but costs $100) and is probably better.
Trending Topics
06-01-2005, 04:01 PM
#8
Professor of Pending Projects
Rennlist Member
Rennlist Member
Originally Posted by JasonAndreas
ChrisM,
The first few times I adjusted my valves I found it really helpful to check my work with a dial-gauge indicator. If you are only going to do this a couple times you don't need to spend a fortune on Mitutoyo (see photo below) or Starrett ($100-400) and can get by with something cheaper from ENCO. For a holder you can use the Z-block ($34) that's normally used for cam-timing but something like VW387 or a (cheaper) generic 3-way adjustable holder would work fine (VW387 was designed for checking valve clearance but costs $100) and is probably better.
The first few times I adjusted my valves I found it really helpful to check my work with a dial-gauge indicator. If you are only going to do this a couple times you don't need to spend a fortune on Mitutoyo (see photo below) or Starrett ($100-400) and can get by with something cheaper from ENCO. For a holder you can use the Z-block ($34) that's normally used for cam-timing but something like VW387 or a (cheaper) generic 3-way adjustable holder would work fine (VW387 was designed for checking valve clearance but costs $100) and is probably better.
Next time you are doing yours, would you mind taking a few photos... I have never used a dial-gauge indicator for this and would like to see it in action. Thanks!
06-01-2005, 08:40 PM
#9
Rennlist Member
Thread Starter
OK what's the trick to getting the rear 10mm bolt off the blower motor? The little copper piece that's embedded in the plastic turns as you try to loosen the nut. I reached some pliers back there trying to keep it from turning but it's impossible to get a good grip. I tried levering the motor out while loosening the nut and that didn't work either. Any suggestions?
c
c
06-01-2005, 11:22 PM
#10
Professor of Pending Projects
Rennlist Member
Rennlist Member
Originally Posted by Chris M.
OK what's the trick to getting the rear 10mm bolt off the blower motor? The little copper piece that's embedded in the plastic turns as you try to loosen the nut. I reached some pliers back there trying to keep it from turning but it's impossible to get a good grip. I tried levering the motor out while loosening the nut and that didn't work either. Any suggestions?
c
c
?????? You do not need to remove the blower motor to adjust the valves....
06-02-2005, 01:12 AM
#11
Technical Guru
Rennlist Member
Rennlist Member
Originally Posted by Wachuko
Next time you are doing yours, would you mind taking a few photos... I have never used a dial-gauge indicator for this and would like to see it in action. Thanks!
06-02-2005, 07:19 AM
#12
Rennlist Member
Thread Starter
?????? You do not need to remove the blower motor to adjust the valves....
Jason-thanks for the dial gauge tip.
c
06-02-2005, 12:53 PM
#13
Rennlist Member
Because Adrian's book does not have you remove the sheet metal wall between the engine bay and the road.
I don't understand your problem with the blower motor bolt - there are two bolts that fasten the blower motor assembly to the aluminum intake manifold, at 3 o'clock and 6 o'clock relative to the blower motor if you are facing the left rear wheel. Both bolts thread directly into the aluminum intake manifold.
I don't understand your problem with the blower motor bolt - there are two bolts that fasten the blower motor assembly to the aluminum intake manifold, at 3 o'clock and 6 o'clock relative to the blower motor if you are facing the left rear wheel. Both bolts thread directly into the aluminum intake manifold.
06-02-2005, 01:17 PM
#14
Professor of Pending Projects
Rennlist Member
Rennlist Member
Originally Posted by Dave R.
...I don't understand your problem with the blower motor bolt - there are two bolts that fasten the blower motor assembly to the aluminum intake manifold, at 3 o'clock and 6 o'clock relative to the blower motor if you are facing the left rear wheel. Both bolts thread directly into the aluminum intake manifold.
Bolts seize and the whole assembly turns in the plastic... making it impossible (or extremely dificult
 ) to remove the bolts...
06-02-2005, 01:19 PM
) to remove the bolts...
06-02-2005, 01:19 PM
#15
Technical Guru
Rennlist Member
Rennlist Member
Definitely easier to do it all from below... To pull the distributor caps you need to remove the heater tube so maybe some people find it easier to reconnect the tube to the rear sheet-metal with it already attached to the blower outside of the car?
