
Check strap removal/replacement guide
 10-07-2005, 04:33 PM
#16
Rennlist Member
Join Date: May 2004
Location: Fairfax Station, Va. USA
Posts: 656
Likes: 0
Received 1 Like
on
1 Post
Thanks, Marc for excellent descriptions and photos. I did this repair today to my driver's side door. 1 hour start to finish, this quickly thanks to you. I'll do the passenger's door next and predict 30-45 minutes. Tip for others: I didn't have to take the door panel off completely, just remove all screws, etc., and pop off the door panel, then swing it out of the way enough to access the 3 screws attaching the speaker. Remove speaker screws and swing it out of the way. Easy repair. The difference in old and new is simply amazing. The squarish-shaped piece of urethane on mine -- that is shown damaged in Marc's photos -- was completely missing!
 10-07-2005, 05:15 PM
#17
Burning Brakes

Originally Posted by puma1824
I found these at Automotion.com (Performance Products) ...
Originally Posted by Richard Curtis
... The squarish-shaped piece of urethane on mine -- that is shown damaged in Marc's photos -- was completely missing!
11-02-2006, 01:57 PM
#18
Instructor

Join Date: Dec 2001
Location: United Kingdom
Posts: 249
Likes: 0
Received 0 Likes
on
0 Posts
Hi Marc,
I have just read the start of this thread regarding the fitting of the reinforcement kit and new straps....I tried calling Type 911 but they were closed.
I have an issue with my door since a the bodyshop that was doing my respray fitted new check straps.
Basically the door has been very stiff to open & close. I had only opened it maybe a dozen times since getting it back and the last time I tried to close the door there was a lots of resistence. I tried to close it and felt something starting to give....Initially I thought it was just the check strap easing off but unfortunately it turned out to be the door metal work distorting!!
It appears that the part the strap is bolted to is quite thin metal which is welded to the actual door pressing. It is this thin metal that has distorted.
I have managed to pull open the door enough to remove the check strap and it appears to be jammed solid!
I am a bit unsure as to where the smaller plate of the kit goes. Is it between the thin welded plate and the door pressing? It's clear where the larger one goes. I am not sure how the kit is strengthening the original welded plate unless one plate is on the inside of the door and the other on the outside in the door jamb and then bolted up to each other? Otherwise surely you are still relying on the original plates welds?
Also, what is the correct way to fix the door strap? Is it with the "curve" of the strap towards the outside or the inside of the car? Maybe someone can take a picture of an open door to help me?
At the moment I am not sure whether I have a faulty door strap, an incorrectly installed one or an already weak door fixing. The other door seems to have an easier movement.
Many Thanks,
Gary
11-02-2006, 03:49 PM
#19
Super Duper Moderator
Lifetime Rennlist
Member
Lifetime Rennlist
Member
Thread Starter
Hi Gary,
The smaller plate goes inside the door and the other plate is on the outside so the original metal of the car door is sandwiched between the two plates.
The check-strap is supposed to curve inwards as it heads forwards.
I think the photo in post #6 shows both the location of the smaller plate as well as the curvature of the check-strap.
When I first fitted mine, they were too stiff - I shaved a tiny bit off the plastic that grips the long, curved arm (you have to take the square head apart to get at it) to make it a little easier. Don't take too much - leave it a little stiff as it will quickly loosen over time anyway.
Marc
11-02-2006, 04:04 PM
#20
Instructor
Join Date: Dec 2001
Location: United Kingdom
Posts: 249
Likes: 0
Received 0 Likes
on
0 Posts
Marc thanks for your reply.
So to be clear are you saying this....? On a LHD looking down at the strap with an open door, the slider would be kind of 6 o'clock anti clockwise around to 3 o'clock as opposed to 9 o'clock clockwise around to 12 o'clock?? Hope that makes sense.
Also the small plate is outside the door between the A-pillar and the door. If so did you paint yours?
If you have time could you post a picture of the strap and the plate please.
Sorry to be a pain......
Gary
11-02-2006, 04:09 PM
#21
Instructor
Join Date: Dec 2001
Location: United Kingdom
Posts: 249
Likes: 0
Received 0 Likes
on
0 Posts
Marc,
picture 6 looks like the curvature is a 9 to 12 clockwise sort of orientation. Also one of your pictures show the plate with the lip(which I'm calling the big plate) as being inside the door. You don't appear to have a picture of the smaller plate?
I just want to be sure this will work for my problem before I buy...
Gary
11-02-2006, 09:49 PM
#22
Super Duper Moderator
Lifetime Rennlist
Member
Lifetime Rennlist
Member
Thread Starter
Gary,
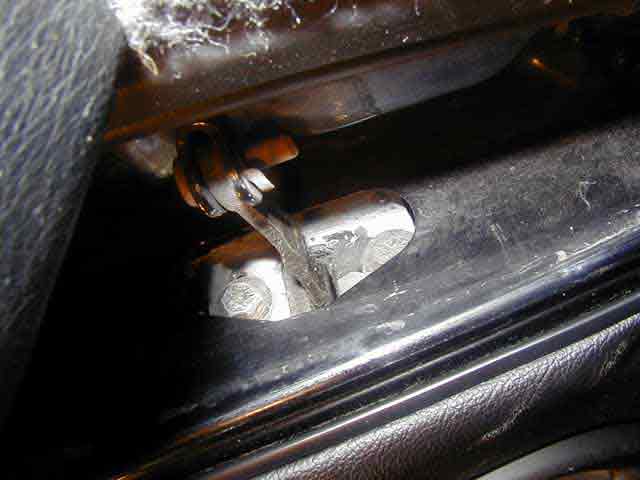
Slider (tongue, arm, etc) curvature is clockwise 9 to 12 o'clock on the driver's side of a LHD car when you are facing forwards.
You are right, the plate with the lip (I called it the smaller plate - blue arrow) goes inside and the other plate (red arrow) is outside on the edge of the door.
Marc
Slider (tongue, arm, etc) curvature is clockwise 9 to 12 o'clock on the driver's side of a LHD car when you are facing forwards.
You are right, the plate with the lip (I called it the smaller plate - blue arrow) goes inside and the other plate (red arrow) is outside on the edge of the door.
Marc
11-02-2006, 09:52 PM
#23
Super Duper Moderator
Lifetime Rennlist
Member
Lifetime Rennlist
Member
Thread Starter
Originally Posted by Gary C2 UK
Also the small plate is outside the door between the A-pillar and the door. If so did you paint yours?
Marc
11-04-2006, 10:29 AM
#24
Instructor
Join Date: Dec 2001
Location: United Kingdom
Posts: 249
Likes: 0
Received 0 Likes
on
0 Posts
Ok so I'm a bit confused 
The small plate (red arrow), is this actually inside the door? If so, how did you get it inside as it's bigger than the hole? Is it between the door pressing and the welded metal that the strap was originally bolted too?
My understanding (!?) was that the plates were arranged with one inside the door(larger) and the smaller one outside creating a "sandwich" with the door pressing in between(assuming the metal plate is thin and there is enough clearance with the door-jamb to allow the door to close) I therefore thought that if the original welded in piece was ruined then the new brackets would form the anchor point for the strap to work against.
If this isn't the case then all I can see is that the plates simple back up the thin metal but if there are any issues with the welds of the thin metal then this kit won't help at all? I then question as to whether this stronger base will then just transfer the force the the A-pillar welds and thus stress them more?
Sorry for all these questions........
It is my doors inner welded in metal work that is deformed. Anyway in summarry it's just the location of the smaller plate I am unsure of.
Thanks again,
Gary
 11-04-2006, 02:30 PM
#26
Super Duper Moderator
Lifetime Rennlist
Member
Lifetime Rennlist
Member
Thread Starter
Gary - sorry to confuse you.
The plate with the lip (blue arrow) goes inside the door but you get it there by inserting it through the large speaker hole. The other plate (red arrow) goes on the outside of the door and they provide the reinforcement to the weak metal as they squish and sandwhich them together as the bolts holding the strap are tightened. In the picture above (post #23) the bolts are running through the red-arrow plate and you can just make out the edge of the check-strap bumper head. The red-arrow plate is a little larger than the hole you have to slip it through but it fits easity.
Correct!
These plates do nothing to reinforce the a-pillar, of course!
Marc
The plate with the lip (blue arrow) goes inside the door but you get it there by inserting it through the large speaker hole. The other plate (red arrow) goes on the outside of the door and they provide the reinforcement to the weak metal as they squish and sandwhich them together as the bolts holding the strap are tightened. In the picture above (post #23) the bolts are running through the red-arrow plate and you can just make out the edge of the check-strap bumper head. The red-arrow plate is a little larger than the hole you have to slip it through but it fits easity.
Originally Posted by Gary C2 UK
My understanding (!?) was that the plates were arranged with one inside the door(larger) and the smaller one outside creating a "sandwich" with the door pressing in between(assuming the metal plate is thin and there is enough clearance with the door-jamb to allow the door to close) I therefore thought that if the original welded in piece was ruined then the new brackets would form the anchor point for the strap to work against.
These plates do nothing to reinforce the a-pillar, of course!
Marc
11-04-2006, 06:13 PM
#27
Instructor
Join Date: Dec 2001
Location: United Kingdom
Posts: 249
Likes: 0
Received 0 Likes
on
0 Posts
Originally Posted by Marc Shaw
The other plate (red arrow) goes on the outside of the door and they provide the reinforcement to the weak metal as they squish and sandwhich them together as the bolts holding the strap are tightened. In the picture above (post #23) the bolts are running through the red-arrow plate and you can jut make out the edge of the check-strap bumper head. The red-arrow plate is a little larger than the hole you have to slip it through but it fits easity.
Marc
You say that the small plate goes on the outside of the door........then later on that it goes through the hole?? The weak metal is what I would describe as "inside" the door pressing.
So you are saying that it goes (with door closed) forward of the weak metal but inside the hole butted against this weak metal? It is not outside the door pressing where it would be between the door pressing and the A-pillar when the door is closed?
As mentioned before, this is what I thought the kit would originally do. I thought the two metal plates would be tightened up (squashing the weak metal) but clamped to the door pressing giving the strength & rigidity required by the check strap.......and there would be no need to worry about welds.
I know your pictures do appear to show a plate inside the hole but I just wanted to be clear(er)......
Thanks again,
Gary
11-04-2006, 06:42 PM
#28
Technical Guru
Rennlist Member
Rennlist Member
Originally Posted by Marc Shaw
Tap pin out gently with hammer
Originally Posted by Gary C2 UK
I have an issue with my door since a the bodyshop that was doing my respray fitted new check straps.

 11-04-2006, 09:41 PM
#29
Super Duper Moderator
Lifetime Rennlist
Member
Lifetime Rennlist
Member
Thread Starter
Originally Posted by Gary C2 UK
You say that the small plate goes on the outside of the door........then later on that it goes through the hole?? The weak metal is what I would describe as "inside" the door pressing.
So you are saying that it goes (with door closed) forward of the weak metal but inside the hole butted against this weak metal? It is not outside the door pressing where it would be between the door pressing and the A-pillar when the door is closed?
So you are saying that it goes (with door closed) forward of the weak metal but inside the hole butted against this weak metal? It is not outside the door pressing where it would be between the door pressing and the A-pillar when the door is closed?

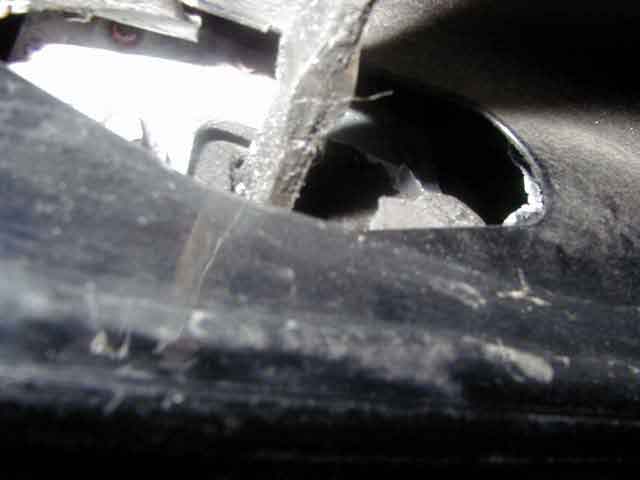
The plates sandwhich the weak metal that the check-strap bolt to but, if you look at the area, this metal area is actually inside the outer skin of the door. One plate (with the lip) goes on the inside of this weak metal area via the speaker hole, the other plate goes on the outside of the weak metal area but is inside the outer door skin (hence the hole you have to slip it into).
In the photo below, you can see (looking from the front of the door where the a-pillar sits) the outer skin (red arrow), the inner weak metal that has to be reinforced (green arrow), the bolt holes for the check strap (peach arrows), and the hole for the check-strap itself (pink arrow).
Clear as mud?
Marc
11-05-2006, 02:39 AM
#30
Instructor
Join Date: Dec 2001
Location: United Kingdom
Posts: 249
Likes: 0
Received 0 Likes
on
0 Posts
Hey, hey I had it all along....!!
I just wanted to be clear on what exactly you meant by "inside" the door!!
I should explain my continual questioning. Basically the guy at Type 911 who sells the bloody kit told me on Friday that the small plate is outside the door in the space between the door & the door jamb. Going by your original pictures, this is not how it appeared to me and you have now confirmed what I suspected, that the small plate is actually inside the hole and thus inside the door space, albeit only just......
Again, this won't strengthen the weak metal in the welded area at all which is also a failure point.........
I guess there's American English, Canadian English, English English and me, Scottish English.......There's a lot of water between us to get muddied!!
Thanks for your patience!!