When you click on links to various merchants on this site and make a purchase, this can result in this site earning a commission. Affiliate programs and affiliations include, but are not limited to, the eBay Partner Network.
Thanks Tarek307 & Foxman,
You keep me encouraged. I thought it was just me.
I allocated 1 hour (had an appointment afterwards. so hard stop) recently to this job of "simply" replacing a stupid tube. I even bought a hose with the part number instead of going the route of trying to find some random hosing.
Well, I had to abandon the job, defeated and decided I need to allocate some more time (like a whole day) to this job!
At one point I even questioned whether I had bought the correct part since there seemed to be no way that round hose was going on the oval receptacle of the vent at the top. The hose also seems too short once the bottom end is attached but it clearly isn't when placed next to the hose that was removed.
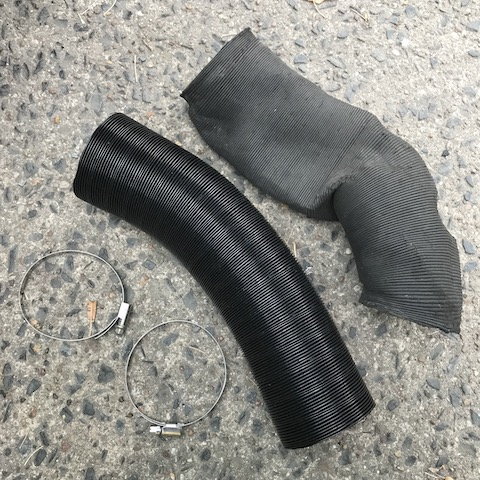
Old heater hose vs new
The access to the top connection seems so limited in my car with all of the cables, etc. in place. Wish it looked as tidy and accessible as it does in your picture Foxman.
The non-Porsche duct is a lot easier, not to mention sturdier, since it is very flexible. 10-min install.
That said, when I was still fiddling with the stock pipes I found the easiest technique was to start with the oval side. Get it most of the way over the oval and then twist it on rather than pushing. The twist/rotation seems to help guide the tube into shape. Don�t tighten the clamps yet, go to the round end (floor side) and do the same thing (carefully, so the the oval end does not slip off) and then tighten both clamps. Also, stretch/flex the tube a bit first.
good luck
Nice. Thanks.
Appreciate any advice.
I was actually thinking to heat the hose up a bit with a hair dryer first in order to make it more pliable.
Pegasus Auto Racing and Aircraft Spruce had the best pricing I could find on the silicone air duct hose. That�s the orangey/red hose for the engine side of the heat pipes. Also works under the dash, or you can use the black neoprene version (lower temp rating).
So first of all, I am very displeased with Porsche right now, and so are my scraped knuckles
Had to take another break in the proceedings today since I had something else to do. I think the trick is to get the back top corner in place as best as possible (no mean feat in itself) and then, as jonathant said, to try to twist the hose on the rest of the way. The hose just seems too small from the diameter to get it all the way over the oval connection piece.
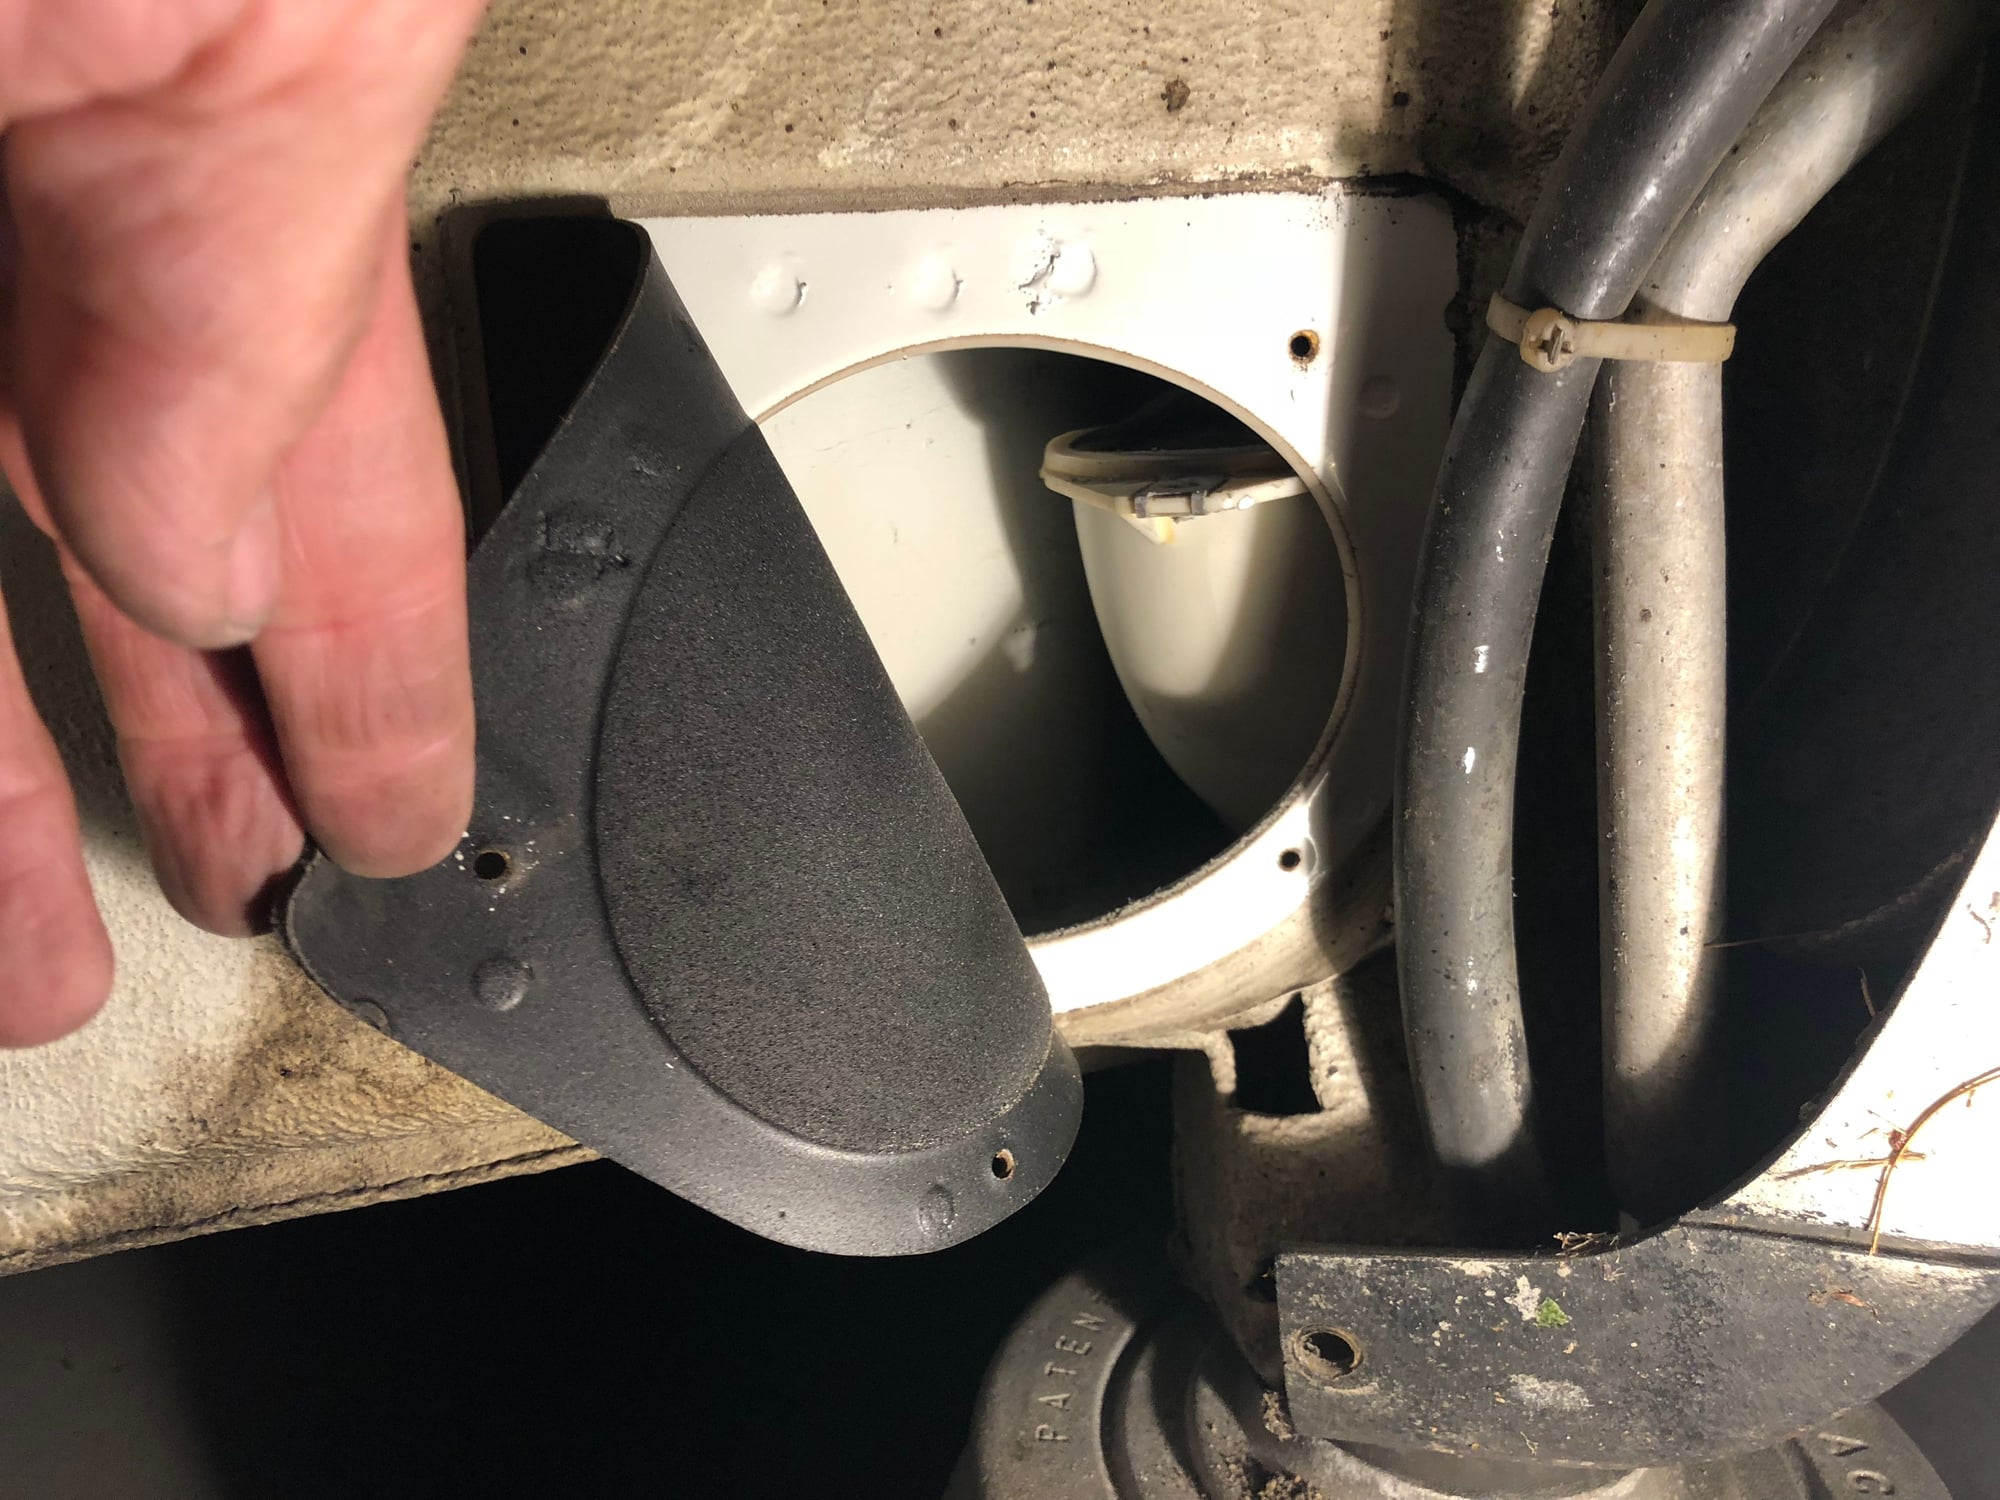
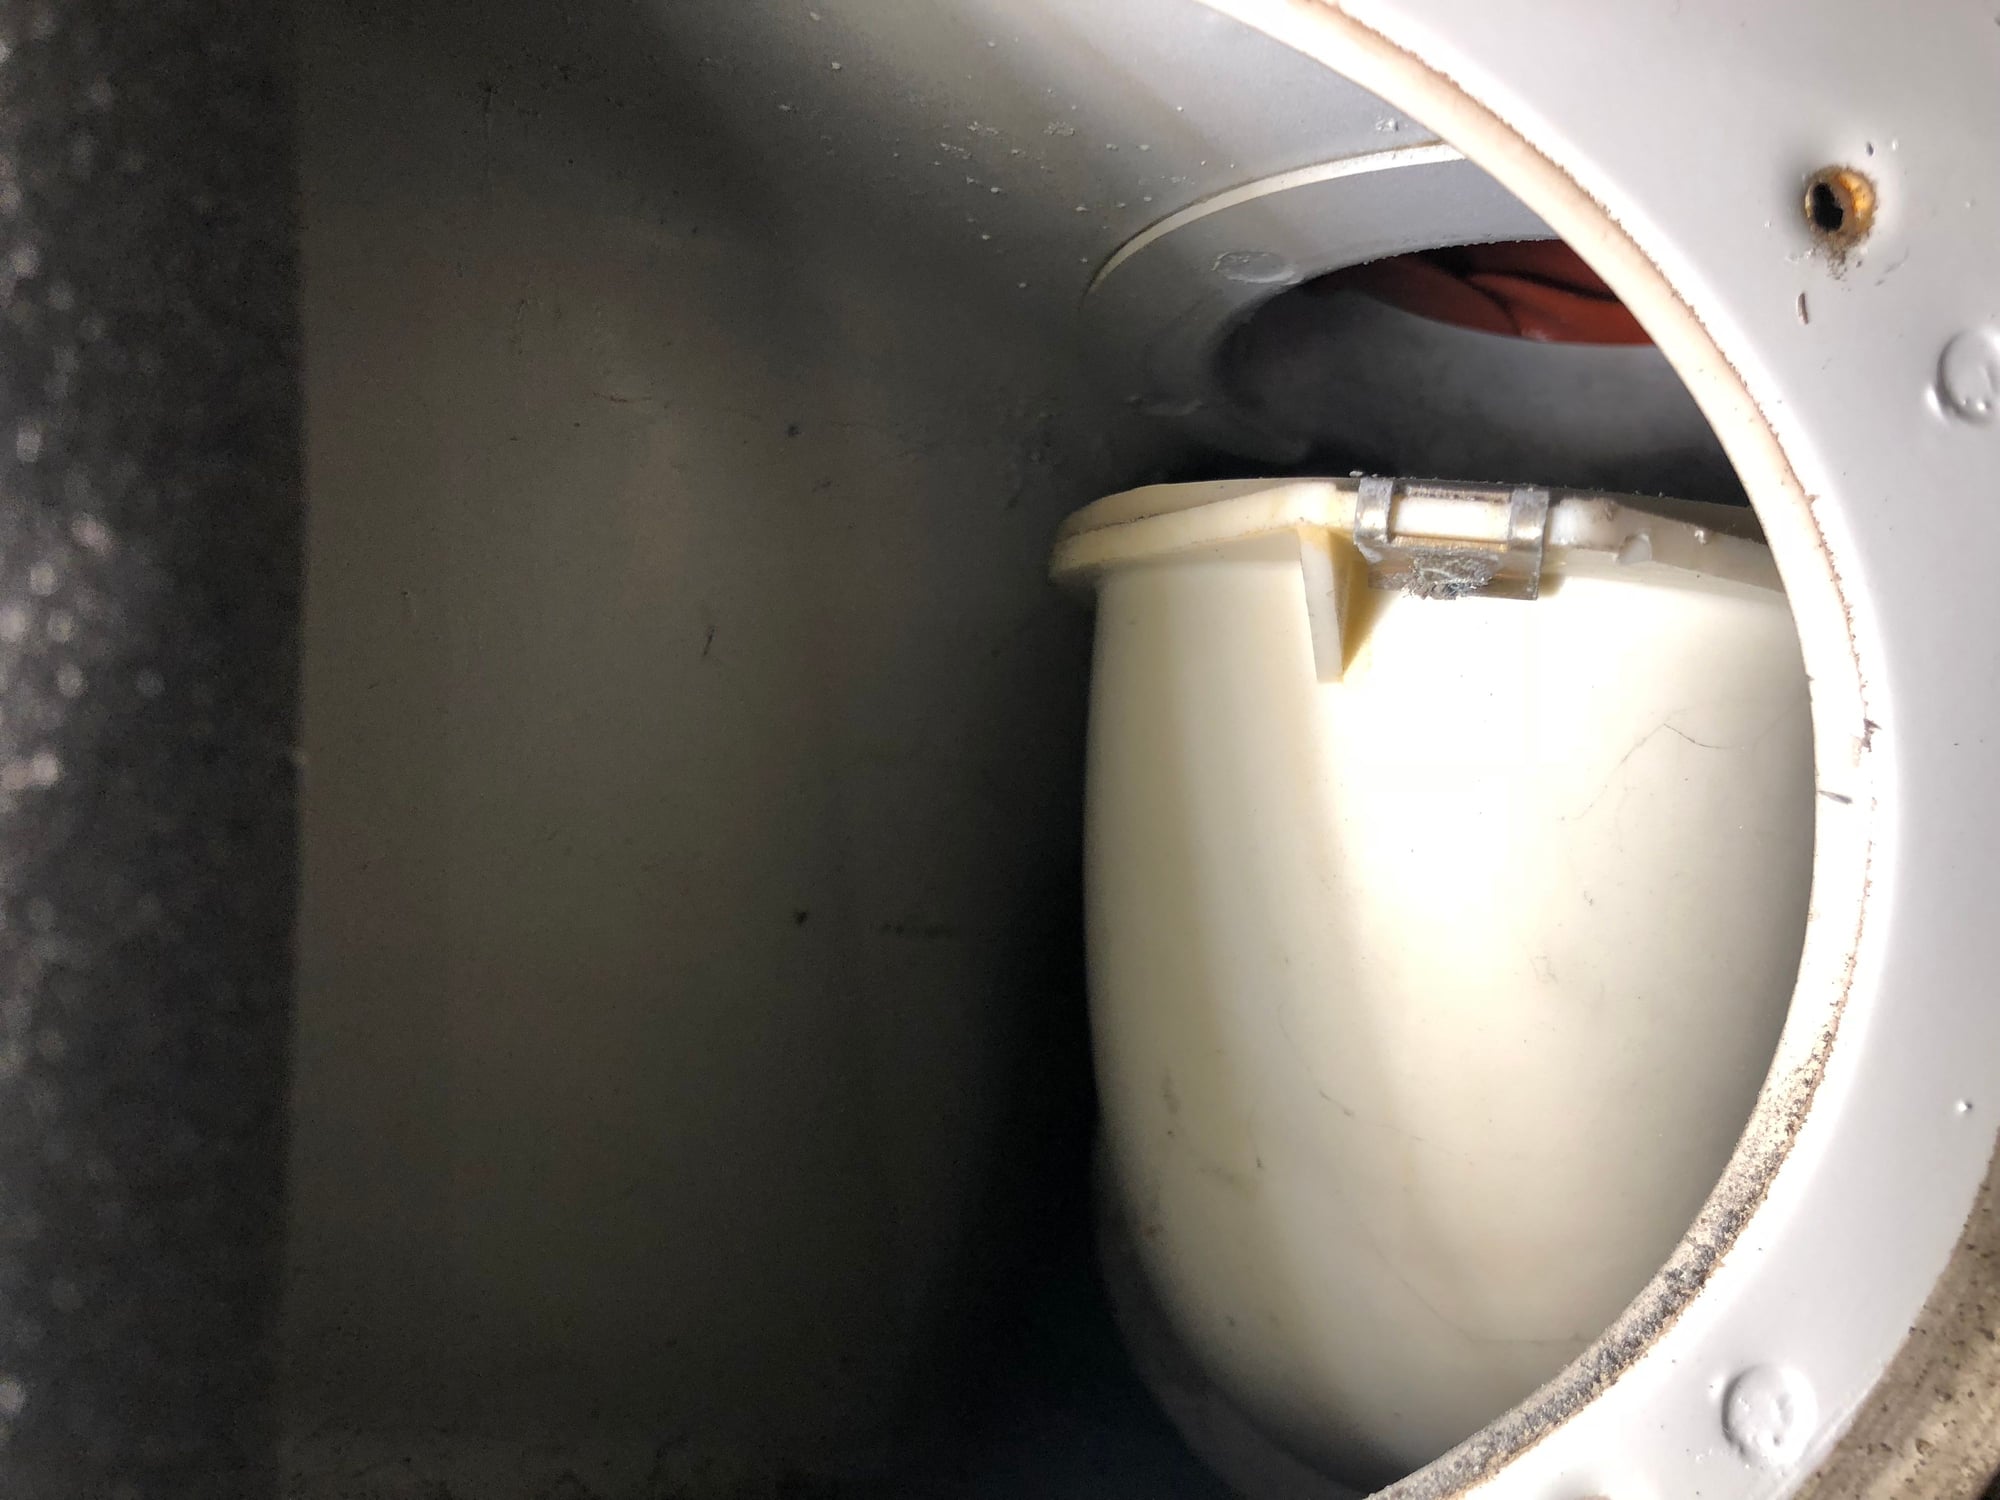
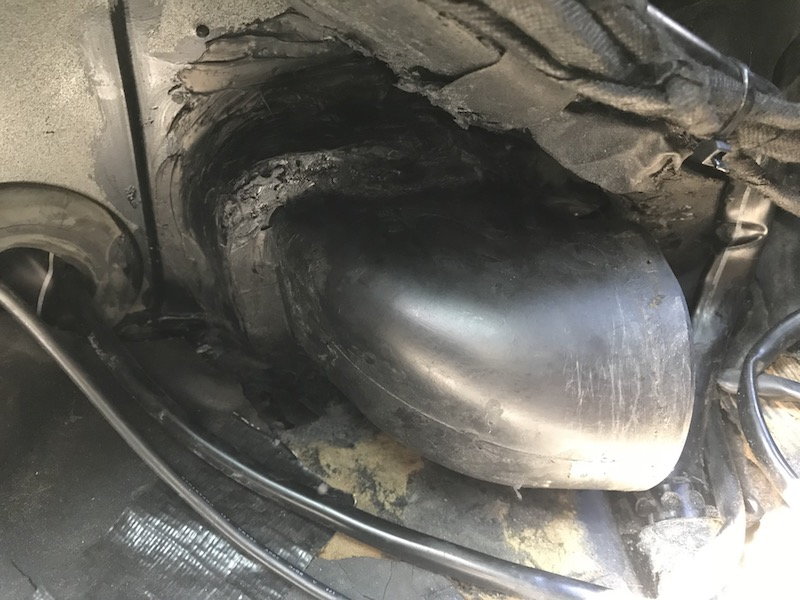
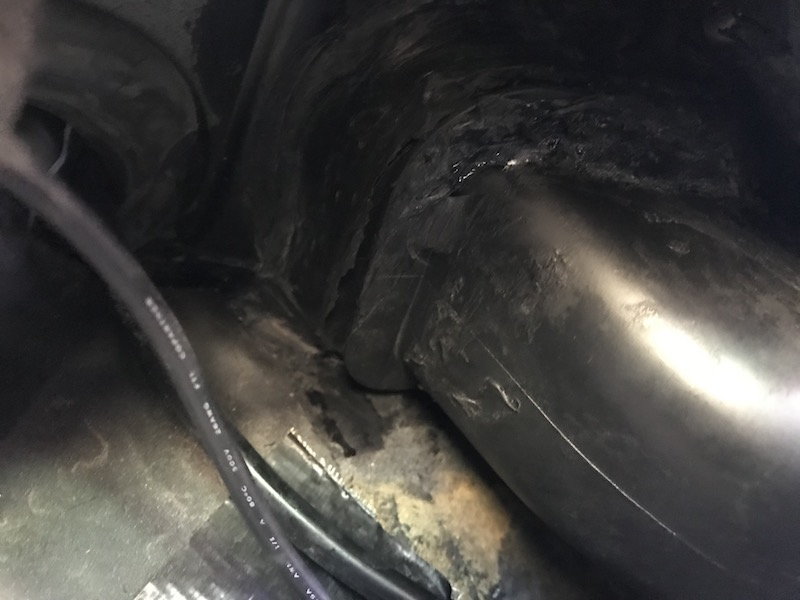
In pushing and pulling to try to get the necessary space to get the back top corner over the plastic, I must have pulled a little too hard and I heard a crack. Now I can feel that the plastic connection piece has come slightly away from its top mounting, it moves a little more than it did before.
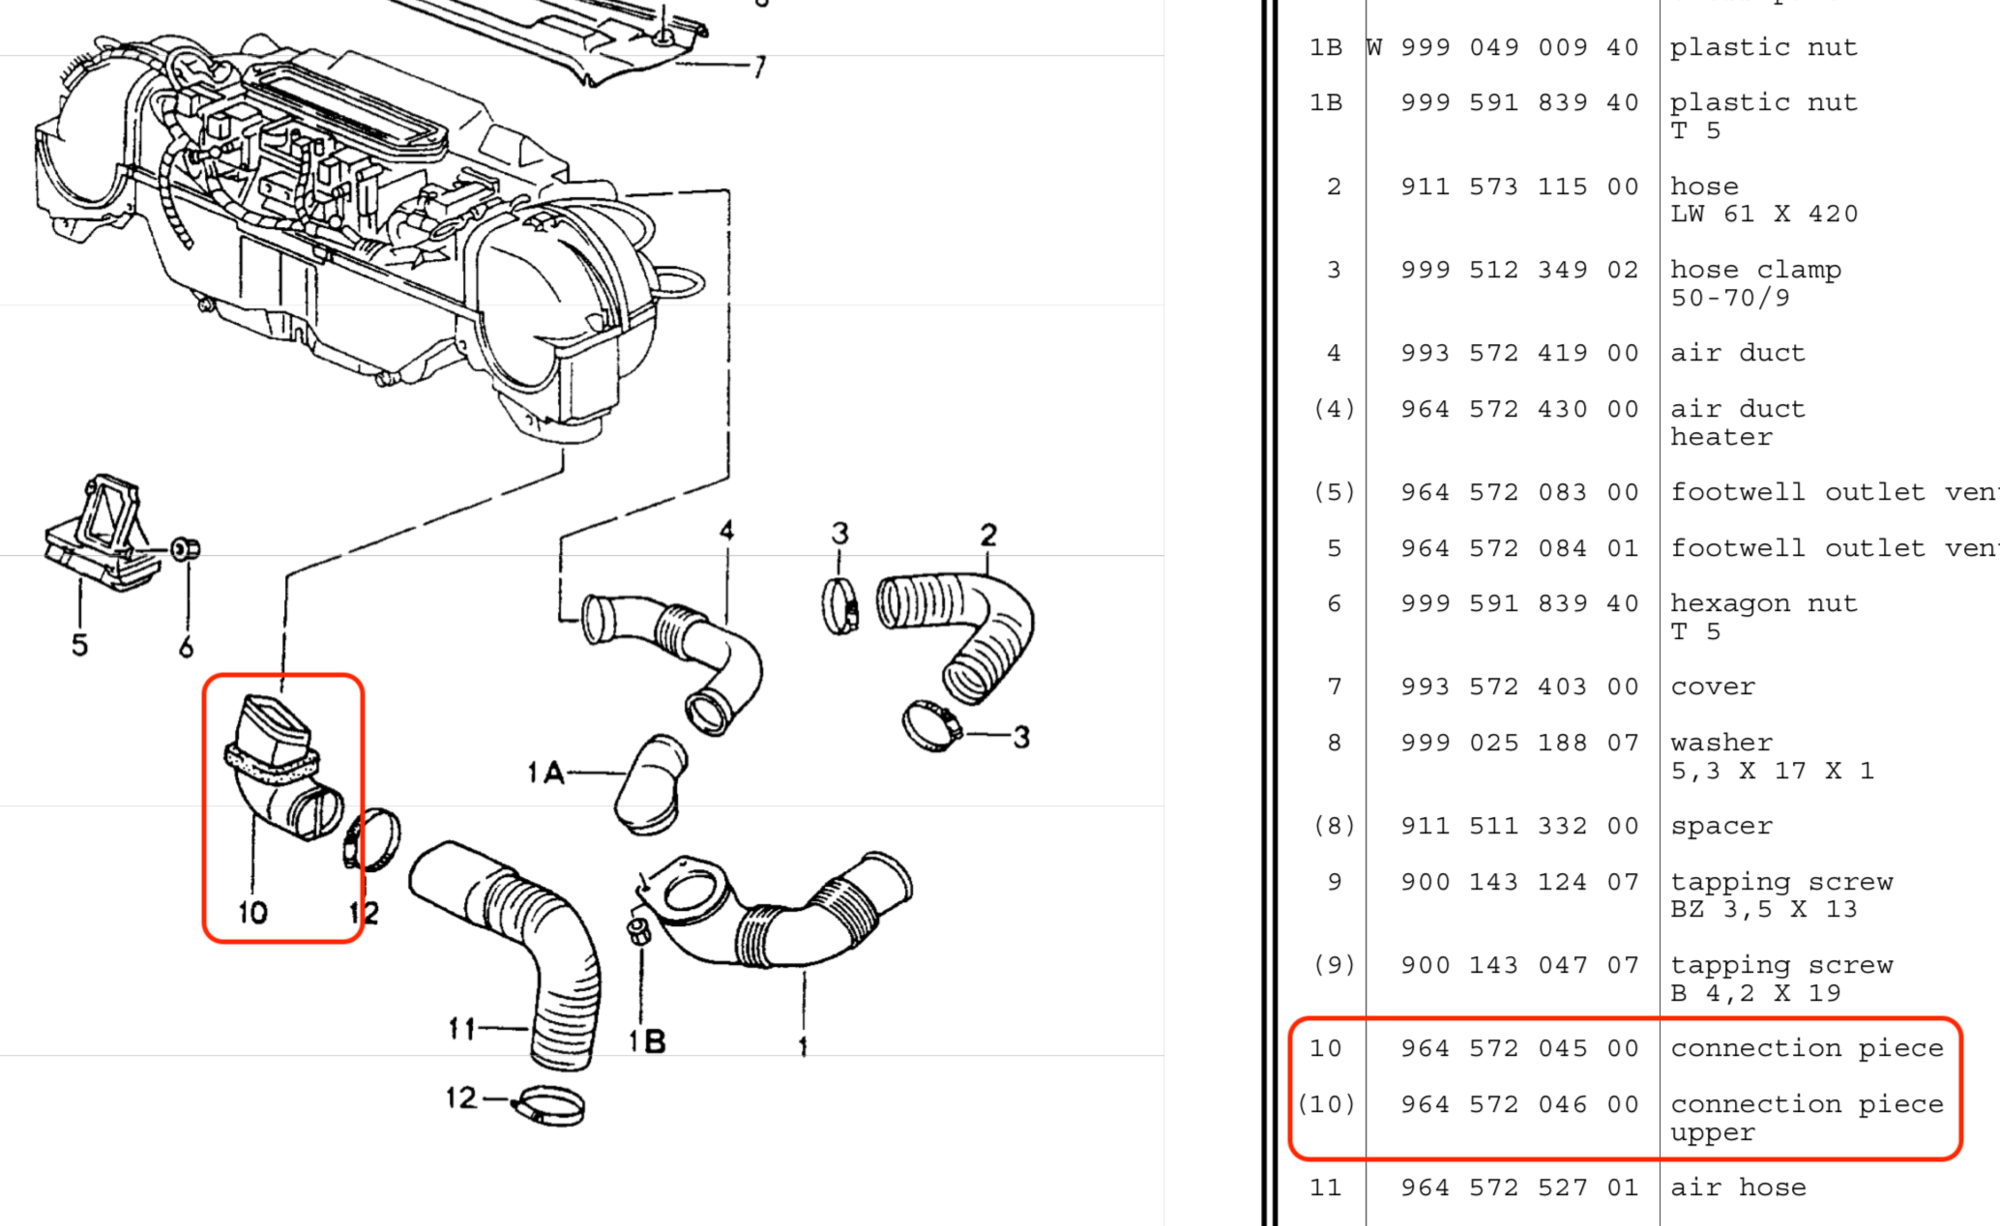
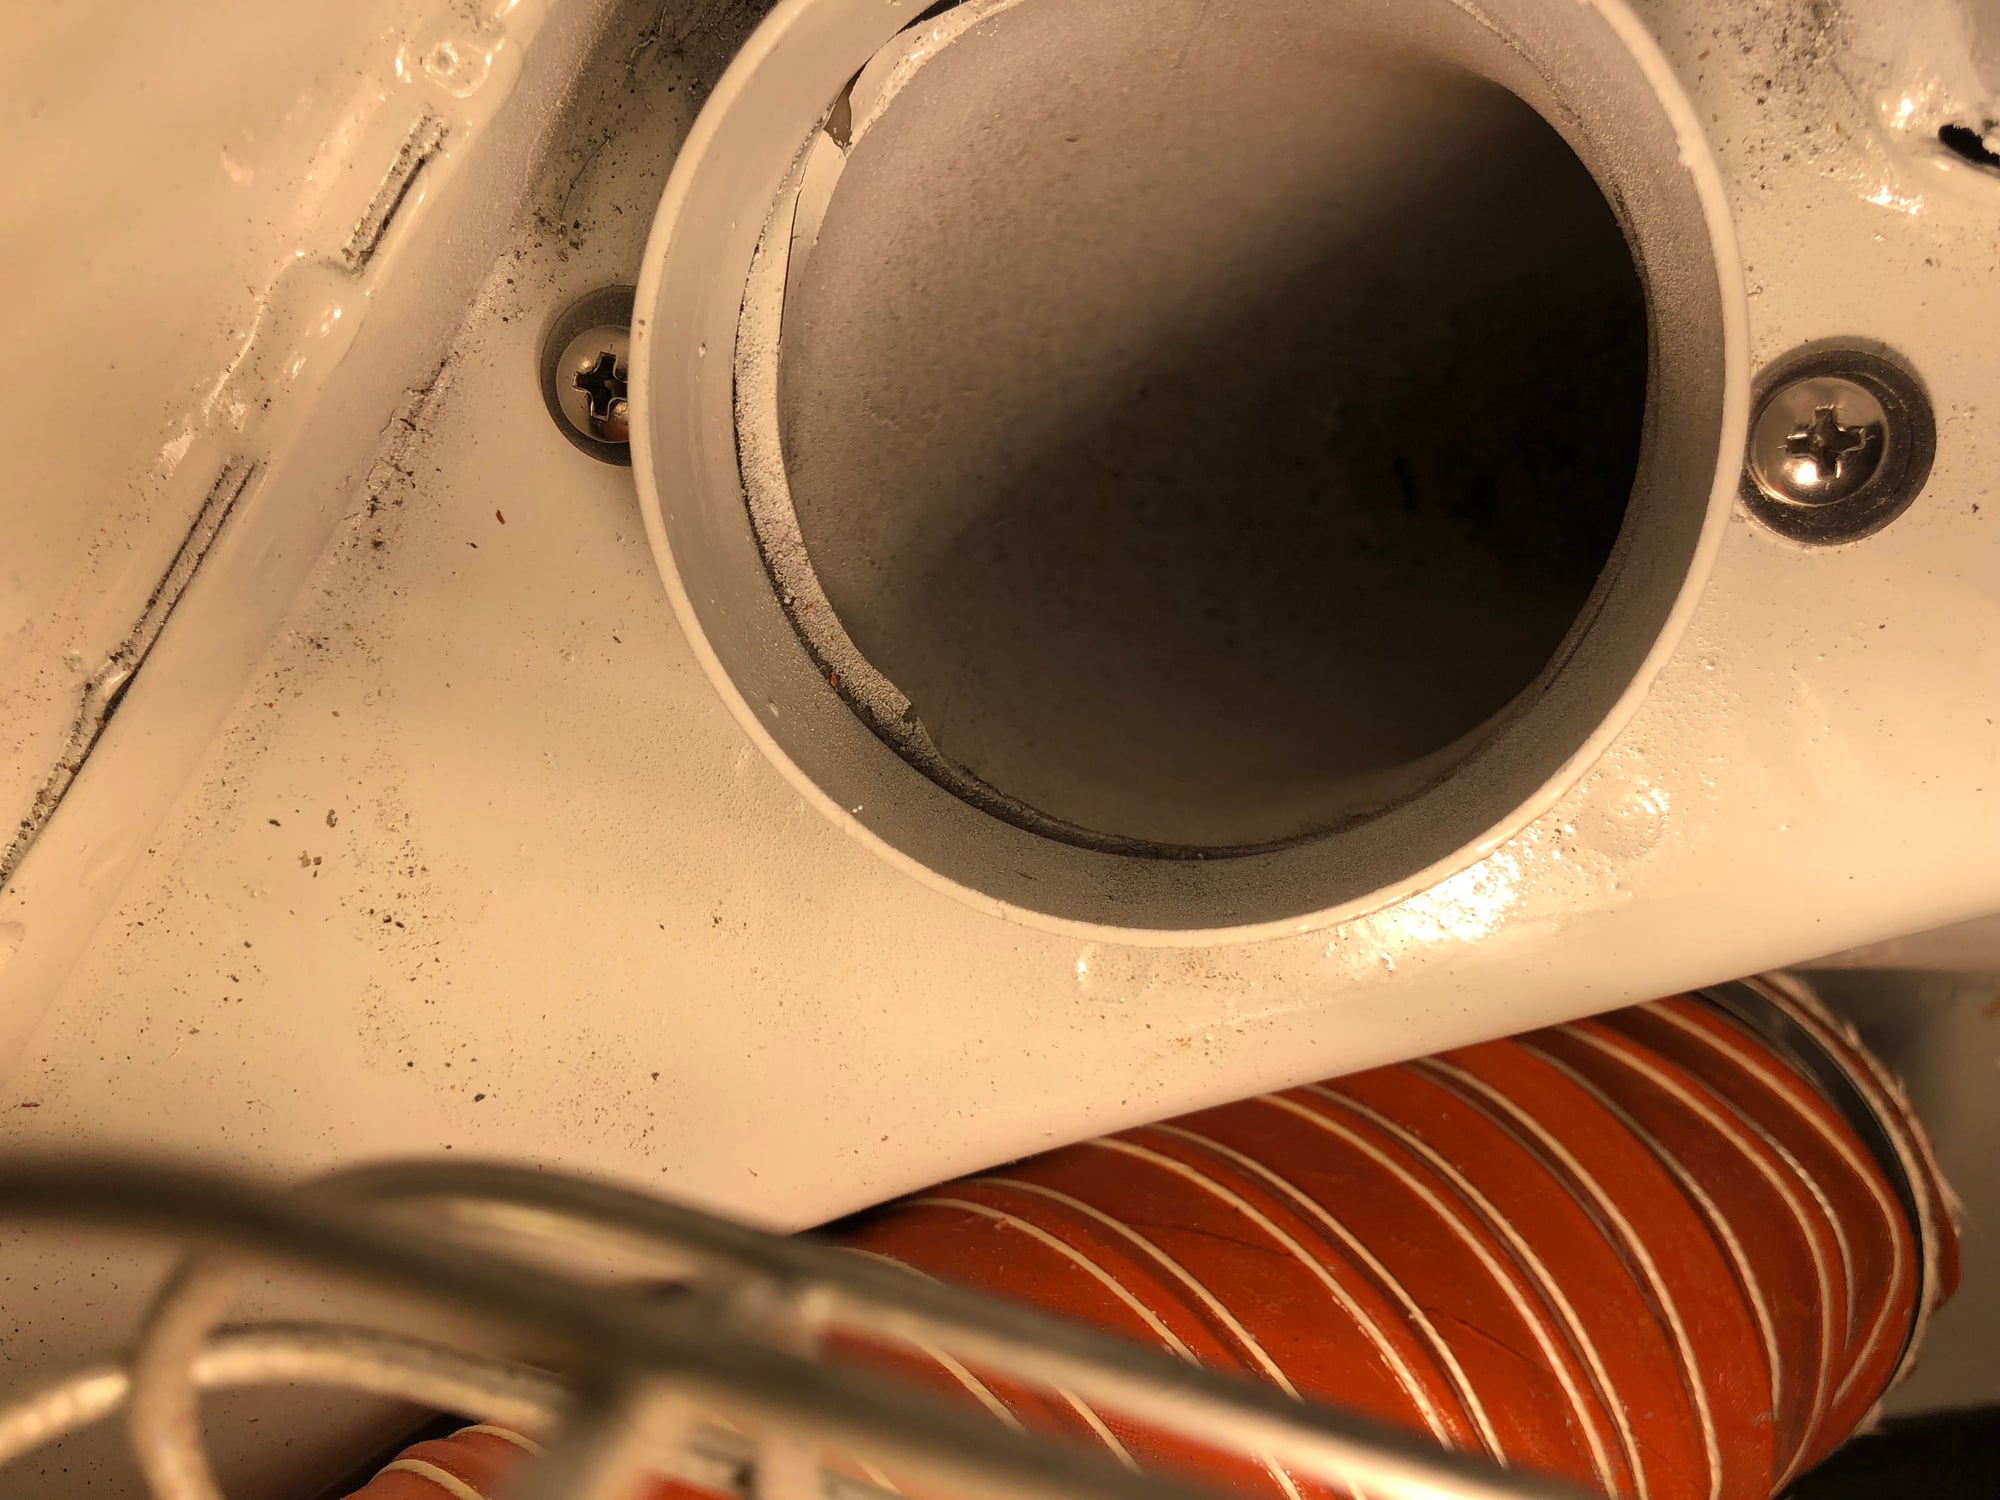
Here my question: how does the connection piece (#10 in the PET diagram) attach to the top, which looks like the plastic blower housing?
I noticed that a previous owner seems to have squeezed a type of silicone into that joint and that is on both sides. I am not sure this is the Porsche factory designed way of connecting this piece to the blower housing.
There is a duct on each side of the car that connects with the blower motors in the suitcase. Get under the dash and wiggle these ducts (red arrow) until the clips on the side release from the blower motor housings and then pull them down. Most people try and force these down from above and break them. This is one of those times where taking a few extra minutes to move some things will end up saving you time, frustration and money. Disconnect the wiring from the unit on the tube (yellow arrow)
Now if I could get those connection pieces out then I think my whole task would be a lot simpler.
Thanks for the pointer to the article. I think it helps me understand now what all of the silicone sealant is doing on my car. I guess the previous owner pulled too hard and broke exactly those clips as described in the article and rather than buy new connection pieces just sealed the broken ones back in place.
Will take a closer look this morning.
Wish me luck!
Quick update on the hot sills in my 964. I think I located the source of the problem at the elbow inside the sill. Big thanks to Tore for his detailed website, and a helpful assist from Nick confirming the layout inside the sills. When I painted the car, I never reinstalled the two sheet metal screws at the base of the footwell heat ducts. Now I realize those screws secure a pvc elbow inside the door sill below. Doh. Hopefully this helps others with this hot door sill malady.
Peak inside the wheel well confirms the elbow has disconnected. This leak negated the pressurized system, so the heater flaps stayed in the natural open position. That’s a leak Problem fixed with screws properly securing elbow hiding below in the sill
Right, the bloody hose is finally fitted ... at both ends.
Halle-chuffing-lujah
I am definitely going to go the flexible red hose route next time.
Now to the next problem
This definitely does not look like work done in Stuttgart.
As I said, in trying to get the darn hose on I broke the seal of the sealant around the back of the connection piece, so I decided to bite the bullet today and try to take the piece off completely, clean it up, then reattach or buy a new one. Well, I wasn't able to cut through the sealant around the front of the piece due to lack of access. Part of the wiring loom was in the way, so that approach was abandoned. Maybe I will do a bigger strip down of the interior in the future, move the loom and try again then.
The problem now is that I have a badly fitting connection piece which again is going to cause a leak in the system and therefore cause the rear flappers not to vent to the atmosphere.
I am wondering whether to try to squeeze new sealant into the split in order to seal it.
Any ideas or thoughts from any one?
Interestingly, I took an extended (120km) drive today and the footwell was not getting hot which is a good sign. External temperatures are really cooling here, not sure how it would be in the height of summer again, but I have some time now to figure out a solution.
I did notice the connection piece itself was getting very hot to touch though. Is this considered normal? I am guessing not, since if the rear flapper is open and directing all heat to the wheel well, no heat should be coming forward at all, right? Not to the sills, not to the silly hose and not to the connection piece. They should be stone cold.
Congrats on making the connection!! A flexible hose is no charm either, but it's far more resilient. I would replace both the upper and lower connection pieces, and eliminate that abomination. You can connect the hose before installing the new connections. Hopefully a new upper connection with plastic clips intact will hold properly.
So first of all, I am very displeased with Porsche right now, and so are my scraped knuckles
Had to take another break in the proceedings today since I had something else to do. I think the trick is to get the back top corner in place as best as possible (no mean feat in itself) and then, as jonathant said, to try to twist the hose on the rest of the way. The hose just seems too small from the diameter to get it all the way over the oval connection piece.
In pushing and pulling to try to get the necessary space to get the back top corner over the plastic, I must have pulled a little too hard and I heard a crack. Now I can feel that the plastic connection piece has come slightly away from its top mounting, it moves a little more than it did before.
Here my question: how does the connection piece (#10 in the PET diagram) attach to the top, which looks like the plastic blower housing?
I noticed that a previous owner seems to have squeezed a type of silicone into that joint and that is on both sides. I am not sure this is the Porsche factory designed way of connecting this piece to the blower housing.
Can anyone advise?
HVAC PET diagram
I was getting a hot air leak from that plastic piece , it wasn't pushed all the way in, Once it snapped in, I connected the rear heat hoses at the heat exchangers and no more hot air at my feet,
I was getting a hot air leak from that plastic piece , it wasn't pushed all the way in, Once it snapped in, I connected the rear heat hoses at the heat exchangers and no more hot air at my feet,
Thanks heliolps2.
I think this is exactly the problem I have now and have always had. I truly believe the hose in the footwell was fine in my car until I started messing around with it and uninstalling and reinstalling it. It was looking very old though and I am glad I have now managed to replace it.


 10-15-2018, 12:43 PM