When you click on links to various merchants on this site and make a purchase, this can result in this site earning a commission. Affiliate programs and affiliations include, but are not limited to, the eBay Partner Network.
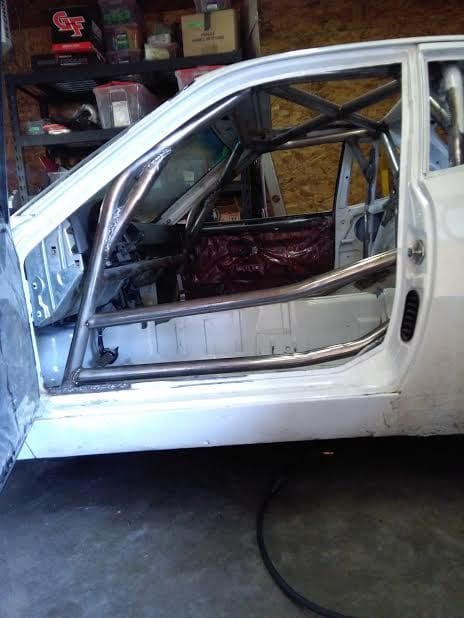
Dash tube is in. Thanks for the feedback fellows, I was able to raise it up and there is no possible way my knees will get banged up because the lower dash pad prevents contact. Additionally padding will be added to this bar.
Partially burned in this a-pillar gusset for the passenger side. Need to make one for driver side. It's time consuming, but I must remember a cage is not for weight savings and not for time savings; but for safety.
Thanks for your welding compliments. The truth is I am just learning & make A LOT of errors. The biggest problem I am having is fitting the tube ends. The quality of fitment will determine if the welding will go smoothly or not.
I should have bought the tube notcher tool from Speedway that 944S&951 suggested. It would increase the quality of the joints & saved time.
I'm not an expert on vehicle safety or crash analysis, but I am mentally engaged with this subject.
I've determined what safety devices you need is dependent on the type of accident. (duh!) example: getting T-bone into a wall on the street or track vs a severe roll over down a cliff into a pond (upside down with water flooding in and unable to open your doors because they are deformed).
The cage I am building is mostly for THESE types of crashes. Watch a bit of the following video. You'll notice a couple of *repeated scenarios*; notices the severity of the crashes, major write off and potential for broken necks, at what is rather low to moderate vehicle speed. Almost all of the worst crashes occur because one of the tires slip off of the road into the ditch. Those damn ditches are everywhere in my neck of the woods. I'm preparing for rally type accidents, and when you see this video, you might agree Wilson's cage is not excessively build.
Note: a while back on another thread I commented on how a roll bar doesn't actually do much to protect the occupants and that you need a true cage. A lot of times cars land in a ditch with the edge of the road right where the occupants heads are.
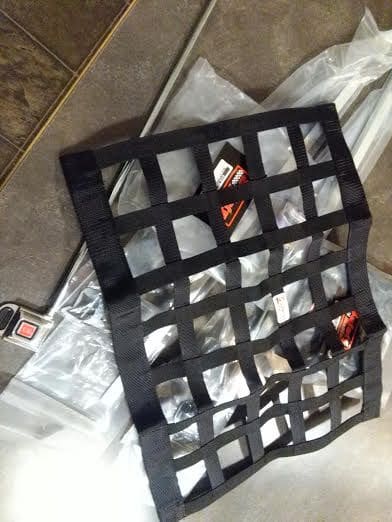
Window nets came in today. Question about install. I see people install them to the cage and always near the head of the occupant. Is it ideal to have no net space in front of the net to be able to hand signal to a faster driver to pass you? Also would love to see pics of the lower portion (the lower bar) attached to the door bars. I will be making the forward portion of the door bars very low to assist with getting in and out of the car easier for daily driving. Are there "extension kits" you buy or do you have to fabricate something? Thanks!
In the following video, many of the crashes in the first half demonstrate the need for great roof and door bars because the cars are hitting light posts, trees & guard rails on the outside of the door. This is why I chose the "x" in the centre of the roof bar. Sadly I will compromise on the door bars... they won't be built with as much coverage.
Used a Straight bar on the bottom (you can see where it goes on the top of the door bar, and in the second pic welded on the attachment point for the front... As far as the top Rear, I took two Stainless nuts and welded them 90 Degrees to each other, One is the pass though for the bolt that holds the top of the net on, (I welded a nut direct to the cage) the other is for the rod to pass through. This allows for the net to "Drop" in the front per our rules, and also Full removal on the street, Sorry I don't have better pics but Ill take some tonight.
I must compliment you on your BEEFY door bars! The attitude of the bars is better in my mind than "s" bends for resistance to harming occupants.
Also thanks for sharing your good idea for the window net.
Slow at work so I came home and bent some door bars. Still need to put the seat in & test ingress/egress. Made the sill and door bar with outward attitude to resist bending inward.
that's super slick mate. Many thanks for posting your set up.
----------------
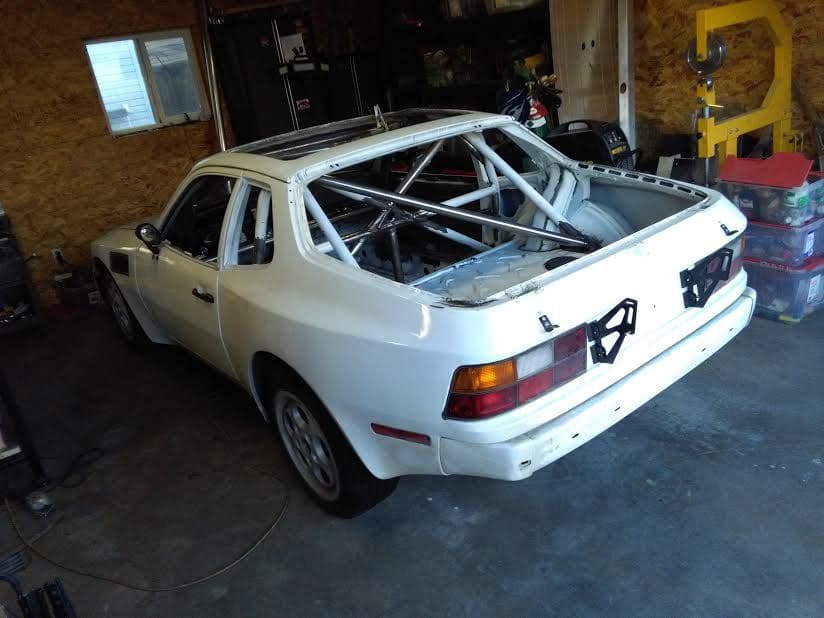
Last night fitted up a rear diagonal. Can't believe I need to order more tubing. Going to try and keep going without ordering more. But I still need to extend tubes forward from front hoop to footwell and a few other gussets. I want to run 2 diagonals in the rear and then connect to front & rear fenders to avoid wheels coming in the cab.
I ended up getting "More" tubing 2x, One time I screwed up a bar and had to re-do it.
I know youre almost done with your build but Ill let you in a "Trick" that I used... SAVE all your bends and scrap. Go to your local store where they carry PVC Tube I Think up north of the border its a DO IT center.... I forgot what size I got but I want to say it was 1-3/4" Sched 40 PVC, My 1-1/2" Roll bar tube slid inside of it perfect, So now I had a "Sliding gauge" and as far as angles. I would put various pieces in until it fit OR cut the fish mouth and slide it in the tube. This was REALLY Handy when making things like your rear cross bars where you need to "Clock" them. Just slide the fish mouths out of the PVC and clock them till they fit. Then Tape them in place and measure you roll bar tube. Cut, and Use the PVC Jig along with the angle finder to copy the exact piece.. and PVC is WAY Cheaper to screw up them DOM tube! Hope it helps... Looking good!


 07-02-2017 | 09:10 PM