When you click on links to various merchants on this site and make a purchase, this can result in this site earning a commission. Affiliate programs and affiliations include, but are not limited to, the eBay Partner Network.
So after replacing my vacuum lines (including venturi delete) it won't run
It starts and runs nice for about a second and then dies after that. You can limp it along by giving it more gas but it doesn't like it. I also swapped to braided fuel lines. Any ideas?
The only thing I can think is I might have damaged the idle controller since everything is so fragile in there. (Both the temp vacuum switch and crank position sensor broke from handling) Also, I guess it's possible something got in the fuel line and I have a clogged injector, but it does run smooth for about a second or so.
Anyway, I would welcome any ideas I could chase down.
Maybe a vac line is routed wrong? It can get confusing under there
You aren't kidding! I've spent hours looking at it over and over. I've got another chart out of the factory manual too, but I'm still not sure. I've tried a bunch of different ways to hook it up but I'm pretty certain except for one thing. I don't know where the lines do that disappear into the firewall. On the Lindsey diagram I have everything matched up except there is one additional "T" against the firewall that is rubber with hard lines running into it. That isn't shown and I'm unsure what's supposed to go where. There is also a yellowish hard plastic line coming out of the firewall. I have them both hooked up in the most logical layout and have tried reversing them but to no avail.
Could someone confirm that arrow on the idle controller is supposed to point to the line that goes to the manifold and AWAY from the line that goes to the J boot? Wondering if somehow I got that reversed.
I think I have everything right then. I wonder if I damaged the idle controller somehow? Such a bummer, I was looking forward to finally being able to drive it (bought it a few weeks ago) and it ran fine after I did the timing belt. Well, guess I'll pull the intake again and see about sourcing one of those controllers. Since it runs for a sec and then quits I figure is must be something trying to adjust air/fuel mixtures after it starts.
I might take some pictures of how my vacuum is routed currently and maybe someone could compare it to theirs just to be sure.
Well I hope that's the case. All of the lines are new so if I just have something connected incorrectly that would be a fantastic bit of news. I'll document how I have things hooked up tonight and look for help.
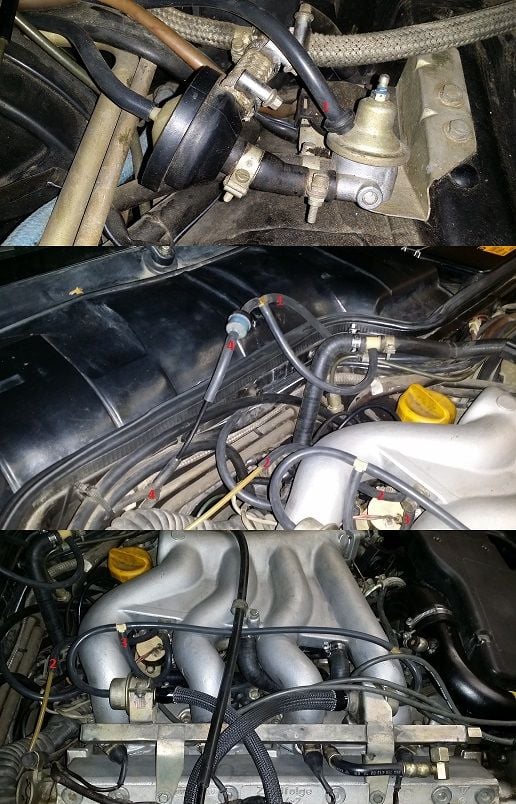
I've gone over those a bunch, but I don't know where a couple of the connections go. Namely the ones I've labeled #2 and #4 in the pictures below. I've played with several variations but no luck yet.
Originally Posted by raleighBahn
I'll take the contrarian view and say it could be fuel or spark related. Don't start pulling things back off yet.
Try testing fuel pump relay, check for spark, etc.
I'll do that, but I did the timing belt, and it ran fine and without moving it from the garage I then replaced the vacuum lines and now it runs fine for 1-2 seconds then runs terrible and dies. It would be an odd coincidence but I won't rule it out.
You can check fuel pressure at rail with ignition on (but not cranked) and check spark in four plugs. If you are lucky, it is here. Because chasing vacuum and electrical gremlins is hell on earth. Take some pictures of your bay, maybe we will see something in your routing. After fuel and fire, make sure your grounds are secure, esp the ones on back of block near speed/ref sensors. If chasing sensors, remember some of them ignored on WOT, so you can rule some things out if you can make it go WOT.
I've gone over those a bunch, but I don't know where a couple of the connections go. Namely the ones I've labeled #2 and #4 in the pictures below. I've played with several variations but no luck yet.
I'll do that, but I did the timing belt, and it ran fine and without moving it from the garage I then replaced the vacuum lines and now it runs fine for 1-2 seconds then runs terrible and dies. It would be an odd coincidence but I won't rule it out.
Sorry missed your pictures. The yellow line goes to the KLR. It routes through the rubber firewall boot and plugs into KLR in the passenger footwell. Line four goes through the firewall, comes out near battery, and goes into the vacuum canister that adjacent to battery bay.
There is a rubber "T" at the #4 connection that isn't shown on any of my diagrams. I put the number on the "T". Does it look like I've hooked everything up correctly otherwise?
Here's a short video of what it's doing. It would seem like I have fuel and spark... just not for very long. Like I said, it ran fine before I swapped out the vacuum lines, so it would seem unlikely that something unrelated to that work (coil/fuel pump/rotor/etc) would be the problem.
A little additional information. From that rubber #4 "T" it goes into the canister near the battery and the other (orange hard plastic line) goes down and through the firewall near the heater hoses. The yellow line that's viable and connected to #2 in my picture goes through the firewall using the same penetration as the wiring harness. Is that the one that goes to the KLR? Is that what is called "charging pressure control" in the workshop diagram? What does KLR stand for? (something in German I'm sure...
There is a rubber "T" at the #4 connection that isn't shown on any of my diagrams. I put the number on the "T". Does it look like I've hooked everything up correctly otherwise?
Here's a short video of what it's doing. It would seem like I have fuel and spark... just not for very long. Like I said, it ran fine before I swapped out the vacuum lines, so it would seem unlikely that something unrelated to that work (coil/fuel pump/rotor/etc) would be the problem.
Which Lindsey diagram are you using (these are definitive and correct)? If you did venturi delete, assuming 86? Let's get on the same diagram as answer is it depends
Your video is listed as private. In your video, want to see the instrument gauge. Go to ign 1, ign 2, then crank.
Q: you said you broke some things from handling? Are they fixed?
Observation: start and then die is also bad fuel pressure regulator symptom. I know you think it is vacuum (and it likely is), but all parts are working. ... until they aren't. Everyone who ever had a bad FPR had it work the previous time.

 11-03-2014, 10:26 AM