

SFR FMIC users, how the #$@$%#@ did you get this to fit??
 04-13-2010, 03:18 PM
#46
Nordschleife Master
Thread Starter
Carlos, it is not that easy.. a longer coupler on the endtank might work but its going to be so badly kinked..i did not spend 4 days trying to fit this thing to end up with a coupler on the verge of tearing or blowing off when i hit boost in that spot. Trust me i thought about doing this, but no way i am going to half *** this after all of this work. Also noone sells reducer couplers longer than 4'' without it being special order; i just got an email back from one place that could do it but with a lead time of about 2 weeks till delivery! I am just hoping the parts i ordered will make this work.
I will be at Hershey depending on weather (and if i ever install this damn thing) and as of right now will definitely be making 944Fest unless my work schedule changes.
I will be at Hershey depending on weather (and if i ever install this damn thing) and as of right now will definitely be making 944Fest unless my work schedule changes.
 04-13-2010, 04:20 PM
#47
Drifting
Jon, I'll respond to your PM here so it can be searched in the future.
My core is under the cross member. The back edge of the core is snug against bottom of the crossmember. It was difficult to get the reducer on to the end tank because the back edge of the tank pipe was so close to the crossmember. I think the difference comes from the fact that I used a lot of spacer washers between the intercooler and the bracket (those allen bolts were too long too). I also didn't bend the bracket assuming that it was supposed to fit without bending stuff (naive).
Justin, another question for you. Did you mount the core so the top is in front of the crossmember, or is your core mounted under it?
04-13-2010, 04:22 PM
#48
Banned
Join Date: Jun 2001
Location: San Diego
Posts: 1,635
Likes: 0
Received 0 Likes
on
0 Posts
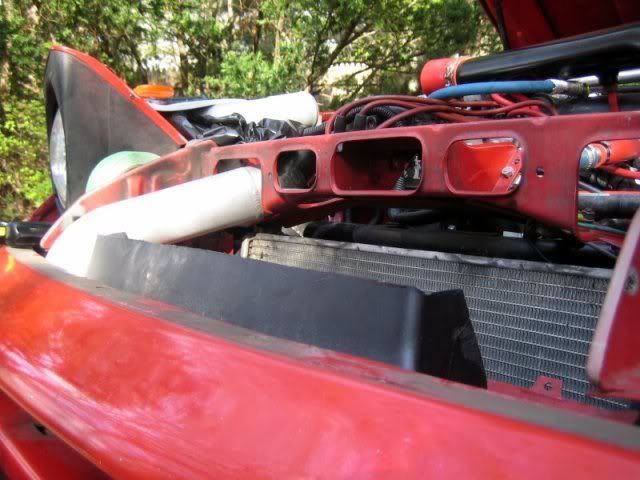
I can see right now why you had to trim so much of your aluminum bumper brace and are having a hard time with the install.You have the intercooler up to high!The top edge of the intercooler should fit right underneath the steel brace which runs across the front of the car.You have yours sitting in front of it which in turn forces the top of the intercooler out towards the front of the car which makes grinding the crap out of the brace necessary to fit the couplers and piping.I have some pics and will post them in a little bit to show you what I am talking about.
Justin, if you get the chance i would like to see pictures of how you cut the bumper out.
Now after another 5hrs working on this, about 1.5 of that spent cutting more of the bumper bar out and about 2hrs wasted taking the bumper cover on and off again i am almost done. I should hopefully have this done before lunch tomorrow however i might be held up because i need to find one of two specific couplers (but i need both to do it right). More on that later in the post.
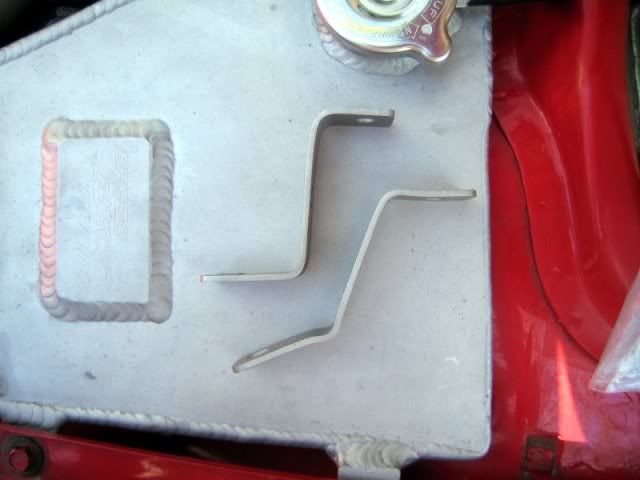
Anyhow here is the progress i made today. I fitted the intercooler again and bent the provided brackets to fit the angle the core sits at. Top is what the brackets looked like originally, bottom is approximately what they need to look like to fit the angle. It was easy to do this, a little trial and error, a vice and a hammer was all i needed.
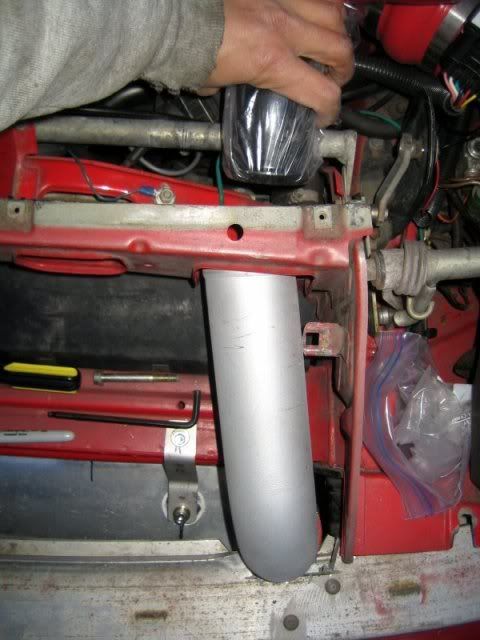
Now before i drilled any holes i test fitted the core with the couplers attached which revealed more issues with the bumper bar. I ended up not cutting enough out of the bumper bar (i honestly couldnt believe it!). I took the entire bumper cover off again (stupid of me to put it back on!) and with the bumper bar off the car, used a whiz wheel yet again to cut off more material.
Here is the finish result after another 1.5hrs of cutting material off the bumper. This seems like it shouldnt take long but i assure you it does. Its tough to get the cutoff wheel in the right spots due to the angle and how damn thick the bumper is in parts. It does not look like it in the picture, but i smoothed everything out also with a grinding nose.
Now with the couplers on..
And now satisfied with that, i drilled the holes for the brackets and FINALLY mounted the intercooler..
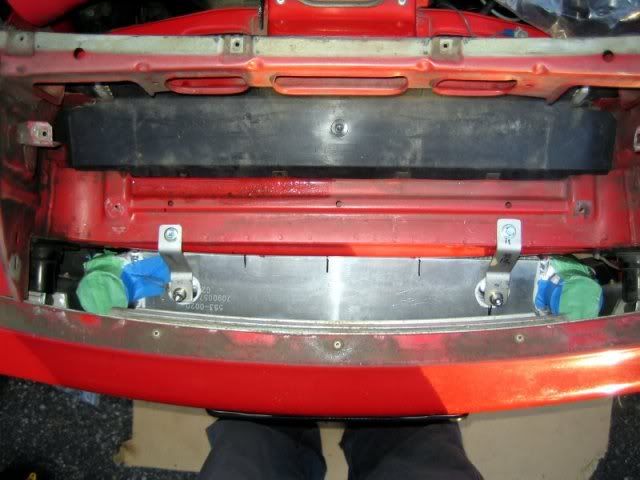

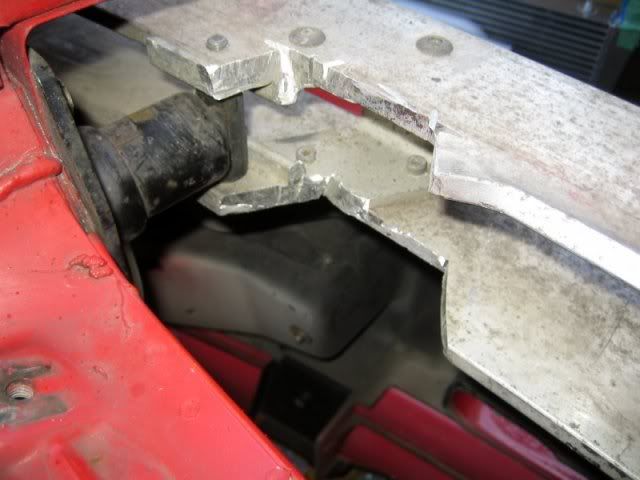
This shows the angle that the core sits at. Note; tilt your head so the lower radiator support is horizontal and you will get an idea of what angle the core sits at.
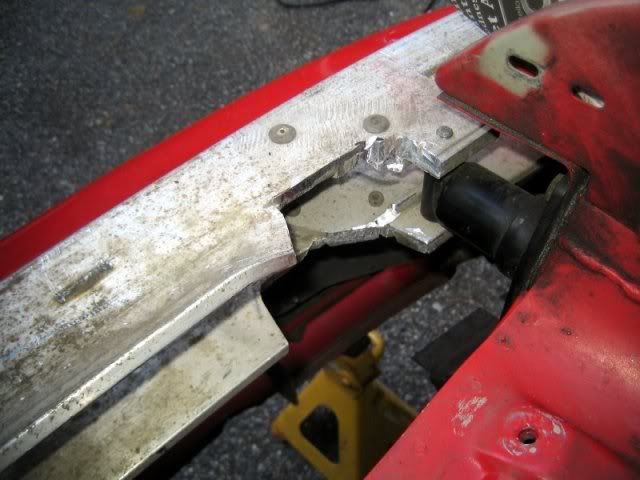
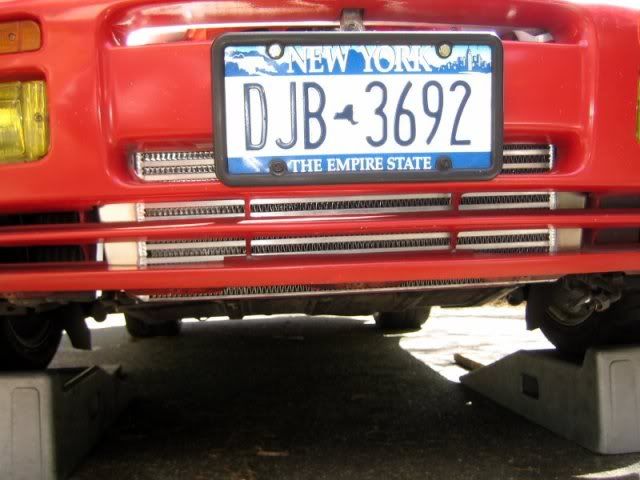
Here you can see some of the material i cut off the bumper (bottom right) to try and get it sit more horizontal. To get it completely level, it would require cutting a significant amount of material off the bottom of the bumper as you can see..
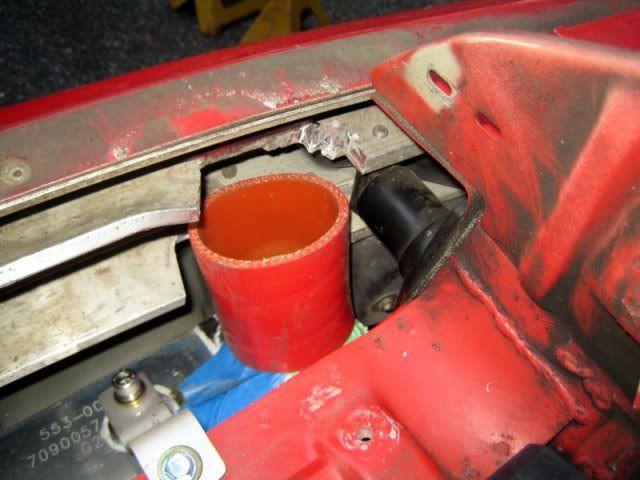
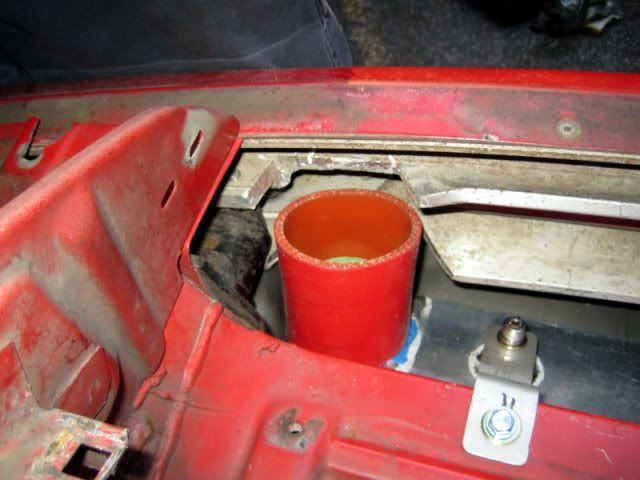
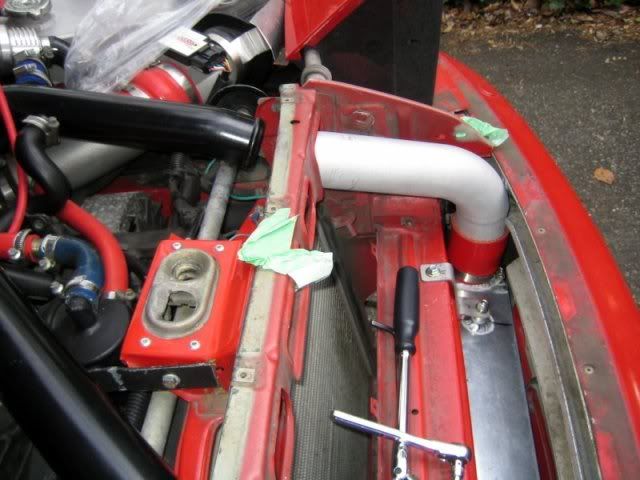
Pre-intercooler charge pipe test fitted, fits reasonably well.

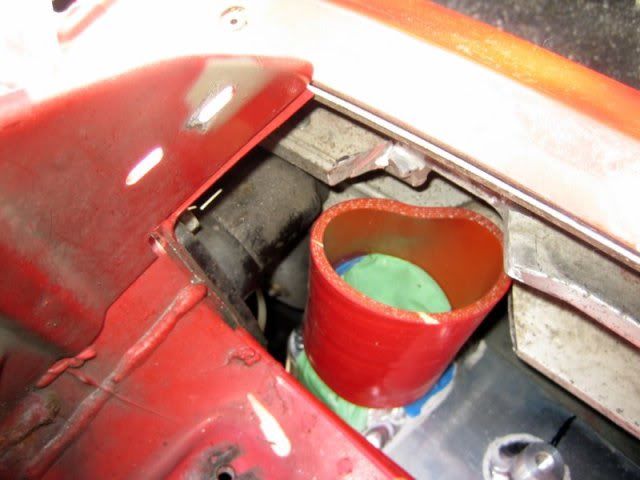
Now comes the 'son of a #$@##@" moment. Here is the post intercooler charge pipe. Way off,
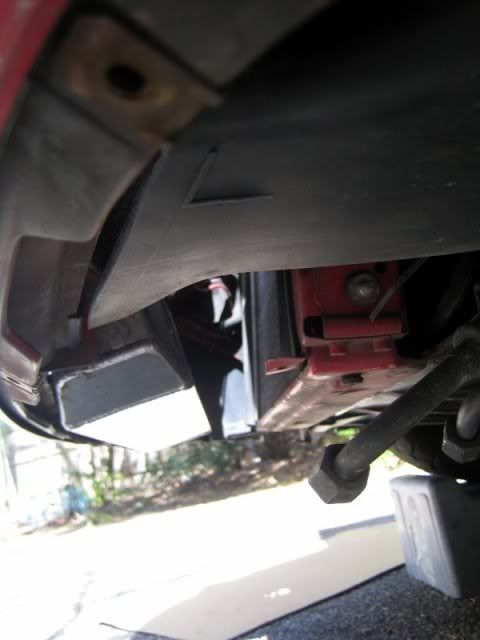
Even when forced down, it is about 1.5" short. Its hard to see where the pipe terminates in the picture, but the bead for the coupler is just under where the pipe is cutoff in the picture by the area the nose panel screws onto. As you can see also, i need to cut off that IC mounting point to get the pipe to line up right. I am planning on cutting it so it can be bent out of the way tomorrow morning.
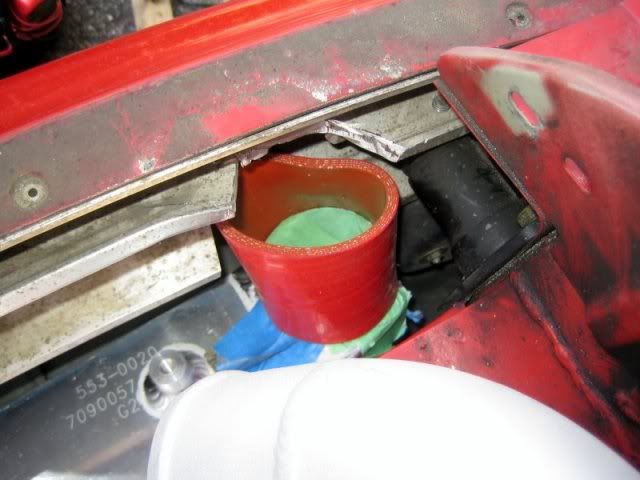
Here is another angle of the pipe being forced downwards, its being held down under the nose panel mounting point.

My plan is to put a 2.5'' hump coupler on the endtank so the chargepipe can bend a little easier. Now what completely screws me i think is the fact the pipes that come with the intercooler are 2.5'' and id say 90% of people out there have 2.25'' pipes. Whats going to be very hard to find is a reducer that goes from 2.25'' -> 2.5'' in a 5'' length which is what i think i need.
Extreme-Psi has both the coupler and reducer in 4'' lengths..but honestly i dont think it will be enough. I need to take some measurements and double check tomorrow. All i know is the generic 3'' lengths couplers come in usually (what i have) is way too short.
I am going to check the two local speed shops tomorrow.. otherwise i am going to get screwed on the shipping having to order online..and that is assuming i can find a place that even considers a reducer longer than the usual 3'' length as a non-custom order type deal.
So close..
Now after another 5hrs working on this, about 1.5 of that spent cutting more of the bumper bar out and about 2hrs wasted taking the bumper cover on and off again i am almost done. I should hopefully have this done before lunch tomorrow however i might be held up because i need to find one of two specific couplers (but i need both to do it right). More on that later in the post.
Anyhow here is the progress i made today. I fitted the intercooler again and bent the provided brackets to fit the angle the core sits at. Top is what the brackets looked like originally, bottom is approximately what they need to look like to fit the angle. It was easy to do this, a little trial and error, a vice and a hammer was all i needed.
Now before i drilled any holes i test fitted the core with the couplers attached which revealed more issues with the bumper bar. I ended up not cutting enough out of the bumper bar (i honestly couldnt believe it!). I took the entire bumper cover off again (stupid of me to put it back on!) and with the bumper bar off the car, used a whiz wheel yet again to cut off more material.
Here is the finish result after another 1.5hrs of cutting material off the bumper. This seems like it shouldnt take long but i assure you it does. Its tough to get the cutoff wheel in the right spots due to the angle and how damn thick the bumper is in parts. It does not look like it in the picture, but i smoothed everything out also with a grinding nose.
Now with the couplers on..
And now satisfied with that, i drilled the holes for the brackets and FINALLY mounted the intercooler..
This shows the angle that the core sits at. Note; tilt your head so the lower radiator support is horizontal and you will get an idea of what angle the core sits at.
Here you can see some of the material i cut off the bumper (bottom right) to try and get it sit more horizontal. To get it completely level, it would require cutting a significant amount of material off the bottom of the bumper as you can see..
Pre-intercooler charge pipe test fitted, fits reasonably well.
Now comes the 'son of a #$@##@" moment. Here is the post intercooler charge pipe. Way off,
Even when forced down, it is about 1.5" short. Its hard to see where the pipe terminates in the picture, but the bead for the coupler is just under where the pipe is cutoff in the picture by the area the nose panel screws onto. As you can see also, i need to cut off that IC mounting point to get the pipe to line up right. I am planning on cutting it so it can be bent out of the way tomorrow morning.
Here is another angle of the pipe being forced downwards, its being held down under the nose panel mounting point.
My plan is to put a 2.5'' hump coupler on the endtank so the chargepipe can bend a little easier. Now what completely screws me i think is the fact the pipes that come with the intercooler are 2.5'' and id say 90% of people out there have 2.25'' pipes. Whats going to be very hard to find is a reducer that goes from 2.25'' -> 2.5'' in a 5'' length which is what i think i need.
Extreme-Psi has both the coupler and reducer in 4'' lengths..but honestly i dont think it will be enough. I need to take some measurements and double check tomorrow. All i know is the generic 3'' lengths couplers come in usually (what i have) is way too short.
I am going to check the two local speed shops tomorrow.. otherwise i am going to get screwed on the shipping having to order online..and that is assuming i can find a place that even considers a reducer longer than the usual 3'' length as a non-custom order type deal.
So close..
04-13-2010, 04:51 PM
#49
Rennlist Member
Carlos, it is not that easy.. a longer coupler on the endtank might work but its going to be so badly kinked..i did not spend 4 days trying to fit this thing to end up with a coupler on the verge of tearing or blowing off when i hit boost in that spot. Trust me i thought about doing this, but no way i am going to half *** this after all of this work. Also noone sells reducer couplers longer than 4'' without it being special order; i just got an email back from one place that could do it but with a lead time of about 2 weeks till delivery! I am just hoping the parts i ordered will make this work.
I will be at Hershey depending on weather (and if i ever install this damn thing) and as of right now will definitely be making 944Fest unless my work schedule changes.
I will be at Hershey depending on weather (and if i ever install this damn thing) and as of right now will definitely be making 944Fest unless my work schedule changes.
04-13-2010, 05:01 PM
#50
Drifting
Tim, if you do start making the transition pipes in stock diameter, I'd swap my set out. I can flip my reducers to the end tanks, which should free up some space between the bumper and cross member as well as improve clearance around the stock intercooler mounts and the headlight bar. That's really all this kit needs to be nearly bolt in.
Also, do you have some pics and advice for the oil cooler? I see adapters and lines, but not quite sure what goes where.
Thanks
Also, do you have some pics and advice for the oil cooler? I see adapters and lines, but not quite sure what goes where.
Thanks
04-13-2010, 06:45 PM
#51
Nordschleife Master
Thread Starter
Tim i must have been reading your mind while you were writing that because i just spent the last two hours remounting the core so it sat under the crossmember. I was looking at the pictures Justin posted side by side while i was eating lunch and saw the difference in the way his core sat. Low and behold i now have the core where its supposed to be and the pipes fit pretty much right on.
I must have completely misunderstood what Tom was saying in his install notes.
https://rennlist.com/forums/944-turb...lection-3.html
I must have completely misunderstood what Tom was saying in his install notes.
https://rennlist.com/forums/944-turb...lection-3.html
04-13-2010, 08:59 PM
#52
Nordschleife Master
Thread Starter
Just finished putting the bumper back on. Here are some pictures showing the core now sitting under the crossmember.
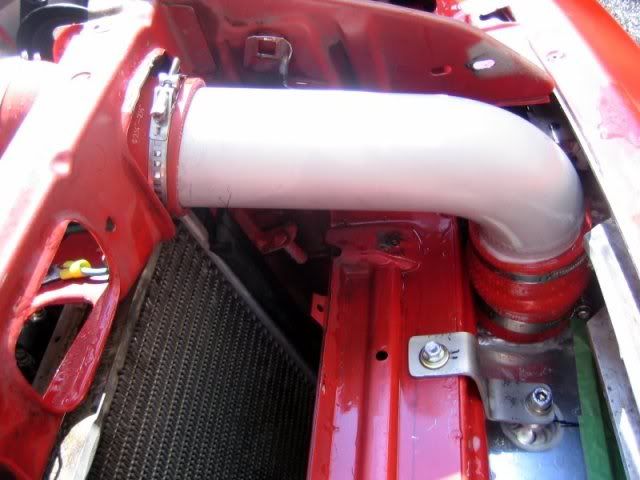
Drivers side pipe now fits correctly, though is still about 2.5'' short. I am really hoping these 4" couplers i overnighted do the trick.
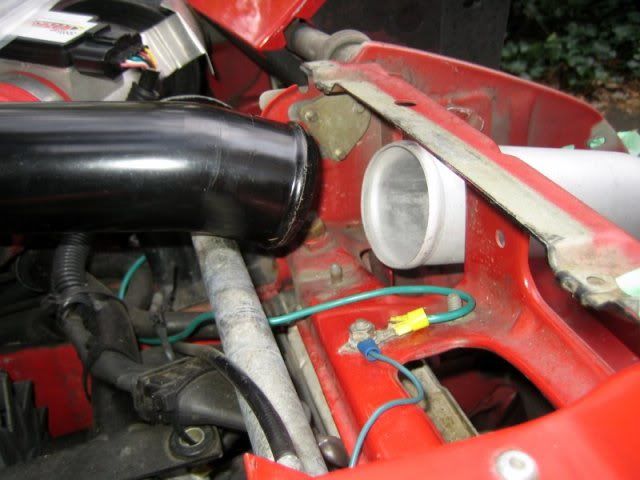
Passenger side still fits well, but i am waiting on the longer reducer coupler here also.. it fits but i feel more comfortable with the longer coupler.
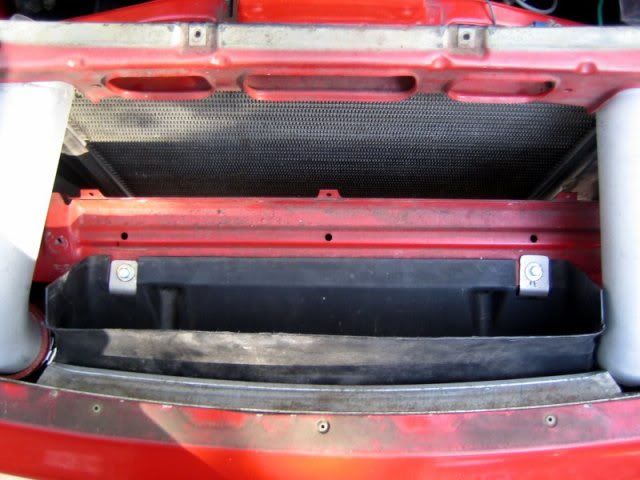
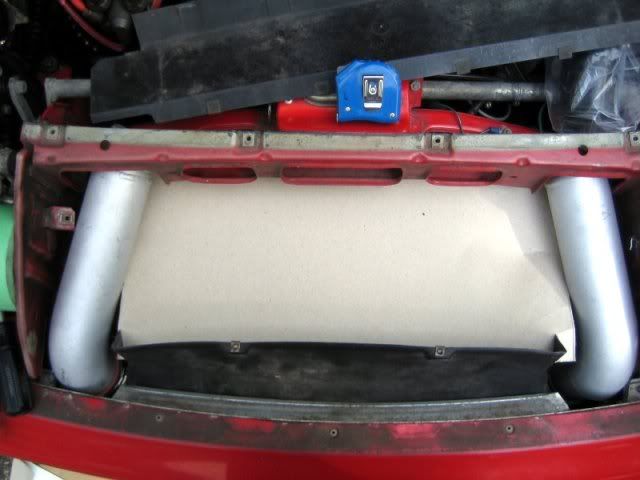
Here is something else i was working on. I am going to use the stock IC duct and fabricate some ducting to feed the top portion of the radiator. I would say about 3'' of the radiator sits above the front crossmember and is usually covered up by a plastic trim piece.
I trimmed the original duct down a little bit and plan to rivet aluminum sheeting over the top of duct all the way to the top of the radiator. The bottom will get the same treatment just it will terminate either right at the edge of the crossmember (leaving the gap between crossmember and rad) or i will extend it all the way up to the radiator core. And of course the sides will be sealed also.
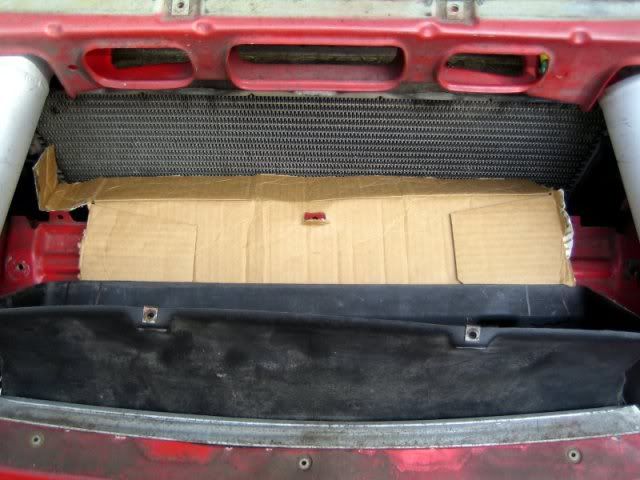
Here is a ghetto cardboard mockup to visualize what i am saying..
This duct would also be perfect for use if one ever wanted to put an oil cooler under the nose panel and not run a vented nose panel. It also wouldnt take much to use some aluminum sheets for duct work either.
Drivers side pipe now fits correctly, though is still about 2.5'' short. I am really hoping these 4" couplers i overnighted do the trick.
Passenger side still fits well, but i am waiting on the longer reducer coupler here also.. it fits but i feel more comfortable with the longer coupler.
Here is something else i was working on. I am going to use the stock IC duct and fabricate some ducting to feed the top portion of the radiator. I would say about 3'' of the radiator sits above the front crossmember and is usually covered up by a plastic trim piece.
I trimmed the original duct down a little bit and plan to rivet aluminum sheeting over the top of duct all the way to the top of the radiator. The bottom will get the same treatment just it will terminate either right at the edge of the crossmember (leaving the gap between crossmember and rad) or i will extend it all the way up to the radiator core. And of course the sides will be sealed also.
Here is a ghetto cardboard mockup to visualize what i am saying..
This duct would also be perfect for use if one ever wanted to put an oil cooler under the nose panel and not run a vented nose panel. It also wouldnt take much to use some aluminum sheets for duct work either.
04-14-2010, 09:15 PM
#53
Nordschleife Master
Thread Starter
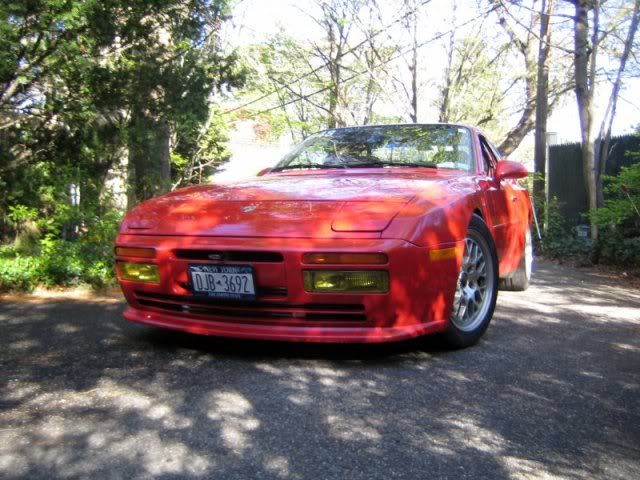
Well guys after 4.5 days of the car up on ramps and i dont even know how many hours spent on this its finally done. I cant compare much to the difference it made compared to stock because i havent driven the car more than 10 miles in over a month.. but man it pulls hard with no sign of giving up. I put probably 20 miles on the car so far and have noticed no noticeable increase in water temps. This is using my digital gauge tapped into the upper rad hose which has a very high resolution and is basically realtime. Temps go up while stopped, fans come on as normal... temps go down when moving again. I only put about 20 miles on the car because my drivers side CV joint is clicking.. that will be addressed tomorrow.
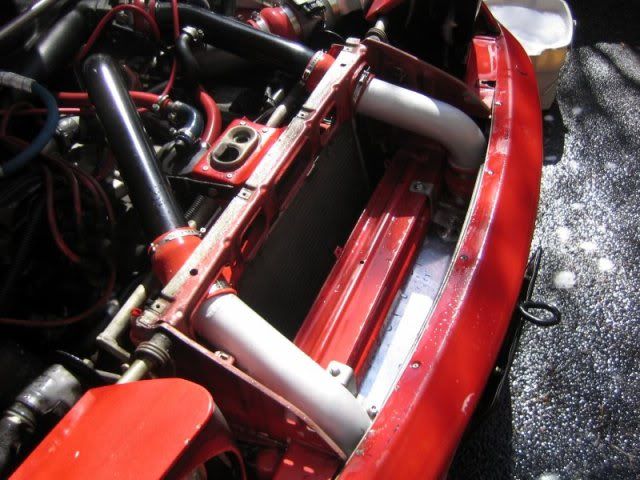
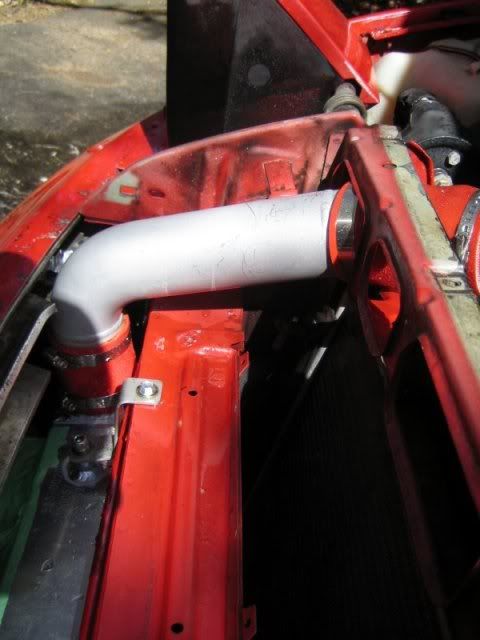
Anyhow to sum things up with the intercooler, i ended up remounting the core so it sat under the crossmember as opposed to infront of it. This make the pipes fit way better and also cut down on the angle, however the core sits just below the bumper now and extreme care needs to be taken otherwise you can ground out on the core easily. The splitter covers the core and i am sure the stock batwing would also.. but still need to be careful!
With everything fitted, the drivers side pipe was still about 2-2.5" short. I was very lucky to find a place that sells 4" long reducer couplers to make up for the gap.. most places only sell them in 3" lengths and every place i talked to said it would take atleast 2 weeks to have a custom one done in 5" which is originally what i wanted. Let me say though the 4" worked BARELY.. any shorter and i would be worried of these pipes blowing off. What i would really like are 2.25" diameter pipes as this would make some much needed clearance in places and also negate the need for a 2.25-2.5" reducer.. a straight 2.25" piece can be used.
Anyhow knowing what i do now and with the information posted in the thread on RL, this install is not THAT bad.. i would still set aside 6-7 hours to complete it. It is alot of trial and error fitment though. The problems i had with mine were stemmed from the fact i originally mounted the core infront of the crossmember which some people have done.. others have installed it under the crossmember which is far less work with the core at less of an angle, at the expense of putting the core aprox. 1" closer to the ground.
If you have specific questions please dont hesitate too ask..
Here are some pictures to show the completed job..
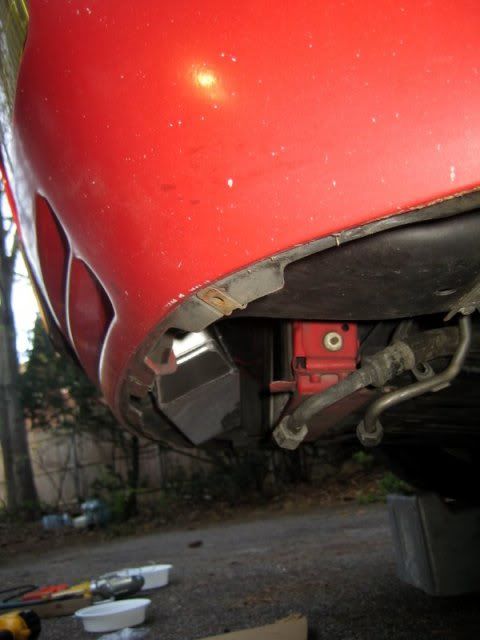
This shows how low the core now sits while mounted under the crossmember.
Angle of the core, note what is parallel for the radiator by looking at the lower rad support.
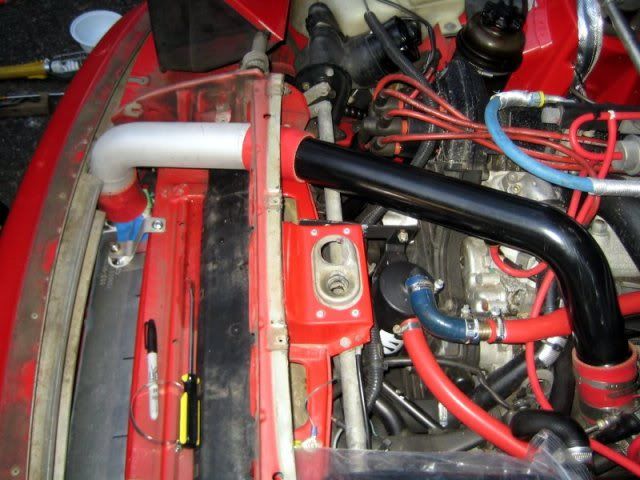
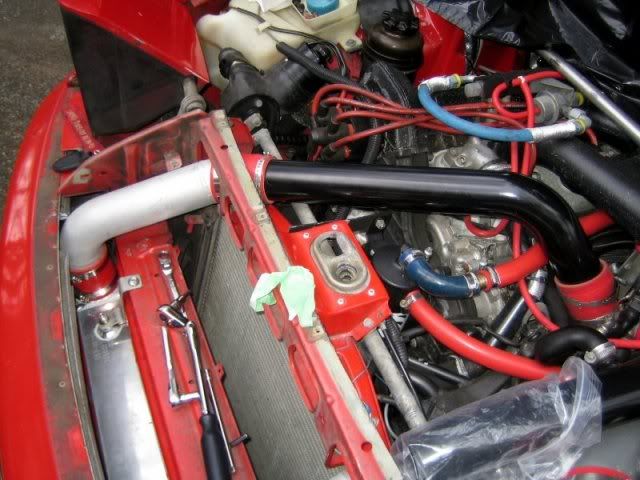
Plumbing hooked up (waiting on my Oetiker stepless screw clamps to come in the mail)
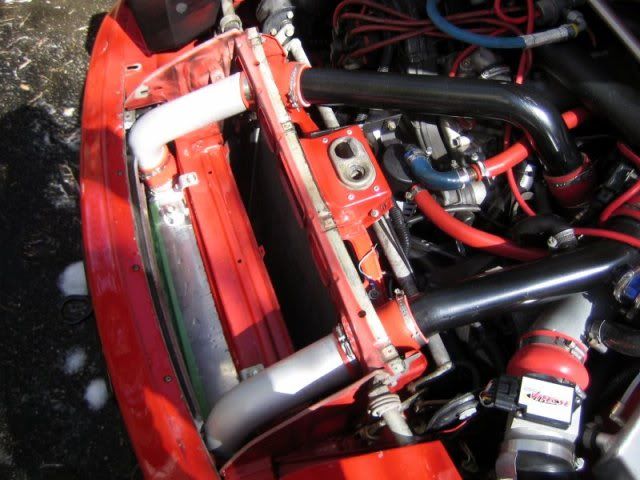
Drivers side BARELY made it with the coupler..
Some head on shots.
Anyhow to sum things up with the intercooler, i ended up remounting the core so it sat under the crossmember as opposed to infront of it. This make the pipes fit way better and also cut down on the angle, however the core sits just below the bumper now and extreme care needs to be taken otherwise you can ground out on the core easily. The splitter covers the core and i am sure the stock batwing would also.. but still need to be careful!
With everything fitted, the drivers side pipe was still about 2-2.5" short. I was very lucky to find a place that sells 4" long reducer couplers to make up for the gap.. most places only sell them in 3" lengths and every place i talked to said it would take atleast 2 weeks to have a custom one done in 5" which is originally what i wanted. Let me say though the 4" worked BARELY.. any shorter and i would be worried of these pipes blowing off. What i would really like are 2.25" diameter pipes as this would make some much needed clearance in places and also negate the need for a 2.25-2.5" reducer.. a straight 2.25" piece can be used.
Anyhow knowing what i do now and with the information posted in the thread on RL, this install is not THAT bad.. i would still set aside 6-7 hours to complete it. It is alot of trial and error fitment though. The problems i had with mine were stemmed from the fact i originally mounted the core infront of the crossmember which some people have done.. others have installed it under the crossmember which is far less work with the core at less of an angle, at the expense of putting the core aprox. 1" closer to the ground.
If you have specific questions please dont hesitate too ask..
Here are some pictures to show the completed job..
This shows how low the core now sits while mounted under the crossmember.
Angle of the core, note what is parallel for the radiator by looking at the lower rad support.
Plumbing hooked up (waiting on my Oetiker stepless screw clamps to come in the mail)
Drivers side BARELY made it with the coupler..
Some head on shots.
04-14-2010, 11:10 PM
#56
Rennlist Member
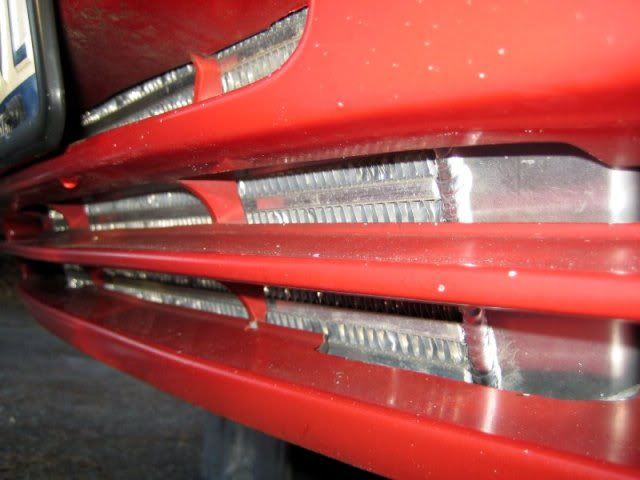
There must be an easier way to cut the Alu bumper? Plasma?
04-14-2010, 11:17 PM
#58
Nordschleife Master
Thread Starter
lol i wish i had one available. That bumper is about 1/4" thick all around and around the mounting points is probably closer to 1/2"...its a major pain to cut it. What makes it hard also is the two bars are parallel.. makes getting a whiz wheel in there very tough. I cut probably twice as much was needed out of that bumper bar to get the pipes to fit initially with the way i had the core mounted. On the bright side by doing that i have plenty of clearance around the couplers and hardpipes.. made getting everything hooked up a little easier.
04-15-2010, 12:06 AM
#59
Rennlist Member
lol i wish i had one available. That bumper is about 1/4" thick all around and around the mounting points is probably closer to 1/2"...its a major pain to cut it. What makes it hard also is the two bars are parallel.. makes getting a whiz wheel in there very tough. I cut probably twice as much was needed out of that bumper bar to get the pipes to fit initially with the way i had the core mounted. On the bright side by doing that i have plenty of clearance around the couplers and hardpipes.. made getting everything hooked up a little easier.