
968 Mirror Installation

 02-11-2010, 01:32 PM
#18
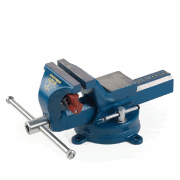
Not everyone has a bench vise.

I suppose with that screw "thing" it takes at least 20-30 minutes per side to put mirror leg & housing together, most likely you have a friend who have a bench vise which can be reached in the same time. With two mirrors it takes about 10 seconds to finished the job withe these high tech tools.
02-11-2010, 01:42 PM
#19
Addict
Lifetime Rennlist
Member
Lifetime Rennlist
Member
Here is some of the original webpage text... if you want more I'll post the rest...
_______________________________________________________________
968 Aero Mirror Upgrade
By Keith Foster - Porsche Club of America - Lone Star Region - Rennlist Web Forum (icat)
Copyright 2002 - All Rights Reserved
This procedure outlines the steps required to install the 968 aero mirrors package on a 944. The installation shown herein was performed on a 1986 944 Turbo with electric mirrors, however the procedure will work for any 924 or 944.
Before you begin, please note that there are two ways to obtain the aero mirrors. The first is to procure a set from a donor 968. The second is to purchase Porsche part number 944-731-901-00 from a Porsche dealer. This kit includes all of the main hardware required for the conversion. Detailed information is included in this procedure for either method.
In addition to the aero mirrors, you will also need to purchase the following items:
Electrical Part Supply House:
Two sets of .093" 6 Circuit Plugs and Receptors with Pins
Hardware Store (Home Depot):
One 3/8� x 3� Bolt (threaded portion is 3�minimum not including head � bolt can be longer)
Two 3/8� Nuts to fit Bolt
Three 3/8� Washers to fit Bolt (width of 1� � no more, no less)
One #0 Screw Eye
The following terminology will be used when describing the mirrors.
Mirror Mount: The metal mounting base which attaches to the door.
Mirror Housing: The �tear� shaped aero which houses the motor transmission.
Reinforcement Plate: The inside 'frame' the adjusting motor attaches to.
Adjusting Motor: The mirror motor.
Mirror Glass: The glass face.
Mirror Assembly: A complete unit of base, aero, mirror, and motor.
Mirror Bolt: The metal core which connects the mirror mount to the mirror housing.
Table of Contents
Tools Required to Disassembly 968 Aero Mirrors for Painting
Disassembly of Pre-Owned Aero Mirrors
Assembly of 968 Aero Mirrors
Removal of Original 944 Flag Mirrors from Car
Wiring the 968 Aero Mirrors
Final Assembly of 968 Aero Mirrors to Car
Tools Required to Disassembly 968 Aero Mirrors for Painting
968 Aero Mirrors can be purchased from part dismantlers or from individuals who are parting out their cars. Additional sources include your local Porsche dealer, Oklahoma Foreign, 986.net, and E-Bay. There are several Porsche Dealers who offer deep discounts when purchasing out of state or over the Internet. Even your local dealer may offer you a discount if asked.
In order to prepare donor 968 Aero Mirrors for painting you will need to disassemble the mirror assembly. If you have purchased the aero mirror kit, then you do not need to disassemble the mirrors � they come disassembled. However, you eventually will need to reassemble the units and the procedure is the same.
The removal of the mirror mount from the mirror housing is by far the most difficult step in this procedure. However, if you follow the instructions closely, you will save yourself a great deal of time and trouble. There may be other ways to accomplish the task, but this one works.
If you have not already done so, purchase the following items at your local hardware store (all items are available at Home Depot):
One 3/8� x 3� Bolt (threaded portion is 3�minimum not including head � bolt can be longer)
Two 3/8� Nuts to fit Bolt
Three 3/8� Washers to fit Bolt (width of 1� � no more, no less)
One #0 Screw Eye
Test place the above listed hardware in this order:
Thread one nut all the way onto the bolt until it contacts the bolt head.
Place two washers on bolt.
Place screw eye on bolt.
Place final washer on bolt.
Place final nut on bolt.
<< PIC of Gizmo and Spring Thingy >>
The assembly you have created will be used to compress the spring which allows the mirror to �snap� open and closed. Once compressed, you will be able to unseat the mirror bolt that holds the mirror mount to the mirror housing.
Disassembly of Pre-Owned Aero Mirrors
Remove the glass from the aero mirror by inserting a small flat blade screw driver into the long hole located on the bottom of the mirror housing. Use the flat blade to push the geared lock toward the car body to release the glass. Once the gear is unlocked, gently pry the mirror away from the mirror housing using your fingers. DON�T FORCE THE MIRROR GLASS. It is easily broken and very expensive to replace. If you are having to use force to pry the mirror glass off, then you have not unlocked the mirror gear properly. Failing to unlock the gear before prying the mirror glass off will result in a broken mirror glass and will most likely break the adjusting motor as well. Trust me, I�m qualified to tell you this.
Once the mirror glass has been removed, pull the adjusting motor wires free of the plastic connector device (located inside the mirror bolt assembly which holds the mirror mount to the mirror housing). You can now unscrew the three Philips head screws and remove the adjusting motor.
Turn the mirror assembly over and look inside the mirror mount. You will see the plastic connector, located inside the mirror bolt assembly, which holds the pins from the cars wiring harness. You will need to remove this plastic connector. Fortunately, we will not be reusing the plastic connector, so do not be afraid to break it. It must be removed, so use what ever is handy to remove it. I used a pair of needle nose pliers and a flat blade screw driver.
Once the plastic connector is removed you will be able to see through the mirror bolt assembly. Now comes the fun part. Remove the last bolt, the last washer, and the #0 Screw Eye from the hardware device you created. Wrap the threads on the Screw Eye with tape to prevent scratching the paint on your mirrors.
<< PIC of Taping the Screw Eye >>
Place the #0 Screw Eye into the mirror housing's reinforcement plate and get it as close to the top of the mirror bolt assembly as possible. It will fit snugly into the reinforcement plate and will create a raised ring over the top of the mirror bolt assembly. Look up into the mirror bolt assembly from the bottom of the mirror mount and center the screw eye�s position.
<< PIC of Scren eye in mirror Assembly >>
# 0 Screw Eye Mounted In Reinforcement Plate Over Top Of Mirror Bolt Assembly
Take the hardware assembly with the second nut and the two remaining washers still attached, and insert the device into the mirror bolt assembly from the bottom of the mirror mount. Place the remaining washer over the screw eye and then attach the last nut. You may need to slightly compress the mirror bolt assembly spring to get enough treads to attach the nut. I found that it is easiest to do if you hold the nut and turn the hardware bolt from the bottom. Turn the �aero portion� nut until the threads of the hardware bolt are flush with the top of the nut.
<< PIC of Hardware Bolt, Center Nut, and Washers Inserted Into Mirror Mount >>
Here�s what we are going to do. The mirror bolt assembly is locked to the reinforcement plate by small arms and held tight by the spring. You need to �lift� the mirror bolt assembly to raise the arms out of the reinforcement plate and unlock the mirror mount from the mirror assembly. This is accomplished by lifting and then turning the mirror bolt assembly. However, the spring which surrounds the mirror bolt assembly is VERY strong and will not allow you to easily do this. We will use the hardware device to compress the spring and then turn the mirror bolt assembly. The screw eye allows the mirror bolt assembly to "lift" as the hardware bolts and nuts compress the spring.
To begin the compression, place a wrench on the hardware bolt head and hold it in place. DO NOT allow the bolt to turn. Using a second wrench, turn the nut that is against the bolt head so that the nut travels toward the mirror bolt assembly and begins to compress the spring. This nut will be referred to as the �center nut�. Continue turning the center nut until the spring is fully compressed. This is very important � make sure you have fully compressed the spring. You will find that the two washers will fit inside the mirror mount opening for the mirror bolt and will be just below the surface of the opening when the spring is fully compressed.
<< PIC of Tighten Center Bolt To Compress Mirror Bolt Spring >>
Look inside the mirror housing and see if you can see the mirror bolt assembly raised to the bottom of the washer that covers the screw eye. There is a small opening where the screw eye comes into contact with itself that you can look through. It�s small, but it is there. The mirror bolt assembly must be all the way up to the screw eye washer in order to continue.
Once the spring is fully compressed, it�s time to turn the mirror bolt assembly. Use one wrench to hold the center nut. Place the second wrench onto the hardware bolt head. You will turn the bolt head and the center nut at the same time � in the same direction. The goal is to turn the mirror bolt assembly. If you don�t keep pressure on the center nut, then you will not turn the mirror bolt. Turn the two hardware bolts one half turn. Then release the center nut to remove the pressure on the spring and take out the hardware bolt. If you have done the procedure correctly, the mirror bolt assembly will either come out of the mirror mount or it will be resting on top of the reinforcement plate - but no longer in the locked position. If the mirror bolt assembly locking arms are resting on the reinforcement plate, insert a large flat blade screw driver into one of the slots on the bottom of the mirror bolt assembly and turn the fitting until it releases. The process works well, but may take one or two tries to get the feel for the spring and the distance you need to turn the assembly. Trust me, it gets easier every time you do it.
<< PIc of Turning Hardware Bolt and Center Nut To Move Mirror Bolt Assembly >>
Once the mirror housing has been separated from the mirror mount, remove the screw on bottom of the mirror housing that holds the plastic gasket. You will also find a small round ring washer under the larger plastic gasket. Place these items in a safe place. I recommend placing all removed items in a small �baggie� and marking which mirror they go to. The final item to remove is the reinforcement plate. Your mirrors are now ready for the paint shop.
_________________________________________________________
More stuff...
Assembly of 968 Aero Mirrors
Removal of Original 944 Flag Mirrors from Car
Wiring the 968 Aero Mirrors
Final Assembly of 968 Aero Mirrors to Car
if you want more I'll post the rest... _______________________________________________________________
968 Aero Mirror Upgrade
By Keith Foster - Porsche Club of America - Lone Star Region - Rennlist Web Forum (icat)
Copyright 2002 - All Rights Reserved
This procedure outlines the steps required to install the 968 aero mirrors package on a 944. The installation shown herein was performed on a 1986 944 Turbo with electric mirrors, however the procedure will work for any 924 or 944.
Before you begin, please note that there are two ways to obtain the aero mirrors. The first is to procure a set from a donor 968. The second is to purchase Porsche part number 944-731-901-00 from a Porsche dealer. This kit includes all of the main hardware required for the conversion. Detailed information is included in this procedure for either method.
In addition to the aero mirrors, you will also need to purchase the following items:
Electrical Part Supply House:
Two sets of .093" 6 Circuit Plugs and Receptors with Pins
Hardware Store (Home Depot):
One 3/8� x 3� Bolt (threaded portion is 3�minimum not including head � bolt can be longer)
Two 3/8� Nuts to fit Bolt
Three 3/8� Washers to fit Bolt (width of 1� � no more, no less)
One #0 Screw Eye
The following terminology will be used when describing the mirrors.
Mirror Mount: The metal mounting base which attaches to the door.
Mirror Housing: The �tear� shaped aero which houses the motor transmission.
Reinforcement Plate: The inside 'frame' the adjusting motor attaches to.
Adjusting Motor: The mirror motor.
Mirror Glass: The glass face.
Mirror Assembly: A complete unit of base, aero, mirror, and motor.
Mirror Bolt: The metal core which connects the mirror mount to the mirror housing.
Table of Contents
Tools Required to Disassembly 968 Aero Mirrors for Painting
Disassembly of Pre-Owned Aero Mirrors
Assembly of 968 Aero Mirrors
Removal of Original 944 Flag Mirrors from Car
Wiring the 968 Aero Mirrors
Final Assembly of 968 Aero Mirrors to Car
Tools Required to Disassembly 968 Aero Mirrors for Painting
968 Aero Mirrors can be purchased from part dismantlers or from individuals who are parting out their cars. Additional sources include your local Porsche dealer, Oklahoma Foreign, 986.net, and E-Bay. There are several Porsche Dealers who offer deep discounts when purchasing out of state or over the Internet. Even your local dealer may offer you a discount if asked.
In order to prepare donor 968 Aero Mirrors for painting you will need to disassemble the mirror assembly. If you have purchased the aero mirror kit, then you do not need to disassemble the mirrors � they come disassembled. However, you eventually will need to reassemble the units and the procedure is the same.
The removal of the mirror mount from the mirror housing is by far the most difficult step in this procedure. However, if you follow the instructions closely, you will save yourself a great deal of time and trouble. There may be other ways to accomplish the task, but this one works.
If you have not already done so, purchase the following items at your local hardware store (all items are available at Home Depot):
One 3/8� x 3� Bolt (threaded portion is 3�minimum not including head � bolt can be longer)
Two 3/8� Nuts to fit Bolt
Three 3/8� Washers to fit Bolt (width of 1� � no more, no less)
One #0 Screw Eye
Test place the above listed hardware in this order:
Thread one nut all the way onto the bolt until it contacts the bolt head.
Place two washers on bolt.
Place screw eye on bolt.
Place final washer on bolt.
Place final nut on bolt.
<< PIC of Gizmo and Spring Thingy >>
The assembly you have created will be used to compress the spring which allows the mirror to �snap� open and closed. Once compressed, you will be able to unseat the mirror bolt that holds the mirror mount to the mirror housing.
Disassembly of Pre-Owned Aero Mirrors
Remove the glass from the aero mirror by inserting a small flat blade screw driver into the long hole located on the bottom of the mirror housing. Use the flat blade to push the geared lock toward the car body to release the glass. Once the gear is unlocked, gently pry the mirror away from the mirror housing using your fingers. DON�T FORCE THE MIRROR GLASS. It is easily broken and very expensive to replace. If you are having to use force to pry the mirror glass off, then you have not unlocked the mirror gear properly. Failing to unlock the gear before prying the mirror glass off will result in a broken mirror glass and will most likely break the adjusting motor as well. Trust me, I�m qualified to tell you this.
Once the mirror glass has been removed, pull the adjusting motor wires free of the plastic connector device (located inside the mirror bolt assembly which holds the mirror mount to the mirror housing). You can now unscrew the three Philips head screws and remove the adjusting motor.
Turn the mirror assembly over and look inside the mirror mount. You will see the plastic connector, located inside the mirror bolt assembly, which holds the pins from the cars wiring harness. You will need to remove this plastic connector. Fortunately, we will not be reusing the plastic connector, so do not be afraid to break it. It must be removed, so use what ever is handy to remove it. I used a pair of needle nose pliers and a flat blade screw driver.
Once the plastic connector is removed you will be able to see through the mirror bolt assembly. Now comes the fun part. Remove the last bolt, the last washer, and the #0 Screw Eye from the hardware device you created. Wrap the threads on the Screw Eye with tape to prevent scratching the paint on your mirrors.
<< PIC of Taping the Screw Eye >>
Place the #0 Screw Eye into the mirror housing's reinforcement plate and get it as close to the top of the mirror bolt assembly as possible. It will fit snugly into the reinforcement plate and will create a raised ring over the top of the mirror bolt assembly. Look up into the mirror bolt assembly from the bottom of the mirror mount and center the screw eye�s position.
<< PIC of Scren eye in mirror Assembly >>
# 0 Screw Eye Mounted In Reinforcement Plate Over Top Of Mirror Bolt Assembly
Take the hardware assembly with the second nut and the two remaining washers still attached, and insert the device into the mirror bolt assembly from the bottom of the mirror mount. Place the remaining washer over the screw eye and then attach the last nut. You may need to slightly compress the mirror bolt assembly spring to get enough treads to attach the nut. I found that it is easiest to do if you hold the nut and turn the hardware bolt from the bottom. Turn the �aero portion� nut until the threads of the hardware bolt are flush with the top of the nut.
<< PIC of Hardware Bolt, Center Nut, and Washers Inserted Into Mirror Mount >>
Here�s what we are going to do. The mirror bolt assembly is locked to the reinforcement plate by small arms and held tight by the spring. You need to �lift� the mirror bolt assembly to raise the arms out of the reinforcement plate and unlock the mirror mount from the mirror assembly. This is accomplished by lifting and then turning the mirror bolt assembly. However, the spring which surrounds the mirror bolt assembly is VERY strong and will not allow you to easily do this. We will use the hardware device to compress the spring and then turn the mirror bolt assembly. The screw eye allows the mirror bolt assembly to "lift" as the hardware bolts and nuts compress the spring.
To begin the compression, place a wrench on the hardware bolt head and hold it in place. DO NOT allow the bolt to turn. Using a second wrench, turn the nut that is against the bolt head so that the nut travels toward the mirror bolt assembly and begins to compress the spring. This nut will be referred to as the �center nut�. Continue turning the center nut until the spring is fully compressed. This is very important � make sure you have fully compressed the spring. You will find that the two washers will fit inside the mirror mount opening for the mirror bolt and will be just below the surface of the opening when the spring is fully compressed.
<< PIC of Tighten Center Bolt To Compress Mirror Bolt Spring >>
Look inside the mirror housing and see if you can see the mirror bolt assembly raised to the bottom of the washer that covers the screw eye. There is a small opening where the screw eye comes into contact with itself that you can look through. It�s small, but it is there. The mirror bolt assembly must be all the way up to the screw eye washer in order to continue.
Once the spring is fully compressed, it�s time to turn the mirror bolt assembly. Use one wrench to hold the center nut. Place the second wrench onto the hardware bolt head. You will turn the bolt head and the center nut at the same time � in the same direction. The goal is to turn the mirror bolt assembly. If you don�t keep pressure on the center nut, then you will not turn the mirror bolt. Turn the two hardware bolts one half turn. Then release the center nut to remove the pressure on the spring and take out the hardware bolt. If you have done the procedure correctly, the mirror bolt assembly will either come out of the mirror mount or it will be resting on top of the reinforcement plate - but no longer in the locked position. If the mirror bolt assembly locking arms are resting on the reinforcement plate, insert a large flat blade screw driver into one of the slots on the bottom of the mirror bolt assembly and turn the fitting until it releases. The process works well, but may take one or two tries to get the feel for the spring and the distance you need to turn the assembly. Trust me, it gets easier every time you do it.
<< PIc of Turning Hardware Bolt and Center Nut To Move Mirror Bolt Assembly >>
Once the mirror housing has been separated from the mirror mount, remove the screw on bottom of the mirror housing that holds the plastic gasket. You will also find a small round ring washer under the larger plastic gasket. Place these items in a safe place. I recommend placing all removed items in a small �baggie� and marking which mirror they go to. The final item to remove is the reinforcement plate. Your mirrors are now ready for the paint shop.
_________________________________________________________
More stuff...
Assembly of 968 Aero Mirrors
Removal of Original 944 Flag Mirrors from Car
Wiring the 968 Aero Mirrors
Final Assembly of 968 Aero Mirrors to Car
If you will, please post all of it, or email it too me and I'll try to get it posted for everyone. There's no way of knowing if the site that contained this will ever be back up and this info is sure to be neccesary in the future to new owners.
Thanks!
02-11-2010, 05:19 PM
#21
Drifting
Thread Starter
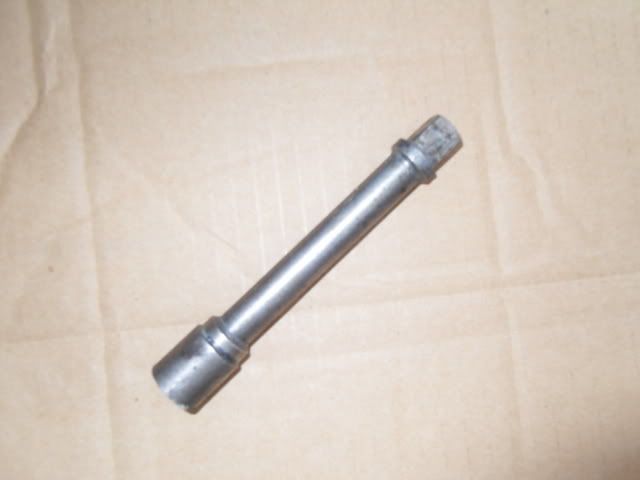
Olli- are you saying clamp the socket into the vice, and then set the mirror on the socket and press down with all my force?
I'm half tempted just to permanently bolt these bastards together and say **** on the power mirror option!
I'm half tempted just to permanently bolt these bastards together and say **** on the power mirror option!
02-12-2010, 03:28 AM
#22
Olli- are you saying clamp the socket into the vice, and then set the mirror on the socket and press down with all my force?
 02-12-2010, 03:35 PM
#25

Beanpole my a$$... you are strapping young lad, put some effort into and you'll be fine. lol Oh, and how do you propose to mount them if you bolt them together? Drywall screws? lol The access to the bolts that mount it to the door are in the base.
Olli's method works well if you have access to a decent bench vise, just make sure you have the extension secured, and he's right, push down and twist 90 deg to the right (iirc) and you are done. The eyelet method works and gets the same result, and doesn't take much more than about two minutes per mirror once you've done it once or twice. Either way, its not a big deal.
Cory, you've done much harder wrenching jobs than this, so dont let it intimidate you. If you truly get stuck, shoot me a pm and lets see if we can find a time to get together and I'll help.
Regards, ...Scott

